5 Best Ways to Extract Photos from iPhone Easily
Apr 27, 2022 • Filed to: iPhone Data Transfer Solutions • Proven solutions
We all know how much we love our life and the memories that we make every day. But making memories does not satisfy our needs because we want to remember every single memory we experience in life. Though it’s not possible to store every memory but we always try to take photos of every place that we visit or everything that we experience. iPhone is one of the best device to store your memories in. Because you can’t carry a camera with you all the time but with iPhones high quality camera and crystal clear image taking capability, you can take any pictures in any time you want. But what happens when you face an unexpected crash or your device breaks because of falling from a height?
All your data and all of your important memories get locked inside your device. So, in order to store your photos elsewhere just in case of any accident happens is a very wise decision. There are a lot of ways to extract photos from iPhone but I am going to describe how you can extract your photos from iPhone easily in 5 methods.
- Method-1: Extract Photos from iPhone with Dr.Fone - Phone Manager (iOS)
- Method-2: Extract Photos from iPhone Using Windows AutoPlay
- Method-3: Extract Photos from iPhone Using iCloud
- Method-4: Extract Photos from iPhone Using Photos App (For Windows 10)
- Method-5: Extract Photos from iPhone Using Email
Method-1: Extract Photos from iPhone with Dr.Fone - Phone Manager (iOS)
Dr.Fone - Phone Manager (iOS) is a great software built for your iOS device, Windows or Mac. This software will give you a chance to transfer photos between iPhones, iPads and computers in easy ways. It will help you get access to every part of your disk. It has the simplest way to transfer files without overwriting or damaging them. There are a lot of free solutions for extracting photos from iPhone.
But Dr.Fone - Phone Manager (iOS) is the best because it will give you a smooth, clean and perfect file transfer system in the shortest time. Dr.Fone - Phone Manager (iOS) will allow you to transfer contacts, SMS, photos, music, video, and more on your iPhone and iPad; manage your data and it’s fully compatible with iOS 13!

Dr.Fone - Phone Manager (iOS)
Excellent Program to Extract Photos from iPhone
- Transfer, manage, export/import your music, photos, videos, contacts, SMS, Apps etc.
- Backup your music, photos, videos, contacts, SMS, Apps etc. to computer and restore them easily.
- Transfer music, photos, videos, contacts, messages, etc from one smartphone to another.
- Transfer media files between iOS devices and iTunes.
- Fully compatible with all iOS versions that run on iPhone, iPad, or iPod touch.
To extract photos from iPhone to your computer is an easy method with some simple steps that you need to follow-
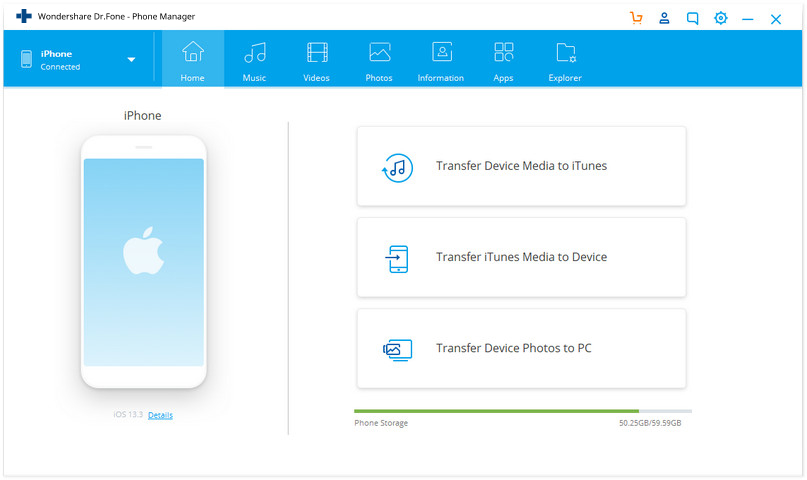
Step-1: Connect your iOS device to your PC and launch Dr.Fone - Phone Manager (iOS) on your PC. Choose "Phone Manager" option from the main menu.

Step-2: Click on the option named, “Transfer Device Photos to PC” or "Transfer Device Photos to Mac". Which will lead you to the next process of this extraction.

Step-3: You will be able to see a new window opened so that you can choose the location to extract the photos. Select the desired folder and click “Ok” to finalize this process.
Extract Photos Selectively:
You can also extract photos from your iPhone to you PC in a selective way. After connecting your device to your PC, launch Dr.Fone and click on “Photos” option to complete the process.
Next, you will be able to see the pictures divided into different albums. All you need to do is select your desired pictures and click on the export button. From there, click on “Export to PC”. You can either select single pictures or the entire album to extract.
Method-2: Extract Photos from iPhone Using Windows AutoPlay
In this method, you need to understand that only camera roll photos can be extracted to your PC by using Windows AutoPlay. If you organize those photos in an order, only then you can extract all kinds of iPhone photos to your PC.
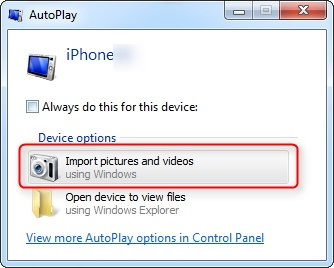
Step-1: First connect your iPhone to your computer and click on "Import Pictures and Videos using Windows" option after the AutoPlay window appears.

Step-2: Now you need to click on “Import Settings” link in the resulting window. Then, click the Browse button next to the "Import to" field and you will be able to change the folder to which your Camera Roll's photos will be imported.
Step-3: Set up your import options and click “ok”. You can choose a tag if you wish and click the import button.
Method-3: Extract Photos from iPhone Using iCloud
You can easily extract photos from iPhone by using iCloud. Just follow these easy steps-
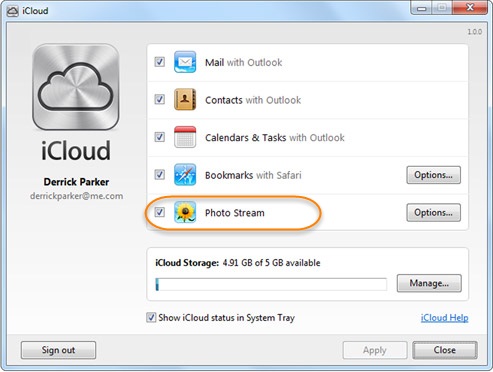
Step-1: You need to start iCloud on your iPhone and turn Photo Stream on. As a result, all the photos you take in your iPhone, will be uploaded to iCloud automatically.
Step-2: After opening iCloud in your computer you need to select the checkbox named “Photo Stream”. After that, click “apply” to go through the process.

Step-3: First click “Pictures” menu and then select “Photo Stream”, from your windows taskbar.
Step-4: If you want to see the photos synced from your iPhone, you will have to double click on My Photo Stream.
Method-4: Extract Photos from iPhone Using Photos App (For Windows 10)
You can easily follow these steps to extract photos from iPhone by using Photos App-
Step-1: First you need to download the latest version of iTunes in your computer and then connect your iPhone to your PC with a good quality USB cable.
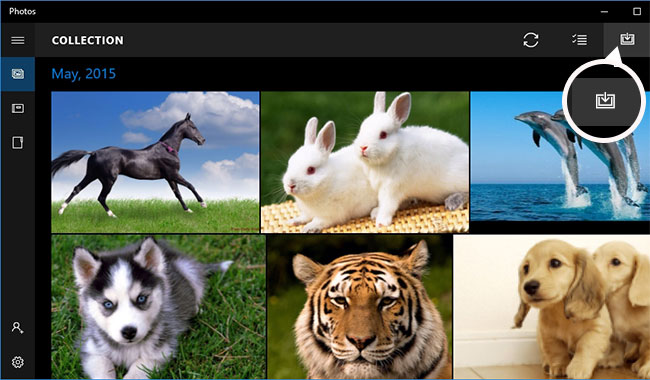
Step-2: Run Photos App on your PC and click on the “Import” button which can be found in the top right corner of your screen.

Step-3: Then you need to select the photos you want to extract from your iPhone and after your selection, click on the “Continue” button. Within a moment, all selected photos will be extracted to your computer from your iPhone.
Method-5: Extract Photos from iPhone Using Email
Extracting photos from iPhone by using email is not a very reliable method if you have a large amount of files. But still for a small amount of files, you can also follow this one.
Step-1: From the “Home screen” of your iPhone, tap on the “Photos” icon to launch the app.
Step-2: Choose the photos that you want to extract by browsing through the albums.
Step-3: Tap on the “Select” button to select 5 pictures and then tap on the “Share” button.
Step-4: Then you need to tap on the “Mail” button and this will open a new message with the selected photos attached in it. You can later access your email from your computer to get the photos.
These are the best working 5 methods that can be used to extract photos from iPhone easily. But if you want permanent solution in this issue, you should use Dr.Fone - Phone Manager (iOS) app which is described in the first method of this post. This app is a perfect choice for you if you want to extract any data from your iPhone. This app will give you an easy access to everything on your iPhone and by clicking a few button, you will be able to extract your precious photos from your iPhone in no time. Free solutions can be found all over the internet but there is nothing better than Dr.Fone - Phone Manager (iOS).
iPhone Photo Transfer
- Import Photos to iPhone
- Transfer Photos from Mac to iPhone
- Transfer Photos from iPhone to iPhone
- Transfer Photos from iPhone to iPhone without iCloud
- Transfer Photos from Laptop to iPhone
- Transfer Photos from Camera to iPhone
- Transfer Photos from PC to iPhone
- Export iPhone Photos
- Transfer Photos from iPhone to Computer
- Transfer Photos from iPhone to iPad
- Import Photos from iPhone to Windows
- Transfer Photos to PC without iTunes
- Transfer Photos from iPhone to Laptop
- Transfer Photos from iPhone to iMac
- Extract Photos from iPhone
- Download Photos from iPhone
- Import Photos from iPhone to Windows 10
- More iPhone Photo Transfer Tips


James Davis
staff Editor