Does My iTunes Back Up Photos?
Mar 07, 2022 • Filed to: Manage Device Data • Proven solutions
If you're new to Apple and the Apple ecosystem, you would know that you'd have to use iTunes for everything. Whether it is listening to music or syncing files, iTunes is what Apple users spend most of their time in when they've connected their PC to their Apple devices. If you're copying photos, the question that might come to your mind. Does iTunes backup photos?
Note: If your iTunes fail to work as expected, follow these steps to bring iTunes to normal.
Well yes, iTunes backup photos so that in case you lost your phone or it gets damaged, you can successfully recover your photos.
Does iTunes backup stores photos excluding camera roll?
No, an iTunes backup backs up the photos which are present only in the camera roll. All other photos must be separately backed up on your system and can be restored later. On the other hand, if you like to backup large images it is suggested to store pictures on SD card even from the latest 360 best Camera!
Part 1: How to backup iTunes photos using iTunes
How to backup photos and check iTunes backup
Note: If your iTunes cannot work properly, follow this quick fix to bring it to normal.
Step 1: Open iTunes on your system by double clicking on its icon. Now, connect your device to your computer with the help of USB cable.
Step 2: Now, click on the option 'File' present on the left top corner of the screen. A drop down menu appears. Scroll down and click on 'Devices' as shown below.
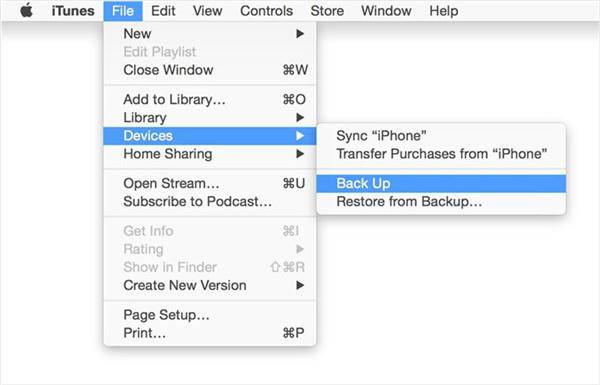
Step 3: Once you click on 'Devices', a new menu appears. Click on 'Back Up'. Once you click on 'Back Up', it automatically creates a backup of your device on your computer.
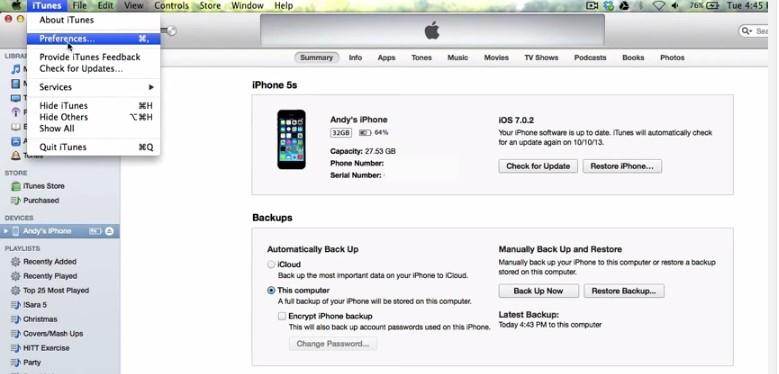
Step 4: To cross check and verify whether the backup has been created, click on the 'iTunes' options present at the left top and then click on 'Preferences'. A new window appears as shown below.
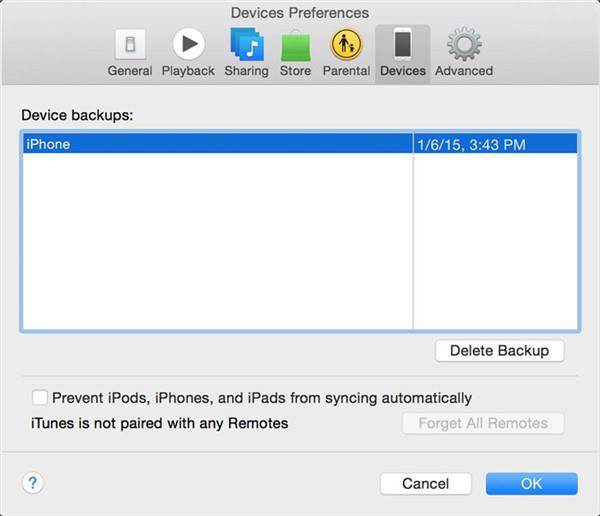
Step 5: In the 'Preferences' window, click on the the option 'Devices' as shown below and you can view the details of your backup like backup date and time.
Note: Here we need to know that iTunes can only do a whole device backup, it doesn't allow us to backup whatever we want. And the iTunes backup on our computer is not readable, because it is saved as a SQLite database file. You can read Part 3 to know how to view iTunes backup directly on your computer. Also, in order to solve the weakness of iTunes backup, we are going to introduce a user friendly software, Dr.Fone - Phone Backup (iOS) to preview and flexibly backup your iPhone data. And the exported backup is also readable. Let's see the below part.
Part 2: How to selectively backup and preview iPhone photos
From the above introduction, we can know that iTunes can backup photos. But it is a whole backup. We can't backup only photos with iTunes, which makes iTunes not flexible and friendly to users. While Dr.Fone - Phone Backup (iOS) allows you to view and selectively backup iPhone data to our comptuer.

Dr.Fone - Phone Backup (iOS)
Preview and selectively backup iPhone photos in 5 minutes!
- Fast, simple and safe.
- Selectively backup and restore any data you want.
- Export what you want from the backup to your computer.
- Support all models of iPhone, iPad and iPod touch.
- Fully compatible with Windows 10, Mac 10.15 and iOS 13.
Steps to selectively backup photos from iPhone by Dr.Fone
Step 1. Download, install and run Dr.Fone on your computer. Connect your device to the computer. Go to select "Phone Backup" from all features.

Step 2. Select the type of data "Photos" to backup, then click button "Backup".
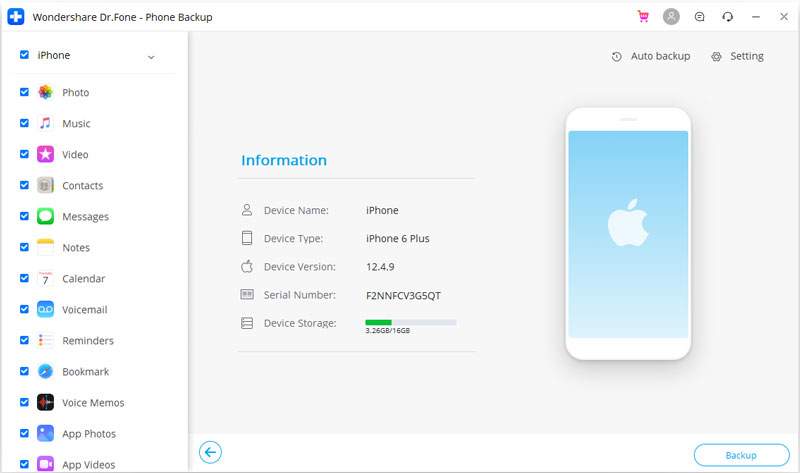
Here you can see Dr.Fone is backing up your photos.
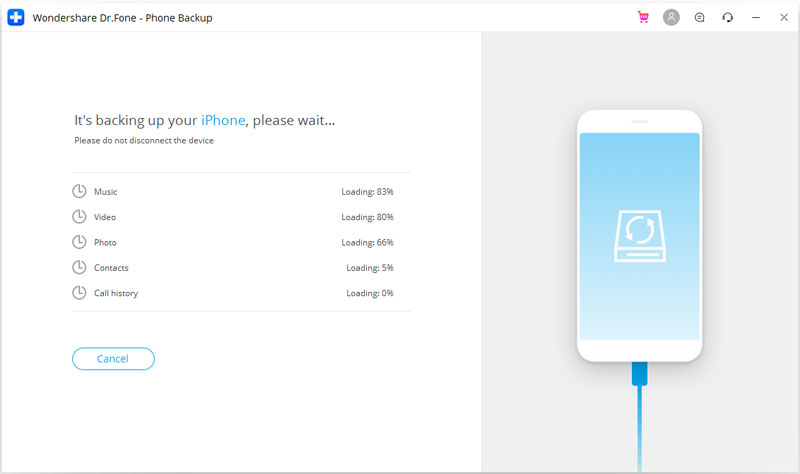
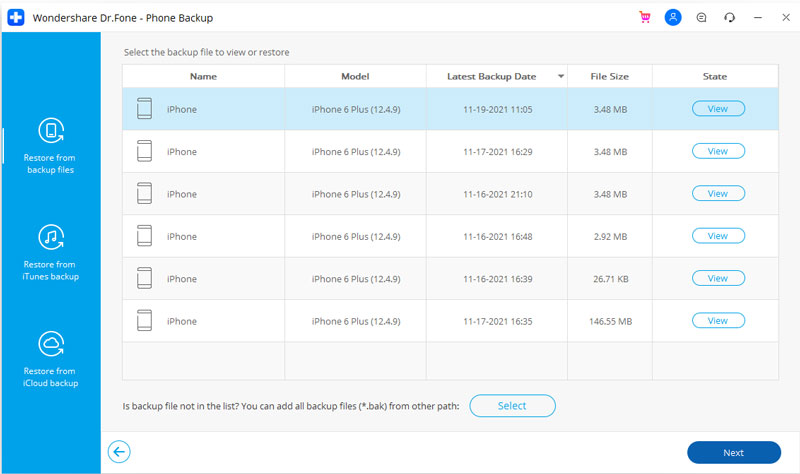
Step 3. After the backup completes, click on View Backup History. Then you can seel all backup files on your computer. Click on the latest backup file and then click View button.
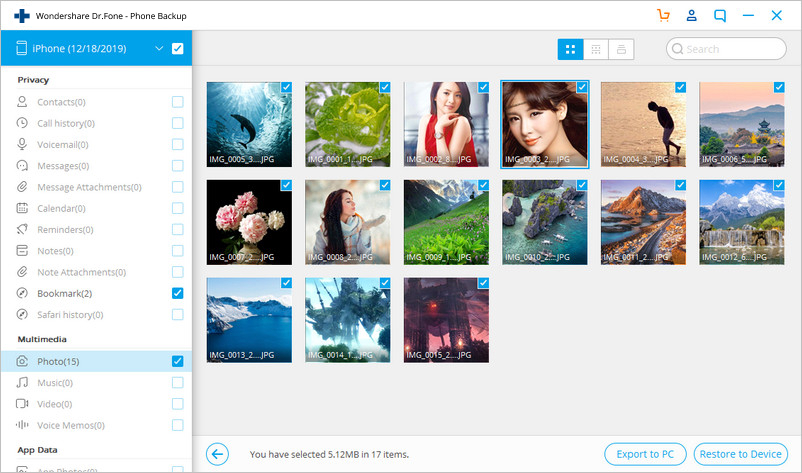
Step 3. Then you can view all files in the backup.
Part 3: How to view iTunes backup directly

Dr.Fone - Data Recovery (iOS)
View iTunes backup easily & flexibly.
- Support to recover deleted text messages and photos, contacts, call history, calendar, etc.
- Compatible with latest iOS devices.
- Preview and selectively recover what you want from iPhone, iTunes and iCloud backup.
- Export and print what you want from the iTunes backup to your computer.
Steps to view iTunes backup directly
Step 1: Open the Dr.Fone, it shows you three way to recover and view the backup files namely 'Recover from iOS device', 'Recover from iTunes Backup File' and 'Recover from iCloud Backup File'. Click on the option 'Recover from iTunes Backup File' as show below.
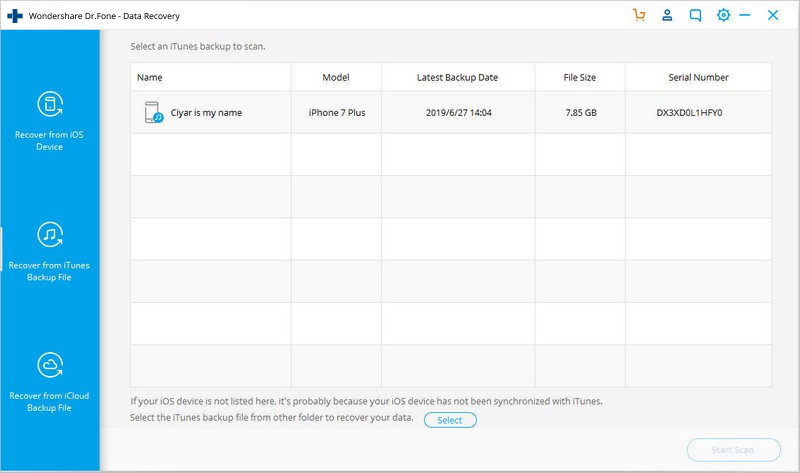
Step 2: Once you click on 'Recover from iTunes Backup File', a list of all the iTunes backup files present in your computer appears on the screen. You can see the name of the backup file, date and time of creation etc. Select the backup which you want to view by clicking on it and finally click on the 'Start Scan' option present at the right bottom corner.
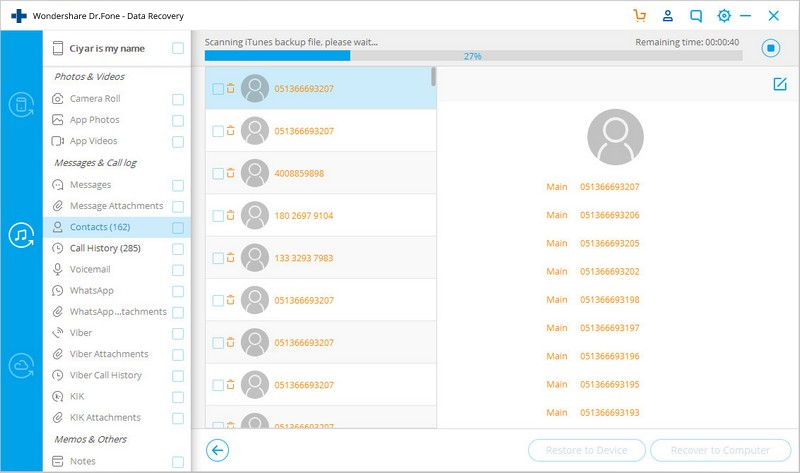
Step 3: Once the scanning is completed, you can view all the contents in the backup file like contacts, messages, notes, call log, photos etc. You can view the entire contents as show below.

Part 4: How to transfer iPhone data to computer selectively for backup
Dr.Fone - Phone Manager (iOS) is also amazing software by Wondershare team which helps you to backup your files, messages, contacts, media files, iTunes library etc. very easily.

Dr.Fone - Phone Manager (iOS)
Best Tool to Transfer iPhone Data to PC for Backup
- Transfer, manage, export/import your music, photos, videos, contacts, SMS, Apps etc.
- Backup your music, photos, videos, contacts, SMS, Apps etc. to computer and restore them easily.
- Transfer music, photos, videos, contacts, messages, etc from one smartphone to another.
- Transfer media files between iOS devices and iTunes.
- Fully compatible with iOS 7, iOS 8, iOS 9, iOS 10, iOS 11, iOS 12, iOS 13 and iPod.
Steps to backup iPhone data to computer selectively
Step 1: Open Dr.Fone software on your system by click on its icon, and select Transfer. Once you open the software, now connect your iOS device to your system using the USB cable. It will take some time to detect your device. Once detected, your device will be shown on the screen.
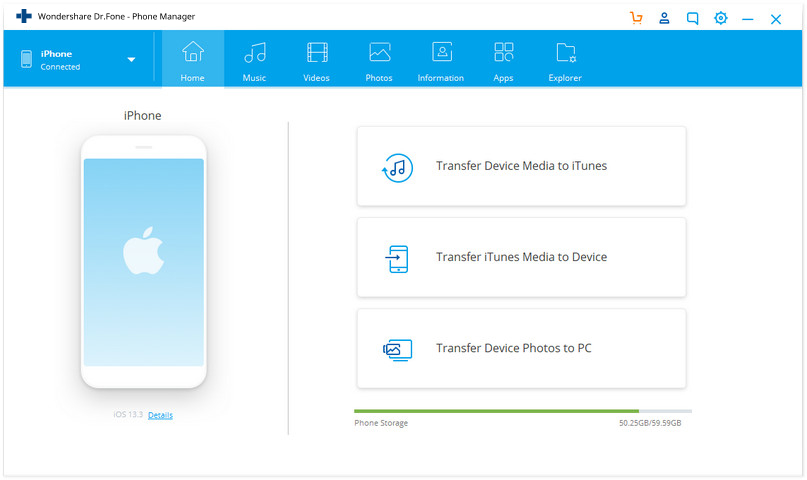
Step 2: On the menu on the left side, different categories are present of the backup files like media, playlist, contacts etc. Click on any of the category to view the details. For example you want back up photos to your computer, then click on 'Photos'. A menu appears on the screen.
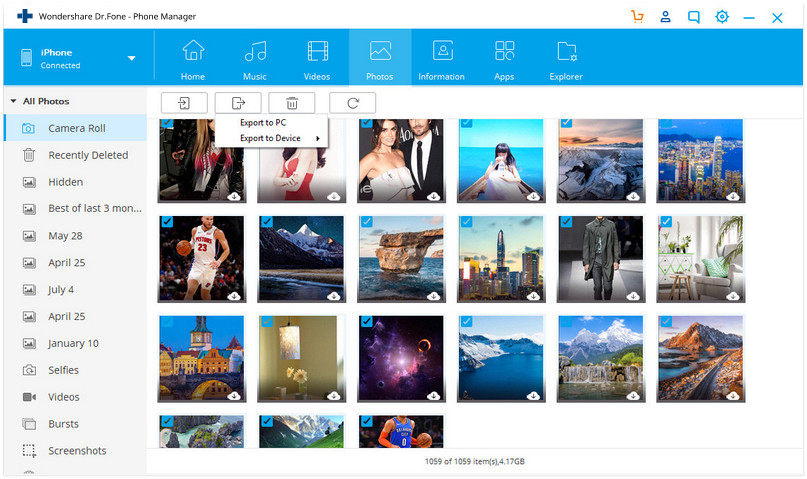
Step 3: Open the folder whose photos you want to backup by double clicking on it and the clicking on it. A new menu appears showing the photos in that folder. Select the photos you want to backup and the click on 'Export' and then select 'Export to PC' as shown below.
Step 4: A new window appears asking for the destination where you want to backup the file. Browse and select the location and then click on 'OK' option. These wil create a backup of the files you selected on your computer.
Step 5: The status bar shows the progress of your export. Once it reaches 100% your files are exported successfully. Click on 'OK' and disconnect your device.
Part 5: How to fix iTunes issues that interrupt photo backup
iTunes is a common and effective way to backup your media files like photos, music, and videos. But things are not that easy when iTunes is down due to some unknown reasons. Don't worry. Here is an iTunes diagnosis and repair tool to help you.

Dr.Fone - iTunes Repair
Fastest solution to fix iTunes issues that interrupt photo backup
- Easily fix all iTunes errors like iTunes error 9, error 21, error 4013, error 4015, etc.
- Take care of all iTunes connection and syncing issues with iPhone/iPad/iPod touch.
- Diagnose and fix iTunes components to normal without affecting phone/iTunes data.
- Easy and fast process to restore iTunes to normal state.
Follow the steps below to easily fix your iTunes to normal:
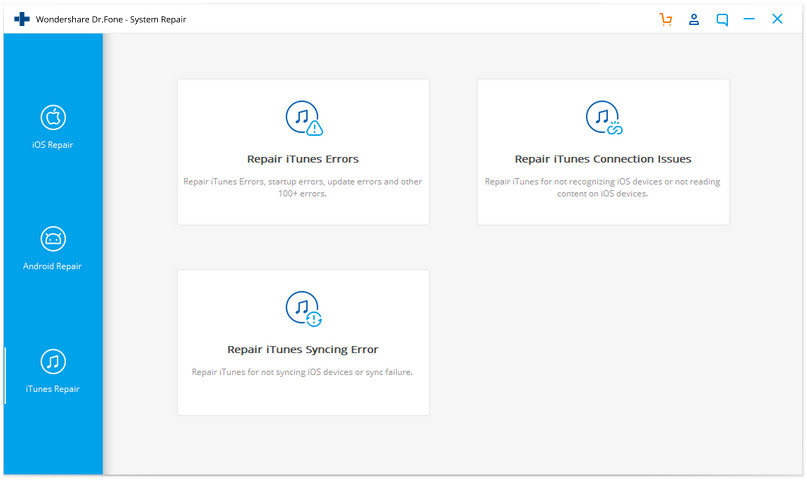
- Download the Dr.Fone toolkit, install and open it. The following screen shall appear.
- Select the "Repair" option among all the options. Then, click on the tab "iTunes Repair" from the left column.
- Above all, diagnose iTunes connection issues by choosing "Repair iTunes Connection Issues".
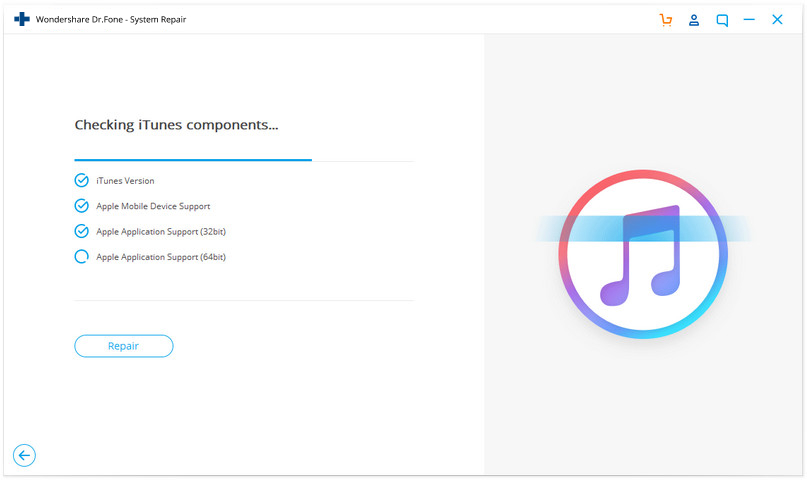
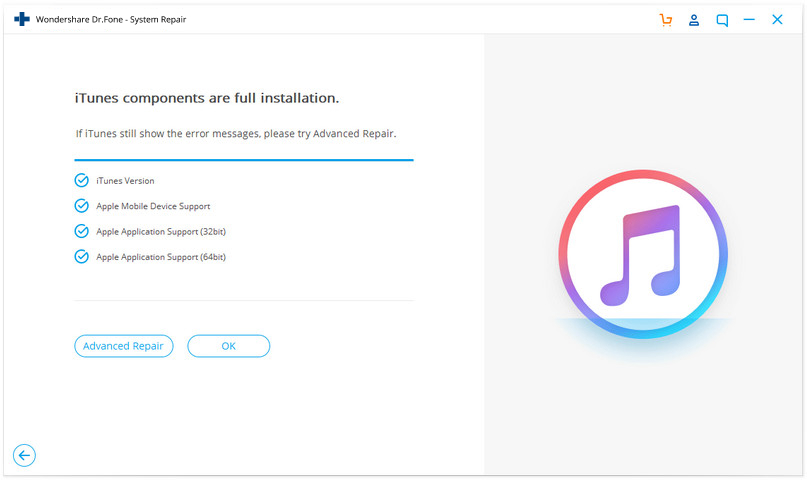
- Click "Repair iTunes Errors" to diagnose and repair all the program components of iTunes.
- If iTunes keeps down, select "Advanced Repair" to have iTunes repaired in advanced mode.

iTunes
- iTunes Backup
- Restore iTunes Backup
- iTunes Data Recovery
- Restore from iTunes Backup
- Recover Data from iTunes
- Recover Photos from iTunes Backup
- Restore from iTunes Backup
- iTunes Backup Viewer
- Free iTunes Backup Extractor
- View iTunes Backup
- iTunes Backup Tips


Alice MJ
staff Editor