[iPhone 13 Dahil] Dosyaları Mac'ten iPhone'a Aktarmak için AirDrop Nasıl Kullanılır
07 Mart 2022 • Dosya: Sık Kullanılan Telefon İpuçları • Kanıtlanmış çözümler
AirDrop is one of the easiest ways to transfer files between two iOS devices, or the iOS device and the Mac computer. If you use AirDrop on your iOS devices, you should make sure that the iOS version is 7.0 or later. AirDrop will enable you to establish a connection with your computer and the iOS device easily, and it doesn't need you to connect your device with the Mac computer with a USB cable. Using AirDrop, users can transfer files without limits on the size of the files, and that's a great convenience for the users to transfer large files. This article will introduce how to use AirDrop between Mac and iPhone, including iPhone 13. Check it out.
AirDrop creates an ad-hoc network between Mac and iPhone to share files. With the help of AirDrop, one can send photos, locations, and much more to the nearby iPhone and iPad wirelessly and transfer vi andMac to the iPhone. There are certain requirements to use AirDrop in iPhone and Mac, check them out.
Requirements for Using AirDrop
- MacBook Pro - 2012 or newer
- MacBook Air - 2012 or newer
- iMac - 2012 or newer
- Mac mini - 2012 or newer
- Mac Pro - Late 2013
- iOS Devices - only those with iOS 7 or newer
Part 1. How to use AirDrop from Mac to iPhone, Including iPhone 13
If you are going to transfer files using AirDrop from Mac to iPhone, you'll find it very easy to get the work done. The guide below will show you how to use AirDrop to transfer files from Mac to iPhone in detail.
How to Use AirDrop to Transfer Files from Mac to iPhone
Step 1. Turn on Wi-Fi settings on your iPhone and your Mac. On iPhone, you go to Settings > Wi-Fi, and on Mac, you go to the Menu Bar > Wi-Fi > Turn the Wi-Fi on. AirDrop continues to work on both devices even when both the devices use different Wi-Fi networks.

Step 2. Now, turn on the Bluetooth on your iPhone by swiping from the bottom and enlight the Bluetooth icon; and also, on your Mac, click Menu Bar > Apple > System Preferences > Bluetooth > Turn Bluetooth On.

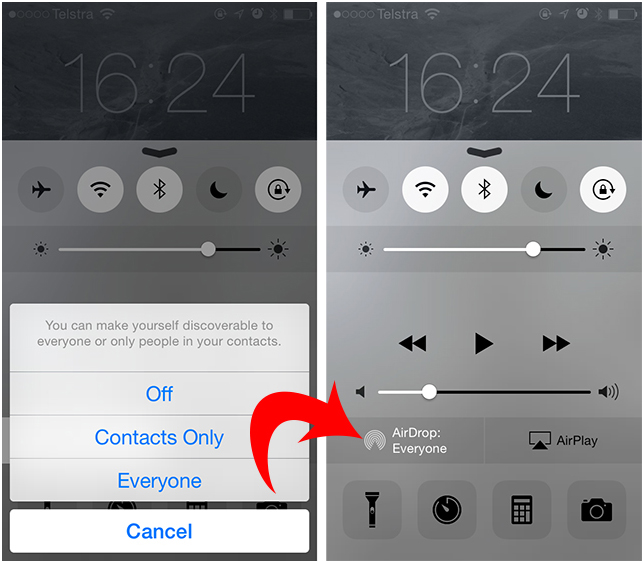
Step 3. Now it's time to turn on AirDrop on your iPhone and Mac. On your iPhone, swipe from bottom to call up Control Center, and tap AirDrop, then choose Contacts or Everyone; On Mac, you must go to Finder > Menu Bar > Go > AirDrop > click on 'Allow me to be discovered by:' > choose 'Contacts Only' or 'Everyone'.
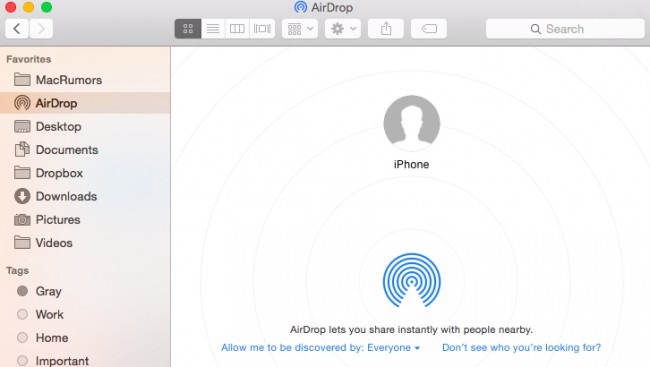
Step 4. Now, it's time to begin the file transfer between your Mac and iPhone. To test, go to the AirDrop menu in Finder and check that a circle represents your device. You can drag and drop the files on to the circle to share it with your device. As soon as you drop the files on to the device, a message will prompt on the screen asking you to accept or decline the sharing.
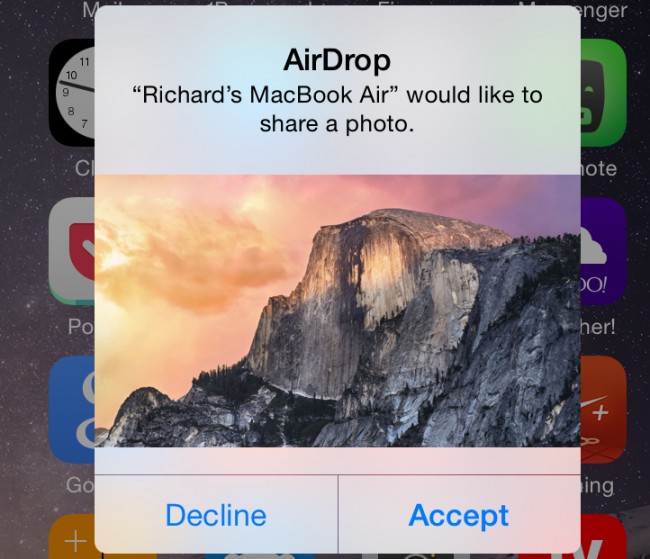
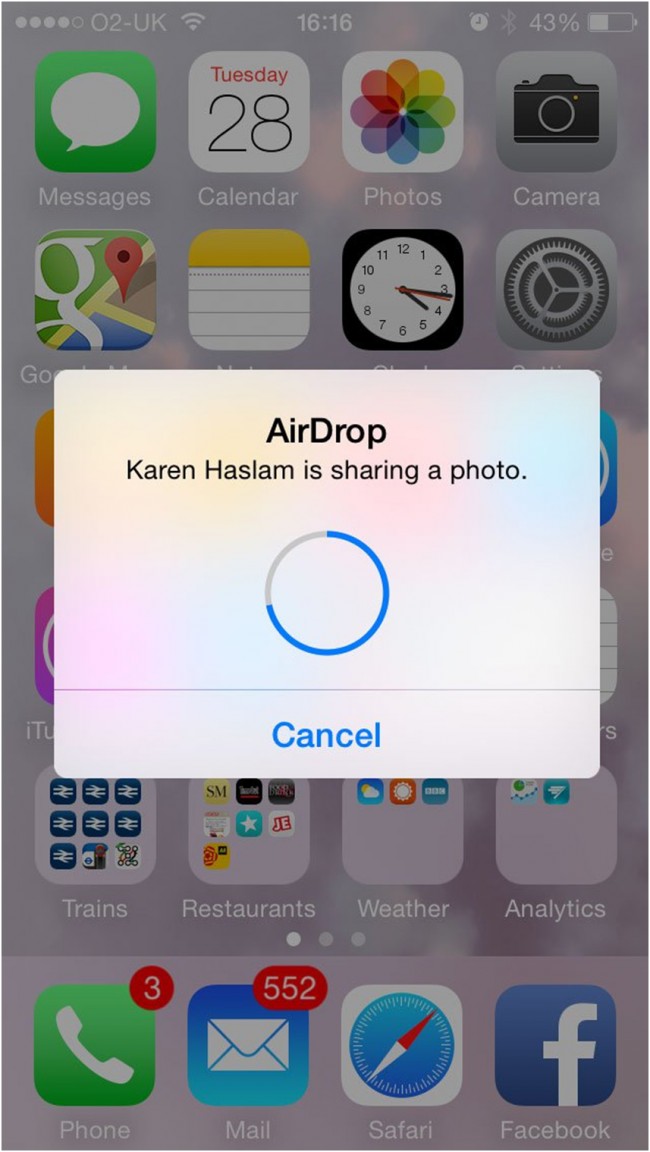
Once you accept the request from the Mac, you can easily see on your iPhone screen the live transfer of the files happening. This is the way how to use airdrop from mac to iphone.
Part 2. Top 3 Problems about AirDrop and How to Fix Them
Problem 1. Unable to Locate Target Device
There are various problems associated with AirDrop while using on Mac and iPhone. The biggest problem associated with it is the inability to locate the target device. This often happens with the Mac device being able to locate the iPhone, however, the iPhone cannot locate the Mac. Also, your iPhone refuses to detect the Mac.
If you have been facing this issue, the best solution is that you keep your iPhone in active mode all the time. This means that you can see the received AirDrop files from Mac to iPhone. Also, select the option of 'Everyone' to avoid any problems while transferring the files.
Problem 2. iCloud Errors and Issues
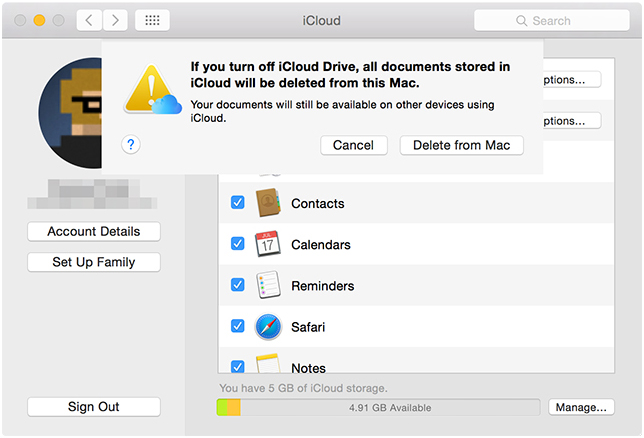
The second biggest problem that is associated while transferring through AirDrop is the issues with iCloud. Despite of there being no evidence of connecting the Mac and iPhone through the same Apple ID, this problem arises often times. Many of the users have reported that their AirDrop disappears once they fiddle with their iCloud settings.
To solve this problem, disable iCloud from your iPhone and re-enable it again. This is the solution that works for most users. Others report errors after even re-enabling the iCloud. For them, the solution is to log out from the iCloud completely and then again log in into the account, which seems to work.
Problem 3. Firewall Interfacing Issues
Usually the Mac devices come with a built-in firewall. This firewall prevents the unwanted connections to your device thus blocking the different virtual ports. This can cause undesired effects with the file transfers, specifically with AirDrop.
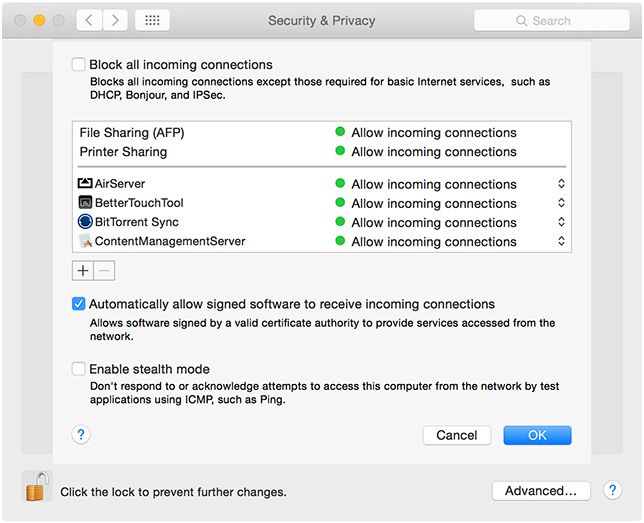
To resolve this issue, you must change the firewall settings. This can be done from the system preferences. The procedure is simple and convenient. One needs to go to system preference, and then go to security and privacy. There, click on the firewall option. Now, click on the padlock in the bottom left corner. Also, if your device is password protected, you will be asked to enter the password to make the necessary changes.
Now, check whether the option of 'block all the incoming connections' is checked. If so, then uncheck it and save the changes made. Also, you can temporarily disable the firewall settings to transfer your files without any disturbances.
So, there you are, now you know exactly what you need to do to use AirDrop from mac to iphone. If you face the commonly known issues with AirDrop, you also know how to resolve them easily.
Part 3. How to Transfer Files from Mac to iPhone with Dr.Fone - Phone Manager (iOS) [iPhone 13 Supported]
As mentioned above, AirDrop at times run into several problems, which will bring much inconvenience to your data transfer between Mac computer and iPhone. When you want to transfer files from Mac to iPhone, you can also take advantage of the third-party iPhone transfer software, Dr.Fone - Phone Manager (iOS), to get the work done. This program is used for managing files on iPhone, iPad and Android devices, and it can help you transfer files from Mac to iPhone with Dr.Fone - Phone Manager (iOS) in detail.

Dr.Fone - Phone Manager (iOS)
Transfer Music from Mac to iPod/iPhone/iPad without iTunes
- Transfer, manage, export/import your music, photos, videos, contacts, SMS, Apps etc.
- Backup your music, photos, videos, contacts, SMS, Apps etc. to computer and restore them easily.
- Transfer music, photos, videos, contacts, messages, etc from one smartphone to another.
- Transfer media files between iOS devices and iTunes.
- Fully compatible with the newest iOS and iPod.
How to Transfer Files from Mac to iPhone with Dr.Fone - Phone Manager (iOS)
Step 1. Download and install Wondershare Dr.Fone - Phone Manager (iOS) on your Mac, then start it. After that, connect your iPhone to Mac with the USB cable.
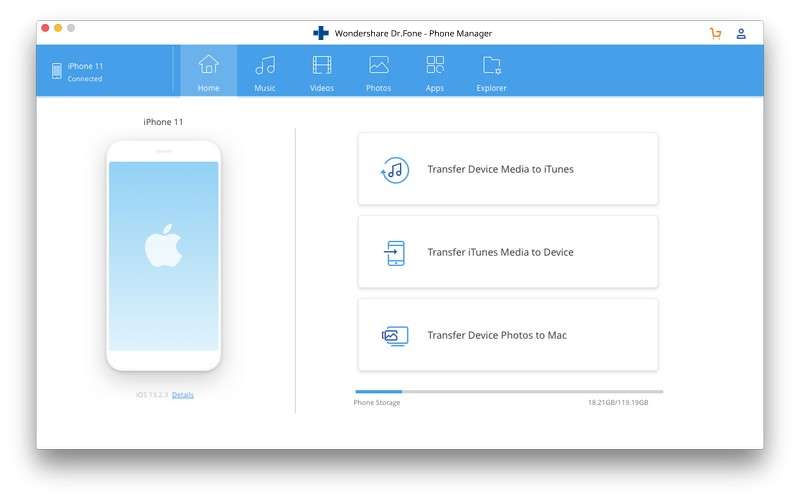
Step 2. You'll see several file categories at the top of the main interface. Let's set Music as an example. Choose the Music category and you'll see all your iPhone music in the window.
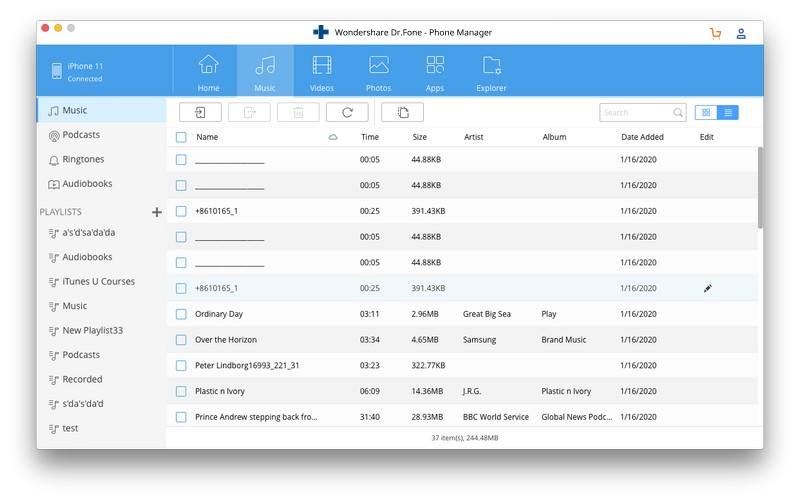
Step 3. Click the Add button in the main interface, and you'll see a pop-up window. Select the songs you need from the window and click OK to transfer files from Mac to iPhone.
When the transfer finishes, you'll get the songs in the Music app. For other files, you'll get them in the corresponding apps. So that's how Wondershare Dr.Fone - Phone Manager (iOS) helps you to transfer files from Mac to iPhone, and it can be as helpful as AirDrop. If you are interested in this program, you can free download it to have a try.
iPhone Tips & Tricks
- iPhone Managing Tips
- iPhone Contacts Tips
- iCloud Tips
- iPhone Message Tips
- iPhone'u SIM kart olmadan etkinleştirin
- Yeni iPhone AT&T'yi Etkinleştir
- Yeni iPhone Verizon'u etkinleştirin
- iPhone İpuçları Nasıl Kullanılır
- Diğer iPhone İpuçları
- En İyi iPhone Fotoğraf Yazıcıları
- iPhone için Çağrı Yönlendirme Uygulamaları
- iPhone için Güvenlik Uygulamaları
- Uçakta iPhone'unuzla Yapabilecekleriniz
- iPhone için Internet Explorer Alternatifleri
- iPhone Wi-Fi Şifresini Bul
- Verizon iPhone'unuzda Ücretsiz Sınırsız Veri Alın
- Ücretsiz iPhone Veri Kurtarma Yazılımı
- iPhone'da Engellenen Numaraları Bul
- Thunderbird'ü iPhone ile senkronize edin
- iPhone'u iTunes ile/iTunes olmadan güncelleyin
- Telefon bozulduğunda iPhone'umu bul özelliğini kapatın


James Davis
staff Editor