How to Transfer Files from Mac to iPhone?
Apr 27, 2022 • Filed to: Backup Data between Phone & PC • Proven solutions
Buy any Apple device and chances are you would end up with another Apple product. This is by way of the ecosystem Apple has meticulously designed and how well their products function within it and to some extent outside of it. So, you have an iMac or a MacBook or a Mac mini and there are chances you’d end up with buying an iPhone just for the simple conveniences the ecosystem offers. For those who have a Mac with them already and just bought an iPhone, one of the first things on their minds is how to transfer files from Mac to iPhone.
Over the years, Apple has built an ecosystem where an iPhone can live without a Mac comfortably. Photos get stored in iCloud Library and sync over-the-air between all devices. You can use Apple Music to stream high-quality music all day long. There’s Netflix, Amazon Prime, Hulu, and now even Apple TV and Apple TV+ streaming services for your movies and shows. If you have money to spare, you can live untethered all your life. However, we all come across times when we want to or need to use our Mac to transfer files from Mac to iPhone.
Best iPhone File Transfer Tool For Mac: Dr.Fone - Phone Manager (iOS)
You might make do with Apple’s own file transfer methods baked into macOS and iTunes, but if you transfer files frequently, you might consider a third-party tool that makes transferring files from Mac to iPhone a breeze. The best third-party solution to transfer files from Mac to iPhone like a pro is Dr.Fone - Phone Manager (iOS). The software works reliably and offers a comprehensive Mac to iPhone file transfer solution.

Dr.Fone - Phone Manager (iOS)
Transfer Files to iPhone/iPad/iPod without iTunes
- Transfer your music, photos, videos, contacts, SMS, Apps etc by simple one-click.
- Backup your iPhone/iPad/iPod data to computer and and restore them to avoid any data loss.
- Move music, contacts, videos, messages, etc from old phone to a new one.
- Import or export files between phone and computer.
- Reorganize & manage your iTunes library without using iTunes.
- Fully compatible with newest iOS versions (iOS 13) and iPod.
3981454 people have downloaded it
Step 1: Connect your iPhone to your Mac using a USB cable

Step 2: Once connected, open Dr.Fone
Step 3: Choose Phone Manager module from Dr.Fone
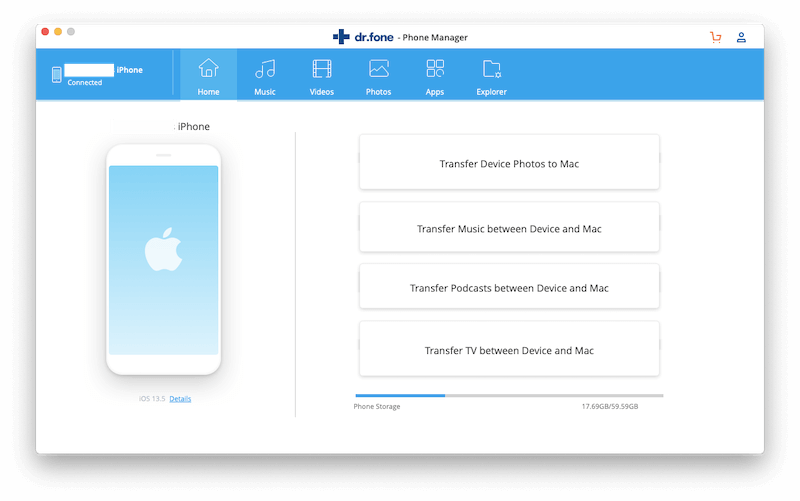
Dr.Fone - Phone Manager (iOS) is a one-stop solution for all your iPhone file transfer needs. The interface is a visual delight and everything is easy to understand with spacious tabs. There are big blocks for key functions, and then there are tabs at the top to go to individual sections such as Music, Videos, Photos, Apps, and Explorer. Right away, you can see how much storage your phone is using currently. A small Details link rests below the image of a phone and clicking that link brings you more information than Apple ever intended you to find out about your device, the SIM card, the network you are using. With a little different polish to the UI, this software could well have been Apple’s utility.
Step 4: Click on Music, Photos or Videos tab
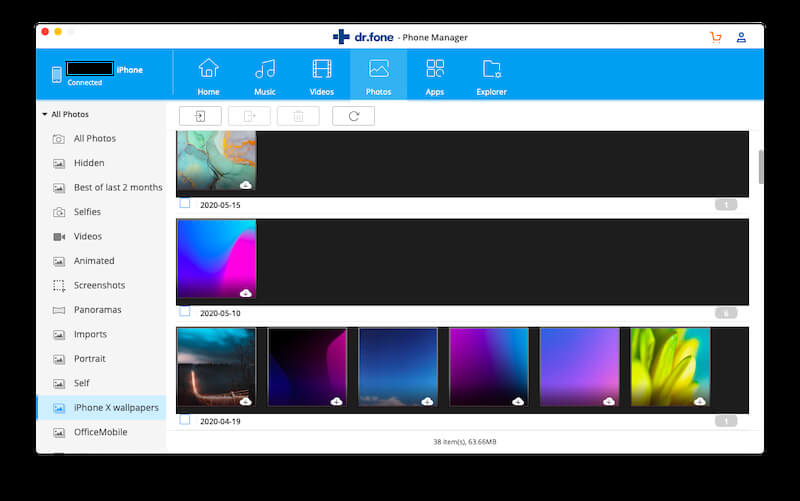
Step 5: As you can see from the interface’s photos above, all your music albums, playlists, photos, photo albums, even smart albums, and live photos are listed and shown as large thumbnails
Step 6: You can click the first icon above the Name column to add files and folders to music, photos, and videos
Step 7: You can create new playlists in music, new albums in photos, and the software even shows you that the photo you are seeing is in the iCloud Library by way of a small cloud icon on the photo. Neat, huh?
Transferring Files From Mac to iPhone: Using iTunes
On macOS 10.14 Mojave and earlier, iTunes has been the de-facto way to transfer files from Mac to iPhone seamlessly, albeit the process still feels clunky and slow. However, nothing beats free, and built-in, so if you have sparse needs to transfer files from Mac to iPhone, you might want to consider using iTunes to transfer files between the iPhone and your MacBook/ iMac.
Step 1: Connect your iPhone to the Mac using a USB cable
Step 2: If iTunes does not automatically open up, open iTunes
Step 3: Look for the small phone symbol as shown in the image

Step 4: You will come to the Phone Summary screen. On the left-hand side, select File Sharing
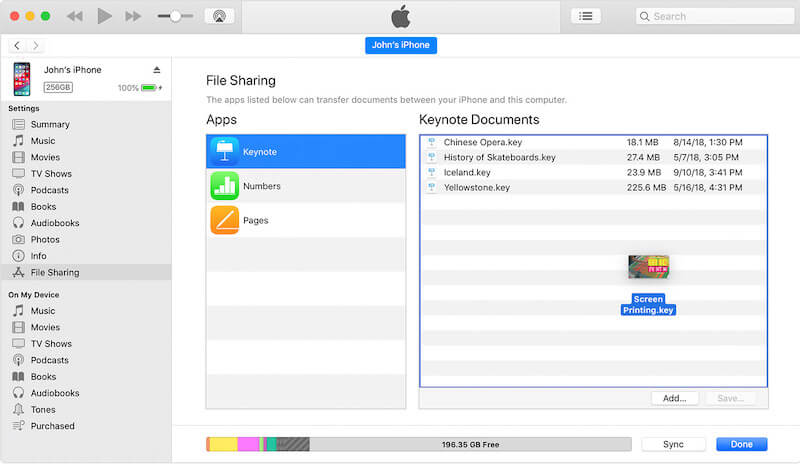
Step 5: Select the app you want to transfer files to
Step 6: Drag and drop files from Mac to iPhone
This is a free way to transfer files from Mac to iPhone using iTunes. Files can even be deleted right within the apps. For more granular control, a third-party app is recommended.
Transfer Files from Mac to iPhone On Catalina Without iTunes
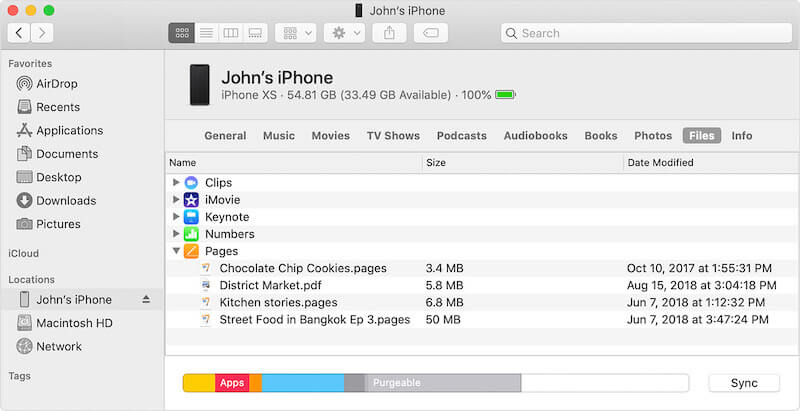
iTunes works only on macOS 10.14 Mojave and earlier. On 10.15 Catalina, there is no iTunes and no replacement app that you can use for file transfer from Mac to iPhone. Instead, the functionality is baked into macOS Finder.
Step 1: Connect your iPhone to your Mac running Catalina
Step 2: Open a new Finder Window
Step 3: From the sidebar select your iPhone
Step 4: You will get an option to Pair your iPhone and Mac together. Click Pair.
Step 5: On your iPhone, tap Trust and enter your passcode.
Step 6: After this initial pairing is done, select Files from the options in the pane, and you will see a list of apps that you can send files to.
Step 7: Just use drag-and-drop to transfer files from Mac to iPhone on Catalina.
You can also delete the files from this window itself. When you are done transferring, eject the iPhone using the icon on the sidebar. Again, this functionality is fine in a pinch, but is cumbersome and not ideal or conducive for frequent/ everyday use. However, you can transfer any kind of file to the relevant app using Finder on macOS Catalina 10.15.
Transfer Files From Mac to iPhone Using Bluetooth/ AirDrop
Macs and iPhones that were released in 2012 and later come with AirDrop support but if you just bought a new iPhone for the first time, you might never have used AirDrop before. AirDrop is a quick and efficient way to transfer files from Mac to iPhone wirelessly. For most users who want to transfer a quick image or video from their Mac to the iPhone, this is the fastest and the most convenient way to do it wirelessly.
Check If AirDrop Is Enabled On The Mac
Step 1: Open a Finder window
Step 2: Select AirDrop on the left-hand side pane
Step 3: If either of your Wi-Fi or Bluetooth is disabled for any reason, it will show here along with an option to enable them
Step 4: Once enabled, look at the bottom of the window for a setting called “Allow me to be discovered by:”
Step 5: Select Contacts Only or Everyone and our Mac is now ready to send files via AirDrop
Check If AirDrop Is Enabled On The iPhone
Step 1: Open Control Centre by swiping up from the bottom on iPhones with the home button or by swiping down from the top-right corner on iPhones without the home button
Step 2: Enable Wi-Fi and Bluetooth
Step 3: Long-press the square containing toggles for Airplane mode, Cellular Data, Wi-Fi and Bluetooth
Step 4: Ensure Personal Hotspot is off
Step 5: Long-press AirDrop toggle and choose Contacts Only or Everyone
Your iPhone is now ready to receive files from Mac via AirDrop/ Bluetooth
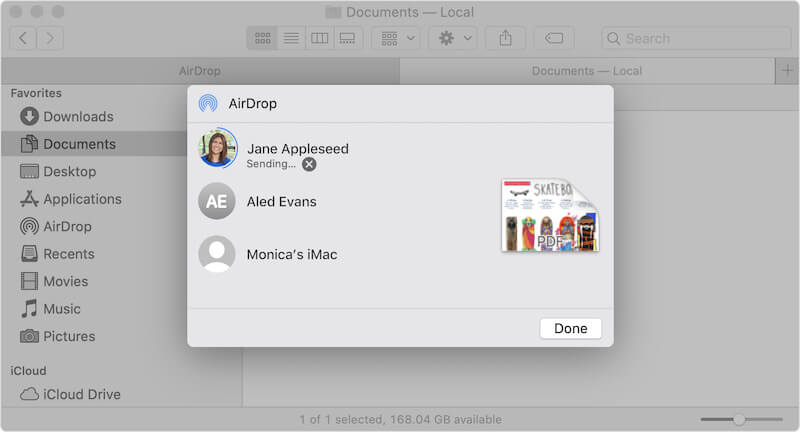
There are two ways you can use to transfer files from Mac to iPhone using AirDrop/ Bluetooth.
#Method 1
Step 1: Open a Finder window and navigate to the file(s) you want to transfer
Step 2: Drag the file(s) to AirDrop in the sidebar and keep holding the file
Step 3: In the AirDrop window, you should see a list of devices you can transfer to
Step 4: Drop the file(s) on the device you want to transfer to
#Method 2
Step 1: Open a Finder window and navigate to the files you want to transfer
Step 2: In the sidebar, right-click AirDrop and click Open In New Tab
Step 3: Switch back to the tab with your files
Step 4: Select your files and drag them to the AirDrop tab
Step 5: Drop on the desired device
If you are transferring between your own devices signed in to the same Apple ID, you wouldn’t receive a prompt to Accept on the receiving device. If you are sending it to some other device, the other device will receive a prompt to Accept or Reject the incoming files.
Pros and Cons Of AirDrop/ Bluetooth
The single largest benefit of using AirDrop is convenience. All you need to do is be within a range of the device you want to transfer to, and you can transfer files from your Mac to an iPhone using drag-and-drop convenience. It doesn’t get simpler than this. And this simplicity is both its boon and bane, depending on which end of the power-user spectrum you are on.
When you transfer files from Mac to iPhone using Bluetooth/ AirDrop, iPhone tries to bring the files into relevant apps, such as, images/ photos and videos go in Photos by default, and the iPhone won’t even ask you if you want to transfer them to a particular album in Photos or if you want to create a new album for the photos. Now, if that was what you intended to do, well and good, but this can quickly become annoying and users need to waste more time organizing said images on their devices.
A third-party tool such as Dr.Fone - Phone Manager (iOS) will help you transfer files from Mac to iPhone to the exact location you want it to the right from the get-go. You can transfer videos, photos, and music to exactly where you want, and create new albums as well, something that is not allowed in AirDrop/ Bluetooth.
Conclusion
Transferring files from Mac to iPhone is a breeze using the built-in AirDrop if you want to transfer only a few files infrequently or if you have some images and videos that can go straight into Photos on iOS and you can arrange and organize them later. If you are looking for something more, you need to use iTunes if you are using macOS Mojave 10.14 or use Finder to transfer files from Mac to iPhone if you are using macOS 10.15 Catalina. There are excellent third-party tools available for you to use such as Dr.Fone - Phone Manager (iOS) that provides seamless transfer of media straight into respective albums and folders and can even read smart albums and live photos from the iPhone. Pick the method that suits you best and transfer files from Mac to iPhone like a pro.
iPhone İpuçları ve Püf Noktaları
- iPhone Yönetim İpuçları
- iPhone Kişileri İpuçları
- iCloud İpuçları
- iPhone Mesaj İpuçları
- iPhone'u SIM kart olmadan etkinleştirin
- Yeni iPhone AT&T'yi Etkinleştir
- Yeni iPhone Verizon'u etkinleştirin
- iPhone İpuçları Nasıl Kullanılır
- Diğer iPhone İpuçları
- En İyi iPhone Fotoğraf Yazıcıları
- iPhone için Çağrı Yönlendirme Uygulamaları
- iPhone için Güvenlik Uygulamaları
- Uçakta iPhone'unuzla Yapabilecekleriniz
- iPhone için Internet Explorer Alternatifleri
- iPhone Wi-Fi Şifresini Bul
- Verizon iPhone'unuzda Ücretsiz Sınırsız Veri Alın
- Ücretsiz iPhone Veri Kurtarma Yazılımı
- iPhone'da Engellenen Numaraları Bul
- Thunderbird'ü iPhone ile senkronize edin
- iPhone'u iTunes ile/iTunes olmadan güncelleyin
- Telefon bozulduğunda iPhone'umu bul özelliğini kapatın


Alice MJ
personel editörü