Telefondan Dizüstü Bilgisayara Nasıl Fotoğraf Aktarılır?
27 Nis 2022 • Dosya: Telefon ve PC Arasında Veri Yedekleme • Kanıtlanmış çözümler
En son ne zaman yanınızda tam teşekküllü bir kamera sistemi taşıdınız? Bugün çoğumuz hareket halindeyken cep telefonlarımızla fotoğraf çekiyoruz ve bunun iyi bir nedeni var. Bugün cep telefonlarındaki kamera sistemleri dünyanın en iyi kamera üreticilerine rakip oluyor ve performans çoğu amaç için çoğunlukla yeterli. Söylemeye gerek yok, bugün çoğu insanın kameralı telefonu var ve insanların her yıl telefonlarını yükseltmeyi düşünmelerinin en önemli nedenlerinden biri kamera iyileştirmeleri. Bugün, dünyanın en iyi kameralı telefonlarından bazıları 8K video kaydedebiliyor ve 48 MP kamera sistemleri yeni bir normal gibi görünüyor. Tüm bu teknoloji harika, ancak para değil bir maliyeti var. Maliyet, veri depolamadır ve üreticiler bugün kendinizi rahat hissedebileceğiniz yeterli depolama alanı sağlamıyor. bu ultra yüksek çözünürlüklü kayıtların ve multi-megapiksel fotoğrafların büyük dosya boyutları ve insanların oyunlar, müzik ve videolar gibi telefona kaydedilmeyen ancak görüntülemek için geçici olarak telefonda saklanan diğer öğeler için depolamaya ihtiyacı olduğu düşünüldüğünde. Er ya da geç, insanlar şu soruyla karşı karşıya: telefondan dizüstü bilgisayara nasıl fotoğraf aktarılır?
The Good Old USB Method With Dr.Fone Phone Manager
The simplest and the fastest way to get photos from your phone to laptop remains connecting your phone to your laptop with a USB cable and using the excellent and powerful suite of tools called Dr.Fone to manage media on your phone on a laptop. In a few simple steps, you will be transferring photos from phone to laptop.
Setting Up Your Phone
Nothing needs to be done on an iPhone. For Android phones, the steps are provided.
Step 1: Connect your phone to the laptop using a USB cable
Step 2: On the phone, swipe down from the top and in the notifications, select USB. Within these settings, select File Transfer.
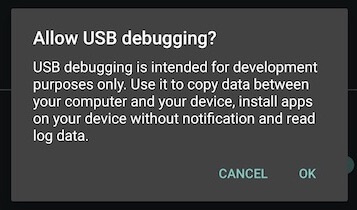
Step 3: If you have Developer Mode activated on the phone, you most likely have USB debugging enabled as well. If not, go to developer options in Settings and enable USB debugging. If you do not have Developer Options enabled or do not know how to enable them, move to step 4.
Step 4: Go into Settings and tap About Phone.
Step 5: Scroll down to the build number and keep tapping it till Developer Options are enabled.
Step 6: Go back into Settings and scroll down to System
Step 7: If Developer Options are not listed inside System, tap Advanced and then tap Developer Options
Step 8: Scroll down to find the USB debugging option and enable it.

Downloading And Setting Up Dr.Fone Phone Manager
Step 1: Download and install Dr.Fone Phone Manager on your laptop
Step 2: Launch Dr.Fone on your laptop
Step 3: Choose Phone Manager
Transferring Photos From Phone To Laptop Using Dr.Fone USB
When you launch Dr.Fone Phone Manager, you will see a clean window with large tabs at the top and some common, one-click actions listed beside an image of your phone in a big, clear font.
One-Click Step: All you need to do is select the first option that says Transfer Device Photos. In the next popup, select the location where you want to export your phone’s photos and all your photos will be exported from your phone to the computer.

Dr.Fone - Phone Manager (Android)
Transfer Data Between Android and Mac Seamlessly.
- Transfer files between Android and computer, including contacts, photos, music, SMS, and more.
- Manage, export/import your music, photos, videos, contacts, SMS, Apps etc.
- Transfer iTunes to Android (vice versa).
- Manage your Android device on computer.
- Fully compatible with Android 8.0.
Transfer Photos From Phone To Laptop Wirelessly Without USB
The world is going wireless today. We have hated cables for long, and today phones come equipped with wireless charging capabilities to make your life truly wireless, should you want it to be. Transferring photos from phone to laptop wirelessly can be done as sync over the cloud as well, and photos will be right where you want them to be, like magic. Sure, that consumes data but might be more convenient depending on the way you look at it.
Dropbox
Dropbox is a common, cloud-based file-sharing solution wherein you get a starter 2 GB ‘box’ for you to store your files in and that you can sync over the cloud and make available to all your devices using the Dropbox apps on devices. Considering that this solution consumes data and the starting storage is a meagre 2 GB, Dropbox is not recommended for use as a standard way to transfer photos from phone to laptop or store your photos in the cloud or keep your photo collection synced. Now, if you pay for Dropbox’s higher storage tiers, or are not a very heavy user and can make do with the meagre 2 GB storage you get for free, Dropbox can be a quick and easy way to transfer your photos from phone to laptop, if you do not mind the data consumption and the time it takes to upload photos from phone to Dropbox’s servers.
Uploading Files From Phone
Step 1: Install the Dropbox app on your phone
Step 2: Launch the app
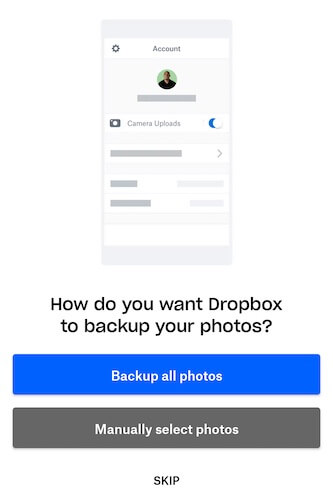
Step 3: Dropbox asks you at launch if you want to use Dropbox to backup your photos to the Dropbox servers or if you want to manually select photos to backup, or if you want to skip the step altogether.

Step 4: Now, if you are on the free tier with 2 GB storage, and you are just starting, or if you are on one of the fancy high storage tiers that Dropbox offers, you can start by allowing Dropbox to backup all photos on your device. Dropbox will create a folder and upload all your photos from the device to that folder in your Dropbox. If you are using Dropbox to transfer a few photos randomly, then choose to skip the automatic backup.

Step 5: Once you are signed in to your Dropbox, go back to your app drawer and launch Google Photos
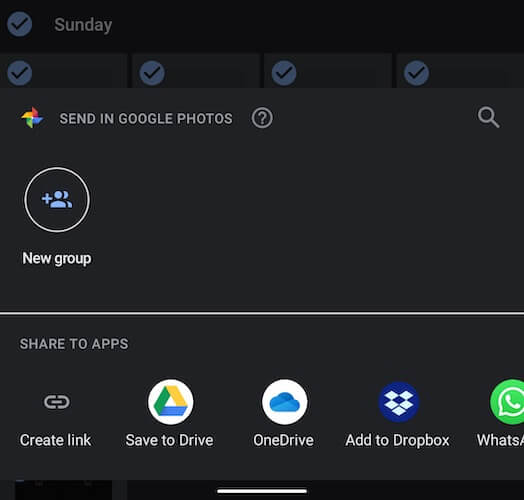
Step 6: Choose the photos you want to transfer from phone to laptop using Dropbox, and then tap the Share icon at the top, and select Add To Dropbox option.
Step 7: Dropbox will upload files from your phone to the cloud.
Downloading Files On Laptop
Step 1: Visit https://www.dropbox.com or if you have the Dropbox app on your computer, launch it.
Step 2: If you had not selected a different location to save while sending files to Dropbox on your phone, you will find your photos in the Sent Files folder. If you had chosen to backup automatically, the photos will be in the Camera Uploads folder.
Step 3: Select the files by clicking on the empty square that pops up on each file to the left of the file name when you hover over the files and then select the download option on the right.
WeTransfer
WeTransfer is a relatively easy and a quick and easy way to send files to people, and you might think that this could work for transferring photos from phone to laptop as well. To save you some trouble, in short, let’s say some options are more suited to sending photos from Android to laptop, such as Dr.Fone - Phone Manager for Android if you want to use a USB cable, or could-based solutions already integrated into Android such as Google Photos and Google Drive, or third-party solutions such Microsoft OneDrive. Still, if you want to use WeTransfer to send photos from phone to laptop, here are the steps.
Step 1: Launch the app store on your phone and download the Collect app by WeTransfer
Step 2: Launch the app
Step 3: Select All Items tab at the bottom, then tap Share Files at the top-right
Step 4: Select Photos from the options
Step 5: Select the photos you want to transfer.
Step 6: You can finish the transfer using Collect, or copy the link to share it in an email.
If you choose to email, you will receive an email with the link to download the files you just transferred.
Microsoft OneDrive
Microsoft offers its cloud storage solution under the OneDrive banner and gives every user a generous 5 GB for free, compared to Dropbox’s 2 GB. This is comparable to what Apple provides as Apple also provides 5 GB free iCloud storage to users. OneDrive is easily integrated into both macOS and is tightly integrated with Windows File Explorer making it a good choice to transfer photos from phone to laptop.
Send Photos From Phone To OneDrive
Step 1: Install and launch the OneDrive app on your phone
Step 2: Create a new account if you are a new user, else sign in to your existing Microsoft Account
Step 3: Go to the photos app on your phone and select the photos you want to transfer from phone to laptop using OneDrive
Step 4: Choose the upload location of files on OneDrive. Photos will now be uploaded to OneDrive.

Download Photos From OneDrive To Laptop
Step 1: Open Windows File Explorer if you are using Windows, and select OneDrive from the left sidebar. Alternatively, use the Windows Start menu to look for OneDrive. Both lead to the same location in File Explorer. If you are on macOS, download OneDrive, set it up, and it will be available in the Finder sidebar.
Step 2: Sign in to your OneDrive using your Microsoft account if you are not already signed in. Skip this step if you are on macOS, you would have already signed in as part of the OneDrive setup process on macOS.
Step 3: Select and download photos as you would any other files and folders in File Explorer or on Finder in macOS.
Conclusion
Transferring photos from phone to laptop can be done using a USB cable as well as wirelessly, with distinct advantages and disadvantages to both. Transferring photos from phone to laptop using a USB cable is a necessarily manual process. If you are using this process to create backups, you might occasionally forget and that can be an issue. On the other hand, having a local backup is always a good thing, so you should always frequently transfer photos from phone to laptop directly using a USB cable and third-party solutions such as Dr.Fone Phone Manager to give you a seamless one-click transfer experience. Using cloud services such as DropBox and OneDrive, you can transfer photos randomly and conveniently, as well as choose to have complete photo library backups if you wish to.
Phone Transfer
- Get Data from Android
- Transfer from Android to Android
- Transfer from Android to BlackBerry
- Import/Export Contacts to and from Android Phones
- Transfer Apps from Android
- Transfer from Andriod to Nokia
- Android to iOS Transfer
- Transfer from Samsung to iPhone
- Samsung to iPhone Transfer Tool
- Transfer from Sony to iPhone
- Transfer from Motorola to iPhone
- Transfer from Huawei to iPhone
- Transfer from Android to iPod
- Transfer Photos from Android to iPhone
- Transfer from Android to iPad
- Transfer videos from Android to iPad
- Get Data from Samsung
- Transfer Data to Samsung
- Transfer from Sony to Samsung
- Transfer from Motorola to Samsung
- Samsung Switch Alternative
- Samsung File Transfer Software
- LG Transfer
- Transfer from Samsung to LG
- Transfer from LG to Android
- Transfer from LG to iPhone
- Transfer Pictures From LG Phone to Computer
- Mac to Android Transfer


Alice MJ
staff Editor