

How to Transfer Pictures from iPad to SD Card

Apr 27, 2022 • Filed to: iPhone Data Transfer Solutions • Proven solutions
Q: "I have a lot of photos on my iPad and I need to move them to my SD card to free some space for new pictures. What is the easiest way to do this?" --- Grouser
When speaking of file transfers in general, we have to admit that not everyone is good at it. Transferring files is easy for the experienced users, but for the greenhands, it becomes troublesome. Well, here we are going to show you two ways to transfer pictures from iPad to SD card. Nowadays most of the gadgets are equipped with SD Card Slot, so anyone with that card can use it to transfer files instead of the flash drive. If you want to transfer files with SD card in a good and safe way, this post is just right for you. You can save files in SD card for a backup, so that you are able to take it anywhere you want. This post will introduce how you can transfer pictures from iPad to SD card.
Part 1. Transfer Pictures from iPad to SD Card without iCloud
The primary choice for transferring pictures from iPad to SD card is using our suggested tool:Dr.Fone - Phone Manager (iOS). This is a great program that does not only manage pictures but also all other files you need, including transfering music, videos and more. The wonderful tool with powerful functions is completely compatible with latest iOS and Windows OS. What's more, you can manage your work done even without iCloud! The following guide will show you how to transfer pictures from iPad to SD card.
Dr.Fone - Phone Manager (iOS)
One Stop Solution to Manage and Transfer Pictures from iPad to SD Card
- Transfer, manage, export/import your music, photos, videos, contacts, SMS, Apps etc.
- Backup your music, photos, videos, contacts, SMS, Apps etc. to computer and restore them easily.
- Transfer music, photos, videos, contacts, messages, etc from one smartphone to another.
- Transfer media files between iOS devices and iTunes.
- Fully compatible with iOS 7, iOS 8, iOS 9, iOS 10, iOS 11 and iPod.
Steps to Transfer Pictures from iPad to SD Card
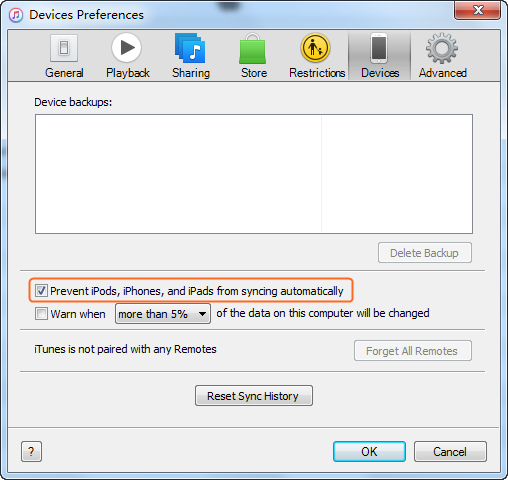
Step 1. Disable the Auto Sync of iTunes
Start iTunes and disable the auto sync option by clicking Edit > Preferences > Devices, and checking Prevent iPods, iPhones and iPads from syncing automatically.
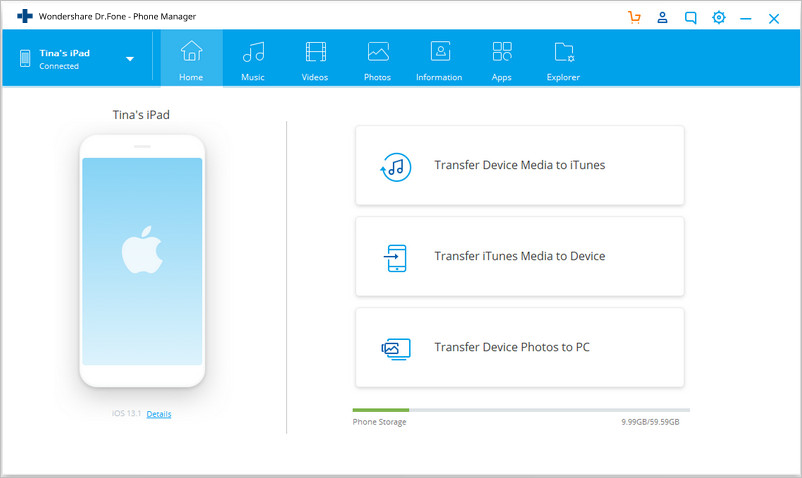
Step 2. Start Dr.Fone and Connect iPad
Download and install Dr.Fone on your computer. Launch it and choose "Phone Manager". Connect iPad to computer with the USB cable and the program will automatically detect it.
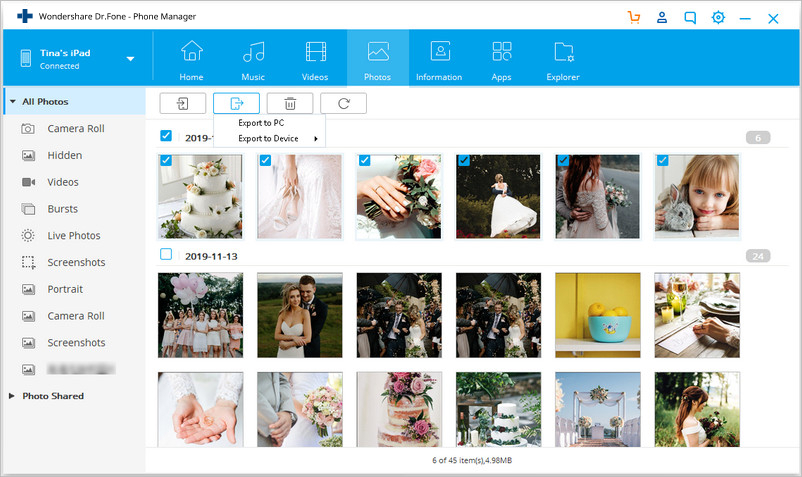
Step 3. Transfer Pictures from iPad to SD Card
Choose Photos category at the top middle of the software window. Then you'll see the "Camera Roll" and "Photo Library" in the left sidebar. Select one album and check the photos you need, then click the "Export" button at the top middle. After that, choose "Export to PC" in the drop-down menu, and select the your SD card as the target.
Part 2. Transfer Pictures from iPad to SD Card with iCloud
Another way of transferring pictures from iPad to SD card is using iCloud. iCloud Photo Library is also a good solution, especially when it comes to backing up. Next few steps describe you how to do it in most easy way.
How to Use iCloud to Save iPad Photos
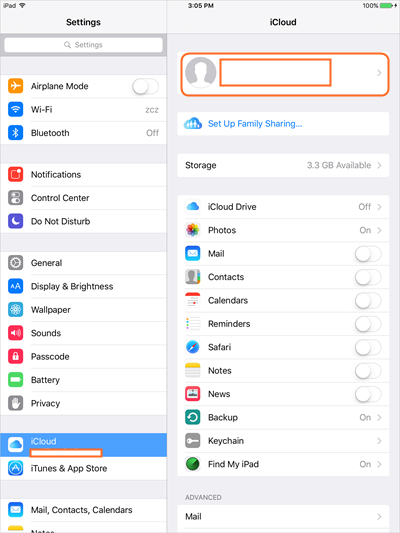
Step 1. Log in iCloud on iPad
Tap Settings > iCloud, and log in with your Apple ID if you have never used it before.
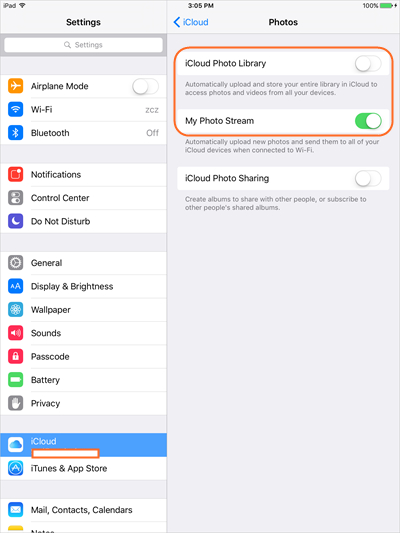
Step 2. Turn on Photo Stream
Tap Photos, and then turn on Photos Stream in the next page. Now all the new photos will be backed up in iCloud.
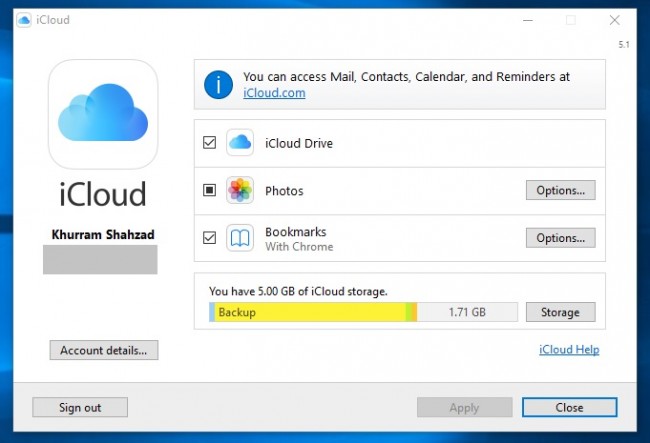
Step 3. Turn On Photos in iCloud for Windows
Now download and start iCloud for Windows on your computer, and turn on Photos after logging in.
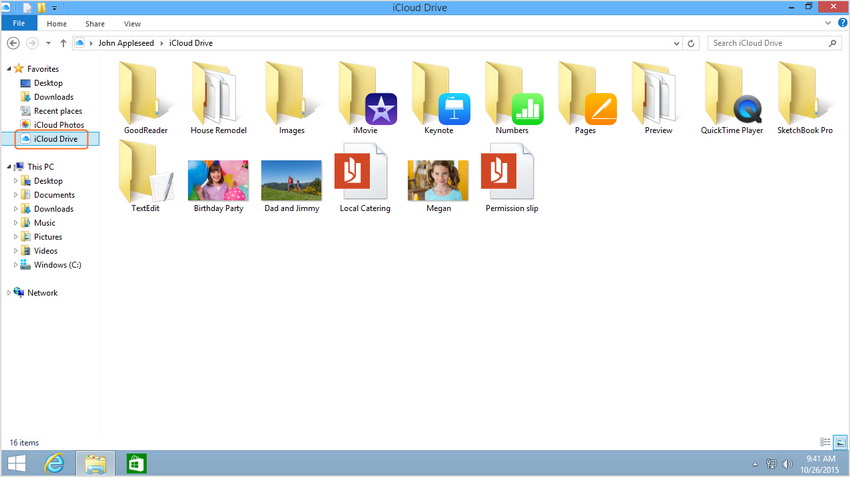
Step 4. Transfer iPad Pictures to SD Card
Go to the iCloud folder on your computer, and you'll see the photos. Now you can copy and paste the photos to your SD card.
Part 3. Extra Tips for Using SD Card
Above two ways will make you easily transfer photos from ipad to SD card, and you could choose one of them that is better for you. Besides, we are giving you extra tips when it comes to transfer pictures to SD Card, which may provide you a little help when you are in need.
![]()
Tip 1.: Check if your SD card is mounted properly. If it is not, files will not be read properly. In cases where you do not mount your SD card appropriately, sometimes errors can occur which will eventually lead to deleting your files.More worse, your SD card can get corrupted. The only solution would be formatting your SD card.
Tip 2.: Keep it simple. Sometimes, files and pictures can be erased if you are overly trying to customize the settings. So you should keep your SD card simple and organize to make the files safe in your SD card.
Tip 3.: Bugs can occur in the system very often. Back up your SD card regularly to prevent data loss. If you use the SD card on different devices, there are chances that it gets virus. So you should back up the files from SD card to a local hard drive.
Tip 4.: Format your SD card. If you think your SD card is not working properly or perhaps just want to clear space for new pictures,it's better to use the format option. You should avoid deleting all the pictures, because formatting is a safe way to erase all the data from your SD card and make a clean start, just like with your hard drive.
Tip 5.: Keep your SD card safe and clean. Writing and reading issues are not that uncommon when it comes to SD cards. Dust can affect the quality of reading, so you need to keep them safe and clean. The best idea is to keep them in the cases to reduce the effect from the dust. You should get a case for them if you don't have one.
Tip 6.: Don't eject SD card while using it. This is something you might already know, but it's worth remembering once again. Make sure not to eject your card while it's in use, as this might corrupt the data on your SD card.
Tip 7.: When you are done using an SD card, you should safely eject it and unmount it first. We should all start doing so, because when you pull it out without dismounting, same process happens when power is lost, which can lead to file losses.
Transferring files and pictures from your iPad to SD card is now easier than ever, thanks to the tools like Dr.Fone - Phone Manager (iOS). Also, you can use iCloud as a transfer method, but it may be a little complicated for the novices. With this application, even direct transferring between two iOS based devices is possible, so if you want to transfer photos from your iPad to iPhone or one iPhone to another, you might not even need to use the SD card to do so! Which way you find the most suitable, we leave the decision to you, because in the end, they are all equally efficient when it comes to just one task: picture transfer. You can now complete your task, and remember: when it comes to pictures, there are things more valuable and a lot heavier than just a few bytes. Back up those wonderful moments because you do not want to lose them. You can eventually drop your SD card somewhere out, without knowing it.


iPad Tips & Tricks
- Make Use of iPad
- iPad Tips and Tricks
- Can iPad Pro Replace Laptop
- Smart Keyboard Folio VS. Magic Keyboard
- iPad Photo Transfer
- Transfer Music from iPad to iTunes
- Transfer Purchased Items from iPad to iTunes
- Delete iPad Duplicate Photos
- Download Music on iPad
- Use iPad as External Drive
- Transfer Data to iPad
- Transfer Photos from Computer to iPad
- Transfer MP4 to iPad
- Transfer Files from PC to iPad
- Transfer Photos from Mac to ipad
- Transfer Apps from iPad to iPad/iPhone
- Transfer Videos to iPad without iTunes
- Transfer Music from iPad to iPad
- Transfer Notes from iPhone to iPad
- Transfer iPad Data to PC/Mac
- Transfer Photos from iPad to Mac
- Transfer Photos from iPad to PC
- Transfer Books from iPad to Computer
- Transfer Apps from iPad to Computer
- Transfer Music from iPad to Computer
- Transfer PDF from iPad to PC
- Transfer Notes from iPad to Computer
- Transfer Files from iPad to PC
- Transfer Videos from iPad to Mac
- Transfer Videos from iPad to PC
- Sync iPad to New Computer
- Transfer iPad Data to External Storage
Daisy Raines
staff Editor