How to Root Galaxy Tab 2 7.0 P3100/P3110/P3113 Using CF-Auto-Root
Mar 07, 2022 • Filed to: All Solutions to Make iOS&Android Run Sm • Proven solutions
Preparations Before Rooting
Before rooting Galaxy Tab 2 7.0 P3100/P3110/P3113, please make sure this before you start:
1) You have more than 80% battery on your device.
2) You have backed up the important data on your device. Check how to backup Android files to PC.
3) You accept it that rooting will void your warranty.
How to Root Galaxy Tab 2 7.0 P3100/P3110/P3113 Using CF-Auto-Root Manually
This tutorial is only for devices below:
Samsung Galaxy Tab 2 7.0 P3100
Samsung Galaxy Tab 2 7.0 P3110
Samsung Galaxy Tab 2 7.0 P3113
If you don't use any of them, don't follow this guide to root your device. Or it will be damaged. Just search for another guide suitable for it.
Download Android Root tools for the rooting process
1. Download the CF-Auto-Root package below for your device.
CF-Auto-Root-espressorf-espressorfxx-gtp3100.zip (for P3100)
CF-Auto-Root-espressowifi-espressowifiue-gtp3113.zip (for P3113)
CF-Auto-Root-espressowifi-espressowifixx-gtp3110.zip (for P3110)
Step 1. Extract the CF-Auto-Root file and you'll see a .tar file. Leave it alone and go to the next step.
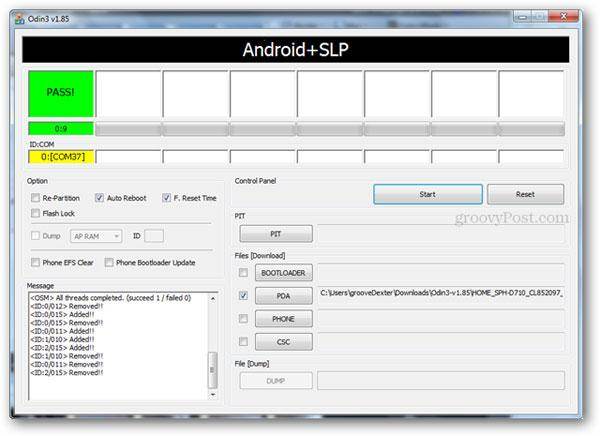
Step 2. Extract the Odin3 file, and then you'll see a .exe file. Double click to run it on your computer.

Step 3. Tick off the box in front of PDA on the window of Odin3, and then browse to select the .tar file and load it in.
Step 4. Then check the boxes of Auto-Reboot and F.Reset Time, leaving the Re-Partition box unchecked.
Step 5. Now Switch off your device. Then press the Power + Volume Down buttons together for about a few seconds until you see the warning message appearing on the screen, and then press the Volume Down button. Wait till your device is restarting in Download mode.
Step 6. Get your device connected to the computer with a USB cable. When the Odin3 detects your device, you'll see a yellow-highlighted port under the ID:COM. Then move forward.
Note: If you didn't see the yellow-highlighted port, you should install the USB drivers for your device.
Step 7. Click the Start button in the Odin3 to begin rooting your device now. Don't disconnect your device during this process. It will cost you a little while. When it completes, you can see a PASS! message on the window. Then your device will restart by itself, and the whole rooting process is over. You're free to do whatever you want now.
Android Root
- Generic Android Root
- Samsung Root
- Root Samsung Galaxy S3
- Root Samsung Galaxy S4
- Root Samsung Galaxy S5
- Root Note 4 on 6.0
- Root Note 3
- Root Samsung S7
- Root Samsung J7
- Jailbreak Samsung
- Motorola Root
- LG Root
- HTC Root
- Nexus Root
- Sony Root
- Huawei Root
- ZTE Root
- Zenfone Root
- Root Alternatives
- KingRoot App
- Root Explorer
- Root Master
- One Click Root Tools
- King Root
- Odin Root
- Root APKs
- CF Auto Root
- One Click Root APK
- Cloud Root
- SRS Root APK
- iRoot APK
- Root Toplists
- Hide Apps without Root
- Free In-App Purchase NO Root
- 50 Apps for Rooted User
- Root Browser
- Root File Manager
- No Root Firewall
- Hack Wifi without Root
- AZ Screen Recorder Alternatives
- Button Savior Non Root
- Samsung Root Apps
- Samsung Root Software
- Android Root Tool
- Things to Do Before Rooting
- Root Installer
- Best phones to Root
- Best Bloatware Removers
- Hide Root
- Delete Bloatware


James Davis
staff Editor