How to Backup Apps and App Data on iPhone
Mar 07, 2022 • Filed to: Backup Data between Phone & PC • Proven solutions
Backing up your iPhone apps is as simple as backing up your contacts, messages, videos and music files. Though simple, the procedure on how to backup apps on iPhone can be a bit different when compared to backing up other iPhone-related files.
With me, I have two methods on how to backup apps on iPhone. Both of these methods are free to use and hence you shouldn't be worried about paying an extra dollar. However, we need to have an external program to enable us to backup our apps efficiently in our PC or Mac.
- Part 1: How to Backup iPhone Apps for Free
- Part 2: How to Backup iPhone App Data to PC or Mac
- Part 3: Comparison Between iTunes Backup and Dr.Fone Backup
Part 1: How to Backup iPhone Apps for Free
In our first method, we're going to use the iTunes to backup iPhone apps. It's highly advisable to have an active iTunes account.
Step 1: Launch iTunes Account
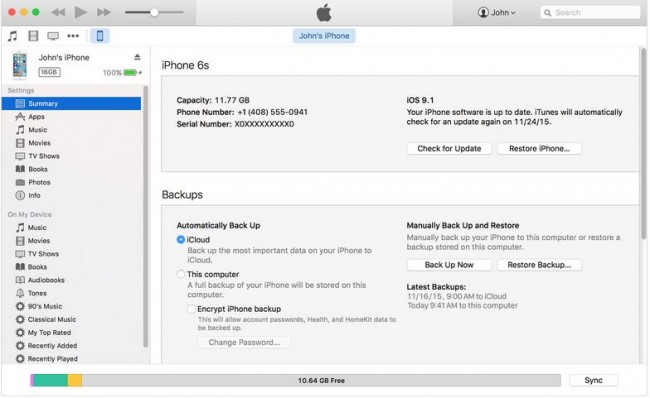
To backup your apps, you need to have an active iTunes account. Log into your account and connect your iPhone device. Depending on how you have arranged your iTunes account, you are going to get something that looks like the screenshot below.
Step 2: Open iPhone Apps
On your iTunes interface, locate the "Apps" icon under the "Summary" icon. Click on it to open up a list of all your apps present in your phone as illustrated in the screenshot below. Keep in mind that the icon arrangement may differ from one version to another. At the top of your interface, click on the "File" tab. This action is going to display a drop down list. From this list, click on the "Devices" tab and another drop down list with different directions will open up. Click on the "Transfer Purchases" tab.
Step 3: Confirm iPhone Apps
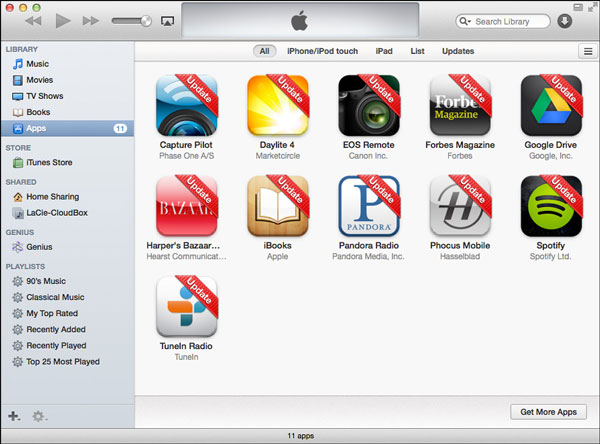
A list of all your apps will be displayed on your interface as illustrated below.
Step 4: Move iPhone App
On your list of apps, locate the "Capture Pilot" app and right click on it. You can however choose any other app that you want to backup first. A new command of instructions will be displayed. Click on the "Show in Finder" tab as illustrated below.
Step 5: Create a Backup Plan
This action will open up a new interface where you'll be required to create a new backup folder on your device where you'll save the app. You can create your backup folder anywhere in your device. The choice is all yours. Repeat the same procedure to each and every app. In our example, you can see that the "Capture Pilot" app is under the "Mobile Applications" folder. Just like that, you have your apps well backed-up.
Part 2: How to Backup iPhone App Data to PC or Mac
Dr.Fone - Phone Backup (iOS) is a great program from Wondershare that gives you the ability to backup iPhone apps each and every time you feel like. Since this program comes with a handful of features, the iOS Data Backup & Restore feature is our main point of concern when it comes to how to backup iPhone apps and app data. It allows you to selectively backup and export WhatsApp, Kik, Viber and many other apps' photos, videos and documents.
Step 1: Launch Dr.Fone
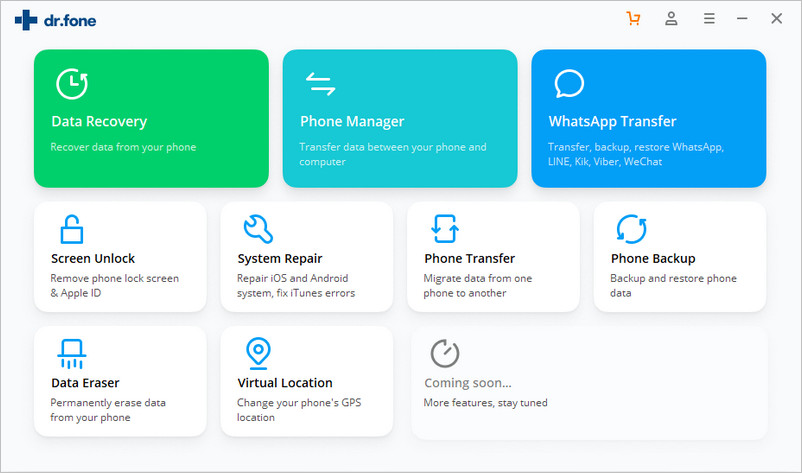
Download, install and launch Dr.Fone on your computer. Once, launched, click the "Phone Backup" on the interface.
Step 2: Connect your iPhone to your PC
Once, the new interface opens up, connect your iPhone to your computer using its USB cable.
Step 3: Confirm Backup Data
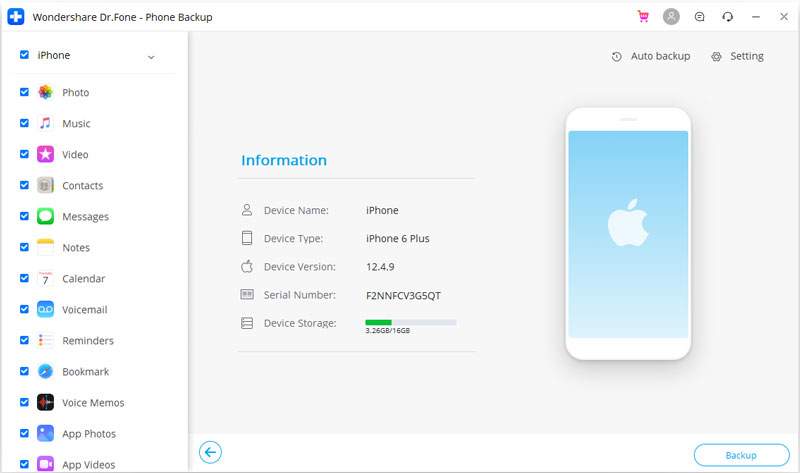
Select the "iOS Data Backup and Restore" option to initiate the backup process. A new interface with a list of all your files will pop out. Check the box next to the "Messages and Attachments", "WhatsApp and Attachments", "App Photos", "App Videos", "App Documents" and "Photos". Once you're satisfied with what you see, click on the "Backup" icon to initiate the backup process.
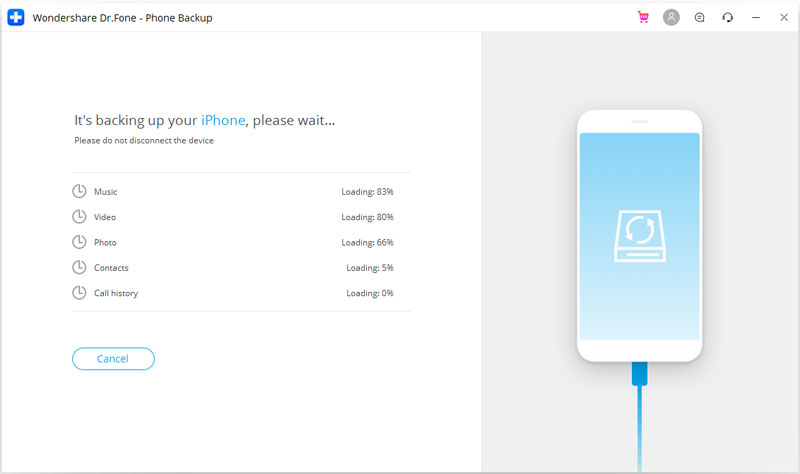
Step 4: Monitor Backup Progress
The amount of time required to complete the backup process solely depends on the amount of data present in your phone. Dr.Fone also gives you the opportunity to monitor the backup process via its interface.
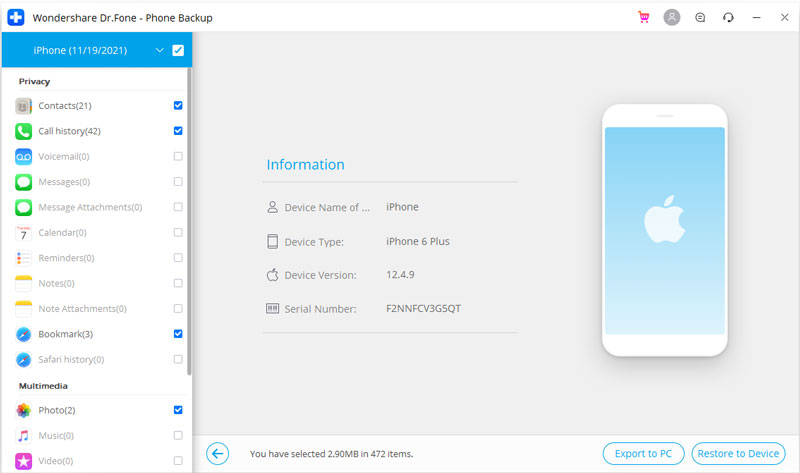
Step 5: Confirm Backup Point
Once the backup process is over, choose each and every file that we want to backup and once we're done, we're going to click on the "Export to PC" icon located below our screen.
Part 3: Comparison Between iTunes Backup and Dr.Fone Backup
Though both of these methods are exceptionally excellent when it comes to backing up your iPhone, a difference is clearly visible.
In our first method, you must have an active iTunes account to create a backup plan. Though this method is free to all iTunes and Apple users, it can be a bit problematic to some users you may find it tiring to create a backup plan. In our second approach, we only need to have an external program to create a backup. This method is simple to use as compared to our first method.
The safety of your data is not guaranteed in the first method as compared to our second method. We can attribute this to the fact that we have heard of hacking incidences affecting a good number of Apple users. In such situations, some users usually end up losing their valuable data to hackers.
In our first method, we have to move one app at a time as compared to our second method where the entire apps are moved at once.
Backing up any type of information is no doubt a must do to each and every person who operates a smartphone and more specifically an iPhone. Individuals who fail to create a backup plan always end up losing more precious information as compared to those who create backup plans.
In this article, we have clearly seen the importance as well as the methods employed to backup iPhone apps and data. From the above two methods on how to backup iPhone apps, it's clear to see that the procedures don't require any form of technologically genius to undertaken them. I hope that you have learned enough tricks, tips and methods on how to backup iPhone apps from this article.
iPhone Backup & Restore
- Backup iPhone Data
- Backup iPhone Contacts
- Backup iPhone Text Messages
- Backup iPhone Photos
- Backup iPhone apps
- Backup iPhone Password
- Backup Jailbreak iPhone Apps
- iPhone Backup Solutions
- Best iPhone Backup Software
- Backup iPhone to iTunes
- Backup Locked iPhone Data
- Backup iPhone to Mac
- Backup iPhone Location
- How to Backup iPhone
- Backup iPhone to Computer
- iPhone Backup Tips


Alice MJ
staff Editor