The Definitive Guide to Import Photos from Android to Windows 10: 5 S
Android Transfer
- Transfer From Android
- Transfer from Android to PC
- Transfer Pictures from Huawei to PC
- Transfer Pictures from LG to Computer
- Transfer Photos from Android to Computer
- Transfer Outlook Contacts from Android to computer
- Transfer from Android to Mac
- Transfer Photos from Android to Mac
- Transfer Data from Huawei to Mac
- Transfer Data from Sony to Mac
- Transfer Data from Motorola to Mac
- Sync Android with Mac OS X
- Apps for Android Transfer to Mac
- Data Transfer to Android
- Import CSV Contacts to Android
- Transfer Pictures from Computer to Android
- Transfer VCF to Android
- Transfer Music from Mac to Android
- Transfer Music to Android
- Transfer Data from Android to Android
- Transfer Files from PC to Android
- Transfer Files from Mac to Android
- Android File Transfer App
- Android File Transfer Alternative
- Android to Android Data Transfer Apps
- Android File Transfer Not Working
- Android File Transfer Mac Not Working g
- Top Alternatives to Android File Transfer for Mac
- Android Manager
- Seldom-Known Android Tips
Mar 26, 2022 • Filed to: Data Transfer Solutions • Proven solutions
When was the last time you used a DSLR? That’s right, the cameras in our mobile phones have grown by leaps and bounds to a level today where most of us do not feel the need to use a DSLR to take stunning family photos and portraits. Shooting high definition 4K videos has become a child’s play. Add to this the benefit of dedicated selfie cameras and software optimizations and hacks the new phones bring year after year to advance our experience, most of us do perfectly well with possessing a smartphone with a great camera. As our interaction and dependence on our phones grow, now more than ever, we need ways to manage the data on our phones seamlessly, reliably, and securely. Arguably, besides the contacts in our phones (who remember phone numbers now, anyway?) the most cherished data on our phones today are our photos. So what are the smartest ways to import photos from Android to Windows 10?
- I. The Best Way To Import Photos From Android To Windows 10: Dr.Fone
- II. Download Android Photos to Windows 10 Using File Explorer
- III. Import Pictures from Android to Windows 10 Using Dropbox
- IV. Transfer Photos From Android To Windows 10 Using Microsoft Photos
- V. Import Photos from Android to Windows 10 Using OneDrive
I. The Best Way To Import Photos From Android To Windows 10: Dr.Fone
Dr.Fone - Phone Manager (Android) is a cross-platform suite designed to manage your Android (and even iOS) devices on Windows 10 (and macOS). This is the most feature-rich, most powerful, most comprehensive suite of tools out there to perform a number of activities on your phone. It is the smartest and easiest way to import and download photos from Android to Windows 10.

Dr.Fone - Phone Manager (Android)
Transfer Data Between Android and Mac Seamlessly.
- Transfer photos, videos, music from Android to Windows
- Install, uninstall app APKs on Android directly from Windows
- Access and manage internal storage, file, and folder system on Android directly from Windows
- Restore iCloud Photos to Android using Windows
Step 1: Connect your phone to the laptop using a USB cable
Step 2: Launch Dr.Fone and let it detect your phone

Step 3: Click on Photos from the six tabs at the top
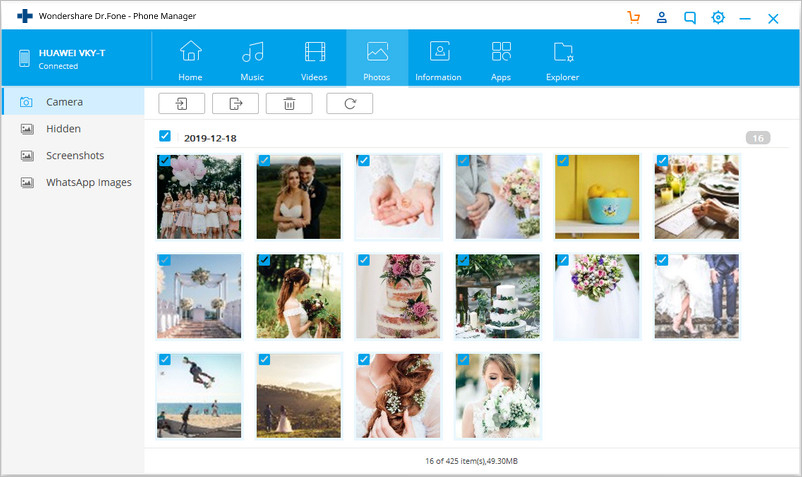
Step 4: You will see a list of albums on the left-hand side and the right will be shown thumbnails of photos in the selected album. Click on any album you want to transfer photos from Android to Windows 10 from.
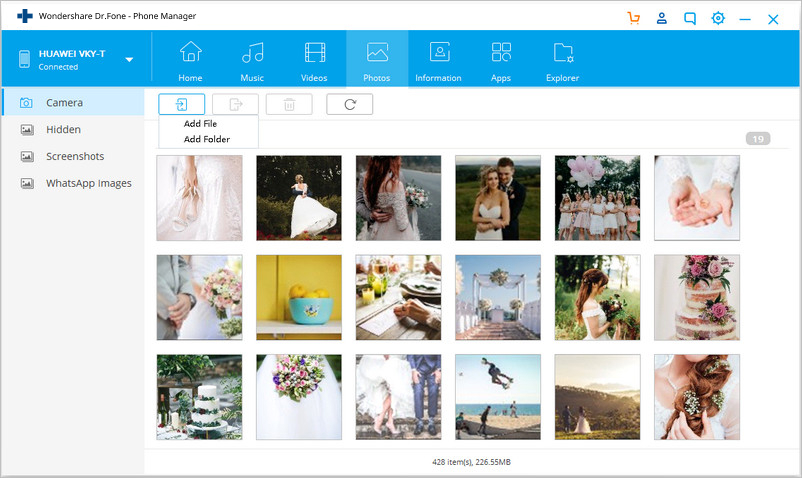
Step 5: Select the photos you want to transfer from Android to Windows 10 and then click the button at the top with an arrow pointing outward - that is the Export button
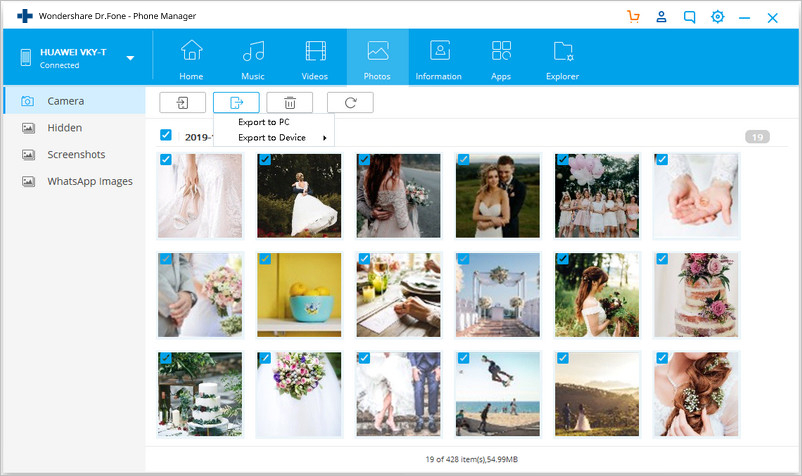
Step 6: Select Export to PC from the options presented. This will bring up another window where you will need to choose where to export the photos
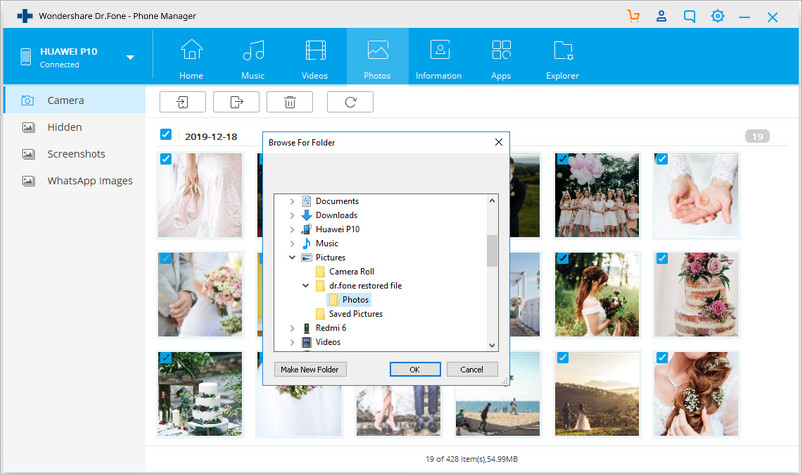
Step 7: Choose where to export photos and click OK to confirm and export photos from Android to Windows 10 using Dr.Fone - Phone Manager (Android).
Dr.Fone is capable of doing a lot more. Use the same steps as above to transfer music and videos from Android to Windows 10. You can install/ uninstall apps as well as access the file system using the Explorer tab to interact with Android’s internal storage directly.
II. Download Android Photos to Windows 10 Using File Explorer
Just as Finder is to macOS in the Apple world, File Explorer is to Windows 10 in Microsoft world. It allows you to navigate the contents of your disk drive and is at the heart of your operating system user experience. You use it every day and are familiar with it already. You use it to access your USB drives, your internal drives, your documents, and everything else on your disk drive every day. Microsoft has built a surprising amount of functionality in File Explorer, and as such, you can use File Explorer to transfer photos from Android to Windows 10 rather easily, if you do not mind the severely limited functionality and zero album management capabilities when using File Explorer to transfer Android photos to Windows 10. There is a far better way to transfer photos from Android to Windows 10 using another Microsoft software that is available free of cost in Windows 10, and we will get to that in part IV.
Step 1: Unlock your Android
Step 2: Connect it to Windows using a USB cable
Step 3: Using the dropdown menu on your phone to access USB settings, set your USB preferences to File Transfer
Step 4: Wait for Windows to detect the phone
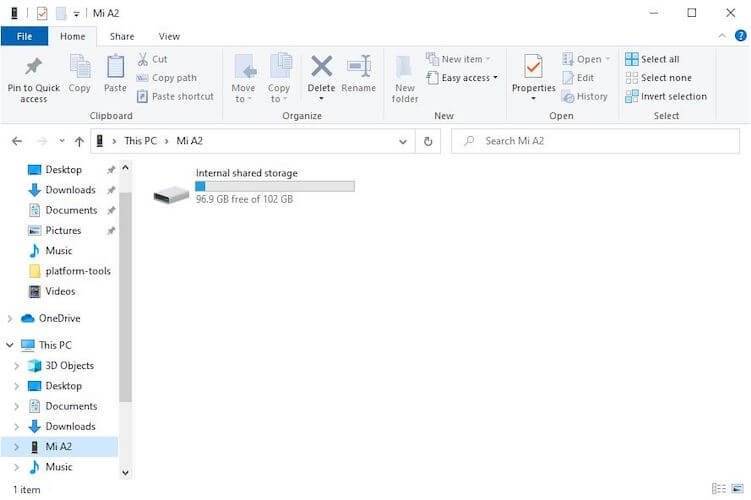
Step 5: On detection, a window like above will pop up. Double-click Internal Shared Storage
Step 6: Locate the DCIM folder and open it
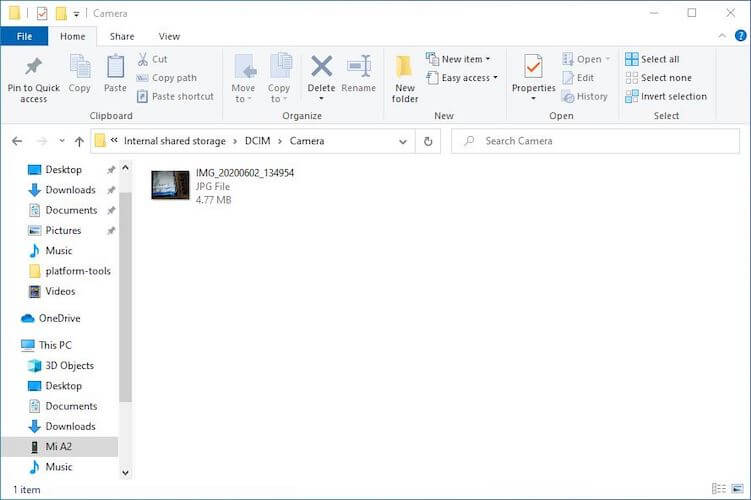
Step 7: In the Camera folder inside DCIM, you will see all your photos taken from your camera
Step 8: Select any or all and copy them to your desired location on your Windows computer.
This method does not take care of the organization, it only lets you transfer all photos taken from your camera on your phone.
III. Import Pictures from Android to Windows 10 Using Dropbox
Importing photos from Android to Windows 10 using Dropbox requires two parts, the first part wherein you upload your photos to Dropbox and the second where you download photos on Windows 10. Also, Dropbox has a small storage limit of 2 GB by default, so you won’t be able to transfer too many of your photos sustainably using Dropbox long-term.
Uploading Photos to Dropbox On Android
Step 1: Install Dropbox if you don’t have it already and sign in or create a new account
Step 2: Open Google Photos on your phone
Step 3: Select the photos you want to transfer to Windows
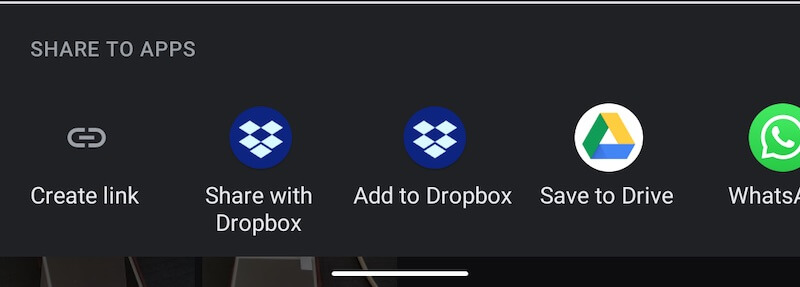
Step 4: Tap Share and tap Add to Dropbox option. Photos will be uploaded to Dropbox
Downloading Photos from Dropbox To Windows
Step 1: No need to download the Dropbox app, you can visit https://dropbox.com in a web browser on Windows and sign in to your Dropbox account
Step 2: Hover over the files you want to download and tap the empty square to the left of each of them
Step 3: If you have a single file, click the 3-dot menu button on the right and select Download. If you have multiple files, the default option will be to download.
IV. Transfer Photos From Android To Windows 10 Using Microsoft Photos
Windows 10 has a great, albeit basic tool to import and manage photos from USB devices, cameras, and phones. The tool is called Photos and it is baked into Windows 10.
Step 1: Connect your phone to Windows
Step 2: From the dropdown menu on Android, select USB options and check File Transfer
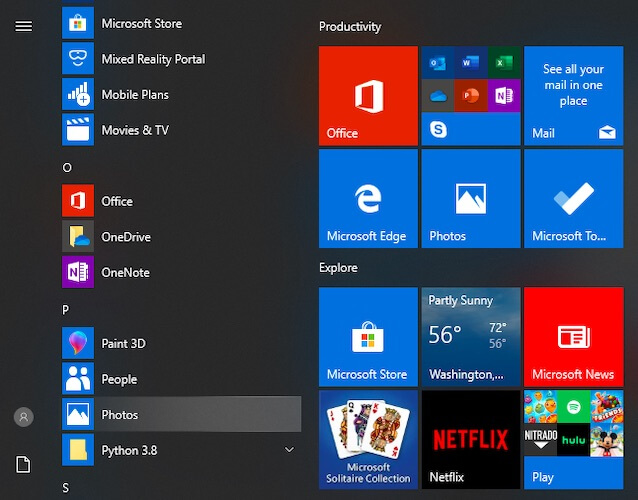
Step 3: Once the phone is detected in Windows as Internal Storage, Open Photos
Step 4: Select Import from the top-right and choose From a USB device
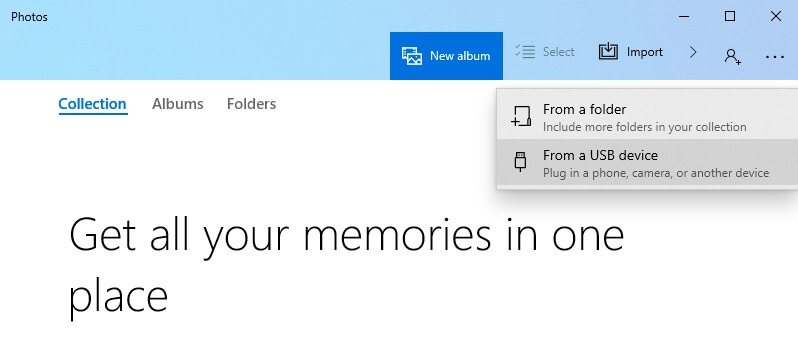
Step 5: Once the software detects and scans your phone, it will show you all available photos on your device for you to select and choose from to download to Windows.
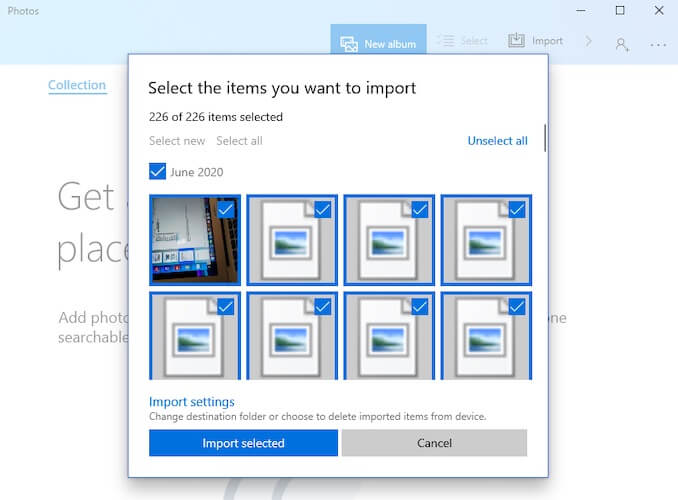
Once you click Import Selected, the files will be downloaded to Photos and you can create albums and perform basic management using Photos. This is not as elegant a solution as Dr.Fone - Phone Manager (Android) that lets you download from and to the smart albums in your device, but it can work for you if you want to dump photos from Android to your Windows 10 computer.
V. Import Photos from Android to Windows 10 Using OneDrive

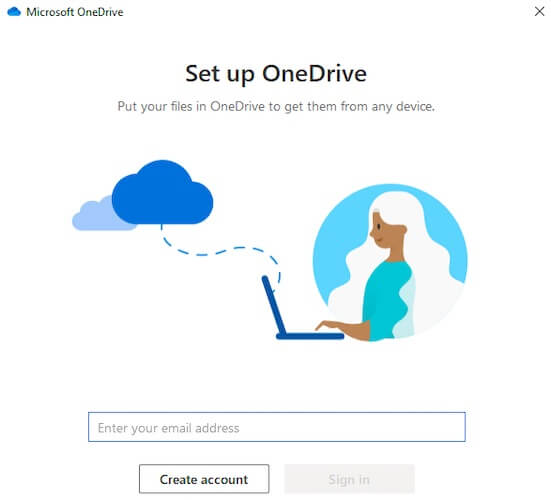
OneDrive is Microsoft’s cloud storage solution and every user gets 5 GB for free. OneDrive folder is easily available and perfectly integrated into Windows File Explorer, all you need to do is click on it and it will take you to your OneDrive, asking you to sign in if you aren’t already signed in. Importing photos from Android to Windows 10 using OneDrive is a two-part process, you upload to OneDrive on Android and download from OneDrive on Windows.
Uploading Photos from Android to OneDrive
Step 1: Install the OneDrive app on your phone from Google Play Store
Step 2: Sign in to your Microsoft Account or create a new account if you are a new user
Step 3: Go to Google Photos app on your phone and select the photos you want to transfer from Android to OneDrive

Step 4: Choose where to upload on OneDrive
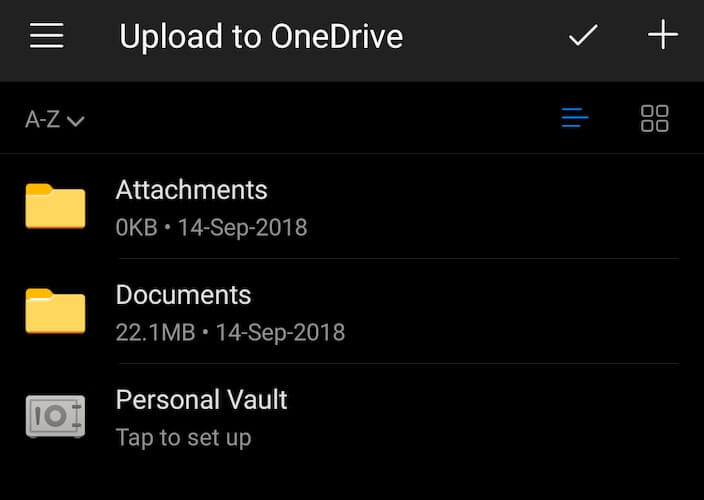
Step 5: Photos will upload to OneDrive
Downloading Photos From OneDrive On Windows
After you are done uploading photos to OneDrive on Android, it is time to download them on Windows.
Step 1: Open Windows File Explorer and select OneDrive from the left sidebar. Alternatively, use the Windows Start menu to look for OneDrive. Both lead to the same location in File Explorer.
Step 2: Sign in to your OneDrive using your Microsoft account if you are not already signed in
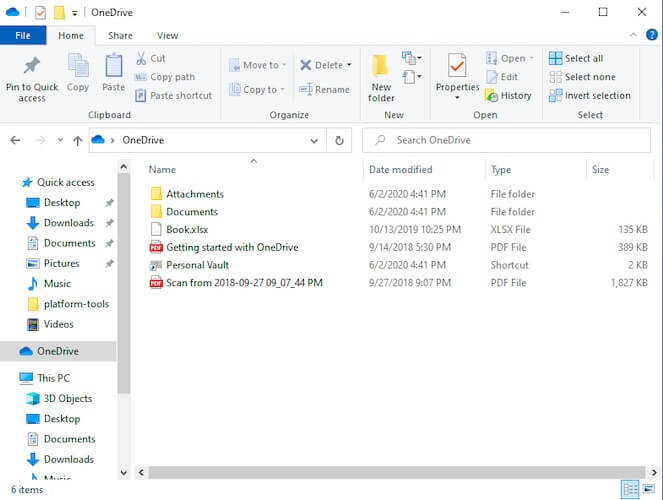
Step 3: Select and download files as you would any other files and folders in File Explorer.
Conclusion
There are several ways to transfer photos from Android to Windows 10. You can use the inbuilt File Explorer in Windows that does an OK job of getting your files off your Android device and onto your Windows PC. You can use File Explorer to directly access the Camera folder of your Android system where photos taken from the phone’s camera are stored. Then there is Microsoft Photos, which offers really basic photo management as well as allowing for another way to import and copy photos from Android to Windows 10. There are cloud-based tools such as Microsoft OneDrive that can take care of the odd file, it is not recommended to use as primary transfer method since it consumes data to upload from Android and then download to Windows PC. The same is the case with Dropbox.
By far, the best way to transfer photos from Android to Windows 10 PC is a third-party software suite called Dr.Fone. Dr.Fone’s Phone Manager (Android) is all you need to transfer photos quickly and reliably over USB, not needing any data, and the added advantage is that it can read smart albums in Android, helping you re-create the structure on Windows if you desire, while helping you pick and select the exact photos you want to transfer quickly. The software also helps you with videos, music, and apps, and you can use Explorer to access the Android file system, all in one place called Dr.Fone - Phone Manager (Android).


Alice MJ
staff Editor