How to Retrieve Photos from iCloud Backup on Mac or PC
Apr 28, 2022 • Filed to: Manage Device Data • Proven solutions
What happens when you lose your iPhone? You buy a new one. But with a brand-new phone comes a brand-new memory and all of a sudden you realize that you have lost that picture or the eBook you bought. Then again, you are a smart user and had backed up all your data on iCloud. Certainly, the question now arises, "how to retrieve photos from iCloud?"
Data is there, backed up in your cloud space but it needs to be restored to your new device. Losing a phone is simple (and also heartbreaking) but recovering lost data is quite tricky. Why blame you for no reason? Maybe you are simply switching to the latest version of iPhone but the problem of how to recover photos from iCloud remains.
So, if Apple lets you back your files up, it also has ways to help you retrieve them. Beside this, there are third party service providers, like Dr.Fone, which provides a much simpler way to achieve the same result. But first, find out what iPhone and iCloud’s designers did for you.
- Part 1: Apple’s way to recover photos from iCloud backup
- Part 2: Dr.Fone's way to retrieve photos from iCloud synced files
Part 1: Apple’s way to recover photos from iCloud backup
As soon as you create an account and log in to your iCloud account, Apple will give you 5GB of storage space free initially. More space will be available on purchase. With this now available, you can back up your entire phone’s contents into Cloud.
To retrieve your photos back from your previous device, you have to follow the following steps:
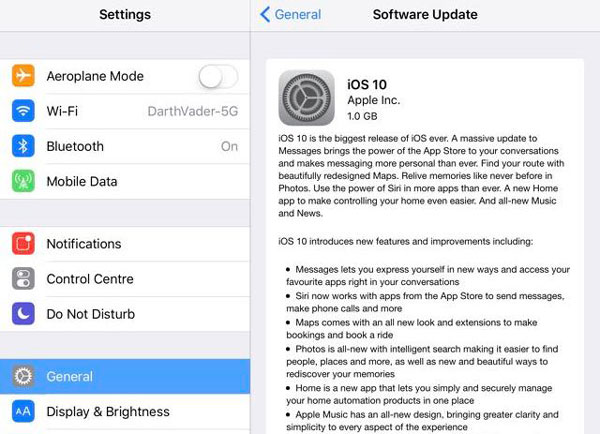
Step 1 Update your iOS if needed
Assuming that you have already had a backup file uploaded to iCloud, you will need to upgrade your OS first.
- • Go to Settings.
- • Tap on General.
- • Click on Software Update.
If an update is available, follow the installation steps and update your device. If no updates are available, simply skip on to the next step.
Step 2 Check for recent backup file
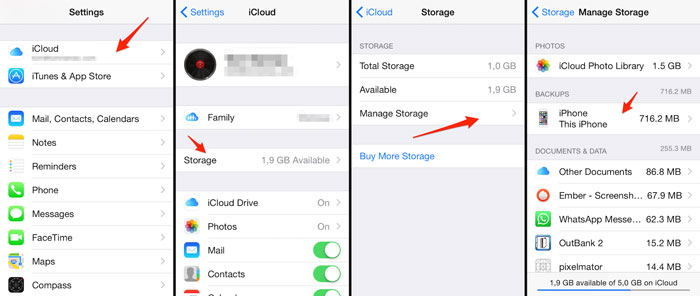
You need to decide which date and time you want your iPhone to go back in. For this,
- • Click on Settings.
- • Go to iCloud.
- • Tap on Storage.
- • Then on manage storage.
This tab will show you a list of backup files along with their date and time. Take a note of the most recent one. The next step is vital, so it is advisable that you create a backup of your current phone’s files while you are still in iCloud.
Step 3 Erase all contents and settings
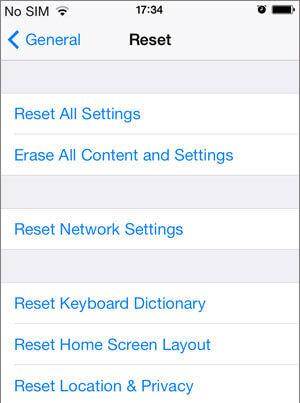
Yes, you have to erase the existing settings for your restoration to take effect.
- • Go to Settings.
- • Tap on General.
- • Click on Reset.
- • Tap on Erase All Content and Settings.
After your phone just severed all its previous ties, it’s now ready for restoration.
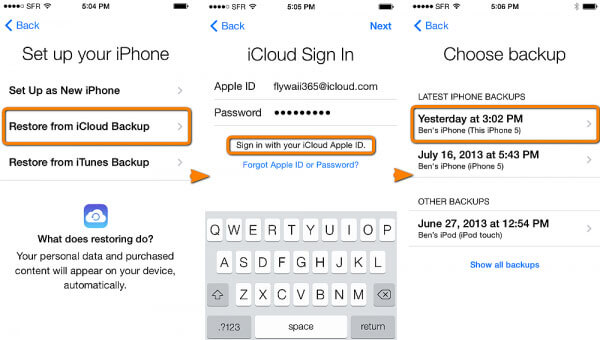
Step 4 Restore your iPhone
Sign into your iCloud account using the username and password. Click on the backup file you wish to restore to and give your device few minutes. The iPhone will reboot, and you will have your contents back.
So, what did you just do?
You just went through 4 hectic steps to retrieve photos from iCloud. If the phone is new, then restoring does not pose that much of a threat. But if you are trying to restore something on your already functioning phone, you may have to sacrifice your existing content for just a few pictures. Of course, you can back up again, and then you will have to follow the above steps all over again.
Too much work indeed! That is why you need services of Dr.Fone - Data Recovery (iOS), the third-party service provider who does all of these in a much easier fashion. In simpler words, if you want to only recover photos from iCloud, Dr.Fone allows you to do it without total restoration.
Part 2: Dr.Fone's way to retrieve photos from iCloud synced files
Dr.Fone - Data Recovery (iOS) is multi-platform data recovery software developed by Wondershare. It has compatible versions for both Mac and Windows OS and performs the recovery task in a few simple steps. Both iTunes and iCloud recovery can be achieved by using this software.
Dr.Fone will allow you to select and recover photos and videos from apps like VLC and Aviary, WhatsApp and Facebook messages, attachments, camera roll photos, calendar events, voice memos, Safari bookmarks and much more. Additional features of this software include:

Dr.Fone - Data Recovery (iOS)
Recover Photos from iCloud safely, easily & flexibly.
- Preview and selective restoration.
- Safe and simple to use. Dr.Fone will never remember your iCloud password.
- Export from iCloud directly to desktop along with printing features.
- Multiple file formats are supported.
- Compatibility with iPhone 13 version with iOS 15 ensured.
- Flexible to use as it’s compatible with all the latest versions of Windows and Mac.
How to retrieve photos from iCloud using Dr.Fone?
Certainly, the process is simpler. All you need to do is follow the next few steps (assuming you have already installed Dr.Fone on your PC):
Step 1. Launch Dr.Fone
If already installed, you will have to launch the software first to get started. A screen will pop up showing you three recovery options:
- • Recovering directly from the iOS device.
- • Recovery from iTunes.
- • Recovery from the iCloud synced files.
In that given order, along with the "More Tools" option.
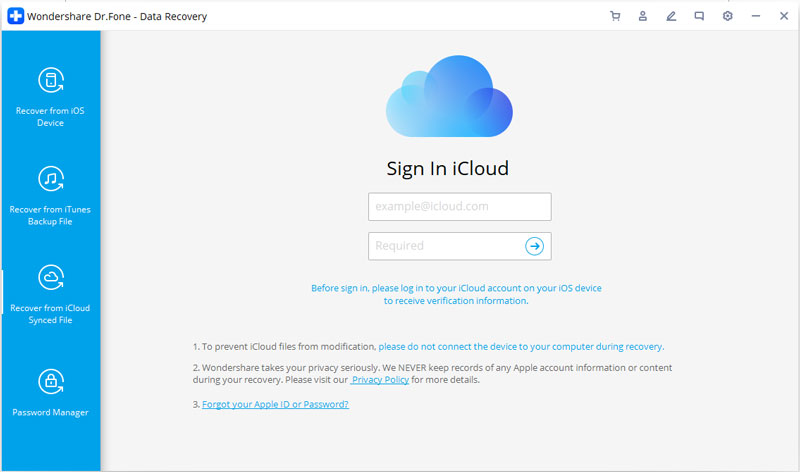
Step 2. Sign in to your account
Currently focussing on retrieving your photos back from iCloud only, click on "Recover from iCloud Synced Files." The other two options can also be used, though.
A login page will then open asking you to enter your iCloud account details. This process is completely safe, and password is stored nowhere.
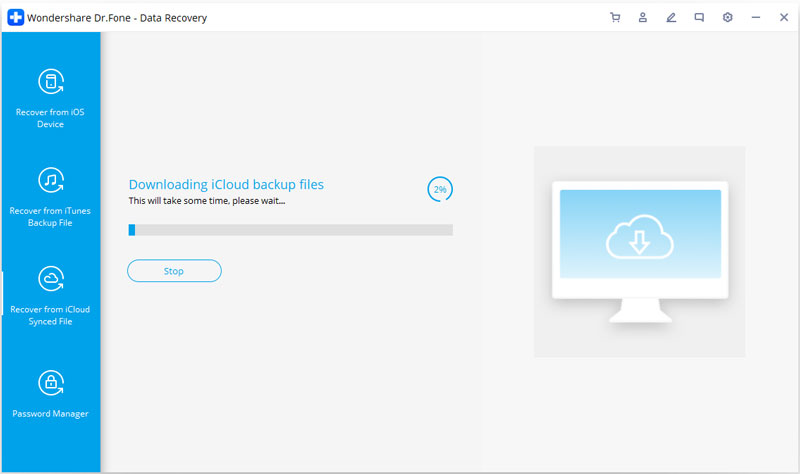
A list of backup files stored in your account will then appear. Choose the file from which you want to retrieve your photos and click on the download button. This will open a new tab.
Step 3. Retrieve photos from iCloud
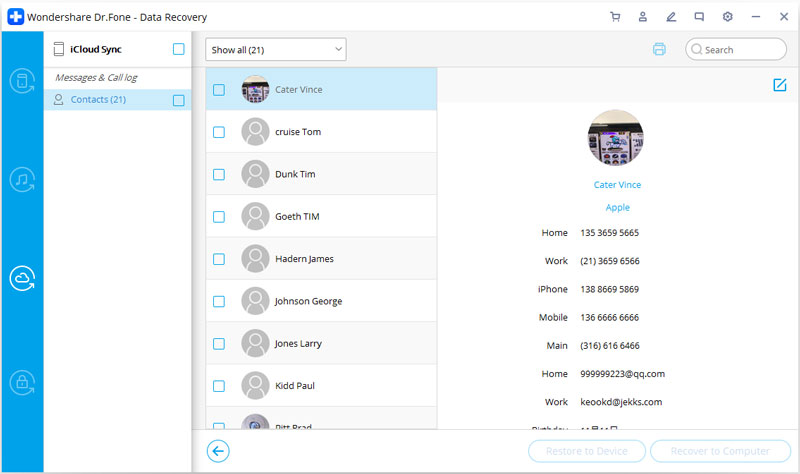
Click the "Download" button on the program to download the iCloud synced files for the pictures you need. After a few minutes, a list of photos in your two selected folders will open. You can scan through the pictures and choose the ones you want to restore.
After selection, click on the "Recover to Computer" button in the bottom right corner. This will ask for permission for the location of download. After selection hit the save button.
What did you achieve with Dr.Fone?
Four main things:
- 1. First, you just saved yourself from going through the whole lot of complexities involved with the Apple way.
- 2. Next, you retrieved only your pictures back without having to restore your entire phone’s status.
- 3. Third, you did not have to erase any existing data for restoring the previous content.
- 4. Last, it's way less hectic and time-consuming than Apple’s or any other method.
The selective recovery feature comes in handy when your backup files’ storage requirement is more than your device’s space availability. You can opt to download only those data which hold relevance now. Undoubtedly, Dr.Fone provides a much more dynamic and flexible method to retrieve photos from iCloud.
Final thoughts:
If iCloud is your storage room, Dr.Fone is the key to that door. A free trial version is now available on their official website along with the premium option. A few clicks are all you need to get all the data back.
iCloud Backup
- Backup Contacts to iCloud
- Backup Contacts to iCloud
- iCloud Backup Messages
- iPhone Won't Backup to iCloud
- iCloud WhatsApp Backup
- Backup Contacts to iCloud
- Extract iCloud Backup
- Access iCloud Backup Content
- Access iCloud Photos
- Download iCloud Backup
- Retrieve Photos from iCloud
- Retrieve Data from iCloud
- Free iCloud Backup Extractor
- Restore from iCloud
- iCloud Backup Issues


Selena Lee
chief Editor