[Barlanylan maslahatlar] Iphone-lary nädip aýyrmaly
28-nji aprel 2022 • Faýl: Enjamyň gulp ekranyny aýyryň • Subut edilen çözgütler
iPhones have held the contemporary market and have provided the world with exquisite handsets and devices containing state-of-the-art features and specifications for the world to savor. iPhone is considered among the most popular smartphone brands for many reasons. One effective reason that has been acknowledged and appreciated throughout the globe was the security protocol followed by Apple for its devices. Apple, known for providing its own operating system, covers its own security protocol that is concealed with its cloud service, iCloud. Apple constitutes its own Apple ID that provides distinctiveness to the device itself and allows the user to operate it properly. Apple ID, in simple words, is known for connecting the application interface with the data across the iPhone or iPad. This article particularly discusses the method to unlink iPhones from their older Apple IDs along with a detailed guide on how to unlink iPhones along with the associated data for paving a way to enter a new Apple ID for a similar device.
Bölüm 1. iPhonlary Apple ID-den parolsyz nädip aýyrmaly?
- You might have come across a variety of remedies that would have offered a mechanism to unlink iPhones from Apple ID. These remedies, however, users have their own downsides in the application. In such cases, third-party applications can provide impressive services in protecting your iPhone along with the completion of the operation. The selection of the most appropriate platform is yet necessary. For this, while believing the existing saturation of third-party platforms in the market, this article looks forward to introducing you to
- . Dr.Fone has ensured the best of services with its toolkit and has considered offering you unique services that would guide you in unlinking your iPhones properly. There are several reasons that allow Dr.Fone to outsmart major platforms in the market, which can be described as:
- You can easily unlock your iPhone by slipping it from memory.
- This platform provides you with effective tools that help you protect the iPhone from its disabled state.
- It can be used to unlock all kinds of iPhones, iPads, and iPod Touch.
- Compatible across the latest version of iOS.
- You do not require iTunes for unlocking your iPhone.
- Requires no technical expertise over its usage.
Dr.Fone can be referred to as the best option for unlinking iPhones from Apple ID; however, it is significant to understand its operation that would help you cater to the complete procedure with ease. The following step-by-step guidelines explain the complete function of unlinking the iPhone without a password using Dr.Fone – Screen Unlock (iOS).
Step 1: Download and Connect your Device
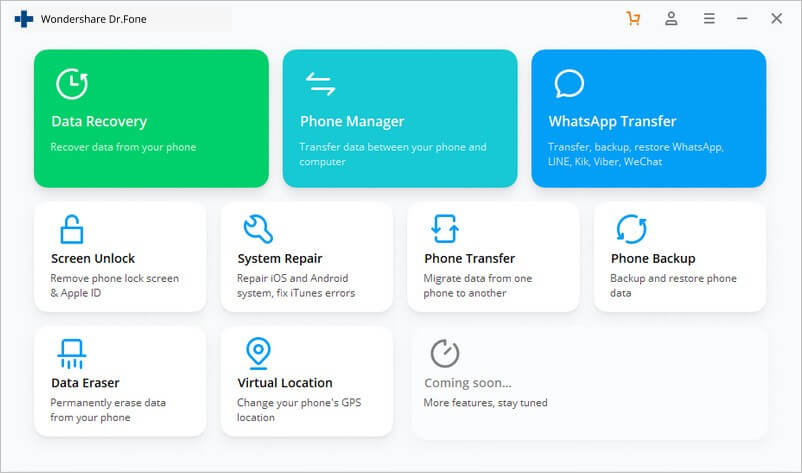
Download the original platform from the official website and install it over the desktop. Following this, connect your Apple device with the help of a USB cable and launch the platform. You need to select the ‘Screen Unlock’ feature that appears on the home interface of the platform.
Step 2: Initiate Process
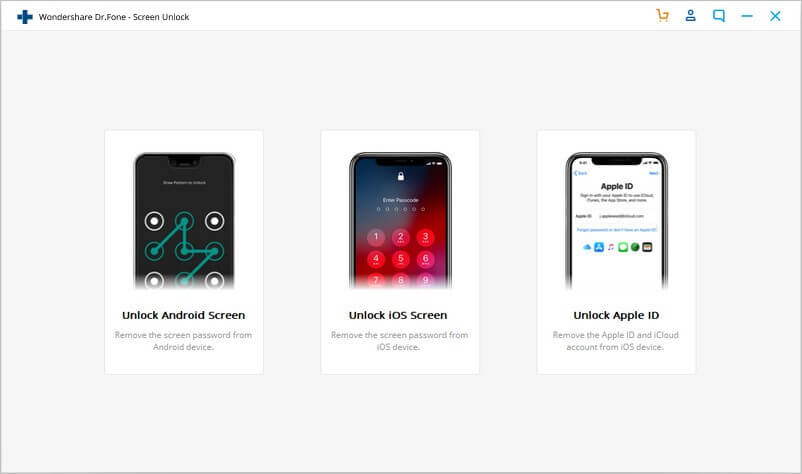
With a new screen on your front, you need to select the “Unlock Apple ID” feature from the provided options to start the procedure of unlinking your Apple ID from the device.
Step 3: Trust the Computer
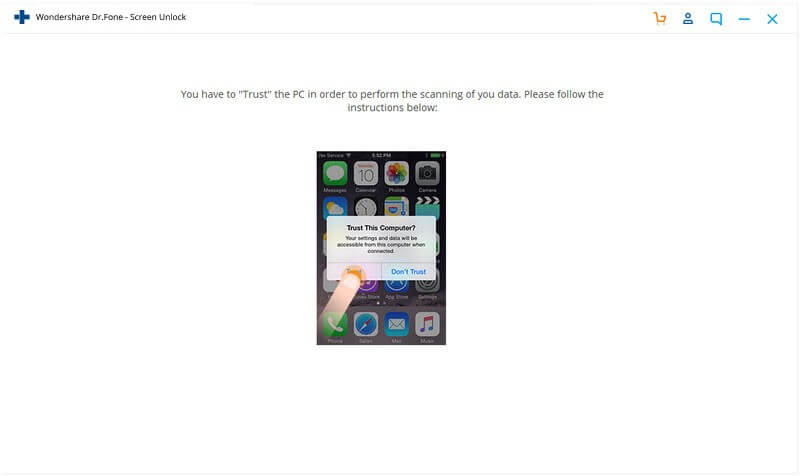
Over accessing your iPhone or iPad, you might have received notification over trusting the computer. Tap "Trust" on the pop-up and proceed.
Step 4: Reset your device
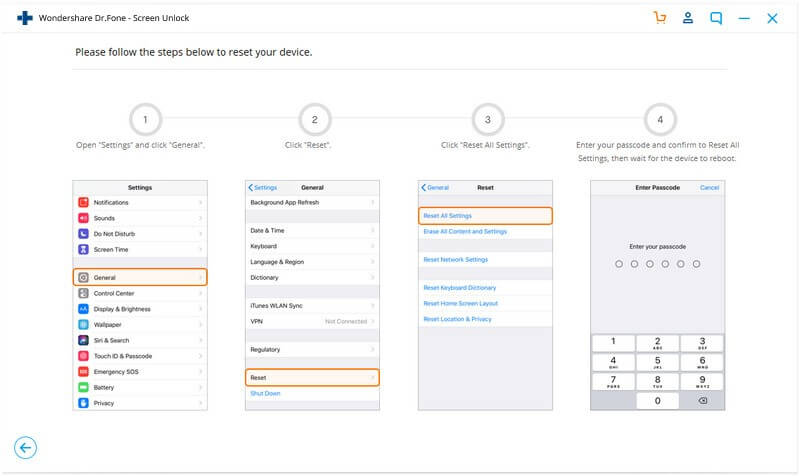
Enjamyň 'Sazlamalaryny' açyň we ekrandaky görkezmelere eýerip täzeden açmagy üstünlikli başlaň. Gaýtadan açmak prosesi gaýtadan açylandan soň derrew başlaýar.
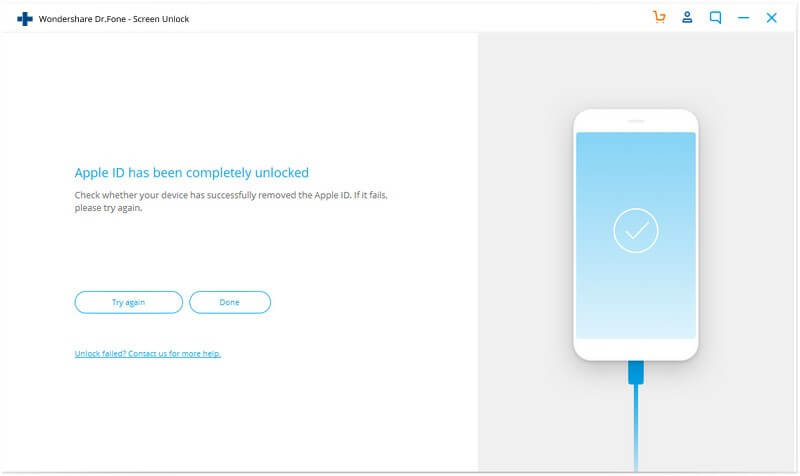
5-nji ädim: ýerine ýetiriş
Bu amal üstünlikli ýerine ýetirilýär we iş stoluňyzyň ekranynda gyssagly penjire görnüşinde görkezilýär. “Apple ID” enjamyňyzdan üstünlikli aýrylýar.
Bölüm 2. Enjamdaky iPhonlary nädip aýyrmaly?
“IPhone” -y “Apple ID” -den aýyrmak üçin kabul edip boljak köp sanly adaty usul bar. Iň ýaýran usullaryň arasynda “iPhone” -yň sazlamalaryna girmek mehanizmleriň iň aňsatsy hasaplanýar. Şeýle-de bolsa, netijeli ýapylmaly belli bir protokola eýerýär. Munuň üçin aşakdaky ýaly yglan edilen gollanmany ýerine ýetirmeli.
1-nji ädim: Giriş sazlamalary
Unlock your iPhone and open the "Settings" of the device. With a new screen on the front, you need to tap on the top of the screen, comprising of a tab that contains your name. Tap on the “iTunes & App Store” banner to proceed.
Step 2: Provide Apple ID credentials
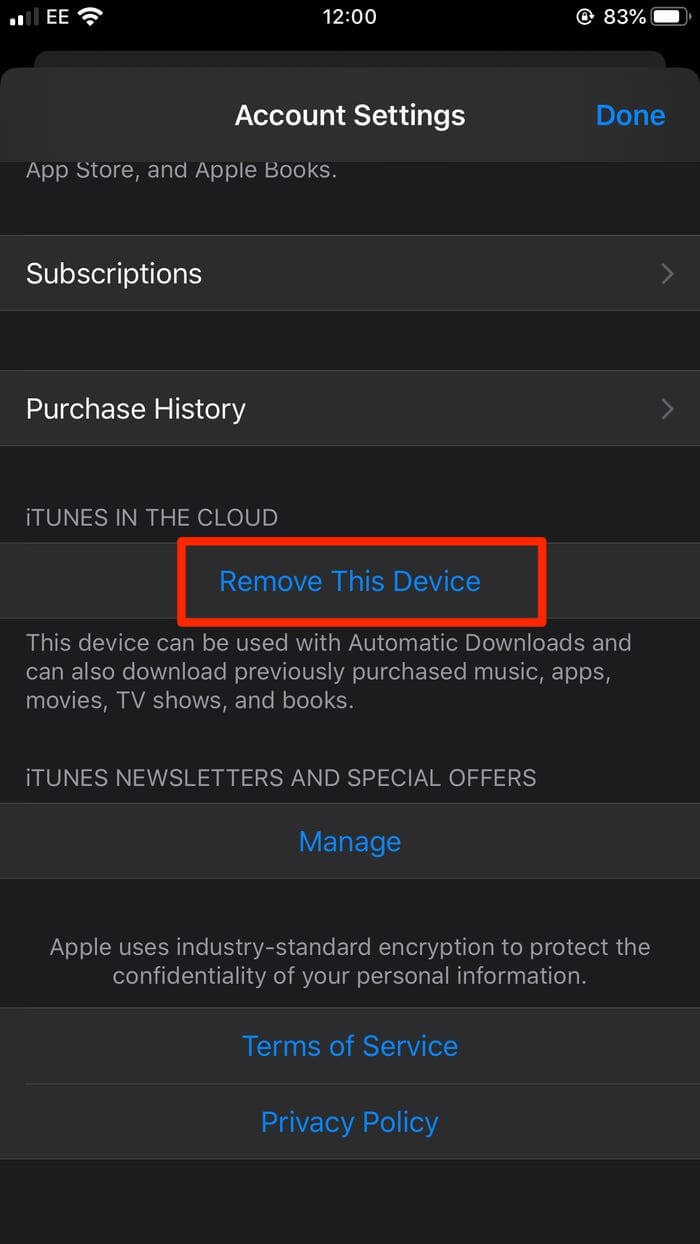
With a new window opened, you need to tap on the Apple ID and provide the appropriate password if inquired. After providing the password the ID, scroll down to the bottom of the window and tap on the option of “Remove This Device” in the “iTunes in the Cloud” section.
Step 3: Provide Credentials on Website
Degişli opsiýa degmek, bir pop-up arkaly daşarky Apple ID web sahypasyna girýär. Aşakdaky penjirede ulanyjy adyňyzy we parolyňyzy görkezmeli. Üstünlikli girişden soň, degişli ID bilen baglanyşykly enjamlaryň sanawyny açmak üçin "Enjamlar" -a basyň.
4-nji ädim: Enjamy aýyryň
“Apple ID” -den aýyrmak isleýän enjamyňyzy saýlamaly, soňra bolsa “iPhone” -yň “Apple ID” bilen baglanyşygyny tassyklamak üçin opsiýalaryň sanawyndan “Aýyr” saýlamaly.
Bölüm 3. “iTunes” -y ulanyp, “iPhone” -lary nädip aýyrmaly?
Göz öňünde tutulyp bilinjek başga bir adaty usul, degişli Apple ID-den iPhonlary aýyrmak üçin iTunes-dan peýdalanmakdyr. “iTunes” ulanyjylaryna maglumatlaryny netijeli dolandyrmaga mümkinçilik berýän dürli amaly goşundylary hödürleýän örän utgaşykly platforma diýlip atlandyryldy. Belli bir Apple ID-den iPhonlary aýyrmak barada aýdylanda, iTunes size dürli hyzmatlary ýerine ýetirip, aşakdaky ýaly düşündirilýän täsirli hyzmatlary berip biler:
1-nji ädim: “iTunes” -y iş stolunda açyň
Ilki bilen, iş stoluňyzda platforma gurmak möhümdir. Platforma göçürip alyň we iPhone-yňyzy Apple ID-den aýyrmaga dowam ediň.
2-nji ädim: Işletmek we dowam etmek
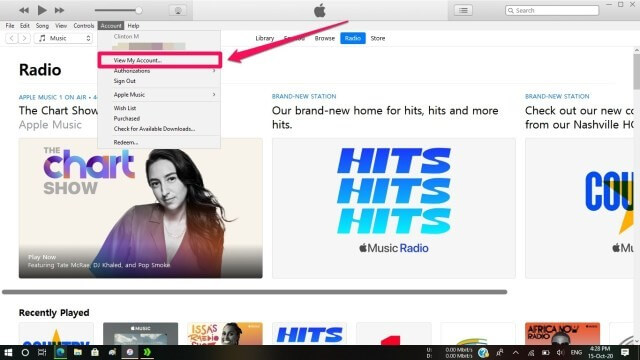
With the homepage of iTunes on your front, you need to tap on "Account," followed by the option of "View My Account" to log in with your Apple ID and its password. As soon as it authenticates itself, you will be directed to the next window.
Step 3: Find the Devices Connected
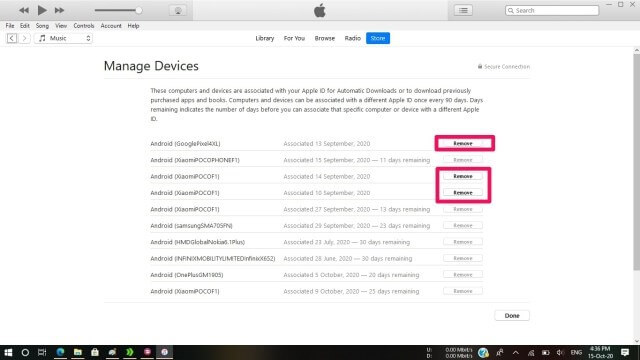
You need to hover across the option of “Manage Devices” from the list. This would open a series of different devices that have been connected across the specific Apple ID. Locate the device that you seek to unlink, and tap 'Remove' from the options that are provided. The device is successfully removed, and it's now disassociated with the Apple ID.
Bonus Tip: How to fix when it keeps receiving each other’s messages after unlinking iPhones?
Despite the fact that you successfully unlinked the iPhone from your previous Apple ID, there are still several cases that reported the receival of messages even after the complete execution of the unlinking procedure. There might be a slight chance that the Apple ID has been completely disassociated from the iPhone and is still connected with it somehow. For such cases, there are a few tests and confirmation that can be undertaken for efficiently confirming the unlinking of the device from the Apple ID. The basic cause for such a problem can be the iCloud, which is usually connected with the iMessage since a similar Apple ID is used for the feature. There are two different directions that can be covered by any user to counter this issue:
- Open the Settings of your iPhone and proceed towards selecting “Messages” from the options. Tap “Send & Receive” on the next window and locate your ID. Sign out the Apple ID and log in with a different credential.
- Similarly, you need to open the Settings of your iPhone and locate the “Messages” option from the list. Select “Send & Receive” from the next window and uncheck the email addresses showing the message “You can be reached by iMessage at:” across both devices.
You need to ensure that the similar Apple IDs are not connected over FaceTime, which would make the other user receive the other device’s FaceTime call.
Conclusion
Bu makalada, iPhon-y jikme-jik aýyrmagyň we amaly üstünlikli ýerine ýetirmek we Apple ID-ni belli bir enjamdan aýyrmak üçin dürli platformalarda synag edilip bilinjek dürli usullar bilen üpjün etmegiň usuly barada aýratyn pikir alyşyldy. Gatnaşýan proseduralara has gowy düşünmek üçin gollanmany gözlemeli.
iCloud
- iCloud açmak
- 1. “iCloud aýlaw gurallary”
- 2. “iPhone” üçin “iCloud Lock” -dan aýlaň
- 3. iCloud parolyny dikeltmek
- 4. “iCloud” işjeňleşdirmesini aýlaň
- 5. iCloud parolyny ýatdan çykardyňyz
- 6. “iCloud” hasabyny açyň
- 7. “iCloud” gulpuny açyň
- 8. “iCloud” işjeňleşdirmesini açyň
- 9. “iCloud” işjeňleşdirme gulpuny aýyryň
- 10. “iCloud Lock” -y düzediň
- 11. iCloud IMEI açmak
- 12. “iCloud Lock” -dan dynyň
- 13. “iCloud Locked iPhone” -yň gulpuny açyň
- 14. Jailbreak iCloud gulplanan iPhone
- 15. “iCloud Unlocker” ýüklemek
- 16. iCloud hasaby paroly ýok et
- 17. Öňki eýesiz işjeňleşdirme gulpuny aýyryň
- 18. Sim kartasyz işjeňleşdirme gulpuny aýlaň
- 19. Jailbreak MDM-i aýyrýarmy?
- 20. iCloud işjeňleşdirme aýlaw gurallary wersiýasy 1.4
- 21. Işjeňleşdirme serweri sebäpli “iPhone” -y işjeňleşdirip bolmaýar
- 22. “iPas Stuck” -y işjeňleşdirme gulpuna düzediň
- 23. IOS 14-de iCloud işjeňleşdirme gulpundan aýlaň
- iCloud Maslahatlary
- 1. “iPhone” -y ätiýaçlandyrmagyň ýollary
- 2. iCloud ätiýaçlyk habarlary
- 3. “iCloud WhatsApp” ätiýaçlyk nusgasy
- 4. “iCloud” ätiýaçlyk mazmunyna giriň
- 5. “iCloud” suratlaryna giriň
- 6. “iCloud” -y “Täzeden dikeltmezden” ätiýaçlykdan dikeldiň
- 7. “iCloud” -dan “WhatsApp” -y dikeldiň
- 8. Mugt iCloud ätiýaçlyk nusgasy
- Apple hasaby açyň
- 1. iPhonlary aýryň
- 2. Unlock Apple ID without Security Questions
- 3. Fix Disabled Apple Account
- 4. Remove Apple ID from iPhone without Password
- 5. Fix Apple Account Locked
- 6. Erase iPad without Apple ID
- 7. How to Disconnect iPhone from iCloud
- 8. Fix Disabled iTunes Account
- 9. Remove Find My iPhone Activation Lock
- 10. Unlock Apple ID Disabled Activation Lock
- 11. How to Delete Apple ID
- 12. Unlock Apple Watch iCloud
- 13. Remove Device from iCloud
- 14. Turn Off Two Factor Authentication Apple


Jeýms Deýwis
işgär redaktory
Umuman 4.5 baha berildi ( 105 adam gatnaşdy)