Samsung Galaxy S3-i maglumatlary ýitirmän nädip zawodda täzeden dikeltmeli
2022-nji ýylyň 7-nji marty • Iberilen: Android mobil meselelerini düzediň • Subut edilen çözgütler
Galaxy S3 is one of the most popular smartphones in the world. Produced by Samsung, it is used by plenty of Android users. Nevertheless, just like every other smartphone, you might face a persisting problem with this one as well. Restoring it to its factory setting might resolve a lot of issues. In this informative post, we will help you learn how to reset Samsung Galaxy S3 in different ways.
Part 1: Backup Galaxy S3 Before Reset
You might already know that after performing a factory reset on your device, you would end up losing its data. Therefore, it is always recommended to take a backup of your data before resetting it. Before you learn how to reset Galaxy S3, follow these easy steps and don’t lose your data in the process.

Dr.Fone - Android Data Backup & Resotre
Flexibly Backup and Restore Android Data
- Selectively backup Android data to computer with one click.
- Preview and restore backup to any Android devices.
- 8000+ Android enjamlaryny goldaýar.
- Uptiýaçlyk, eksport ýa-da dikeldiş wagtynda hiç hili maglumat ýok.
1. “Android Data Backup” -yň Dr.Fone gurallar toplumyny göçürip alyň we şu ýerden dikeldiň . Saýlaw ätiýaçlyk nusgasy bar we häzirki wagtda 8000-den gowrak dürli smartfon bilen utgaşýar.
2. Install the application on your system and launch it. You will get the following screen at first. Start by selecting the “Data Backup & Restore” option.

3. Now, connect your Samsung S3 to the system using a USB cable. Make sure that you have enabled the USB Debugging option on your phone already. Subsequently, the interface will recognize your phone. Select the option of “Backup” to commence the process.
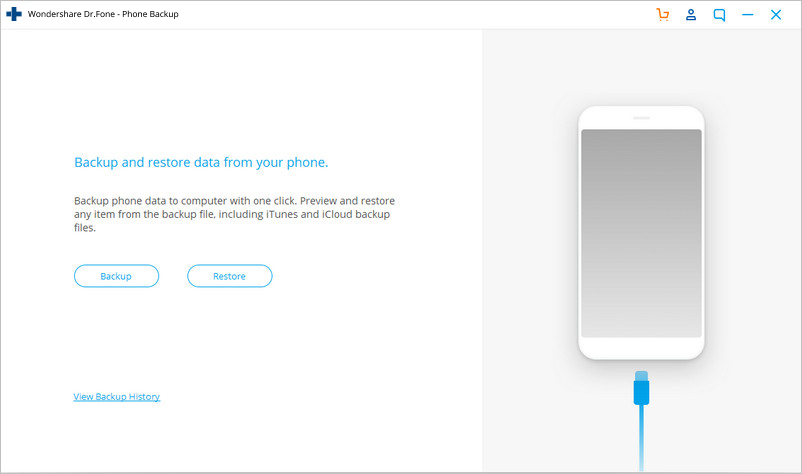
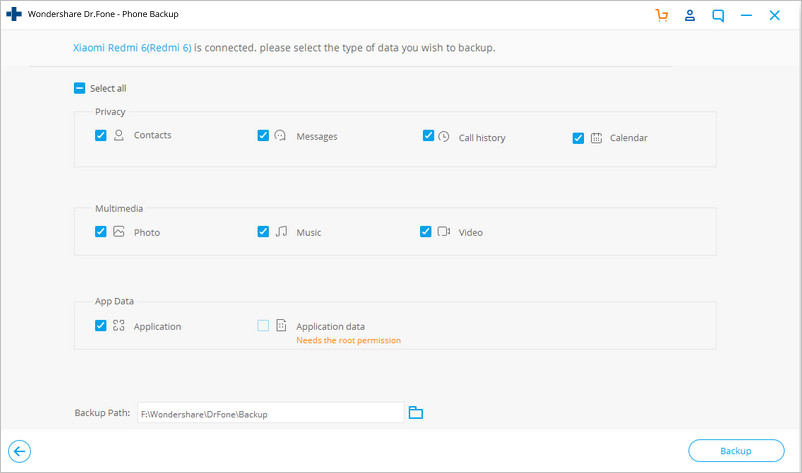
4. The interface will let you know the kind of files available for the backup. By default, all the options will be checked. You can simply select the kind of files you want to save before clicking the “Backup” button.
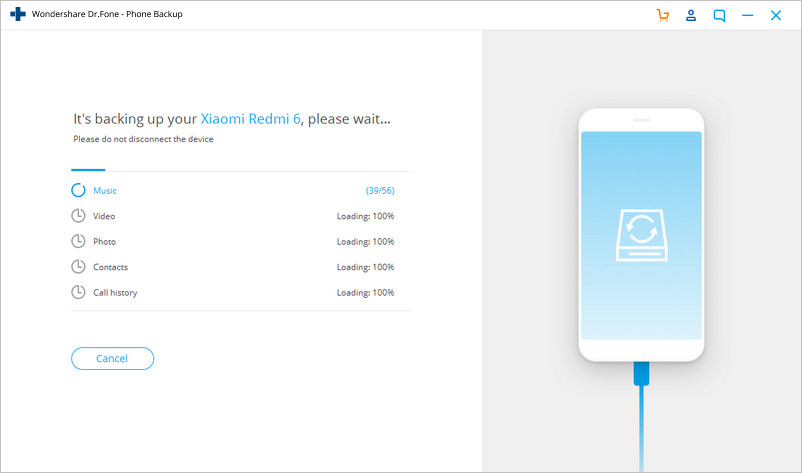
5. Dr.Fone will start taking the backup of your data and will let you know the real-time progress as well. Make sure that your device is connected during this phase.
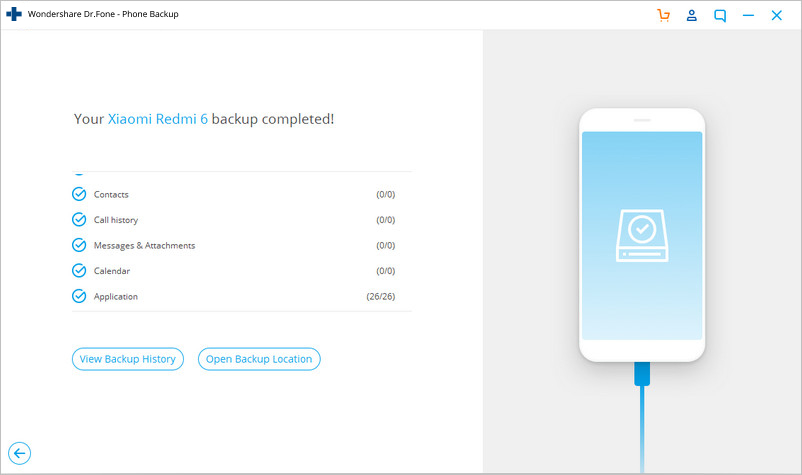
6. As soon as the backup is completed, you would be notified. Additionally, you can click on the “View the backup” option to see the newly saved files.
That’s it! All your data would be safe now. You can restore it easily after resetting your device. This is a crucial step to perform before learning how to factory reset Samsung Galaxy S3.
Part 2: Factory Reset Galaxy from the Settings Menu
This is probably the easiest way to reset your Android device and you won’t have to make a lot of effort to learn how to reset a Samsung Galaxy S3. If your device is responsive and is not depicting any problem, then you can easily restore it by visiting your phone’s setting menu. Just perform these simple steps and learn how to reset Samsung Galaxy S3 from the “Settings” menu.
1. Start by tapping the “Settings” menu option from the phone’s homescreen.
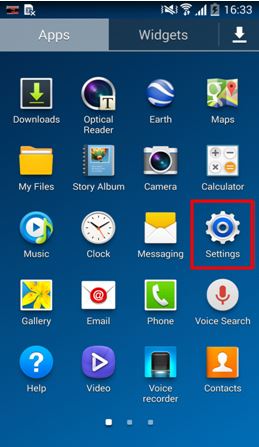
2. Go to the “General” tab and select the “Backup & Restore” option under the Accounts menu.
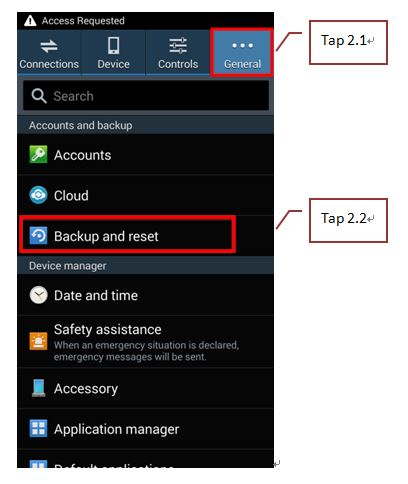
3. You would be given a list of several options. Just tap on the “Factory Data Reset” option now.
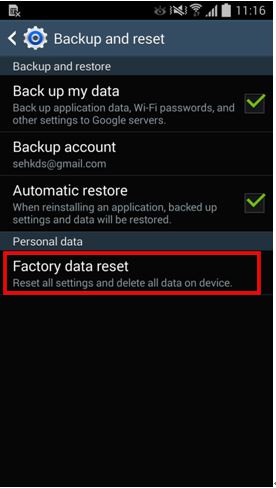
4. Your device will provide a list of all the accounts that are already synced. Just select the “Reset Device” option to commence.
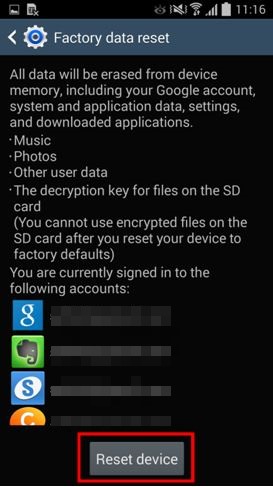
5. Lastly, the device will give you a warning before proceeding. Just tap on the “Delete all” option and your phone would commence the reset process.

Yes, it is really as simple as it sounds. Now when you know how to reset Galaxy S3, we are sure you would be able to resolve every kind of trouble related to your phone.
Part 3: Factory Reset Galaxy from the Recovery Mode
If your device is depicting any kind of an issue, then you can also learn how to factory reset Samsung Galaxy S3 by entering the recovery mode. After entering the recovery mode, you can perform a wide range of operations like fixing permissions, reformatting partitions, and more. In order to know how to reset a Samsung Galaxy S3, you need to first enter its recovery mode. This can be done by following these easy steps.
1. Start by switching off your phone. Wait for a few seconds before turning it to the recovery mode. Do this by pressing the Volume Up, Power, and the Home button at the same time.
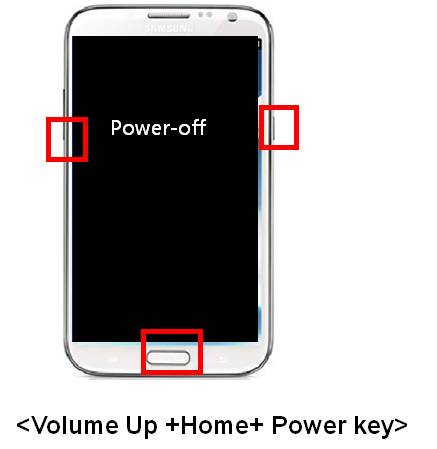
2. Wait for a while till your phone would vibrate and change its logo. It will be restarted in the recovery mode. Now, you can navigate using the Volume up and down button, and the Home button to select anything. Move to the “Wipe data/factory reset” option and select it. Additionally, you need to select “Yes” to Delete All User Data option.
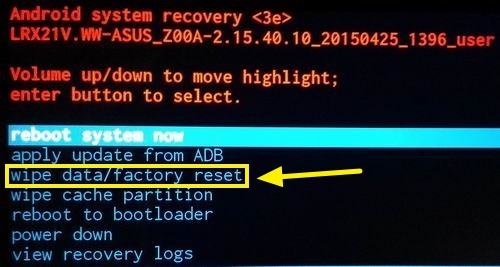
3. This would make your device reset entirely. Now, just select the “Reboot system now” option. Your device would be restarted after getting restored to its factory settings.

Great! Now when you know how to reset Samsung Galaxy S3, you can easily resolve a lot of issues related to your mobile.
Part 4: Factory Reset Galaxy S3 When Locked
By following the above-mentioned steps, you can easily learn how to reset Galaxy S3 from the Settings menu or the recovery mode. But what if your device is locked? Don’t worry! We have got you covered. Just perform these simple steps and learn how to factory reset Samsung Galaxy S3 if your device is locked.
1. Start by simply visiting the Android Device Manager on your system. Just enter your Google credentials in order to log-in.
2. After logging-in, you would be able to access a wide range of features like getting the location of your device, locking it, and more. Out of all the options, click on the “Erase” button.
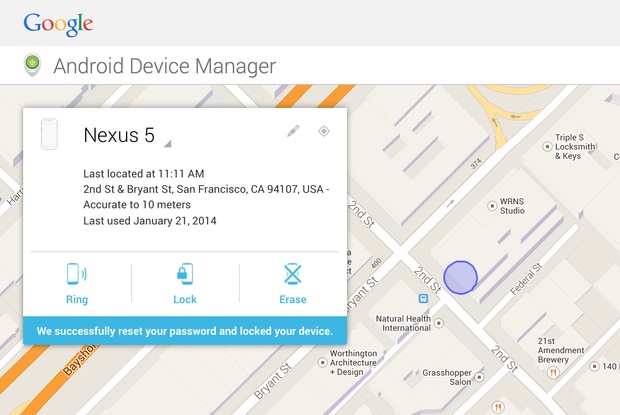
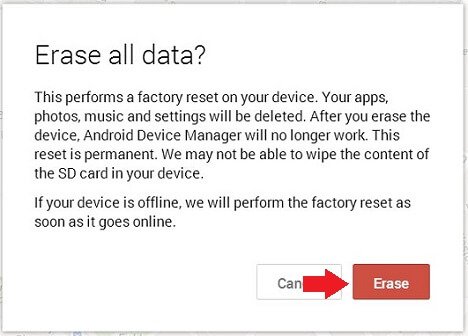
3. This would lead to another pop-up message generated by Google, as it would make your device reset to its factory settings. Click on the “Erase” option to do so.
Wait for a while as your device would start erasing everything from it and will reset it back to its factory setting. After performing these steps, you can reset your device, without unlocking it.
Dowamyny okaň: “Galaxy S3_1_815_1 ” “Galaxy S3” -den gulplandy , maglumatlary ýitirmän Samsung Galaxy S3-i nädip açmalydygyny barlaň.
Bu ýazgynyň köp gezek size peýdaly boljakdygyna ynanýaryn. Indi “Samsung Galaxy S3” -ni dürli usullar bilen nädip täzeden düzmelidigini bilseňiz, enjamyňyzda ýüze çykýan islendik meseläni hökman çözüp bilersiňiz we oňa arassa howa demini berip bilersiňiz! Täzeden düzmek amalyny ýerine ýetireniňizden soň, telefonyňyzyň ätiýaçlyk nusgasyny alyň we ony aňsatlyk bilen dikeldiň.
Android-i täzeden düz
- Android-i täzeden düz
- 1.1 Android paroly täzeden düzmek
- 1.2 Android-de Gmail parolyny täzeden düzmek
- 1.3 Huawei gaty täzeden düzmek
- 1.4 Android maglumatlary pozmak üçin programma üpjünçiligi
- 1.5 Android maglumatlary pozmak programmalary
- 1.6 “Android” -i täzeden açyň
- 1.7 “Android” -i täzeden düzmek
- 1.8 Zawody täzeden düzmek
- 1.9 LG telefonyny täzeden düzmek
- 1.10 “Android” telefonyny formatlaň
- 1.11 Maglumatlary süpüriň / Zawodyň täzeden düzülmegi
- 1.12 Maglumat ýitirilmezden Android-i täzeden düzüň
- 1.13 Planşedi täzeden düzmek
- 1.14 “Power” düwmesiz “Android” -i täzeden açyň
- 1.15 Ses göwrümli düwmeleri bolmadyk Android-i gaty täzeden düzmek
- 1.16 Kompýuteriň kömegi bilen Android telefonyny täzeden düzmek
- 1.17 Android planşetlerini gaty täzeden düzmek
- 1.18 “Android” öý düwmesiz täzeden düzüň
- Samsung-y täzeden düzmek
- 2.1 Samsung täzeden düzmek kody
- 2.2 Samsung hasaby parolyny täzeden düzmek
- 2.3 Samsung hasaby parolyny täzeden düzmek
- 2.4 Samsung Galaxy S3-i täzeden düzmek
- 2.5 Samsung Galaxy S4-i täzeden düzmek
- 2.6 Samsung planşetini täzeden düzmek
- 2.7 Samsung-ny gaty täzeden düzmek
- 2.8 Samsung-y täzeden açyň
- 2.9 Samsung S6-ny täzeden düzmek
- 2.10 Zawody täzeden dikeltmek Galaxy S5


Jeýms Deýwis
işgär redaktory