How to Move WhatsApp to SD Card
WhatsApp Content
- 1 WhatsApp Backup
- Backup WhatsApp Messages
- WhatsApp Online Backup
- WhatsApp Auto Backup
- WhatsApp Backup Extractor
- Backup WhatsApp Photos/Video
- 2 Whatsapp Recovery
- Android Whatsapp Recovery
- Restore WhatsApp Messages
- Restore WhatsApp Backup
- Restore Deleted WhatsApp Messages
- Recover WhatsApp Pictures
- Free WhatsApp Recovery Software
- Retrieve iPhone WhatsApp Messages
- 3 Whatsapp Transfer
- Move WhatsApp to SD Card
- Transfer WhatsApp Account
- Copy WhatsApp to PC
- Backuptrans Alternative
- Transfer WhatsApp Messages
- Transfer WhatsApp from Android to Anroid
- Export WhatsApp History on iPhone
- Print WhatsApp Conversation on iPhone
- Transfer WhatsApp from Android to iPhone
- Transfer WhatsApp from iPhone to Android
- Transfer WhatsApp from iPhone to iPhone
- Transfer WhatsApp from iPhone to PC
- Transfer WhatsApp from Android to PC
- Transfer WhatsApp Photos from iPhone to Computer
- Transfer WhatsApp Photos from Android to Computer
Mar 26, 2022 • Filed to: Manage Social Apps • Proven solutions
- Q&A 1: Is it possible to move WhatsApp to SD Card?
- Q&A 2: Why should I set an SD Card as default storage?
- Part 1: How to move WhatsApp to the SD Card using the ES File Explorer app? [Non-rooted]
- Part 2: How to move WhatsApp to SD Card using Dr.Fone - WhatsApp Transfer?
- Part 3: How do I set WhatsApp as default storage to SD Card?
Q&A 2: Why should I set an SD Card as default storage?
Android phones provide you with a unique feature of transferring your primary storage from Internal to SD Card. The slot and option of attaching SD Cards in your phone are what makes them outplay their rivals. Setting your phone with SD Card as the default storage not only helps save space and improve its speed but enhances the performance of the phone and saves it from getting hanged due to excessive memory. Having your default storage changed helps you in having large applications installed easily on your phone, without any performance issue.
Part 1: How to move WhatsApp to the SD Card using the ES File Explorer app? [Non-rooted]
As stated above, there are no personalized settings available on WhatsApp Messenger that allows you to backup your data on WhatsApp to your SD Card. However, different manual mechanisms are available for Android phones, which includes file explorer applications that are readily available at the Play Store. There is a very dividend variety available in Android phones with very varying traits that develops the fact that there might be different inbuilt file managers on the phone. Smartphones lacking with a smart file manager needs an external application to serve the purpose. One of the best applications available in the Play Store, the ES File Explorer provides you with a free platform to manage and transfer data from one source to another. However, before having your data transferred to another location, it is important to confirm the availability of space on the source where the data is to be transferred. To have your data successfully moved from WhatsApp to your SD Card, you need to follow the series of steps that would be beneficial in carrying out the task.
Step 1. Open ES File Explorer
Before working on the application, it is essential to have that application on your phone. Install the latest version from Play Store and have it opened on your phone to perform the transfer.
Step 2. Browse the Necessary Files
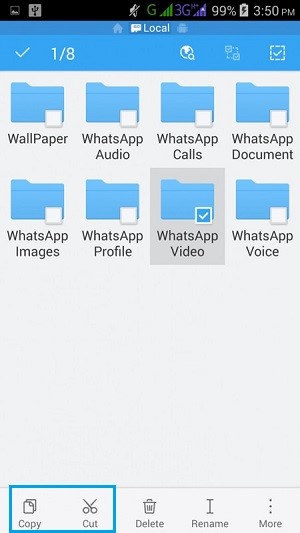
ES File Explorer acts completely like a normal file explorer that enables you to browse the files present within your phone. Browse the folders present on the device of WhatsApp. Open “Internal Storage” followed by the “WhatsApp" folder. This leads you to the folder that allows access to all the files that are contained in your WhatsApp Messenger. Select the folders that you seek meaningful to move.
Step 3. Move your Files
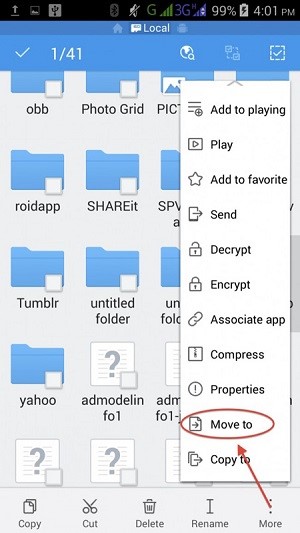
After selecting all the necessary folders, simply select the option on the bottom left of the toolbar showing "Copy." Another option also caters to the needs of the users. The option of "Move to" can be accessed from the "More" button that opens a special menu.
Step 4. Browse to the destination
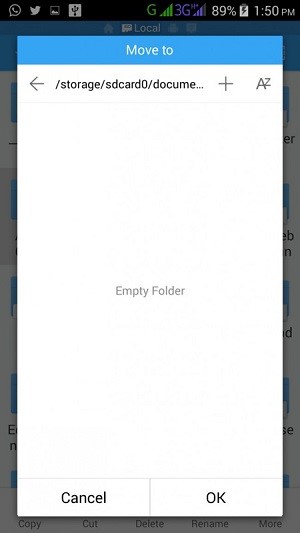
After selecting the “Move to” option, you need to simply browse the location of the SD Card where you wish to transfer your files. Have the location confirmed and execute the task to successfully transfer your data from Internal Storage to the SD Card. However, this only moves the associated data to the SD Card. This means that the user would not be able to access the data from the WhatsApp Messenger since it has been disconnected from the source.
Part 2: How to move WhatsApp to SD Card using Dr.Fone – WhatsApp Transfer?
If you are searching for an application that provides you the ultimate solution of having your data from WhatsApp moved to the SD Card without rooting, Dr.Fone - WhatsApp Transfer can provide very explicit features to its users. This PC tool is not restricted in transferring data but involves other features such as providing cloud backup and restoration of your WhatsApp data on your phone. To perform the tasks of moving WhatsApp data to SD Card with Dr.Fone, you need to function according to the steps provided below.

Dr.Fone - WhatsApp Transfer
Handle Your WhatsApp Chat, Easily & Flexibly
- Transfer WhatsApp messages to both Andriod and iOS devices.
- Back up & export WhatsApp messages to computers and devices.
- Restore WhatsApp backup to Android and iOS devices.
- Supports iPhone X / 8 (Plus)/ iPhone 7(Plus)/ iPhone6s(Plus), iPhone SE and the latest iOS 13 fully!

Step 1. Install Dr.Fone Tool on PC
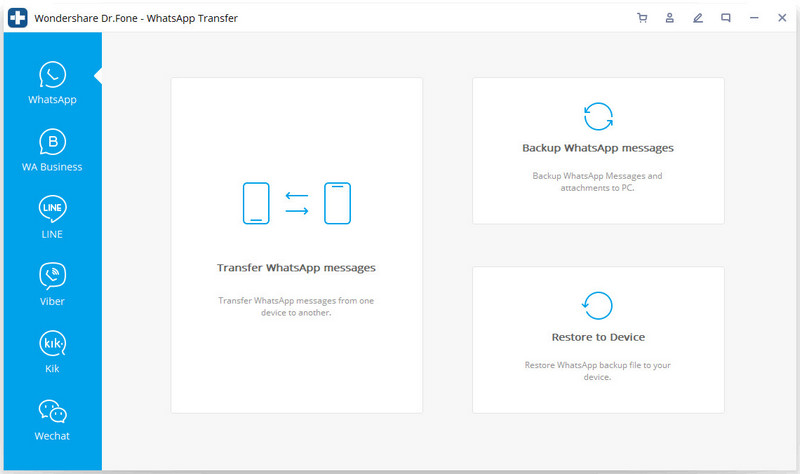
For a perfect experience in WhatsApp backup, transfer, and restoration on Android, Dr.Fone provides its users with an experience worth a while. Install the tool and have it opened. A screen shows on the front showing a series of options to perform. You need to select the option displaying “WhatsApp Transfer” to have the work done.

Step 2. Connect your Phone
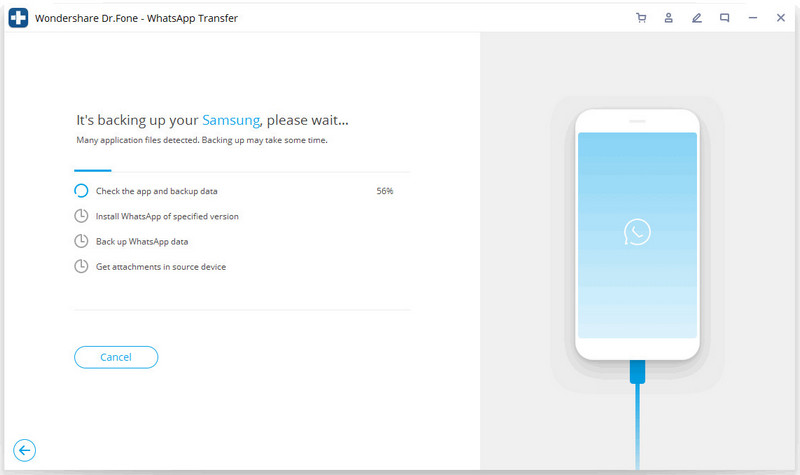
Have your phone connected with a USB cable. After the computer successfully reads the phone, tap on the option of “Backup WhatsApp Messages” to carry out the backup from the phone.
Step 3. Completion of the Backup
The tool processes the phone and initiates the backup. The backup successfully elapses, which can be observed from the series of options that are marked as complete.
Step 4. Confirm the Backup
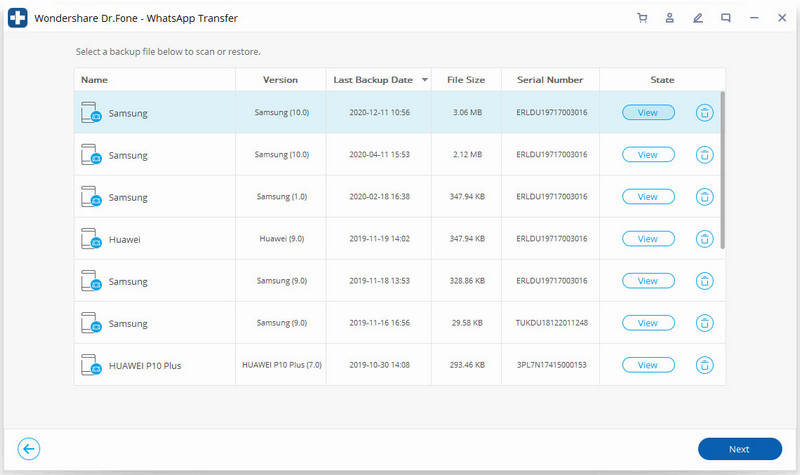
You can click “View it” to confirm the presence of the backed-up data on the PC. A new window appears that shows the backup records present on the PC.
Step 5. Change the default storage location of your Phone.
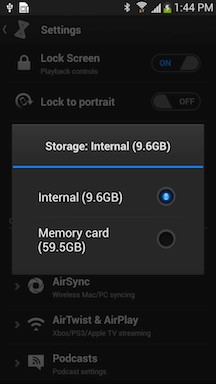
From the settings available on your phone, have the default location changed to SD Card so that any memory allocation will be done using the SD Card
Step 6. Open Dr.Fone and Select Restore
Access the option of "WhatsApp Transfer" from the homepage. Select the option depicting "Restore to Device," which will lead you to the next window.

Step 7. Select the appropriate file and initiate
A new window showing the list of WhatsApp backups opens. You need to select the appropriate file and follow the "Next Option."
Step 8. Restoration elapses
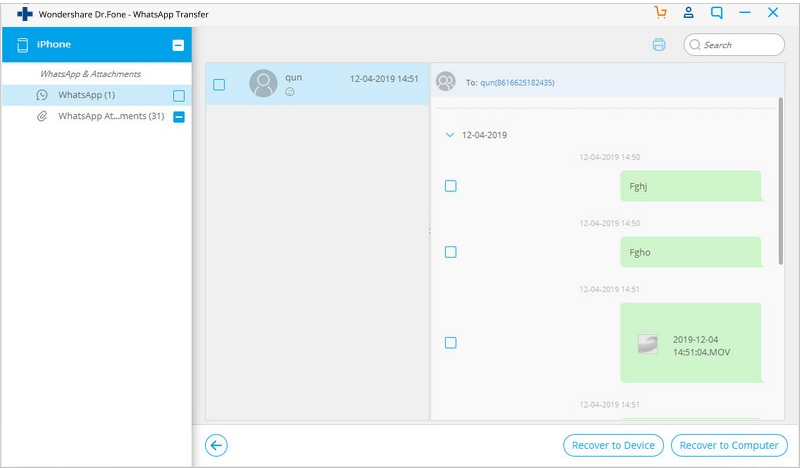
A new window showing the option of "Restore" opens. All the data that is associated with the WhatsApp backup is moved to the phone. After successful completion, it can be seen in the file manager of the phone.
Part 3: How do I set WhatsApp as default storage to SD Card?
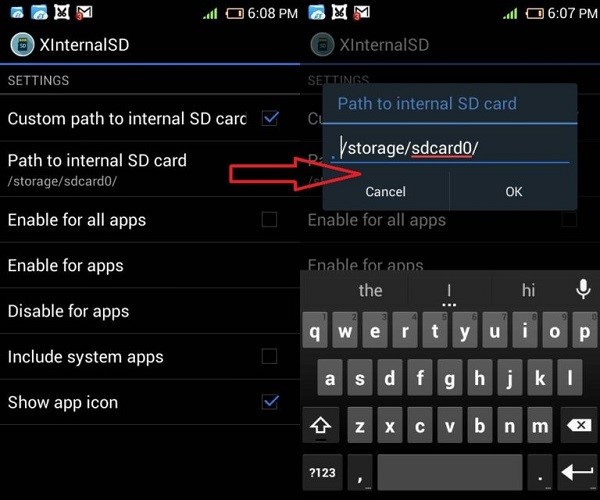
For setting the WhatsApp storage location to SD Card by default, the device needs to be rooted on the first hand. This requires multiple assistance of different applications that would help you set the SD Card as the WhatsApp media's default location. One such example of an application, XInternalSD is taken for this article. The following steps describe a method on how we can set WhatsApp media as default storage to SD Card.
- Install the Application
After successfully downloading its .apk file, you need to install XInternalSD and approach its settings. The option for setting a custom path needs to be activated. After enabling, you can change the option showing “Path to Internal SD Card” to your assorted external card.
- Enable the option for WhatsApp
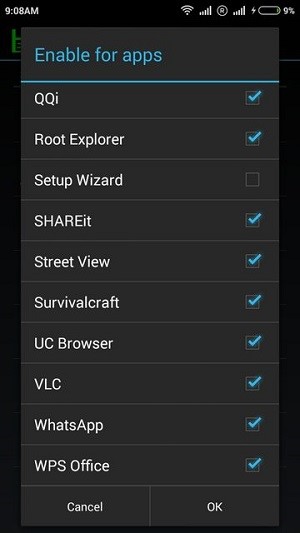
After having the path altered, you need to access the option showing "Enable for all apps." This will lead you to another window where you have to confirm enabling WhatsApp in the option.
- Transfer Files
This elapses the process of the application. Approach the file manager and transfer your WhatsApp folders to SD Card. Restart the device for applying all changes successfully.
Bottom Line:
This article presented its users with multiple methods of having their WhatsApp moved to SD Card. You need to follow any of these stated steps to execute the process successfully.


Alice MJ
staff Editor