iPad'i Yeni Bilgisayarla Nasıl Eşitlersiniz?
27 Nis 2022 • Dosya: Telefon ve PC Arasında Veri Yedekleme • Kanıtlanmış çözümler
" Eski bilgisayarımın yerine yeni bir bilgisayar satın aldım. Şu anda iPad 2'mi yeni bilgisayarda iTunes ile eşzamanlamak istiyorum. Bunu nasıl kolayca yapabilirim? "
Çoğu zaman bilgisayarınızı yeni bir sürüme güncellediğinizde, iPad önceki sisteminizle senkronize edildiğinden, iPad'inizi yeni bilgisayarla da senkronize etmeniz gerekir. Bazen bu görevi yapmak kafa karıştırıcı ve zahmetli olabilir, özellikle de çok büyük miktarda veriye sahip olduğunuzda ve bunları kaybetmekten korktuğunuz zaman. İşlemi daha kolay tamamlamanıza yardımcı olmak için, herhangi bir veri kaybetme endişesi olmadan iPad'inizi yeni bir bilgisayarla senkronize etmenin en iyi yollarını vereceğiz. Çözümü iTunes ile veya iTunes olmadan tartışacağız. Bu nedenle, iTunes'unuz olmasa veya iTunes'un işlevinden memnun kalmasanız bile, aşağıdaki diğer çözümleri deneyebilirsiniz.
2. Seçenek: iPad'i iTunes Olmadan Yeni Bilgisayarla Eşzamanlama
Besides iTunes, you can sync your iPad by using some third-party tools to the new computer. Here we take Dr.Fone - Phone Manager (iOS) as an example, which is a highly recommended phone manager program that makes the process of syncing easy to be done. While users are syncing iPad to a new computer with iTunes, there is always a risk of losing the data as we mentioned above. However, with Dr.Fone - Phone Manager (iOS), you can sync photos, music, movies, playlists, iTunes U, podcasts, audiobooks, TV shows to new iTunes without the worry of data loss. You can also transfer or backup the varieties of data, like photos, contacts, and SMS to your new computer from any apple devices including iPad.

Dr.Fone - Phone Manager (iOS)
MP3'ü iTunes olmadan iPhone/iPad/iPod'a aktarın
- Müziğinizi, fotoğraflarınızı, videolarınızı, kişilerinizi, SMS'lerinizi, Uygulamalarınızı vb. aktarın, yönetin, dışa aktarın/içe aktarın.
- Müziklerinizi, fotoğraflarınızı, videolarınızı, kişilerinizi, SMS'lerinizi, Uygulamalarınızı vb. bilgisayara yedekleyin ve kolayca geri yükleyin.
- Bir akıllı telefondan diğerine müzik, fotoğraf, video, kişi, mesaj vb. aktarın.
- Medya dosyalarını iOS cihazları ve iTunes arasında aktarın.
- iOS 7, iOS 8, iOS 9, iOS 10, iOS 11, iOS 12, iOS 13 ve iPod ile tam uyumludur.
Not: Dr.Fone'un hem Windows hem de Mac sürümleri, iOS cihazları ve bilgisayarlar arasında dosya aktarımı için yararlıdır. İşletim sisteminize göre doğru sürümü seçmeniz gerekiyor.
Dr.Fone - Phone Manager (iOS) is an amazing program that enables you to transfer the playlist, music, videos, TV shows, podcasts, images, music videos, audiobooks, and iTunes U between iDevices, PC, and iTunes. Some of the striking features of Dr.Fone - Phone Manager (iOS) are given below:
Supported Devices and iOS System
Below given is the list of the devices and iOS supported by Dr.Fone - Phone Manager (iOS)
iPhone: iPhone X, iPhone 8, iPhone 8 Plus, iPhone 7 Plus, iPhone 7, iPhone 6s, iPhone 6s Plus, iPhone 6, iPhone 6 Plus,iPhone 5s, iPhone 5c, iPhone 5, iPhone 4s, iPhone 4, iPhone 3GS
iPad: iPad 3, iPad Pro, iPad Air 2, iPad mini with Retina display, iPad Air, iPad mini, iPad with Retina display, The New iPad, iPad 2, iPad
iPod: iPod touch 6, iPod touch 5, iPod touch 4, iPod touch 3, iPod classic 3, iPod classic 2, iPod classic, iPod shuffle 4, iPod shuffle 3, iPod shuffle 2, iPod shuffle 1, iPod nano 7, iPod nano 6, iPod nano 5, iPod nano 4, iPod nano 3, iPod nano 2, iPod nano
Supported iOS: iOS 5, iOS 6, iOS 7, iOS 8, iOS 9, iOS 10, iOS 11, iOS 12, iOS 13

Sync iPad to the New Computer with Dr.Fone - Phone Manager (iOS)
The following guide will outline how to sync the iPad to a new computer with Dr.Fone - Phone Manager (iOS). Check it out.
Step 1. Install and Open Dr.Fone
First of all, download and install Dr.Fone on your computer. Run it and select "Phone Manager". The software will ask you to connect your iOS device.

Step 2. Connect iPad with PC Using the USB cable
Connect the iPad to the computer with a USB cable, and the program will automatically recognize your device. Then you'll see the different categories of the files in the main interface.
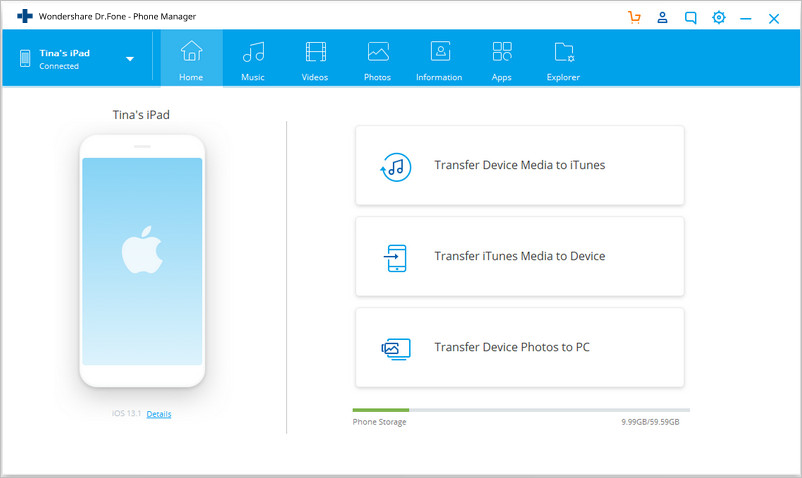
Step 3. Select the targeted iPad Files
Choose one category from the options and the files will show up in the right part of the window. Check the files you want to transfer and click the "Export" button at the top middle of the software window. For the multimedia files, Dr.Fone allows you to select "Export to PC" or "Export to iTunes" in the drop-down menu after clicking the "Export" button.
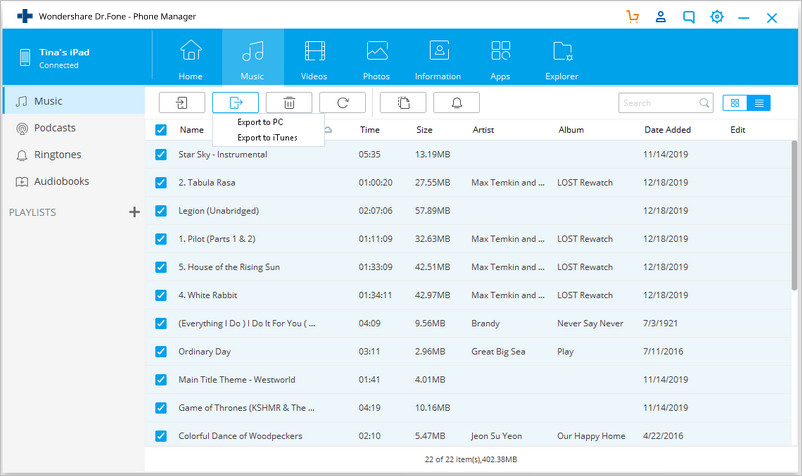
Export Music to New iTunes Library with One Click
In addition, Dr.Fone - Phone Manager (iOS) provides you a chance to sync iPad files to the iTunes Library with one click. The following steps are showing you how to do that.
Step 1. Rebuild iTunes Library
Start Dr.Fone on your computer and connect iPad to computer with the USB cable. The software will detect your iPad automatically. You can choose "Transfer Device Music to iTunes" in the main interface, and a pop-up window will show up and ask you whether you want to copy media files to iTunes Library. Click the "Start" button to transfer music and other media files to the iTunes library.

2nd Option: Syncing iPad to New Computer Using iTunes
Syncing iPad or any iOS devices to a new computer basically means that you are making the iTunes ready to accept the new device. When the iPad is connected to a new computer for syncing, iTunes will offer the option of "erase and replace" to the content which is present on your iPad with the content of the iTunes library of a new computer. Losing all the data from your previous iTunes library may definitely sound frightening, but there are ways in which you can sync iPad to a new computer using iTunes without losing any data like our suggestion tool above.
Before syncing your iPad to a new computer, firstly you need to make a backup of all the data present on your device. For transferring the data which you purchased from iTunes, you can simply transfer the items from the device. But for other data, you should back up the iPad with iTunes. While the backup data is finished, you can sync the iPad by following the given steps below.
Note: Please note that iTunes won't back up all data on your iPad. For more information about iTunes backup, please take a look at the Apple Support page.
Step 1. Install and Open iTunes on New Computer
Download and install the latest version of iTunes on your computer. Then you can start operating it.
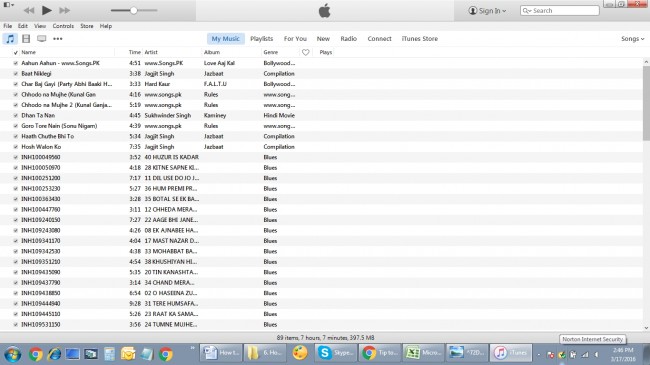
Step 2. Connect iPad to the New Computer
Now you should connect iPad to the computer with the USB cable. Then iTunes will automatically detect your iPad.
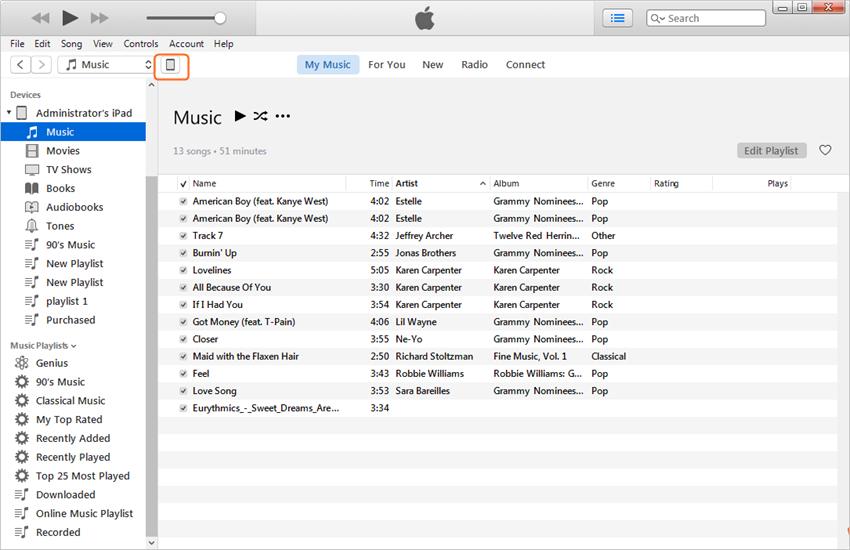
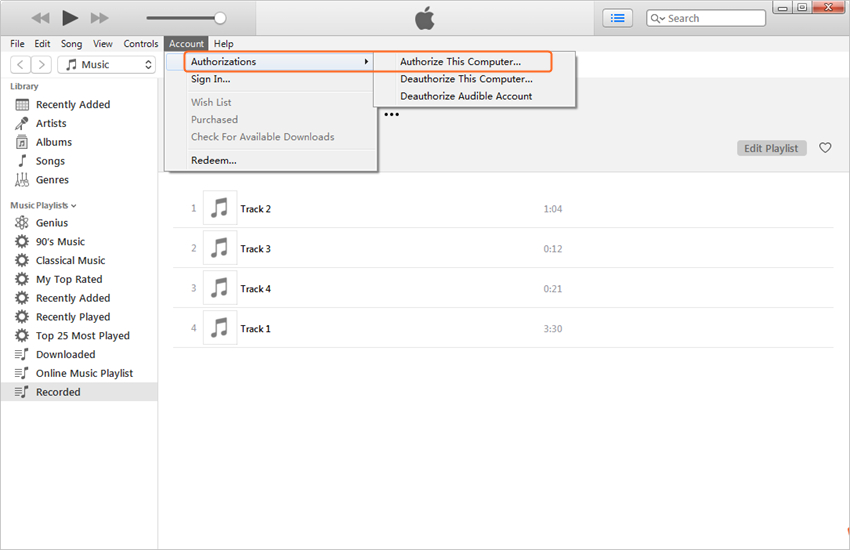
Step 3. Authorize the Computer to iTunes
Now click on the "Account" and "Authorization" to authorize this computer at the upper left corner of the iTunes window.
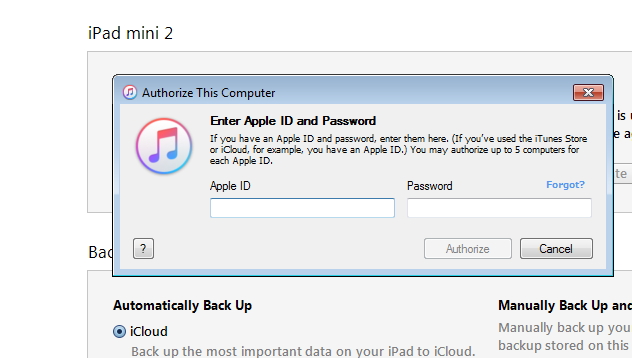
Step 4. Log in with Your Apple ID
If this is the first time you authorize this computer, you need to log in with your Apple ID to accomplish the task. If not, you can skip to step 5.
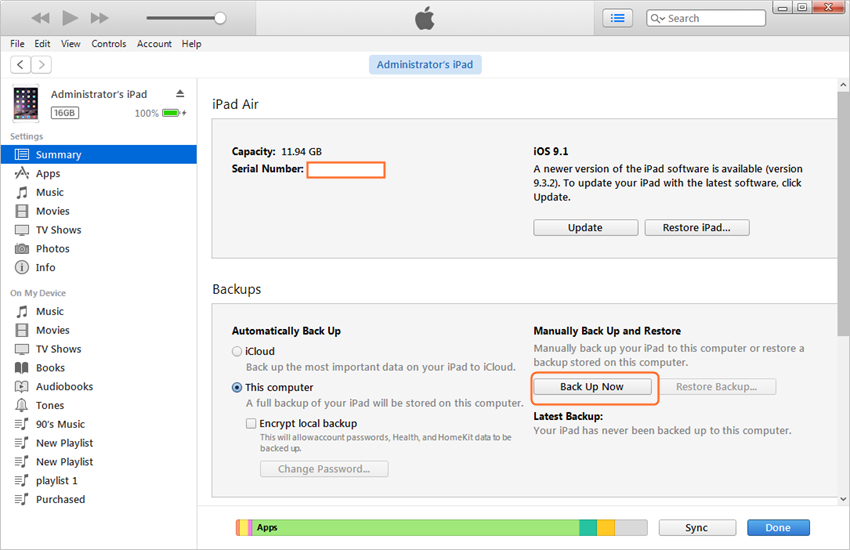
Step 5. Back up iPad with iTunes
Now choose the summary panel of iPad in the left sidebar, and click "Back up Now". Then iTunes will make a backup for iPad on your computer.
Yedekleme bilgisayarınızda oluşturulduğunda, iPad'inizdeki dosyaları güvenle yönetebilirsiniz. Ancak ne yazık ki Apple, kullanıcıların yedeklemedeki dosyaları görüntülemesi için bir yol sağlamıyor. Bu sorunu çözmek için iTunes olmadan başka bir daha iyi yola bakalım.
İşte iTunes ve Dr.Fone - Phone Manager'ın (iOS) iPad'i yeni bir bilgisayarla eşzamanlamanıza nasıl yardımcı olduğu arasındaki fark bunlardır. Bu araç, iPad'i kolaylıkla senkronize etme görevini tamamlamanızı destekleyecektir. iTunes ile karşılaştırıldığında, Dr.Fone - Phone Manager (iOS), iPad dosyalarını yönetmek için daha uygun ve doğrudan bir çözüm sunar. Bu iPad yöneticisiyle ilgileniyorsanız, denemek için yazılımı ücretsiz indirin.
iPad İpuçları ve Püf Noktaları
- iPad'den Yararlanın
- iPad Fotoğraf Aktarımı
- İPad'den iTunes'a Müzik Aktarın
- Satın Alınan Öğeleri iPad'den iTunes'a Aktarın
- iPad Yinelenen Fotoğrafları Sil
- iPad'de Müzik İndirin
- iPad'i Harici Sürücü olarak kullanın
- Verileri iPad'e Aktarın
- Fotoğrafları Bilgisayardan iPad'e Aktarın
- MP4'ü iPad'e aktarın
- Dosyaları PC'den iPad'e Aktarın
- Fotoğrafları Mac'ten ipad'e Aktarın
- Uygulamaları iPad'den iPad/iPhone'a Aktarın
- Videoları iTunes olmadan iPad'e Aktarın
- İPad'den iPad'e Müzik Aktarın
- Notları iPhone'dan iPad'e Aktarın
- iPad Verilerini PC/Mac'e Aktarın
- Fotoğrafları iPad'den Mac'e Aktarın
- Fotoğrafları iPad'den PC'ye Aktarın
- Kitapları iPad'den Bilgisayara Aktarın
- Uygulamaları iPad'den Bilgisayara Aktarın
- İPad'den Bilgisayara Müzik Aktarın
- PDF'yi iPad'den PC'ye aktarın
- Notları iPad'den Bilgisayara Aktarın
- Dosyaları iPad'den PC'ye Aktarın
- Videoları iPad'den Mac'e Aktarın
- Videoları iPad'den PC'ye Aktarın
- iPad'i Yeni Bilgisayarla Senkronize Et
- iPad Verilerini Harici Depolamaya Aktarın


papatya yağmurları
personel editörü