How to Download Photos from Google Drive to iPhone?
Apr 27, 2022 • Filed to: iPhone Data Transfer Solutions • Proven solutions
Google Drive is a huge resource for storing several kinds of files including music, videos, and photos. It allows you to achieve this feat remotely.
It even gets better because you have access to your data through any device as long as you can log in. This brings us to how to download photos from Google Drive to iPhone.
If Google Drive is the answer to your storage issues, how do you get the best of it with your iPhone?
In this post, we will show you how to download pictures from Google Drive to iPhone. Ready? Let’s dive straight in.
Downloading Photos to iPhone from Google Drive
There are two different ways of moving photos to your iPhone from Google Drive. They include:
- Download from Google Drive to the iPhone directly on the iPhone.
- Transfer photos from Google Drive to the iPhone through a computer.
We will discuss each of these in detail with images to help below. Finally, we will show you how to delete duplicates of photos from your Google Drive.
Part One: Download from Google Drive to the iPhone directly on the iPhone.
For most people, the sound of this doesn’t seem easy at all. Contrary to that opinion, transferring photos to your iPhone from Google Drive is very easy. The question you should be asking is how?
The first step is to download Google Drive to your device. To do this, you need to visit the App Store and search for Google Drive. Once you find it, download the app straight to your iPhone.
After downloading Google Drive, install it onto your device. Congratulations, you have successfully crossed the first stage of downloading pictures from Google Drive to iPhone. What’s the next stage? The actual download process.
To download the photos to your device, take the following steps:
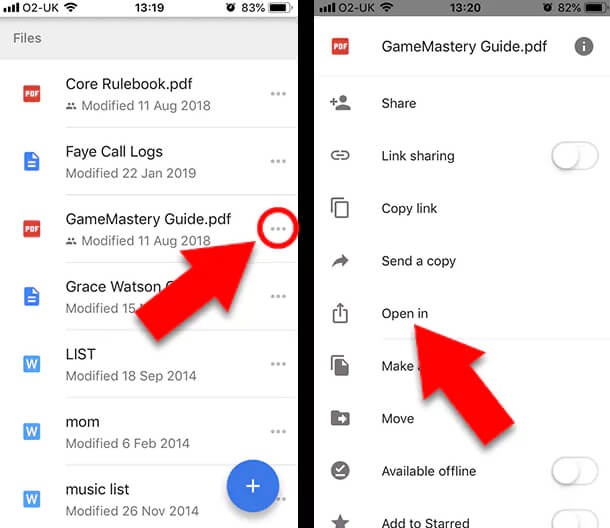
Step 1 – Open Google Drive on your device.
Step 2 – Tap on the “Menu” icon beside the file you want to download.
Step 3 – Choose “Open In” from the list of options you are presented.

Step 4 – Pick the app you prefer to open the photos in and the picture downloads to your device automatically.
It is that simple. There is another way to do this. Check out the steps below:
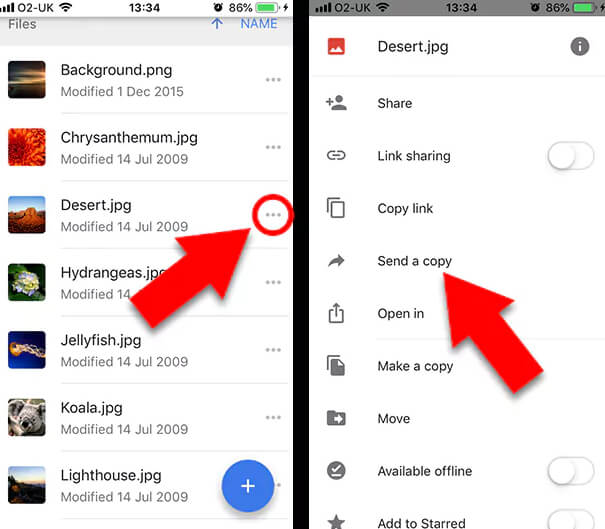
Step 1 – Open Google Drive on your device.
Step 2 – Tap on the “Menu” icon beside the file (video or photo) you want to download.
Step 3 – Tap on “Send a Copy” from the list of options you are presented.

Step 4 – Tap on “Save Video” or “Save Image” depending on the file you are downloading.
Step 5 – The file is automatically added to your Photos app on your iPhone.
Isn’t this very simple and uncomplicated? We bet you can do this with your eyes closed. Now let’s look at how to transfer photos from Google Drive to iPhone using your computer.
Part Two: Transfer photos from Google Drive to iPhone through a computer
This process is also quite easy to understand and carry out, like the first. However, there are two simple questions you need to answer before we move ahead.
Would you rather transfer a few photos to your computer from Google Drive once? Or do you prefer keeping your computer in sync with Google Drive at all times?
Your answers to these questions will determine what app you need and how to handle the process.
Do you want just a few pictures from Google Drive? You just need to download them to your computer from the Cloud. However, if you prefer to always access Google Drive from your computer, you need “Backup and Sync.”
Backup and Sync is a Google app that keeps your PC in sync with Google Drive. This means that there is a reflection of actions taken in Google Drive directly on your computer. For example, if a new file is added or a file is edited, it automatically reflects on your PC. The advantage of this is that you are always up-to-date at both ends. Amazing right?
How do you download photos to your computer from Google Drive?
The steps below will help you through this process:
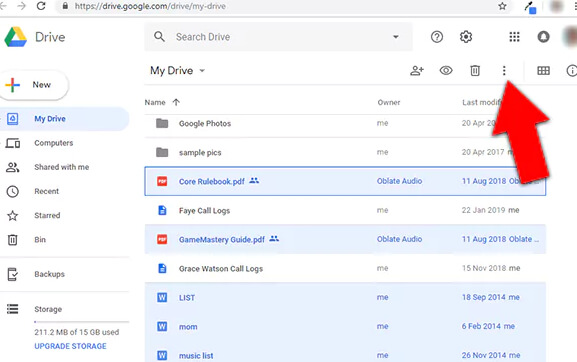
Step 1 – Open the official Google Drive site (https://drive.google.com/)
Step 2 – Log in using your details on Google if you aren’t logged in already. To enter your login details click on “Go To Google Drive.”
Step 3 – Now that you are logged in, choose the pictures you desire to download. If you want to download multiple photos, you can hold down the CTRL key while you click on the photos. Note that if your PC is a Mac, you should use the CMD key instead. If you want to select all the pictures on the page, you press CTRL + A (Windows) or CMD + A (Mac).
Step 4 – To gain access to more options, click “Menu” located in the top-right-hand corner of your window.

Step 5 – Select “Download.”
Step 6 – The photos will be downloaded into a ZIP folder from Google Drive. You will need to extract the files to gain access to them.
Do you prefer using the Backup and Sync method? Let’s look at how to sync Google Drive with your computer.
Usually, the setup wizard for the “Backup and Sync” app takes you through a process. We have made it easy by outlining the stages of the process in the steps outlined below.
Step 1 – Visit https://www.google.com/drive/download/ to download the Backup and Sync app from Google.
Step 2 – To start your download click on “Agree and Download.”
Step 3 – Install the app by double-clicking on the downloaded file.
Step 4 – Click on “Get Started” after installing the program.
Step 5 – Sign in to the app using your Google login details.
Step 6 – To sync Google Drive with your computer, check all the necessary checkboxes. This implies that for all the checked folders, every change in Google Drive will reflect on your computer and vice versa.
Step 7 – Continue the setup process by clicking on “Next.”
Step 8 – To proceed, click “Got It.”
Step 9 – Check the box “Sync My Drive to this computer.”
Step 10 – Choose if all the folders in your Google Drive should sync or only certain folders.
Step 11 – Click on “Start” to begin downloading the files to your PC from Google Drive.
Straightforward right? Yes, it is. The time it will take for the download process to be complete will depend on the number of photos you are downloading. After the process is complete, you can now access your Google Drive from your computer. Great!!!
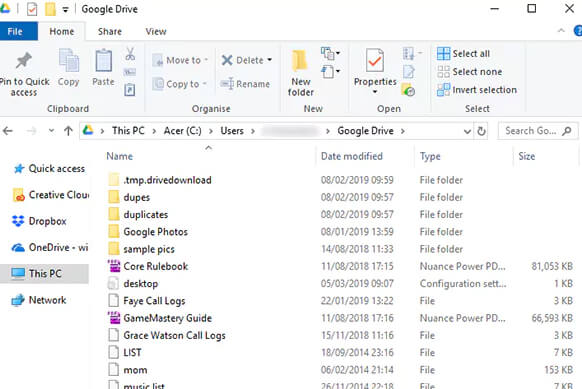
Simply visit your “File Explorer” and click on “Google Drive” located in the left column.

Now, you know how to get your photos into your computer from Google Drive. But this is just one phase. The most important step here is to import photos from Google Drive to iPhone. Don’t be scared, you have done the bulk of the work already.
There are two ways to get your photos into your iPhone. The first is through the use of a File Manager app. There are several software on the market but for this post, we suggest you use Dr.Fone Phone manager. It is free and very easy to use.
The second method is to use a USB cable to transfer the photos. We advise you to go with the first method as it is more reliable.
Deleting duplicates from your Google Drive
Transferring your photos to your iPhone is great but it comes with its cons. When you move files across different platforms, they tend to duplicate. This means that you crowd your space and soon you’d be short of space.
Instead of accumulating duplicates, why not delete the images you download from Google Drive. When you need them back in your Drive, you can always upload and delete them from your device. By the way, duplicates are quite annoying.
You can use an app known as Duplicate Sweeper to clear any duplicates. It is handy and can be used on both Mac and Windows. What it does is scan through your folders then delete any duplicates. This process is done based on your chosen preferences.
With this, you save yourself long hours of going through the files in each folder to find duplicates. All you need to do is specify your preferences and the app handles the rest.
Wrapping Up
Before now, you have been in a fix on how to download photos from Google Drive to iPhone. This post has just saved you from that dilemma. We have shown you two different methods of downloading your photos to your iPhone from Google Drive.
Along with this, we have helped with the details of syncing your computer with Google Drive. Did we leave anything out? Share with us in the comments section below.
iPhone Tips & Tricks
- iPhone Managing Tips
- iPhone Contacts Tips
- iCloud Tips
- iPhone Message Tips
- Activate iPhone without SIM card
- Activate New iPhone AT&T
- Activate New iPhone Verizon
- How to Use iPhone Tips
- Other iPhone Tips
- Best iPhone Photo Printers
- Call Forwarding Apps for iPhone
- Security Apps for iPhone
- Things You Can Do with Your iPhone on the Plane
- Internet Explorer Alternatives for iPhone
- Find iPhone Wi-Fi Password
- Get Free Unlimited Data on Your Verizon iPhone
- Free iPhone Data Recovery Software
- Find Blocked Numbers on iPhone
- Sync Thunderbird with iPhone
- Update iPhone with/without iTunes
- Turn off find my iPhone when phone is broken


Alice MJ
staff Editor