How to Upload Photos from iPhoto to Facebook easily
May 13, 2022 • Filed to: Manage Device Data • Proven solutions
iPhoto is the built-in photo manager in Mac, which allows you to organize your photos by time, place and event description. Facebook is the king of social networking website. Over 600 million active users are using Facebook until January 2011. Now one thing to ask: could iPhoto connect to Facebook so that your friends can easily view your uploaded photos and give their reviews?
The answer is yes as long as you have iPhoto'11 or newer. But what if you use the older version? Don't worry, Facebook Exporter for iPhoto can help you easily upload photos from iPhoto to Facebook. Now let's see how to achieve this with both the new and old version of iPhoto.
1. Upload Photos from iPhoto to Facebook with iPhoto'11 or newer version
iPhoto'11 comes with its own Facebook uploader. If you have iPhoto '11 or newer, you can directly upload photos from iPhoto to Facebook. Here is how:
Step 1 Choose the photos you want to publish.
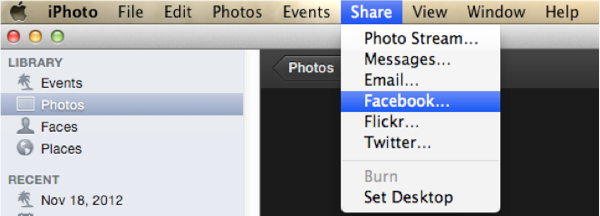
Step 2 Go to "Share" and choose Facebook from the pop-up menu.

Step 3 Log in your Facebook account. Then choose the album you want to add your photos to. If you want to post single photos to your wall, click "Wall".

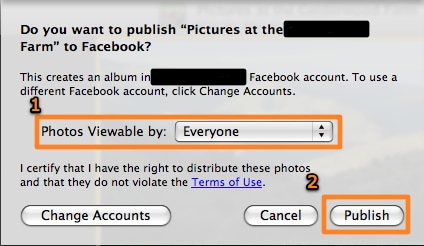
Step 4 In the window that appears, choose an option from the "Photos Viewable by" pop-up menu. But this option isn't available if you're publishing to your Facebook Wall. Instead, you can add a caption for the set of photos.

Step 5 Click "Publish". Then you can view your published album by clicking your Facebook account in the Source list, or use this album in the same way you use any other Facebook album when you visit Facebook.
2. Upload Photos from iPhoto to Facebook with older version
If your still use the old version, Facebook Exporter for iPhoto plugin can help you upload photos from iPhoto to Facebbok. Here is a detailed guide:
Step 1 Install Facebook Exporter
First of all, download Facebook Exporter for iPhoto. Click the download link and you will get a zip file. Double click to unzip it and double click the installer package to start installation.
Step 2 Run iPhoto Application
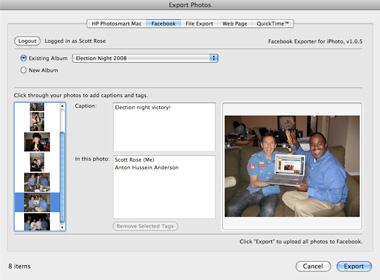
After installing iPhoto to Facebook Exporter, open iPhoto application. In the iPhoto menu click on "File" and then "Export". Then you will see a "Facebook" tab in the bottom right hand side of the screen.

Step 3 Log in Facebook
Even if you have log in Facebook, you still need to log in it again to synchronize the iPhoto Exporter plug-in to your Facebook account. To do so, click on the "Login" button at the upper left corner. Then a new window will pop up in your Internet browser to let you log in.
Step 4 Start exporting iPhoto Picture to Facebook
Then you could choose specific photos or albums within iPhoto on the left. On the center of pop-up screen, simply type in your caption if necessary. When everything is ready, hit the "Export" button to change the status of selected photo to "pending" . The final approval is required before they are visible on your Facebook page.
Tips:
1.You could also upload iPhoto pictures to Facebook using Java-based uploading tool. But you can't see your iPhoto Library.
2.You cannot upload iPhoto pictures directly to a group or event from iPhoto. However, after uploading photos from iPhoto to Facebook, you can always move photos from an album to a group or event by clicking "Add Photos" and then selecting the "Add from My Photos" tab.
3.You could use iPhoto pictures to make 2D/3D flash gallery to share on Facebook, website and blog.
You Might Also Like
iOS Transfer
- Transfer from iPhone
- Transfer from iPhone to iPhone
- Transfer Photos from iPhone to Android
- Transfer Large Size Videos and Photos from iPhone X/8/7/6S/6 (Plus)
- iPhone to Android Transfer
- Transfer from iPad
- Transfer from iPad to iPod
- Transfer from iPad to Android
- Transfer from iPad to iPad
- Transfer from iPad to Samsung
- Transfer from Other Apple Services


Alice MJ
staff Editor