3 Ways to Send Ringtones from iPhone to iPhone Including iPhone 13
Apr 27, 2022 • Filed to: Data Transfer Solutions • Proven solutions
It is a common misconception that sending data from one iPhone to another can be a tedious task. For instance, there are plenty of ways to learn how to send ringtones from iPhone to iPhone without any trouble. You can either perform a direct transfer to your new iPhone, such as iPhone 13 or iPhone 13 Pro (Max) or even take the assistance of your system to do so. In this post, we will teach you in different ways how to transfer ringtones from iPhone to iPhone in a stepwise manner. So let’s get it started!
Part 1: Send ringtones to iPhone including iPhone 13 using iTunes?
Whenever iOS users think of moving their data from computer to iPhone or vice versa, the first tool they think of is usually iTunes. Even though iTunes provides a free solution, it can be a little complicated. There is no way to move files directly from one iPhone to another via iTunes. Therefore, if you are taking iTunes' assistance, you need to transfer ringtones from your old iPhone to iTunes and then move it again from iTunes to the new iPhone.
Don’t worry! After following these steps, you can learn how to send ringtones to the iPhone via iTunes.
- Connect your source iPhone to the computer and launch iTunes.
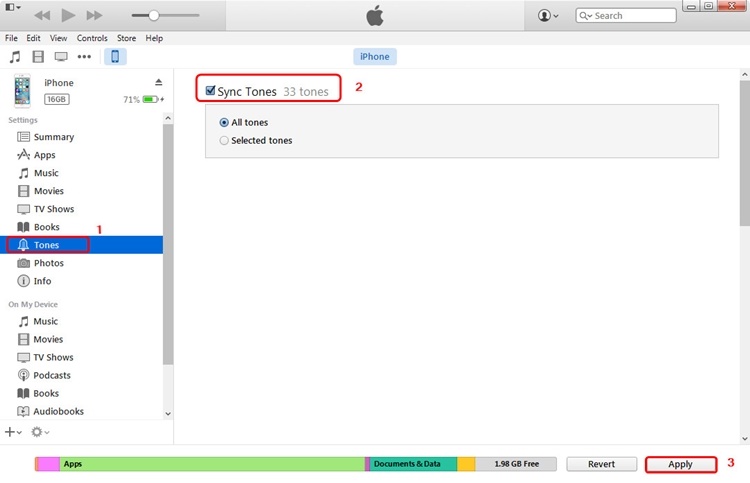
- Select your device on the iTunes interface and visit the “Tones” section.
- From here, check on the “Sync Tones” option and choose to sync all ringtones from your iPhone to iTunes. Then, click on the “Apply” button to implement it.
- Once it is done, disconnect your old phone.
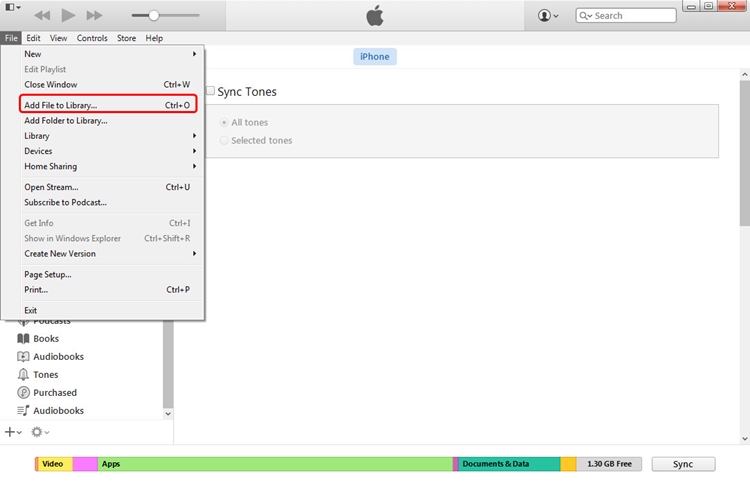
- If you have a ringtone saved on the local storage, go to Files > Add Files to Library option to import ringtones of your choice from the local storage to iTunes.
- After adding ringtones to iTunes, connect your target iPhone to the system.
- To learn how to send ringtones to the iPhone from iTunes, select the device and go to its “Tones” section.
- Check on the “Sync Tones” option. You can either manually choose the ringtones you want to sync or select all files.
- Click on the “Apply” button to sync the selected ringtones to your target device.
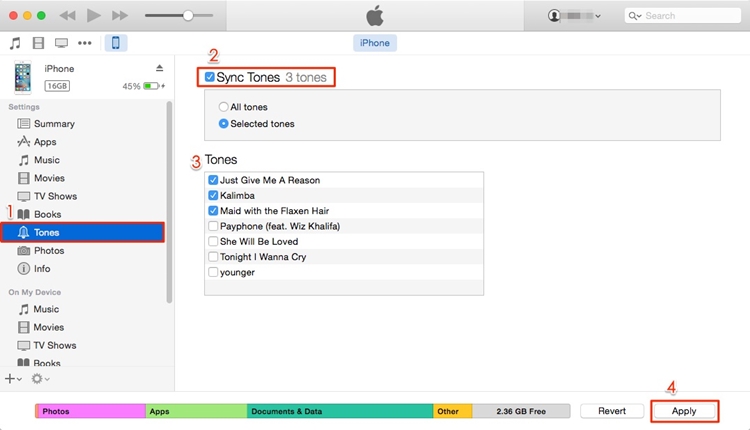
After implementing these steps, you can learn how to send ringtones from iPhone to iPhone via iTunes.
Part 2: Send ringtones to iPhone including iPhone 13 with Dr.Fone - Phone Transfer?
If you don’t want to navigate your way through the settings of iPhone and iPad, then you can use the help of third-party applications that will get the job done in minutes. These applications are also useful when you are trying to shift content from one Apple device to another. Of course, you will need a computer/ Laptop to play the middle man. Dr.Fone - Phone Transfer lets you transfer your contacts from iPhone to iPad.
Here is how:
Step 1: Download Dr. Fone - Phone Transfer application on your computer.
Step 2: Launch the application, and you'll see options on the screen. Go with Phone Transfer.

Step 3: Then connect both your devices to the computer. In our case, it is the iPhone and the iPad. You can also make this transfer between iPhone and Android devices.
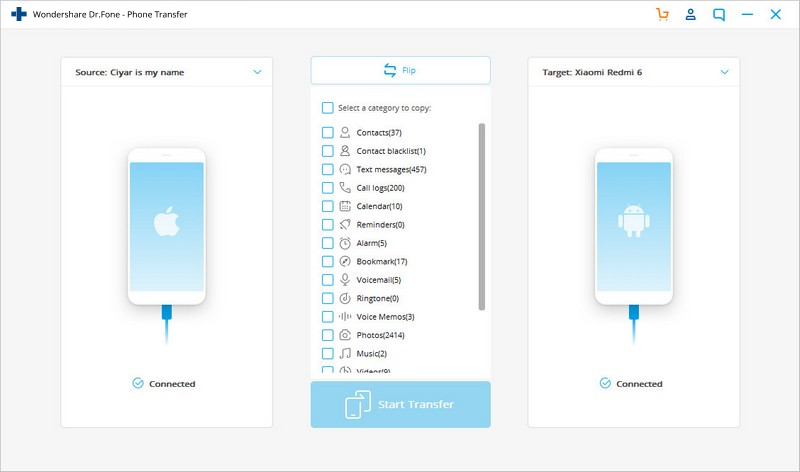
Step 4: Now select the files that you want to transfer. Here, select all the contacts that you want to shift. Then, initiate the transfer and don’t disconnect the devices.
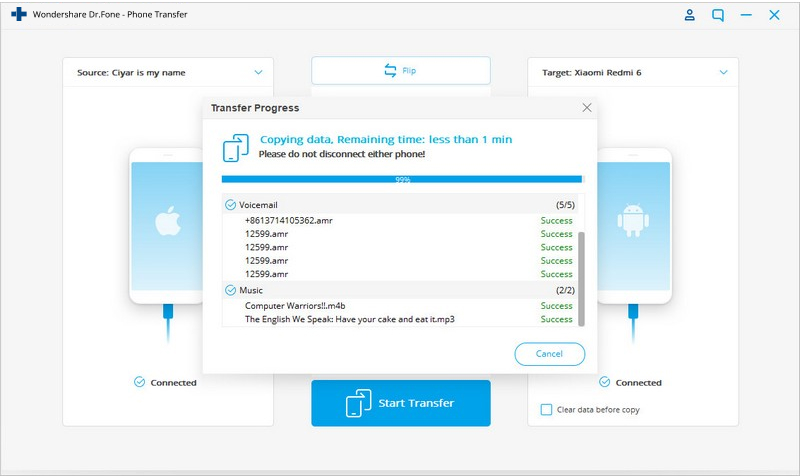
The data will be transferred successfully to the destination device.
Don’t have a laptop? Then you can do this!
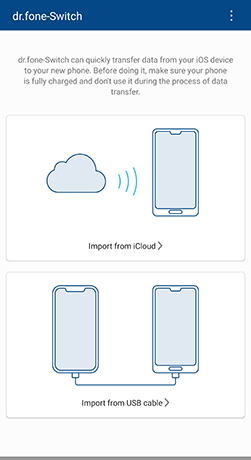
Step 1: Download the mobile version of Wondershare Dr. Fone - Phone Transfer. Connect your iPhone and iPad using a suitable cable.
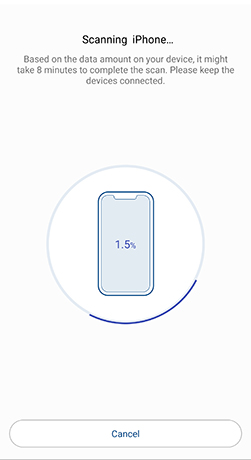
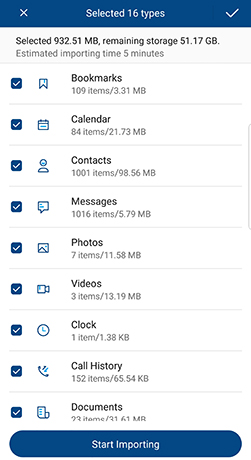
Step 2: The software will start to scan the synced data on your device.
Step 3: After the check, select the contacts you want to shift and click on ‘Start Importing’.
Part 3: Send ringtones to iPhone including iPhone 13 using OneDrive?
With TunesGo, you can transfer ringtones from one device to another directly, and that too within seconds. Nevertheless, if you wish to perform a wireless transfer, then you can take the assistance of a cloud service like OneDrive. Besides moving your files from one device to another, you can also keep them safe on the cloud.
- To start with, download OneDrive on both iOS devices from App Store. You can also visit its iTunes store page right here.
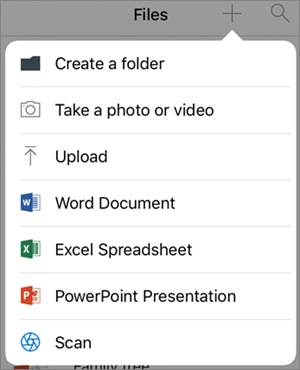
- Open OneDrive on your source device and tap on the “+” icon to add something to the drive. Next, tap on the “Upload” button and locate the ringtone on your device storage to upload it on the drive.
- Now, launch OneDrive on your target device and sign in using the same credentials. Locate the file that you have just added to the drive. Open the folder and download it to your local storage.
- In this way, you can learn how to transfer ringtones from iPhone to iPhone without physically connecting both devices.
Now when you know how to send ringtones from iPhone to iPhone in different ways, you can certainly move your data without any trouble. Feel free to give Dr.Fone - Phone Transfer a try and manage your device in no time. It is a complete phone management tool that will certainly come in handy to you on numerous occasions. If you face any setbacks while moving your ringtones from iPhone to iPhone, let us know about them in the comments below.
iPhone Music Transfer
- Transfer Music to iPhone
- Transfer Music from iPad to iPhone
- Transfer Music from External Hard Drive to iPhone
- Add Music to iPhone from Computer
- Transfer Music from Laptop to iPhone
- Transfer Music to iPhone
- Add Music to iPhone
- Add Music from iTunes to iPhone
- Download Music to iPhone
- Transfer Music from Computer to iPhone
- Transfer Music from iPod to iPhone
- Put Music on iPhone from Computer
- Transfer Audio Media to iPhone
- Transfer Ringtones from iPhone to iPhone
- Transfer MP3 to iPhone
- Transfer CD to iPhone
- Transfer Audio Books to iPhone
- Put Ringtones on iPhone
- Transfer iPhone Music to PC
- Download Music to iOS
- Download Songs on iPhone
- How to Download Free Music on iPhone
- Download Music on iPhone without iTunes
- Download Music to iPod
- Transfer Music to iTunes
- More iPhone Music Sync Tips


Selena Lee
chief Editor