How to Fix iTunes Not Detecting Your iPhone?
Apr 27, 2022 • Filed to: Manage Device Data • Proven solutions
If your concern is similar to this, then you have certainly reached the right place. Some iPhone users might have faced this problem but there is nothing to stress as this can be easily fixed at the comfort of your home or office.
Practically, there could be several reasons which result in iTunes generating issues and freezing whenever you try to make a connection with your PC or Mac. Below we have listed the viable solutions to avoid this problem so that iTunes can start working normally.These solutions are extremely user-friendly and easy to follow. To know the tricks just keep reading.
Part 1: Simple checklist before we Start
Ok, so before we go into details just go through this list of points that might help you getting a fix quickly and knowing what could possibly be causing this error.
If your iTunes not recognizing iPhone, you might see an unknown error or a "0xE" error. And if you do, then simply follow these tricks and try to reconnect your device to check if the problem is persisting.
1. To start with, confirm that you have the updated version of iTunes that works with your PC as an outdated version might have compatibility issues.
2. Also, make sure that you have the up-to-date software on your Mac or Windows PC.
3. Check your device if it is in power on mode
4. If you get an alert saying,“Trust this Computer”, unlock your device and click on Trust.
5. Remove all USB wires from your PC except for your iPhone. Now, test each USB port to confirm if it works. Then try another Apple USB cable.
6. Shut down and then power on your computer and your iPhone.
7. If you have any other PC available then try making a connection with that else get in touch with Apple support.
Part 2: Reinstall the latest version of iTunes on Windows/Mac
A very important thing to make sure is that you should have the current version of iTunes installed on your PC and not an outdated one, which can also create connection problems. Often, iTunes keeps informing its users about the latest updates by sending pop-up requests, however, you can also check any available updates by initiating the inbuilt Software Update tool that comes with iTunes.
The method to do this relies on whether you are utilizing your computer or a MAC to make the connection.
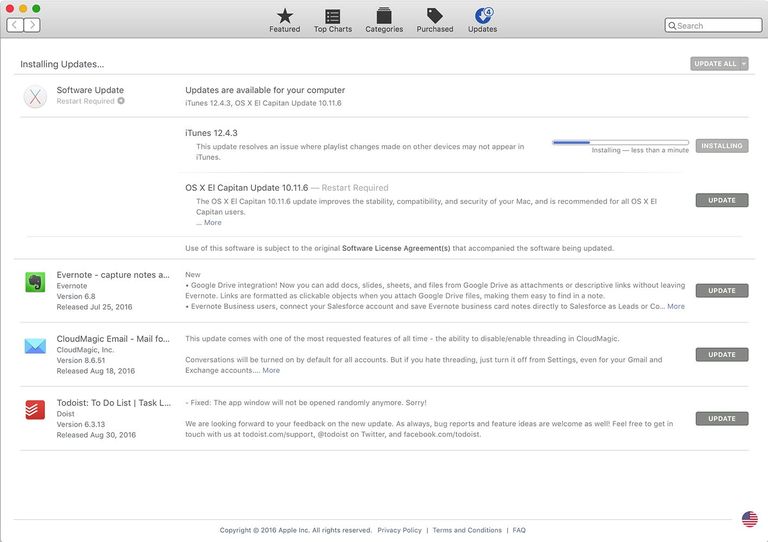
Firstly, we will guide you through the process of Installing or reinstalling the iTunes Update on the Mac. You can also refer to the below illustration for better understanding.

On a Mac, the updates made by iTunes are initiated and Executed by the App Store program that comes preinstalled with Macs. Here's what you need to do.
1. Make sure iTunes is closed as if it is running then the update will not progress.
2. On the top left corner of the screen, you will see the Apple menu bar, Click on that
3. Next, Click App Store.
4. Now, the App Store program opens and automatically navigates to the section where it displays all available updates. Simply, press/touch the Update switch next to the iTunes update.
5. Then, the downloading will start and installs the latest version of iTunes automatically.
6. After the update is executed it disappears from top and shows at the bottom of the screen where it will say Updates Installed in the Last 30 Days
7. And that’s about it, Click iTunes and from now you will be making use of the updated version.
Now, if you own a PC rather than a MAC then you need to follow the below-given instructions to make the connection possible without any errors.

In this whenever you download and install iTunes on your computer you also simultaneously install the Apple Software Update program. This software enables to run available updates on your PC.Now, before you start updating your iTunes let’s just confirm if you've got the latest version of Apple Software Update. Now simply follow the below given stepwise instructions to get the latest update on your PC.
1. Tap on Start> All apps>Apple software update.
2. When the program initiates, it will auto check to confirm if there are any available updates for your PC. If any one of those shows the update is for Apple Software Updates, then just uncheck all options except that one.
3. Finally, Click Install.
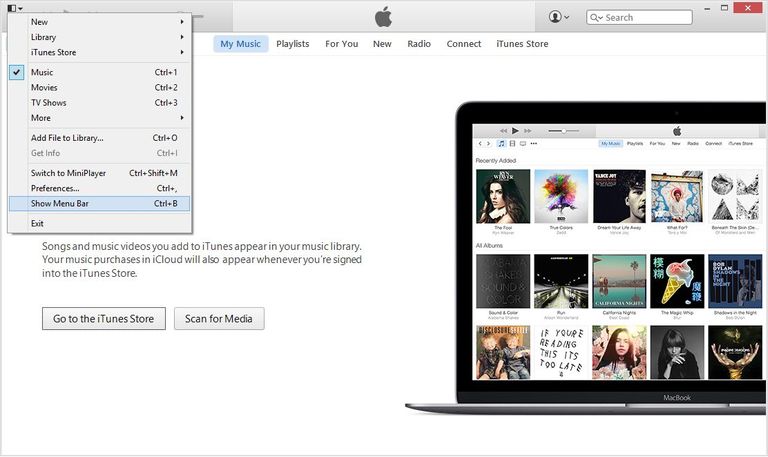
Alternatively, you can also make the update via iTunes in which from inside the iTunesprogram simply tap help and then check for updates and from this point the steps mentioned above apply.
Part 3: Update iPhone driver and service on Windows PC
At times, it also becomes important to update the Apple drives and service on Windows PC in order to make an error-free connection. Adopt this method if the first two methods fail to create a connection. To understand how to do this, just keep reading.
1. Log into your PC as the administrator
2. Make sure iTunes is closed and then connect with the iPhone
3. Tap on the start button on your Windows screen, and type device manager in the search box
4. Moving on, when the device manager appears then simply click to open it
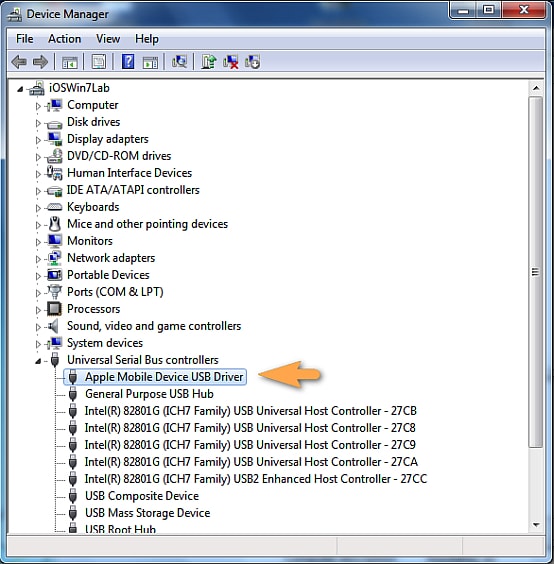
5. Now, on this Device Manager window, roll down and click and open the“Universal series bus controllers”
6. In the drop down list of “Universal series bus controllers” find “Apple mobile device USB driver” which should be listed there.

Note: If you can’t find “Apple mobile device USB driver” that means they are not installed on your system. In this case, you need to install the drivers first and then make a connection.
7. Tap on the selection and you will see the option “Update Driver Software”
8. Click on that and you are good to go.
Part 4: Factory reset iPhone
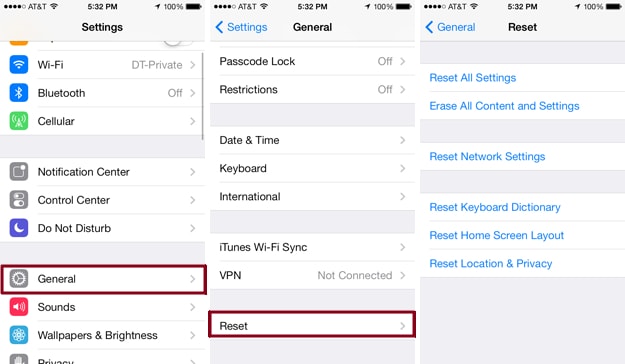
We realize that this is not what you would prefer doing with your iPhone but honestly speaking this might be the only method that will work if none of the above techniques are working for you. That is to factory reset your iPhone.

To do this we highly recommend that you visit the link below as it is a tested and is extremely accurate and makes the entire process simple.
https://drfone.wondershare.com/reset-iphone/factory-reset-iphone.html
Through this article, we pretty much covered all the possibilities to make your iTunes work normally and connect to your device. We hope your questions related to iTunes won’t recognize iPhone has been answered. Also, kindly revert us with your valuable feedback and we will keep you updated with the latest iPhone fixes.
iTunes Tips
- iTunes Issues
- 1. Can't Connect to iTunes Store
- 2. iTunes Not Responding
- 3. iTunes Not Detecting iPhone
- 4. iTunes Problem with Windows Installer Package
- 5. Why iTunes is Slow?
- 6. iTunes Won't Open
- 7. iTunes Error 7
- 8. iTunes Has Stopped Working on Windows
- 9. iTunes Match Not Working
- 10. Can't Connect to App Store
- 11. App Store Not Working
- iTunes How-tos
- 1. Reset iTunes Password
- 2. iTunes Update
- 3. iTunes Purchase History
- 4. Install iTunes
- 5. Get Free iTunes Card
- 6. iTunes Remote Android App
- 7. Speed Up Slow iTunes
- 8. Change iTunes Skin
- 9. Format iPod without iTunes
- 10. Unlock iPod without iTunes
- 11. iTunes Home Sharing
- 12. Display iTunes Lyrics
- 13. iTunes Plugins
- 14. iTunes Visualizers


Alice MJ
staff Editor
Generally rated4.5(105participated)