

How to Restore iTunes Backups to iPhone 13

Apr 28, 2022 • Filed to: Fix iOS Mobile Device Issues • Proven solutions
Apple's new iPhone 13 has debuted with an interesting design, more colors, and advanced features. The line-up consists of four new iPhones - the iPhone 13, the iPhone 13 Mini, the 13 Pro, and the 13 Pro Max model. These new devices boast a larger battery backup, increased storage, and a new A15 Bionic processor.

Though the iPhone 13 line-up comes with many new features, the questions, doubts, and concerns remain almost the same. And, in this post, we're going to answer the question - how to restore iTunes backups to iPhone 13.
So, let's get started in detail.
- Part 1: What does an iTunes backup save?
- Part 2: Why do you need to restore iTunes backups to iPhone 13?
- Part 3: Ways/Methods to Restore iTunes Backups to iPhone 13
- Part 4: What if iTunes does not Restore Backup to your iPhone 13
- Part 5: Using Dr.Fone - Data Recovery (iOS) to Restore Backup to your iPhone 13
Part 1: What does an iTunes backup save?
Most iPhone users use iTunes to back up their mobile phones. But what does this product saves? Well, it includes most of the local data on your device like call logs, messages, photos, local app files, contacts, Keychain data, and more. It doesn't save data that can be downloaded from the server is not saved, to save time and space.
- Photos: Captured from iPhone 13 camera, images saved, screenshots, wallpapers, etc.
- Media Files: Music, movies, videos, ringtones, etc.
- Call & Message Logs: Carrier SMS, iMessage, contacts, voice message, call history, etc.
- Application Data: App settings, data, documents, App Store purchased application data, Keychain data, home screen arrangement, local files, paired Bluetooth devices, etc.
- Settings: Network settings including VPN settings, WiFi hotspots, network preference.
- Memos, Bookmark, & Calendar: Voice memos, notes, calendar accounts, events, Safari, and map bookmark.
- Others: Safari history, browser cache, offline data, temp files, mail cache/message/attachments.
Part 2: Why do you need to restore iTunes backups to iPhone 13?
Mobile phones, Android, or any version of iPhone, including iPhone 13, hold all our work as well as personal data. This sensitive data is often prone to different vulnerabilities. It's easy for the data to get lost. That's why taking the Backup of your mobile data is important. And, in iPhone 13, your data is mostly backed up on iTunes.
But when it comes to maintaining backups and restoring your files back to your iPhone 13, the process can be a bit complex. It's mainly because Apple iTunes may fail to restore iPhone 13 from iTunes backup correctly and efficiently.
Most users complain about receiving the error message that says, "iTunes could not restore iPhone 13 because an error occurred." The error is received when you try to restore iTunes backups to iPhone 13 or any previous model.
In order to solve this issue, we've compiled this detailed, step-by-step guide. Use this guide to walk through the process of how to restore the iPhone 13 from iTunes backup.
Part 3: Ways/Methods to Restore iTunes Backups to iPhone 13
3.1 Restoring your iPhone13 to Factory Settings using iTunes.
If you want to use iTunes for restoring your iPhone to factory settings, you need to make some preparations.
First of all, download and install the latest iTunes version on your PC. After that, backup your data on your mobile device if you have an important and sensitive datastore on it. Finally, disable the "Find My iPhone" setting, and turn off WiFi in order to prevent auto-sync in iCloud.
Steps to Restore your iPhone13 to Factory Settings
Step 1. Connect your iPhone13 to your PC or laptop. After that, run iTunes.
Step 2. Notice when iTunes recognizes your smartphone. When it does, you have to click on the name of the device on the left menu.
Step 3. Finally, you'll see the option named "Restore iPhone..." in the Summary window.

3.2: Steps to Restore iPhone from iTunes Backup
The Apple company often restricts access to its proprietary and important hardware. These programs can only be accessed by approved software applications facilitated by Apple Inc. And iTunes is one such proprietary solution provided by the company.
iTunes is a complete solution that helps backup everything from call logs and messages to application data and music from your iPhone 13 and previous models.
So, if you want to restore your data from iTunes backup, here are the steps you need to follow:
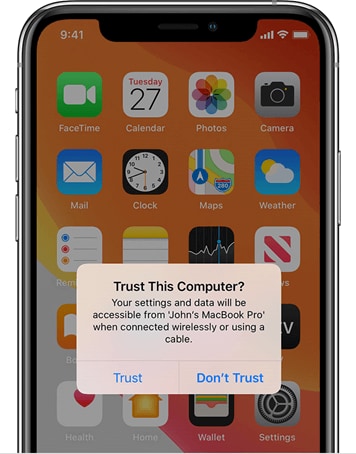
Step 1: Connect your iPhone13 device to your PC or laptop. The software will automatically recognize your iPhone and may request you to enter the passcode of your phone or to press the option ‘Trust This Computer' on your mobile phone.
Step 2: In the iTunes software program on your computer - Windows or MAC, you have to click or tap on the Device button.
You will see this button near the top left of the iTunes window as soon as you connect your device to your computer.

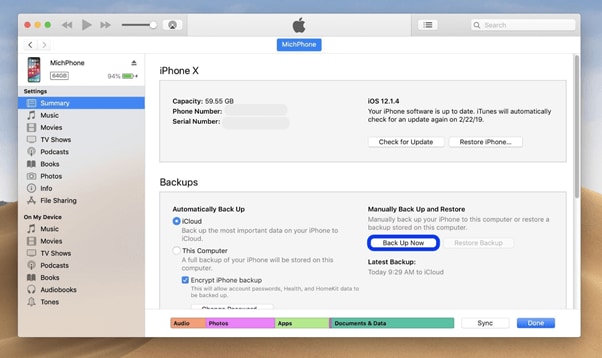
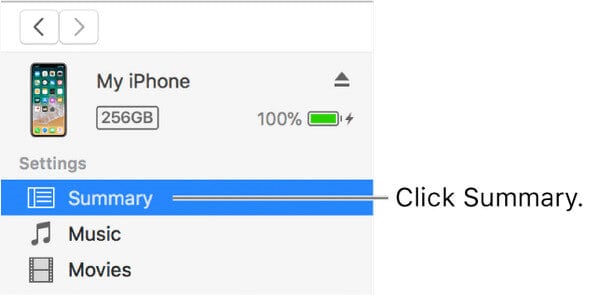
Step 3: After performing the above step, you will land on the Summary page of your iPhone 13. If you are using another window, you have to click the Summary tab. The Summary tab appears on the left menu.
Step 4: Moving forward to the next screen, you will see a 'Restore Backup' button visible right under the Backups section. Simply press it to proceed.
Following this, you will see all the available backups you have on your system. You need to choose the backup file that you want to restore.
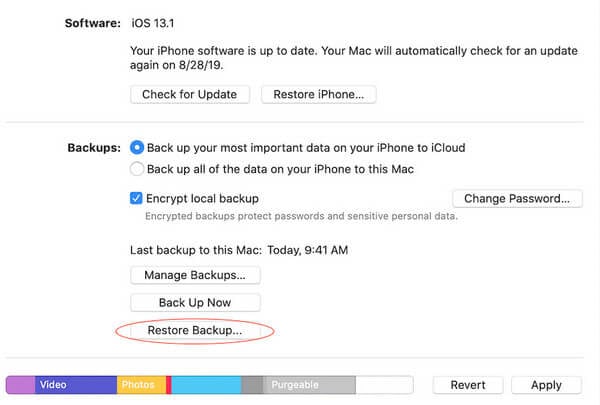
Step 5: Select the desired backup file that you desire to restore, depending on the name or date.
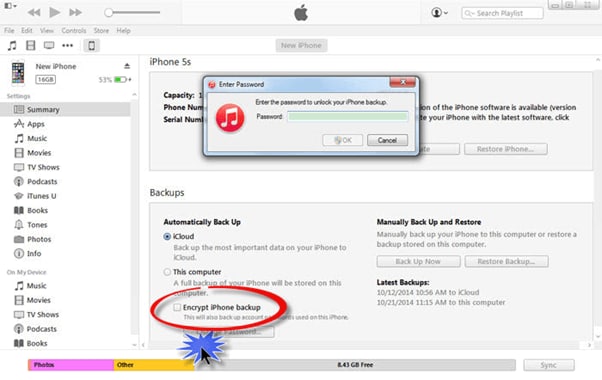
Step 6: On the following window, you might be asked to enter the backup password. This is in case you have selected the “Encrypt local backup” choice.”
Once you have set everything, the restore process will initiate. It takes a few minutes to finish the process, according to the size of the selected backup file.
Step 7: Make sure you don't disconnect your iPhone 13 device after the initiation of the restart process.
You have to wait for it to sync with iTunes. You can disconnect your device once the process finishes.
Part 4: What if iTunes does not Restore Backup to your iPhone 13
There could be the following reasons why iTunes may fail to restore Backup to your device:
- Error in the iTunes backup file
- iTunes internal bug or error
- Bad or no internet connection
- The problematic connection between your computer and iPhone 13 resulting in transfer failure
To resolve these issues, you can try out the following steps or solutions:
Step 1: Use a different USB cable, or switch the connecting port to another available port on your system.
Step 2: Are you using a USB keyword or hub to establish the connection? If yes, then remove the hub and plug in your iPhone 13 directly.
Step 3: Unplug your mobile device and restart it to remove any memory cashing error that might be causing the problem.
Step 4: Are you using Windows Reset Windows Sockets, then restart your computer system. On a Mac, a simple reboot should work.
If these common remedies also fail to work, there is another proven way to restore iTunes backups to iPhone 13 devices. It's called Dr.Fone - Phone Backup (iOS).
Part 5: Using Dr.Fone - Data Recovery (iOS) to Restore Backup to your iPhone 13
Dr.Fone - Data Recovery (iOS) provides a flexible backup and restore solution for your iPhone 13. Besides helping with backup restore, it also restores iCloud and iTunes backup files. And that's all without overwriting any of your data.
It's the easiest and efficient way to restore backups to iPhone 13 without using iTunes. So, here is the step by step process or guide to do so with Dr.Fone - Data Recovery (iOS):
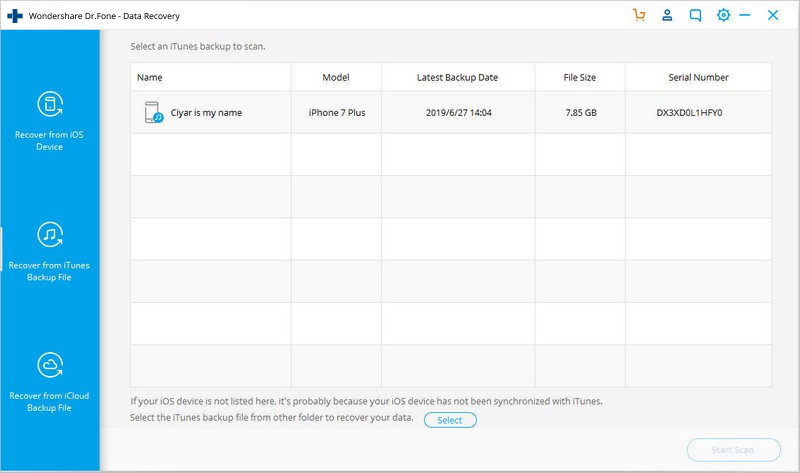
Step 1: First of all, you have to download and install Dr.Fone - Data Recovery (iOS) on your iPhone 13.

Step 2: The next step is to select “Recover from iTunes Backup File.” After that, click the iTunes backup file you wish to restore on your iPhone device. Finally, you have to click or tap on the “Start Scan” button for extraction.
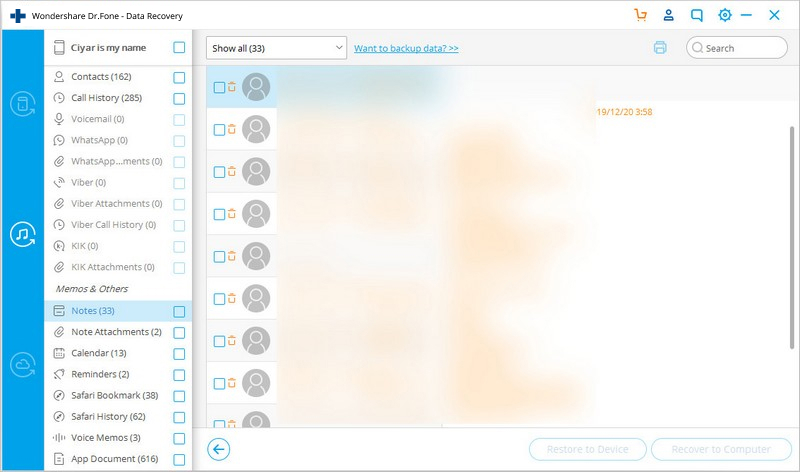
Step 3: After that, you have to previous all the extracted data. And then, tick marks the items that you wish to recover with just a single click.
This is the very simple 3-step process to restore your backup files to iPhone 13 using Dr.Fone - Data Recovery (iOS).
The entire process takes only one click and a few minutes. Once you have connected your device to your system or the software, the program automatically takes the backup of your data on your iPhone, iPod, or iPad. The best part is that in the backup process, new files never overwrite the old ones.
Using Dr.Fone - Data Recovery (iOS), you can preview and select whatever file or content you wish to restore from iTunes to iPhone13.
Conclusion
So, as you see, you can easily restore iTunes backups to your iPhone 13 with or without using the iTunes software program. Dr.Fone - Data Recovery (iOS) works with all models of iPhone. So, if you're an iPhone user, then it's a great tool to have.


iOS Backup & Restore
- Restore iPhone
- Restore iPhone from iPad Backup
- Restore iPhone from Backup
- Restore iPhone after Jailbreak
- Undo Deleted Text iPhone
- Recover iPhone after Restore
- Restore iPhone in Recovery Mode
- Restore Deleted Photos from iPhone
- 10. iPad Backup Extractors
- 11. Restore WhatsApp from iCloud
- 12. Restore iPad without iTunes
- 13. Restore from iCloud Backup
- 14. Restore WhatsApp from iCloud
- iPhone Restore Tips
James Davis
staff Editor