Smart Ways to Back Up iPhone With and Without iTunes
Mar 07, 2022 • Filed to: Backup Data between Phone & PC • Proven solutions
"How to backup iPhone to iTunes? I want to take a backup of my data but can’t seem to make it work with iTunes. Or is there any provision to backup iPhone without iTunes?"
Even though iTunes is a freely available backup tool offered by Apple, users often face troubles using it:
- iTunes doesn’t have a user-friendly interface.
- iTunes can’t help us take a selective backup.
- iTunes doesn’t allow us to preview what is actually in its backup.
Therefore, users often look for alternative ways to backup iPhone/iPad to iTunes.
This tutorial will illustrate how to backup iPhone/iPad/iPod touch to iTunes, and, if you hate iTunes like me, how to back up your iOS device without using iTunes.
- Solution 1: How to backup iPhone or iPad to iTunes
- Solution 2: How to backup iPhone or iPad to computer without iTunes
- iTunes Fact 1: What does iTunes Backup
- iTunes Fact 2: Where are iTunes backups stored (How to preview iTunes backup)
- iTunes Fact 3: How to restore iPhone/iPad from iTunes backup
- FAQs: How to fix iTunes could not backup iPhone issues
Solution 1: How to backup iPhone or iPad to iTunes
Since iTunes is developed by Apple, it is compatible with all the leading iOS devices like iPhone XS, XR, 8, 7 as well as iPad models.
With this video tutorial, you can easily learn how to backup iPhone to iTunes.
Or if you want to backup iPhone to iTunes step by step, follow these instructions.
- If you don’t have iTunes installed, then visit its official website to download it. Following simple on-screen instructions, you can install it on your computer.
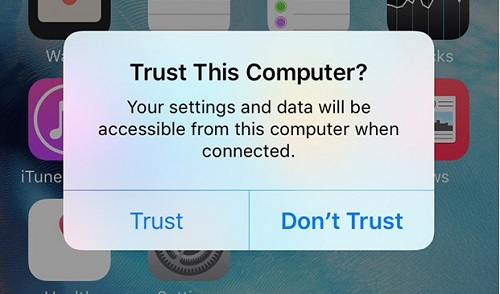
- Launch iTunes on your system and connect your iOS device to it. If you are connecting your iPhone or iPad for the first time, then you will get a prompt like this. Tap on the “Trust” button to authenticate the connection.
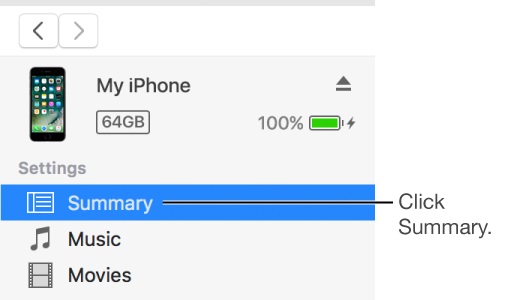
- Wait for a while for iTunes to automatically detect your iPhone or iPad. After that, you can select it from the devices icon and go to its “Summary” tab.
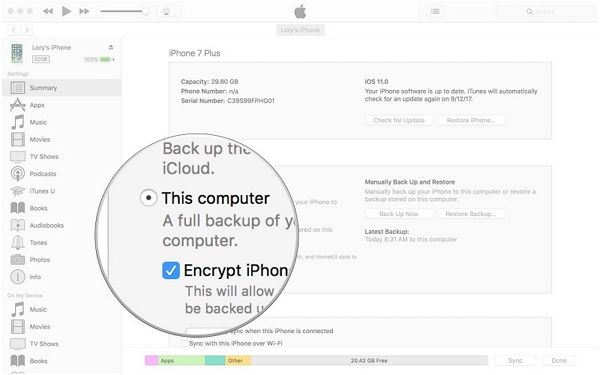
- Move to the “Backups” section. From here, you will get an option to take a backup on the local device or iCloud. Select “This Computer” to save the backup file on your system.
- If you want, you can also encrypt the backup file as well. Just be sure to remember the password else you won’t be able to access your data.
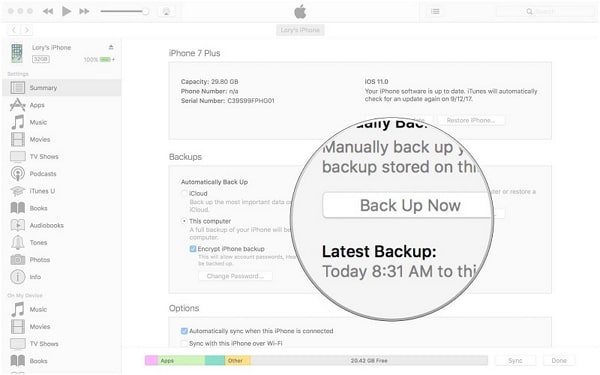
- Now, to manually backup iPhone using iTunes, click on the “Back Up Now” button.
- Wait for a while as iTunes will prepare a backup of your data. You can check the Latest Backup feature to view the details about the last backup.
Due to their appearance, the overall method can look slightly different in Windows and Mac. Though, the technique is similar for both the operating systems to backup iPhone to iTunes.
Solution 2: How to backup iPhone or iPad to computer without iTunes
Due to its limitations, a lot of users look for ways to back up the iPhone without iTunes. If you are also looking for an iTunes alternative, then we recommend trying Dr.Fone - Phone Backup (iOS). It is an extremely user-friendly application that will let you backup and restore your data with a single click. It is a useful tool of the Dr.Fone toolkit, which is developed by Wondershare.
Known as one of the most reliable iOS backups and restore software, it will certainly meet your requirements. Here are some of its features.

Dr.Fone - Phone Backup (iOS)
Backup & Restore iOS Data Flexiblely
- A single click to backup the iOS device data to your computer.
- Selectively backup and restore any iPhone/iPad data you want.
- Allow to preview and restore any data inside the backup to iPhone/iPad/iPod touch.
- No data can be lost on devices during the restore.
- Supported iPhone XS/XR/8/7/SE/6/6 Plus/6s/6s Plus/5s/5c/5/4/4s that run any iOS version
Simply follow these easy steps to backup iPhone/iPad/iPod touch to computer without iTunes.
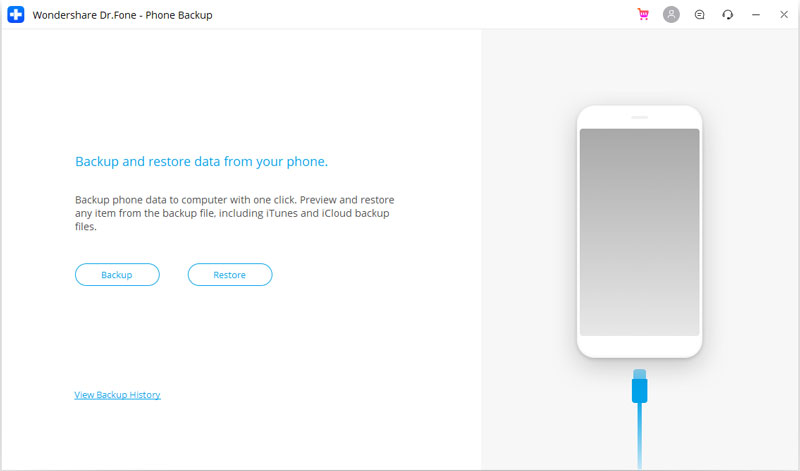
- Launch the Dr.Fone toolkit on your Mac or Windows PC. From its home page, select the “Backup & Restore” option.

- Connect your iOS device to the system and let the application detect it automatically. Click on the “Backup” button once your device is detected.
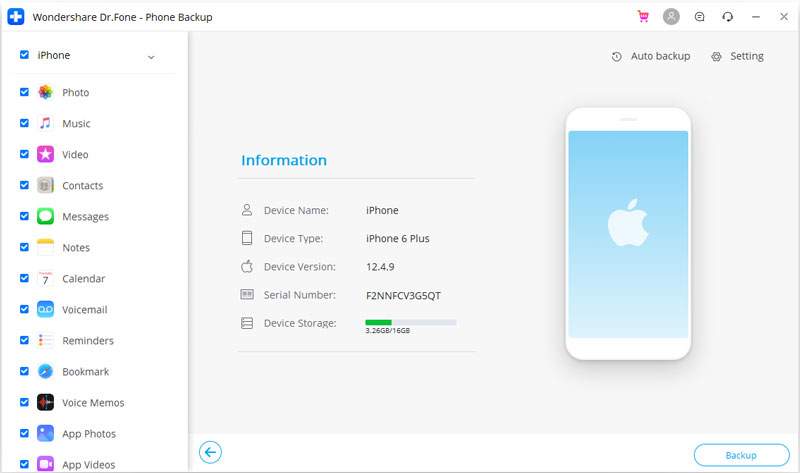
- Now, you can select the type of data that you wish to backup. If you want, you can take a complete backup of your device as well. From here, you can also view or alter the location where the backup would be saved. Click on the “Backup” button to continue.
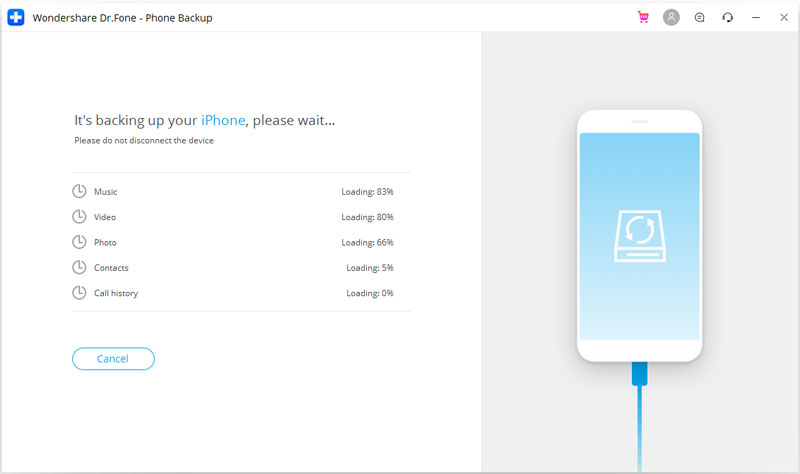
- Sit back for a few minutes as the application will backup selected data types. Once the process is over, you will be notified with a message.
How to restore your iPhone backup since it is backed up to your computer? Here are the steps to follow.
- In order to restore the backup, you can connect your device to the system again and launch the application. Instead of Backup, click on the “Restore” button.
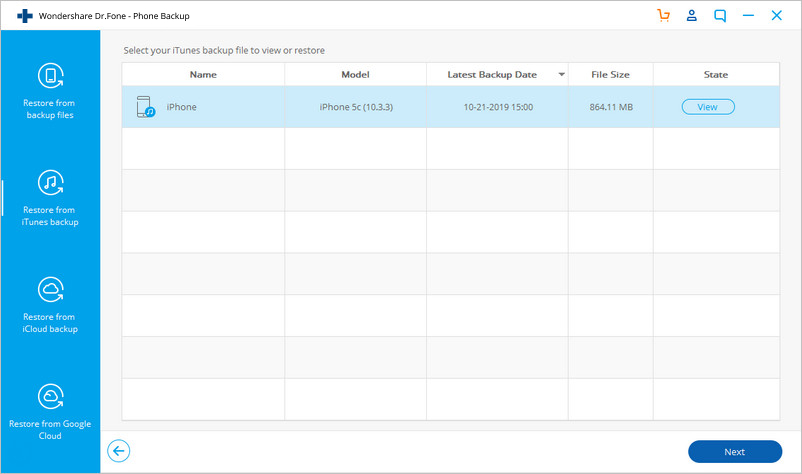
- A list of all the previously taken backup files will be displayed here with their details. If you want, you can load a previous backup from here as well. Select the file of your choice and click on the “Next” button.
- The application will automatically extract the backup and display it under different categories. You can just visit any category and preview your data.
- Select the content you wish to retrieve. You can choose an entire folder and make multiple selections as well.
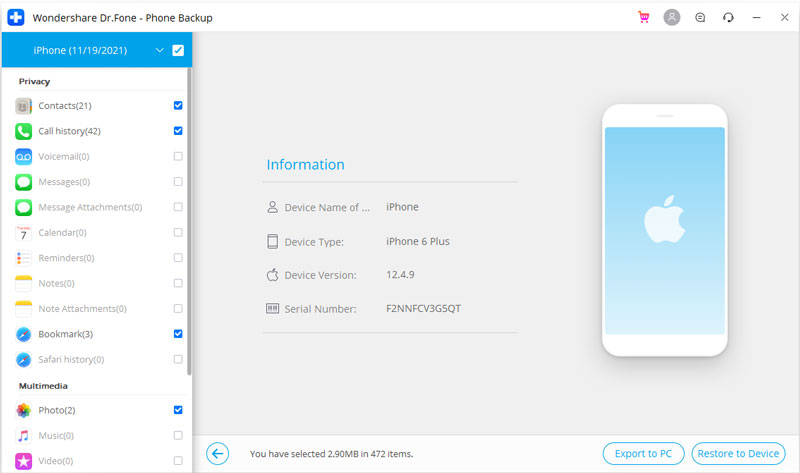
- To restore the data directly to your phone, click on the “Restore to Device” button. In no time, the selected content will be transferred to your iOS device.
- Alternatively, you can save this data to your computer as well. Click on the “Export to PC” button and specify a location where you wish to save your data.
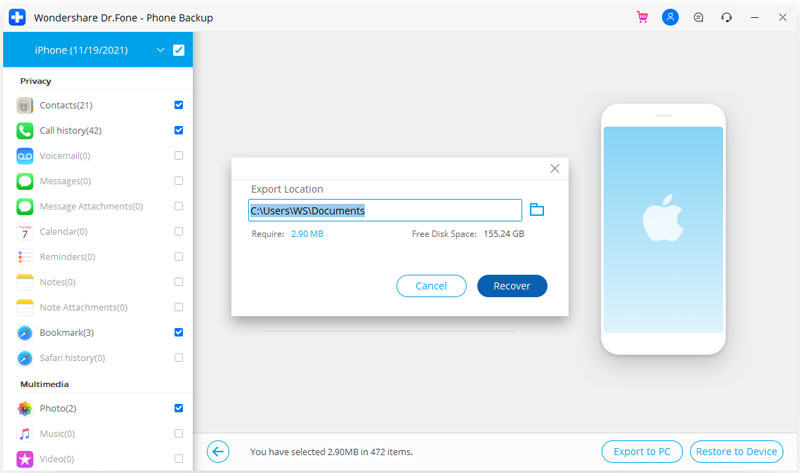
In this way, you can easily backup iPhone without iTunes (or restore it without resetting your device). The process for restoring an iTunes or iCloud backup is quite similar as well.
Still not got it? See this video for more clarifications on iPhone backup & restore on PC.
iTunes Fact 1: What does iTunes Backup
Want to learn how to backup iPhone to iTunes? It is important to cover the basics first. Taking a backup of your data and syncing it with iTunes are two different things.
When we backup iPhone using iTunes, a dedicated folder is maintained on the local system. The file can be encrypted for security purpose as well. An iTunes backup will include all the major data and saved settings on your iPhone like contacts, photos, calendars, notes, messages, and more.
Ideally, it is important to know the type of data that is not included in iTunes backup. Here’s what your iTunes backup will not include:
- iMessages and text messages that are already stored in your iCloud account
- Photos, videos, music, etc. that are already synced with iCloud
- Books and audiobooks that are already present in iBooks
- Touch ID settings and information about Apple Pay
- Health activity
Therefore, before you backup iPhone to iTunes, make sure that the above-mentioned content is saved as it won’t be included in the backup file. Please note that the photos and videos not synced with iCloud will be included in iTunes backup.
iTunes Fact 2: Where are iTunes backups stored (How to preview iTunes backup)
There are times when users want to extract an iTunes backup or simply wish to move it to a more secure location. To do this, you need to know where the iTunes backup is saved. Ideally, it would vary among different operating systems.
Below are how to access the iTunes backup location on Windows and Mac.
On Windows 7, 8, or 10
- Launch the file explorer and go to the directory where Windows is installed. In most of the cases, it is the C: drive.
- Now, browse all the way to Users\<Username>\AppData\Roaming\Apple Computer\MobileSync\Backup.
- Alternatively, you can also go to the Users folder and look for “%appdata%” on the search bar as well.
On Mac
- The location for the iTunes backup is ~/Library/Application Support/MobileSync/Backup/.
- You can launch the Go to Folder app from the Finder. Here, you can enter the location of the iTunes backup folder and press “Go”. Make sure you type “~” as it represents the Home folder on Mac.
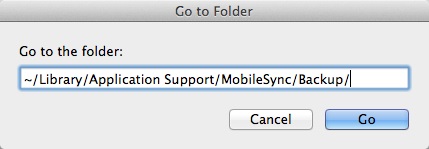
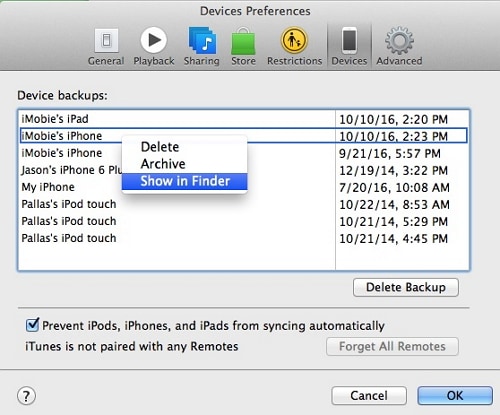
- Alternatively, you can also access it from iTunes as well. Launch iTunes and go to its Preferences from the menu.
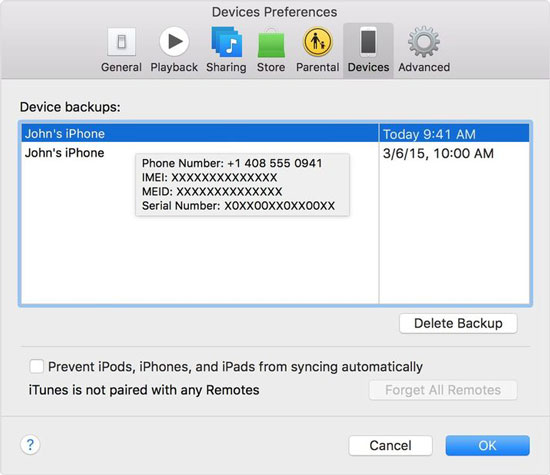
- Go to the Device Preferences to see a list of all the saved backup files. Click the backup while pressing the Control button and select the “Show in Finder” option.
How to preview the details in iTunes backup?
Note: After identifying the location of the iTunes backup, you can’t preview or extract contents from the iTunes backup. To do this, you need to use an iTunes backup extractor.
Here are the steps to preview and restore iTunes backup:
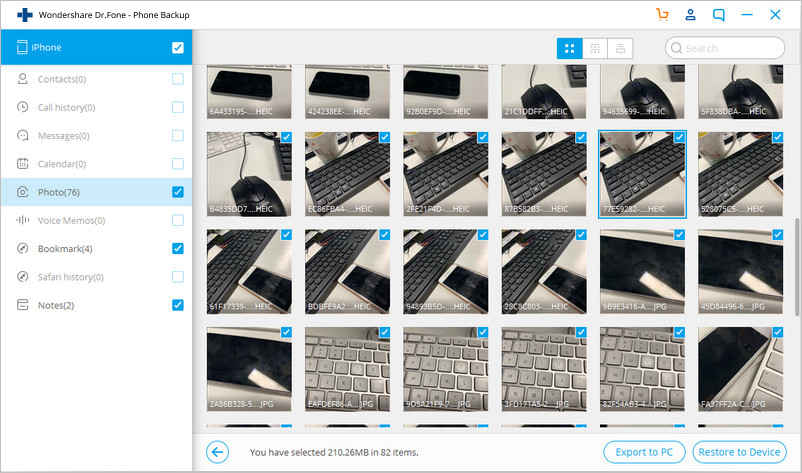
- Open Dr.Fone - Phone Backup (iOS) (see Solution 2), and click "Restore" > "Restore from iTunes backup".
- Here all iTunes backup files are listed. Select one of them and click "View".

- Select a data type. All the details in iTunes backup are now expanded.
iTunes Fact 3: How to restore iPhone/iPad from iTunes backup
Once you know how to back up your iPhone or iPad to iTunes, you can restore your data afterward. The only catch is that in order to restore an iTunes backup, the existing data on your device would be lost.
Anyway, you can follow this video tutorial to restore a previous iTunes backup to your iOS device.
You can also follow these instructions for a step-by-step iTunes backup restore.
- Connect your iOS device to the system and launch iTunes on it.
- Once your device is detected, select it, and go to its Summary tab on iTunes.
- Under the “Backups” option, click on the “Restore Backup…” button.
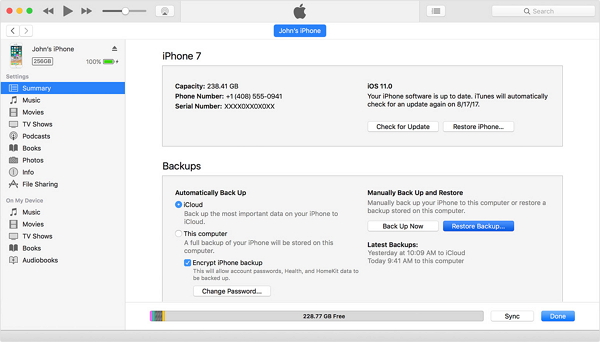
- A pop-up window will appear where iTunes will list the compatible backup files. You can view their respective details from here.
- Select the desired iTunes backup file and click on the “Restore” button.
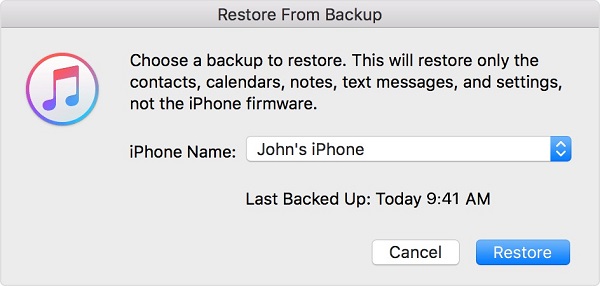
- Wait for a while, and ensure that your device is connected to the system as the backup is restored. Your iOS device would be restarted with the restored content of the backup file.
Drawbacks of iTunes when it comes to restoring iTunes backup:
- In order to restore the iTunes backup, the existing data on your iOS device would be deleted.
- There is no way to preview the data so that you can restore it selectively.
- Users often face compatibility and connectivity issues with iTunes
- It is a more time-consuming and tedious method.
- It can’t take a comprehensive backup of your data. For instance, photos previously synced with iCloud won’t be included in the backup.
To get rid of such troubles, you can restore iTunes backup to iPhone selectively with Dr.Fone - Phone Backup (iOS).
FAQs: How to fix iTunes could not backup iPhone issues
Plenty of times while using iTunes to back up their iOS devices, users face unwanted issues. Here are some of these common issues and how you can fix them in a jiffy.
Q1: iTunes could not backup the iPhone because an error occurred
Sometimes, while taking a backup of iPhone to iTunes, users get this prompt. It mostly occurs when there are compatibility issues between iTunes and iPhone. A network security setting could also be a reason behind it.

- Fix 1: Close iTunes and restart your computer. Launch it once again and check if you still get this error.
- Fix 2: If you haven’t updated your iTunes in a while, then you can encounter this error. Just go to the iTunes menu and check for updates. This will help you update iTunes to a latest stable version.
- Fix 3: Just like iTunes, there could be a problem with the iOS version on your device as well. You can go to its Settings > General > Software Update and upgrade your iPhone or iPad to the latest available iOS version.
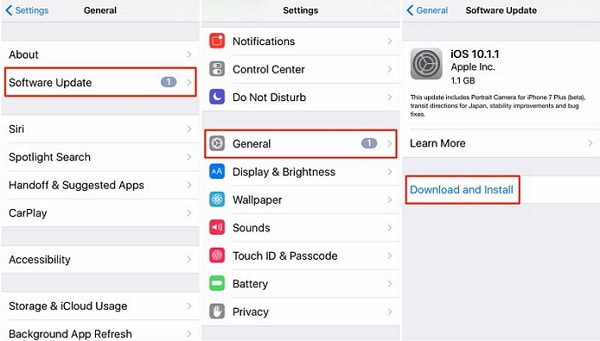
- Fix 4: A firewall setting on your system can be tampering with iTunes too. Simply turn off the firewall or stop any third-party anti-malware tool that you have and try to backup your device again.
Q2: iTunes could not backup the iPhone because the iPhone got disconnected
While taking the iPhone backup on iTunes, you might encounter this problem as well. It usually happens when there is a connectivity issue between your device and the system (or iTunes).

- Fix 1: Firstly, check for any hardware issue. Make sure that you are using the original Apple lightning cable to connect your device and that it should be in a working condition. Also, check the USB sockets on your iOS device and the system to make sure there is no hardware problem.
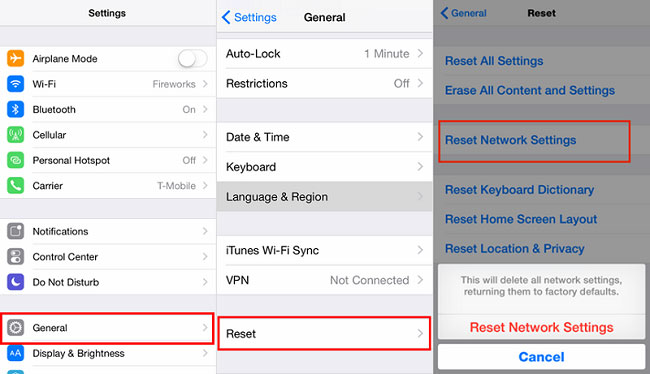
- Fix 2: There could be a network issue with your iOS device as well. To fix this, go to its Settings > General > Reset and choose to Reset Network Settings.
- Fix 3: Go to the Settings on your device and make sure the “Background App Refresh” option is disabled. A running app in the background mostly causes an issue like this.
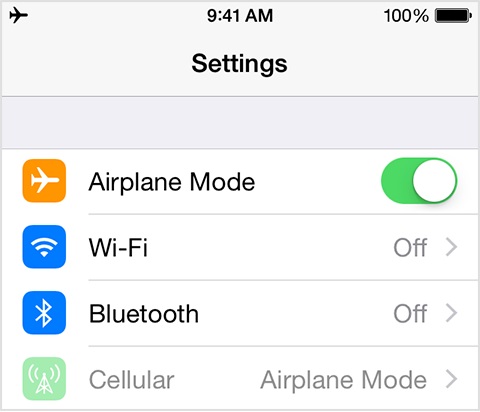
- Fix 4: Disconnect your phone, put it in the Airplane mode, and connect it again to iTunes.
Q3: iTunes backup corrupt
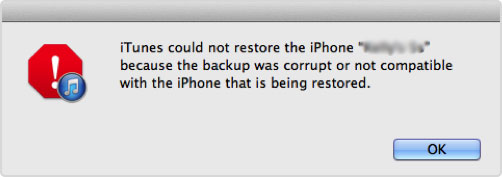
Getting an iTunes backup corrupted prompt is one of the most unwanted situations for any iOS user. Chances are that your backup is actually corrupted and can’t be retrieved in any way. Nevertheless, you can try some of these techniques to fix it.
- Fix 1: Delete the previous unwanted iTunes backup files. We have already discussed how to locate iTunes backup files on Mac and Windows systems. Simply select the files that are no longer needed and delete them. Once it is done, launch iTunes again and try to restore the backup.
- Fix 2: If you don’t want to delete an existing backup file, then you can rename it or simply move it to another location as well.
- Fix 3: Make sure that there is enough free space on your iOS device. Otherwise, the content from the backup file can’t be restored.
- Fix 4: The best way to resolve this issue is by using a dedicated third-party tool that can extract the iTunes backup file. You can use Dr.Fone - Phone Backup (iOS) to do the same. Simply load an iTunes backup to the application and restore its content to your device without any trouble.
By following these easy instructions, you can learn how to backup iPhone to iTunes. We have also provided an ideal alternative to iTunes as well, so that you can backup and restore your important files selectively without losing existing data or settings on your iDevice. The Dr.Fone toolkit provides a super user-friendly and highly reliable solution that will come handy to you on numerous occasions. You can even try it for free before buying the full version and be a judge of it yourself.
iPhone Backup & Restore
- Backup iPhone Data
- Backup iPhone Contacts
- Backup iPhone Text Messages
- Backup iPhone Photos
- Backup iPhone apps
- Backup iPhone Password
- Backup Jailbreak iPhone Apps
- iPhone Backup Solutions
- Best iPhone Backup Software
- Backup iPhone to iTunes
- Backup Locked iPhone Data
- Backup iPhone to Mac
- Backup iPhone Location
- How to Backup iPhone
- Backup iPhone to Computer
- iPhone Backup Tips


Alice MJ
staff Editor