“iPhone” ätiýaçlyk nusgasy: “iPhone” -yň maglumatlaryny çykarmak we dikeltmek
So we all know how amazing Apple is, right? Of course, we do, that’s why we are all so willing to shell out a ridiculous amount of money for the tiniest of iPhone upgrades, even though Apple products do come with their fair share of inconveniences! One of those inconveniences comes in the form of their iPhone backup system. Apple gives you a pretty cool option of backing up your data to iCloud or iPhone. The catch? The backup files are encrypted in such a way that you can’t access the data! You can only access the backup if you download the whole file into your iPhone. This means that to retrieve a few pictures or messages, you might have to completely reformat your iPhone!
Now, this is where this article comes in. This article will help you fix this problem of accessing backup files, using a helpful iPhone backup extractor.
“What’s an iPhone backup extractor,” you ask? Read on and you’ll find out!
- Part One: Everything you need to know about iPhone backup extractors.
- Part Two: #1 iPhone Backup Extractor: Dr.Fone - Data Recovery (iOS)
- Part Three: #2 iPhone Backup Extractor: iPhone Backup Extractor — Recover from iPhone
- Part Four: #3 iPhone Backup Extractor: iBackup Extractor - Retrieve from iPhone
Part One: Everything you need to know about iPhone backup extractors.
What is an iPhone backup?
Before we get into iPhone backup extractors, you need to understand what is an iPhone backup, to begin with. An iPhone backup is the act of transferring all your iPhone data into an iCloud or iTunes backup file. All the data gets stored in that file, in case you ever need to restore data in case of data loss, or in case you want to change an iPhone and carry all your information to the new one. This backup file consists of everything, all your pictures, contacts, messages, apps, and even settings. You can learn how to backup iPhone data to iCloud or iTunes here >>
What is an iPhone backup extractor?
Without getting into the technicalities, an iPhone backup extractor locates and reads your iTunes or iCloud backup file. It can then allow you to view and extract all that information from the backup file individually.
What makes an iPhone backup extractor awesome?
There are several criteria for a great iPhone backup extractor, such as:
- It needs to be compatible with all different iOS devices and iOS versions as well. This is important because Apple keeps introducing new upgrades and your iPhone backup extractor should keep up.
- An ideal iPhone backup extractor should be able to recover data from iTunes backup, iCloud backup, and even from the iPhone directly.
- It should be elegant, simple, and easy-to-use. An ideal iPhone backup extractor would have a gallery you can navigate as well.
Part Two: #1 iPhone Backup Extractor: Dr.Fone - Data Recovery (iOS)
So based on the criteria we’ve listed out we’ve found that Dr.Fone - Data Recovery (iOS) is the best iPhone Backup Extractor. Dr.Fone has been introduced by one of the most reliable software enterprises - Wondershare, which is trusted by millions of people around the world and has been featured in the pages of Forbes magazine several times! So you know you’re in good hands.
It serves as an iPhone Backup Extractor that can retrieve data from iCloud backup files, iTunes backup files, and it can even scan iPhone and recover data directly.

Dr.Fone - Data Recovery (iOS)
3 ways to extract data from iPhone!
- World's 1st data recovery software with the highest recovery rate in the industry.
- Extractor data directly from iPhone, iTunes backup, and iCloud backup.
- Recover data lost due to deletion, device loss, jailbreak, iOS 13 upgrade, etc.
- Selectively preview and recover any data you want.
- Works for all iOS devices. Compatible with the latest iOS 13.

- Fully compatible with Windows 10 or Mac 10.15.
Method 1: Extract Files from iTunes Backup.
Step 1. Choose the Recovery Type.
In the left-hand panel, you’ll find three recovery options, choose “Recover from iTunes Backup file.”
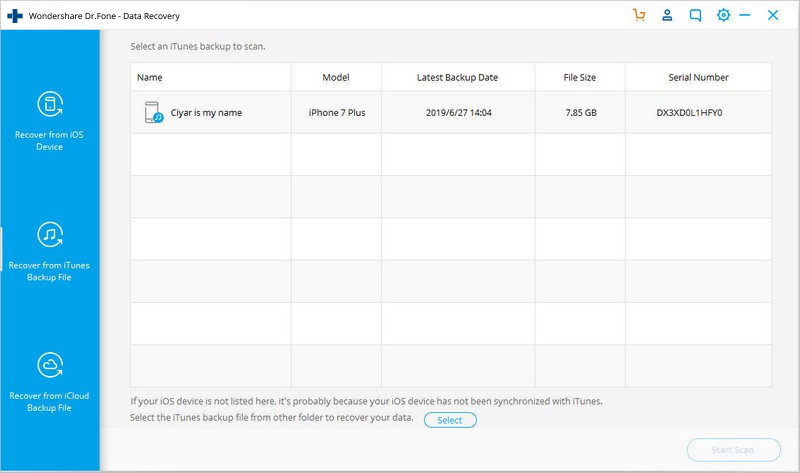
Step 2. Scan the backup file.
Make sure that you choose the correct backup file. You can go through the details of each backup file, such as size, and date, to find out which backup file is the latest. Select it and then click ‘Start Scan.’ After that, you can get rid of the unnecessary backup files.
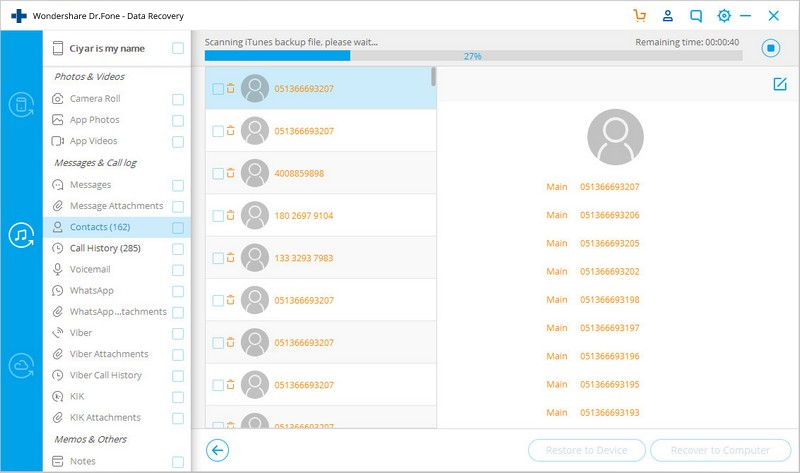
Step 3. Browse through the gallery.
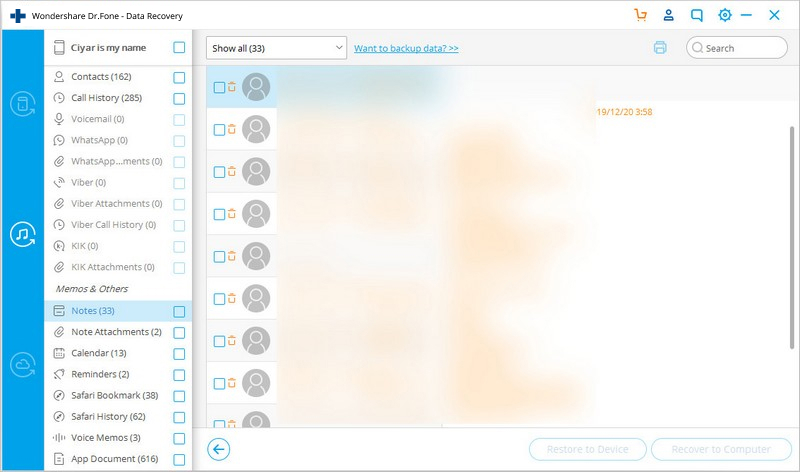
Now, you can simply navigate the different file types from the left-hand panel, and then find the relevant data in your gallery. Select the files that you would like to recover and click “Recover to Computer.”
Join millions of users who have recognized Dr.Fone as the best tool.
Method 2: Recover from iCloud Backup File.
It is slightly easier to view backup files in iCloud through the iCloud website. However, you can only access things like contacts, mail, Pages, etc. If you want to access all the other information like pictures, messages, voicemails, apps, etc, then you’ll need an iPhone backup extractor, which brings us here.
Step 1. Choose the Recovery Type.
Like in the previous method, when asked about the recovery options, choose “Recover from iCloud backup files.” Now you need to enter your iCloud password and ID to log in. However, this is completely safe, Dr.Fone is only a portal through which to access your iCloud backup files, only you can access your account.
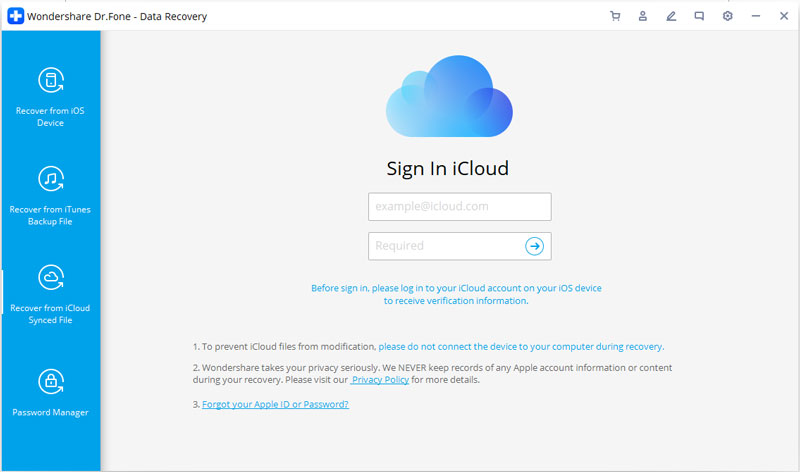
Step 2. Scan the backup file.
Go through the different backup files, click ‘download’, and then click ‘scan.’
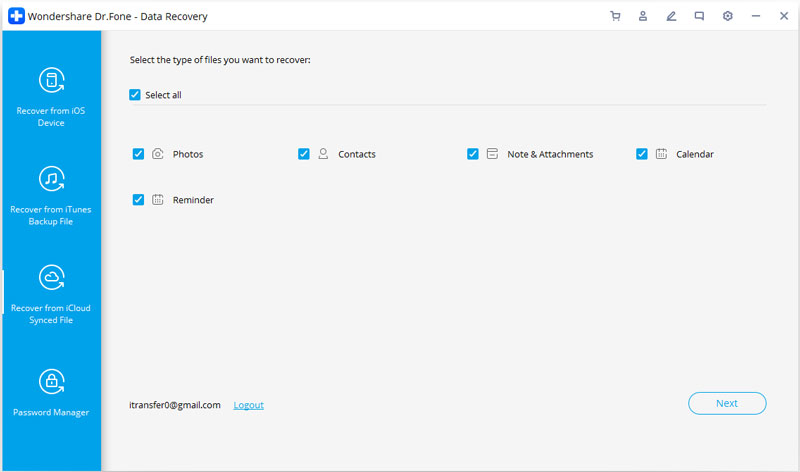
Step 3. Browse through the gallery.
Like in the previous method, you can navigate through the file types using the slider at the side, and then go through the gallery to select the files you’d like to restore, and then click on ‘Recover to Computer.’
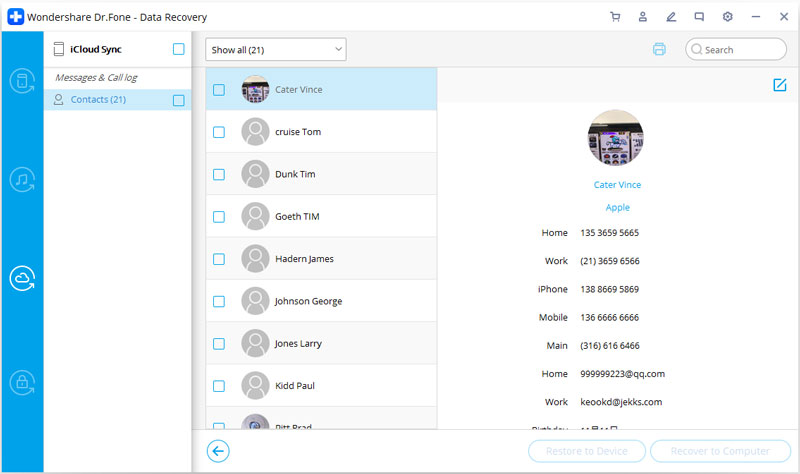
Method 3: Recover iPhone data without backup.
This method is meant for people who don’t have a backup either in iCloud or iTunes. In that case, you can get Dr.Fone to scan your iPhone and display all the files presently there, or all the files that have been deleted even.
Step 1. Connect your iPhone to your computer so it can be scanned.
Download and launch the Dr.Fone software. Then connect your iPhone to your computer using a cable. Dr.Fone will immediately detect your device.
Step 2. Choose the Recovery Type.
Once you find the three recovery options, choose ‘Recover from iOS Device.’
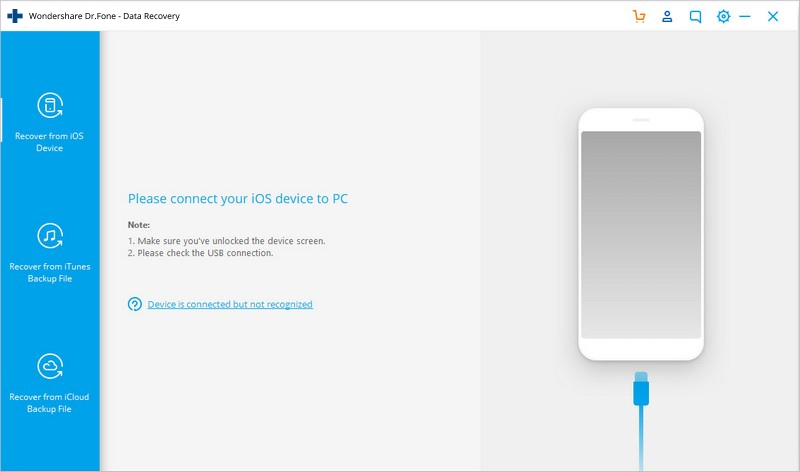
Step 3. Choose the file type.
You’ll get a large selection of different types of files available on your iPhone. Select the ones you’d like to restore, and then click ‘Start Scan.’
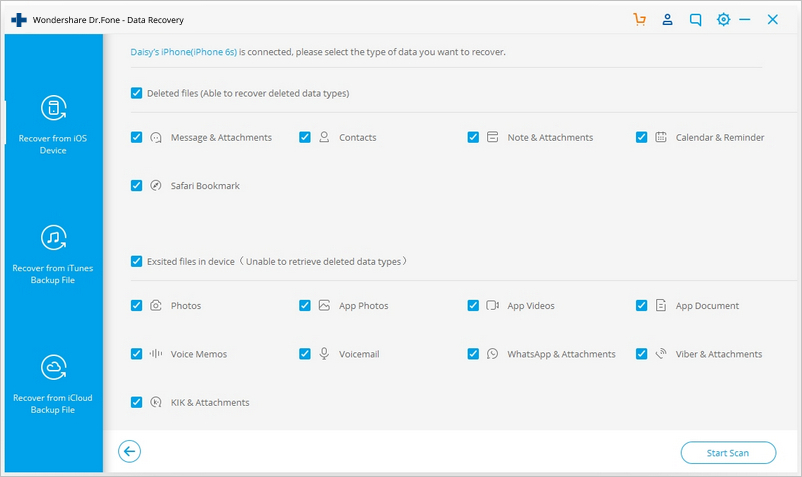
Step 4. Browse through the gallery.
You’ll be able to find a gallery with all the items on your iPhone. You’ll even find all the deleted items. You can select the ones that you’d like to restore and then click “Restore to Computer” on the bottom right.

Part Three: #2 iPhone Backup Extractor: iPhone Backup Extractor - Recover from iPhone
This is another decent iPhone backup extractor that works well with all devices and all operating systems. Within a matter of minutes, it can detect all the backup in your iTunes and restore it to your device. However, it does come with a few drawbacks, which knocks it just a little below Dr.Fone in terms of reliability.
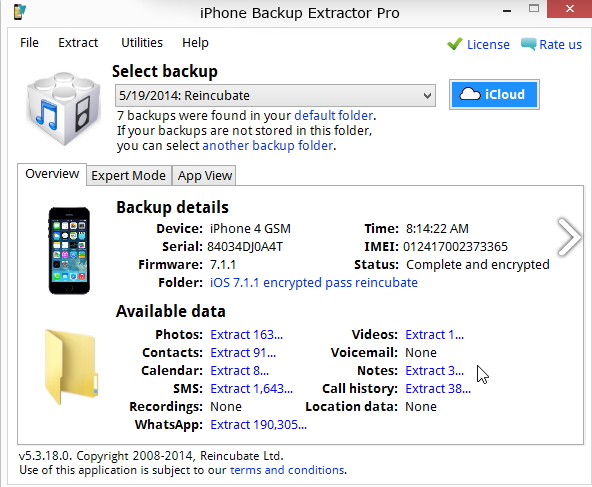
Pros:
- Well designed.
- Compatible with all devices and operating systems.
- You can preview the data in the backup file.
Cons:
- Some users complain that sometimes it doesn’t detect all the data.
- The UI design and interface are very primitive and ugly.
Part Four: #3 iPhone Backup Extractor: iBackup Extractor - Retrieve from iPhone
iBackup Extractor is a very simplistic but efficient software with which you can easily browse all the data in your iTunes backup file and you can easily retrieve data as well, from your iTunes backup and your iOS devices. It even comes with a free trial which can let you extract about 50 items. You can even retrieve call logs, messages, emails, etc.
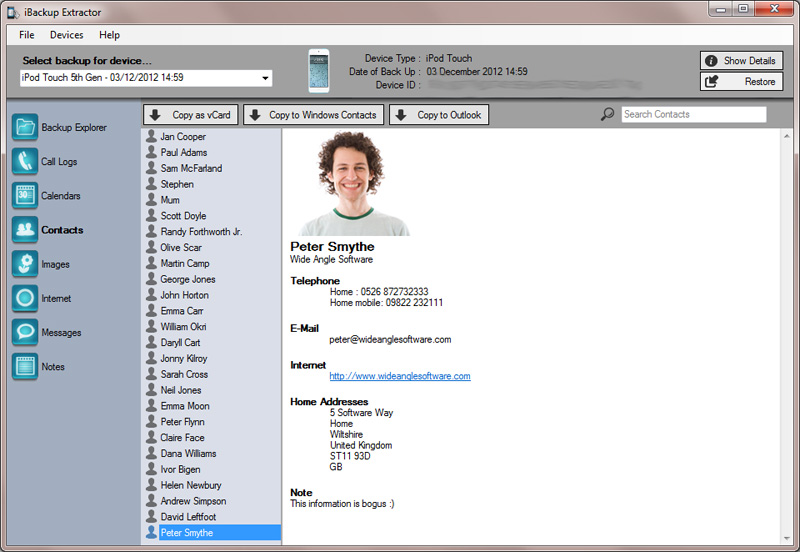
Pros:
- Simple and easy.
- Compatible with Mac and PC.
- Extracting data is very simple and quick.
Cons:
- The free demo is worthless.
- The preview screen is confusing.
- It has a very high failure rate.
So hopefully I’ve been able to give you a good idea about what is an iPhone backup extractor and why you need it. I’ve also listed out the top three iPhone backup extractors according to the criteria listed out earlier. My recommendation is Dr.Fone for all the reasons stated earlier, however, you can have a look at them all and make an informed decision.
Do let us know if you found this guide to be useful, and if you have any questions leave them down in the comments and we’ll get back to you about it!
iPhone Backup & Restore
- Backup iPhone Data
- Backup iPhone Contacts
- Backup iPhone Text Messages
- Backup iPhone Photos
- Backup iPhone apps
- Backup iPhone Password
- Backup Jailbreak iPhone Apps
- iPhone Backup Solutions
- Best iPhone Backup Software
- Backup iPhone to iTunes
- Backup Locked iPhone Data
- Backup iPhone to Mac
- Backup iPhone Location
- How to Backup iPhone
- Backup iPhone to Computer
- iPhone Backup Tips


Alice MJ
staff Editor