How to Find and Change the iTunes Backup Location on Win
Mar 07, 2022 • Filed to: Backup Data between Phone & PC • Proven solutions
"Where is the iTunes backup location in Windows 11/10? I can't seem to find where the iTunes backup folder in Windows 11/10 is!"
Apple's iTunes is a one-in-all media manager and a playback app for both Mac and Windows. It stores the entire Backup of your iOS device in the primary disk of your Mac and windows.

Using iTunes is also possible on computers or other devices running Windows 11/10. Further, you cannot change the default backup location. Generally, iTunes backup in window 10 occurs automatically whenever you connect your iPhone to iTunes and sync. These regular backups can use numerous gigabytes on your system.
The space on your Windows partition gets reduced constantly with the ever-expanding iOS backup folder. Further, iTunes does not allow you to change the iTunes backup location windows 11/10. But, there are some tricks with which you can find or change iPhone backup location windows 11/10.
Bir iTunes kullanıcısıysanız, bu makale sizin için yararlı olacaktır. Bu yazıda, Windows 11/10 iTunes yedekleme dosyası konumunun nasıl bulunacağını ve değiştirileceğini tartışacağız.
Bölüm 1- 11/10 Penceresinde iTunes Yedekleme Konumu Nerede
iTunes, telefonunuzun tüm yedeklerini bir Yedekleme klasörüne kaydeder. Ayrıca, Yedekleme klasörünün konumları işletim sistemine göre farklılık gösterir. Yedekleme klasörünü kopyalayabilmenize rağmen, tüm dosyaları mahvetmek için farklı klasörlere taşımamanız önerilir.
1.1 11/10 penceresinde iTunes yedekleme dosyalarının konumunu bulmanın birkaç yolu:
Mobil Senkronizasyon klasöründe iTunes yedeklemesini bulun
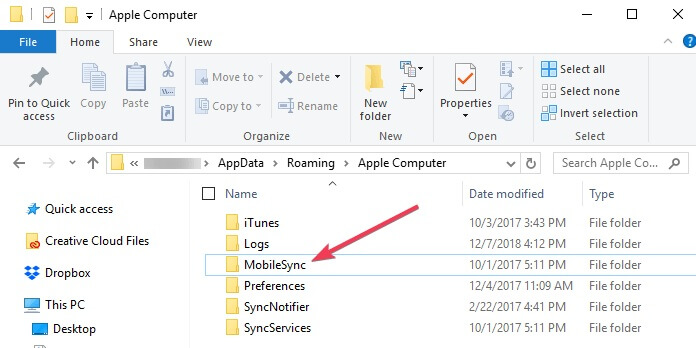
You can find iTunes backup file location windows 11/10 in the Mobile Sync folder. Steps to find the Mobile Sync folder where iTunes backup is saved in Windows 11/10:
- Go to the C: >> Users >> Your username >> AppData >> Roaming >> Apple Computer >> MobileSync >> Backup
Or
- go to C: >> Users >> Your username >> Apple >> MobileSync >> Backup
1.2 Find iTunes location on Windows 11/10 by using the search box
You can also find the iTunes backup folder Windows 11/10 by using Windows Start Menu's Search box. Following are the steps that you have to follow to find the location on window10
- Open the Start menu in Windows 11/10; you can see a Start button next to the search bar.

- If you downloaded the iTunes from Microsoft Store, then you have to click in the Search bar and enter %appdata%
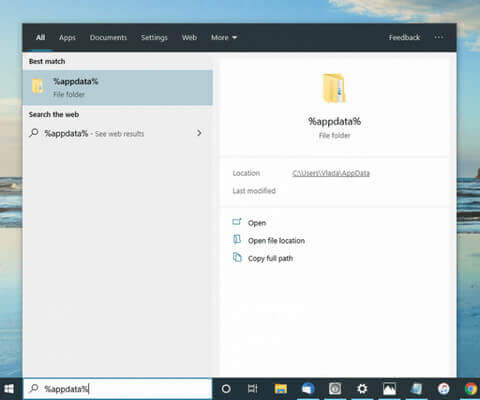
Or go for %USERPROFILE%, then press Enter or Return.
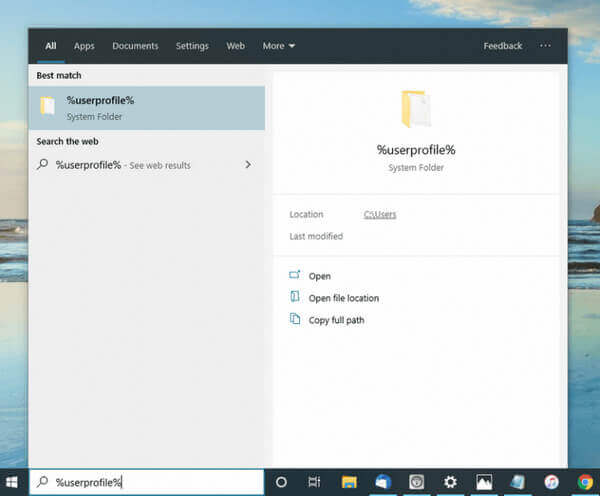
- Then in the Appdata folder, you have to double-click on the "Apple" folder and then "Apple Computer" and "MobileSync" and finally go to the "Backup" folder. You'll find all your iTunes backup file location in Windows 11/10.
Part 2- How You Can Change the iTunes Backup Location Windows 11/10?
If you own an iPhone and want to change the backup location Windows 11/10, you must follow some steps given in the following parts. But before changing the location of the iTunes backup, it is also important to know why there is a need to change the iTunes backup Location in window 10.
2.1 Why you want to change the iTunes backup location Windows 11/10?
iTunes backups are only certain iOS data like app files, settings, and camera roll photos from the iPhone every time you sync. If the iTunes backup gets full, then it affects the ideal performance of your system. Following are some important reasons why you want to change iTunes iPhone backup location Windows 11/10
- Heavy storage on Disk C
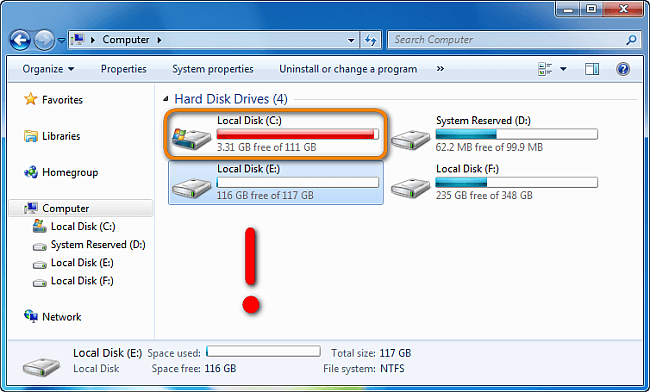
iTunes backs up iOS data, including app files, images, videos, settings, and more from the iOS devices each time you sync. Moreover, the iOS backup files may accumulate the storage of your drive very quickly. Due to this, Disk C gets full in less time. This may further lead to a slow Windows Operating System, low storage space for other files, and no space to install new programs
- For your personal reasons
Sometimes due to personal reasons, you may not want others to look into your personal data. In that case, also you can change iTunes backup location Windows 11/10.
- Easy to find iTunes default location
As it is easy to search iTunes in the default location, so if anybody wants to change the location can do so.
2.2 Ways to change the iTunes backup location on window 10
If you want to change the iTunes back up to a completely different location on Windows 11/10, then a symbolic link may help you. It allows you to connect two folders to a particular location to copy all the files you have.
But before doing that, you will need to make a new folder for all your potential backup locations. After this, you can proceed with locating the existing backup locations. Following are the steps you will need to follow to change the iTunes backup location on window 10.
- As you have located the current iTunes backup directory, now you have to make a copy of the C: >> Users >> Your username >> AppData >> Roaming >> Apple Computer >> Mobile Sync >> Backup >> directory.
- You have to create a new directory for the data, where you want iTunes to store all your backups from now on. For example- you can create a directory in C:\ folder.
- Then you have to go into the directory that you create by using the "cd" command.
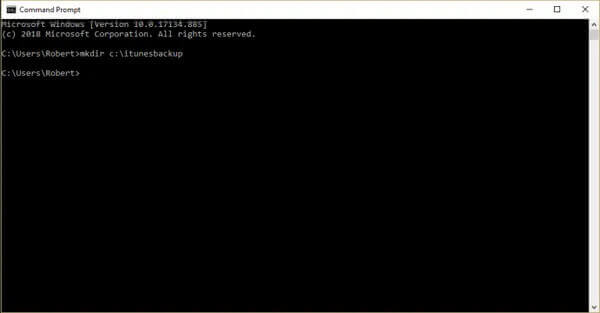
- Now you can navigate to the current backup location by - C: >> Users >> Your username >> AppData >> Roaming >> Apple Computer >> MobileSync >> Backup. Further, using the Windows 11/10 File Explorer can also delete the backup directory and its content.
- Go back to the Command Prompt and then type the same command: mklink /J "%APPDATA%\Apple Computer\MobileSync\Backup" "c:\itunesbackup." Ensure to use the quotes.
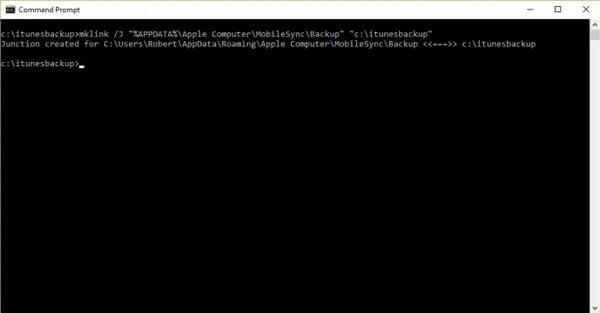
- As you have created the symbolic link successfully, you can now connect the two directories and change the iTunes backup locations in Windows 11/10.
- From now all your new iTunes backups are transferred to the "C:\itunesbackup" or the location that you have select.
Part 3- Best Alternative for iTunes to Backup or Restore your Data
Sometimes you may find it difficult to restore your iPhone's data through the computer as iTunes backup cannot be open on PC. It is one of the limitations of Apple phones. But with the help of Dr.Fone-Phone Backup (iOS), you can open the backup file on a PC, and it can also restore to a different phone.
Notes: I can't open iTunes backup on win 10; why?
When you found an iTunes backup file in Windows 11/10, the files may get encrypted with long character strings or file names. It means you can't read the iTunes backup files. You might not be able to open iTunes backup location Windows 11/10 and receive an error message for the same. Following are some of the reasons for not opening iTunes:
- Not Enough Space Available on this Computer
- iTunes could Not Recognize your Device
- The Lockdown Folder is Corrupt
- Security Software Conflicting with iTunes
- The device is Not Compatible for Requested Build
To open iTunes and restore the Backup and view the files, you will need to use a professional tool like Dr.Fone-Phone Backup (iOS). It helps to extract data from iTunes backup files or view iTunes backup files on window 10.
With Dr.Fone Phone Backup, you can open the backup files on a PC and even restore all the data to a different phone. Further, it enables you to selectively restore all content from iCloud Backup to your iPhone without disturbing the existing data present on the device.
Moreover, it helps to back up the iTunes data selectively as well as freely.
Dr.Fone offers an easy way for iTunes Backup on Window 10
Download for PCDownload for Mac
4,039,074 people have downloaded it
- With just one click, you can take a backup of your photos, videos, audios, contacts, call logs, bookmarks, and so much more to your computer.
- There is a provision to maintain different versions of backup files instead of overwriting your data.
- The application also lets us preview an existing backup's data on its interface and selectively restore it to our phone.
- You can restore the saved Dr.Fone backup to the same or any other device with no compatibility issues.
- The application can also restore an iTunes, iCloud, or Google Drive backup to the target device.
It is essential for backing up the iPhone data regularly. Dr.Fone offers the easiest and flexible ways to Backup and restores all your data in your iPhone. The best part restores the Dr.Fone data backup and restores all the iTunes and iCloud backup files without affecting any other data.
Let's find out how you find and restore iPhone backup file location Windows 11/10 with the help of Dr.Fone-Phone Backup (iOS).
Step 1: Backup iPhone Data to the system
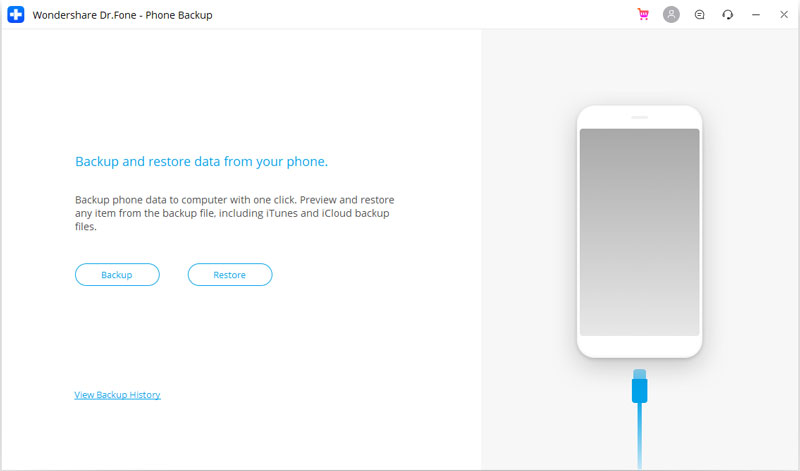
To start with, launch the Dr.Fone toolkit, open the Phone Backup module, and connect your device. From the provided options, choose to backup your iPhone data.

Now, the application will display an extensive list of various data types that you can save. Here, you can select what you wish to include in the backup or select all files.
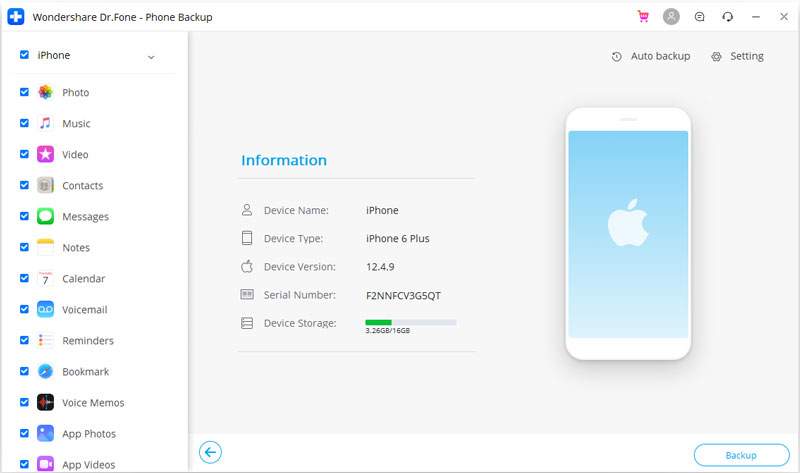
That’s it! You can now click on the “Backup” button and wait for a while as the application would back up your data to the computer. When the process is completed, it will let you know to go to the location where your backup is saved and check it.
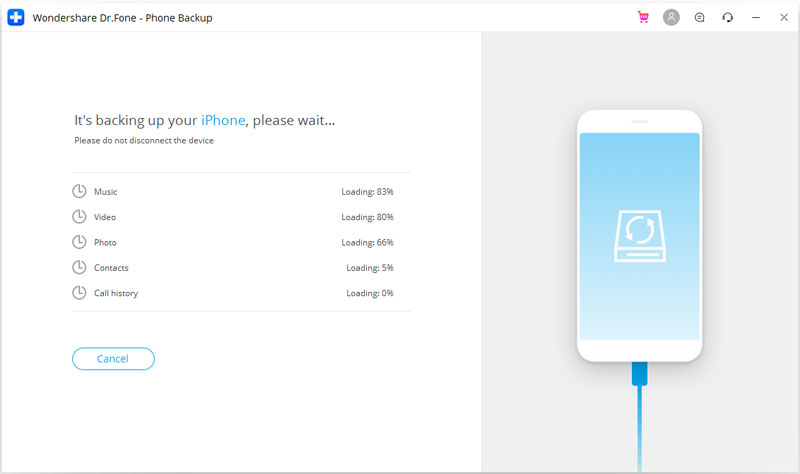
Step 2: Restore a previous backup to your iPhone
Mevcut bir yedeği iOS cihazınıza geri yükleme işlemi de oldukça basittir. İPhone'unuzu bağlayıp uygulamayı başlattıktan sonra, evinden “Geri Yükle” özelliğini seçin.
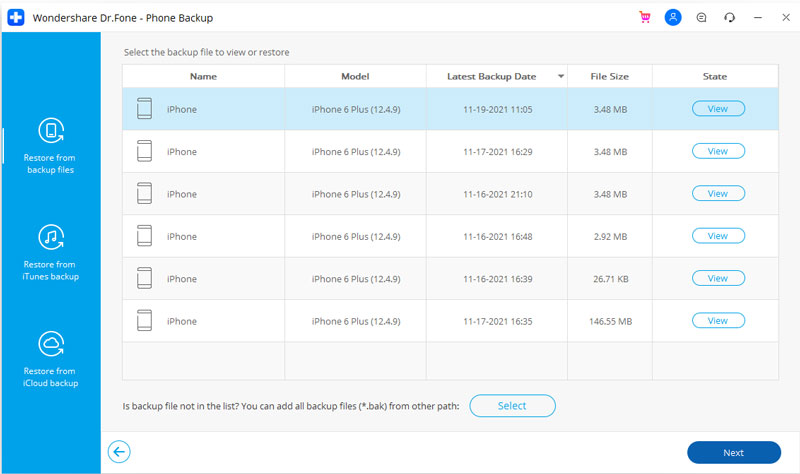
Kenar çubuğundan farklı kaynaklardan iPhone'unuza bir yedeği geri yüklemek için çeşitli seçenekleri görüntüleyebilirsiniz. Kullanılabilir yedekleme seçeneklerinin bir listesini almak için Dr.Fone yedekleme dosyalarını geri yüklemeyi seçin.
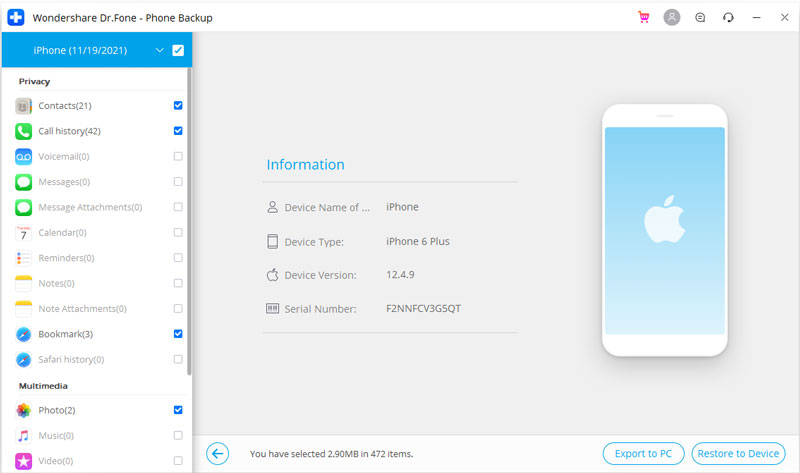
Bir yedekleme dosyası seçip yükledikten sonra, içeriği arayüzde farklı bölümler altında görüntülenecektir. Verileri burada önizleyebilir, geri almak istediklerinizi seçebilir ve doğrudan bağlı cihaza geri yükleyebilirsiniz.
Çözüm
Bu makaleden, Windows 11/10 iTunes yedekleme konumunu nasıl bulacağınızı ve değiştireceğinizi öğrendiğinizi umuyoruz. Ayrıca, iTunes verilerini yedeklemenin en iyi ve kolay yolunun Dr.Fone - Telefon Yedekleme (iOS) olduğunu anlamalısınız. Şimdi dene!
iPhone Yedekleme ve Geri Yükleme
- iPhone Verilerini Yedekle
- iPhone Kişilerini Yedekle
- iPhone Metin Mesajlarını Yedekle
- iPhone Fotoğraflarını Yedekle
- iPhone uygulamalarını yedekle
- iPhone Parolasını Yedekle
- Jailbreak iPhone Uygulamalarını Yedekleyin
- iPhone Yedekleme Çözümleri
- En İyi iPhone Yedekleme Yazılımı
- iPhone'u iTunes'a Yedekleyin
- Kilitli iPhone Verilerini Yedekle
- iPhone'u Mac'e Yedekle
- iPhone Konumunu Yedekle
- iPhone Nasıl Yedeklenir
- iPhone'u Bilgisayara Yedekle
- iPhone Yedekleme İpuçları


Alice MJ
personel editörü