An Extensive Guide to Restoring Notes from iCloud
Apr 28, 2022 • Filed to: Manage Device Data • Proven solutions
How to recover notes from iCloud?
If you are an avid user of iOS Notes, then you might be wondering the same. A lot of people store their sensitive information and details on notes and losing them can be a nightmare. The good news is that any iOS user can restore notes from iCloud even after deleting them without much trouble. You can do it by visiting iCloud’s official website or by using any third-party tool. Read on and learn how to restore notes from iCloud in different ways.
Part 1. Recover notes from "Recently Deleted" folder on iCloud.com
If you are using Upgraded Notes, then you can easily recover notes from iCloud. Whenever a note is deleted, it goes to the “Recently Deleted” folder on iCloud and stays there for the next 30 days. Therefore, if you act promptly in the next 30 days, then you can recover deleted notes from iCloud by visiting the dedicated folder. You can follow these simple steps to learn how to recover deleted notes from iCloud:
- Go to iCloud.com and log in with your account credentials. This should be the same account that is linked to your device.
- Now, go to the “Notes” section. Here, you can find all the saved notes.
- From the left panel, go to the “Recently Deleted” folder. This will display all the notes deleted in the last 30 days.
- Tap on any note you wish to recover. From here, you can view the content of the selected note.
- To restore the note, just click on the “Recover” button. You can also drag and drop it to another folder to move the note.
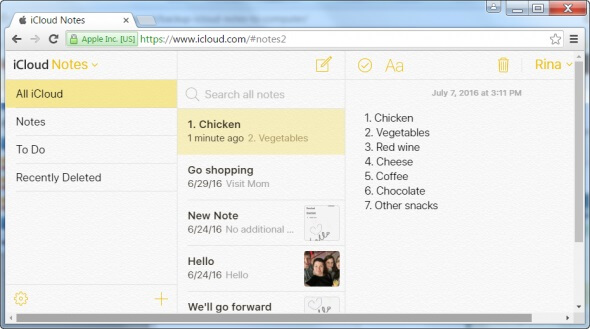
That’s it! By following this approach, you can recover deleted notes from iCloud without any trouble. Though, you can only recover notes that are deleted in the last 30 days through this method.
Part 2. How to restore notes from iCloud backup selectively?
Another way to restore notes from iCloud is by using a third-party tool like Dr.Fone - Data Recovery (iOS). Though, before you proceed, you should know how your iPhone stores different notes. Ideally, notes on iPhone can be stored in three different ways - on the device storage, in Cloud, or on any other service (like Google). Furthermore, the iCloud backup doesn’t include information that is already stored in iCloud like notes, contacts, calendars, etc.
Though, you should save your notes in iCloud if you wish to restore them from an iCloud backup. Since you can’t simply extract notes from iPhone backup directly using a native method, you would need to use a dedicated solution like Dr.Fone - Data Recovery (iOS). The tool can let you extract notes from an iCloud backup so that you can restore them selectively.
As a part of the Dr.Fone toolkit, it is extremely easy to use this tool. It can recover those lost and deleted data from your iPhone storage. Also, you can recover content from iCloud or iTunes backup without resetting your device. Simply preview the recovered data and restore it whenever you want. The tool is compatible with all the leading iOS devices and has dedicated desktop applications for Mac and Windows PC. You can use it to learn how to restore notes from iCloud synced files by following these steps:

Dr.Fone - Data Recovery (iOS)
Recover iPhone Notes from iCloud Synced Files Without Hassle
- Provide three ways to recover iPhone data.
- Scan iOS devices to recover photos, videos, contacts, messages, notes, etc.
- Extract and preview all content in iCloud/iTunes backup files.
- iCloud Synced Files/iTunes yedeklemesinden istediğinizi seçerek cihazınıza veya bilgisayarınıza geri yükleyin.
- En yeni iPhone modelleriyle uyumludur.
- İlk olarak, Mac veya Windows PC'nizde Dr.Fone araç setini başlatın. Karşılama ekranından “Veri Kurtarma” modülüne gidin.

- İCloud'dan notları kurtarmak için “iOS Verilerini Kurtar” seçeneğini tıklayın.
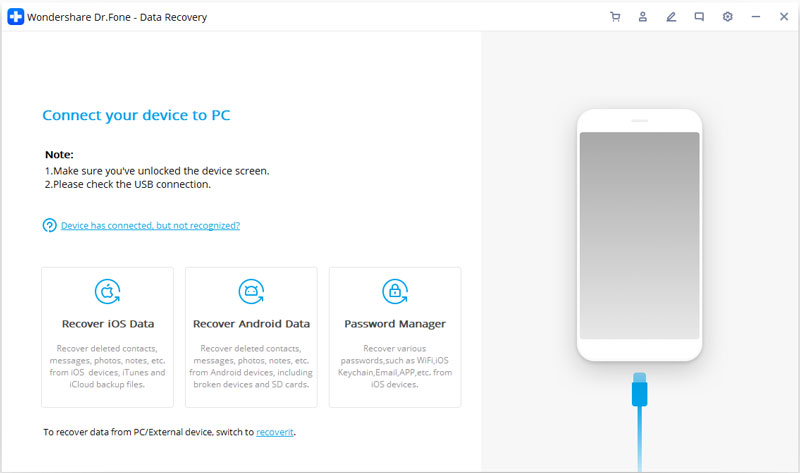
- Şimdi, arayüzün sol panelinden “iCloud senkronize edilmiş dosya dosyasından kurtar” seçeneğine gidin. Doğru kimlik bilgilerini kullanarak iCloud hesabınıza giriş yapın. Daha önce indirilmiş iCloud ile eşzamanlanmış dosyaları buraya yükleme seçeneği de vardır.
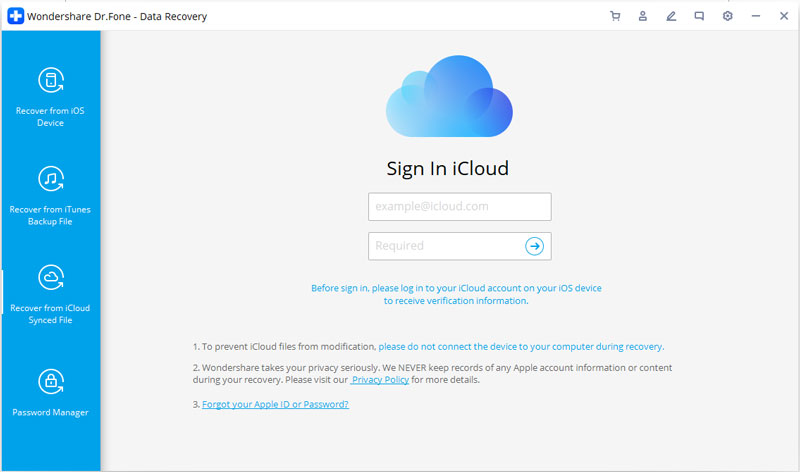
- The application will automatically display a list of all the previous iCloud synced files including their crucial details. Select the backup that you wish to recover.
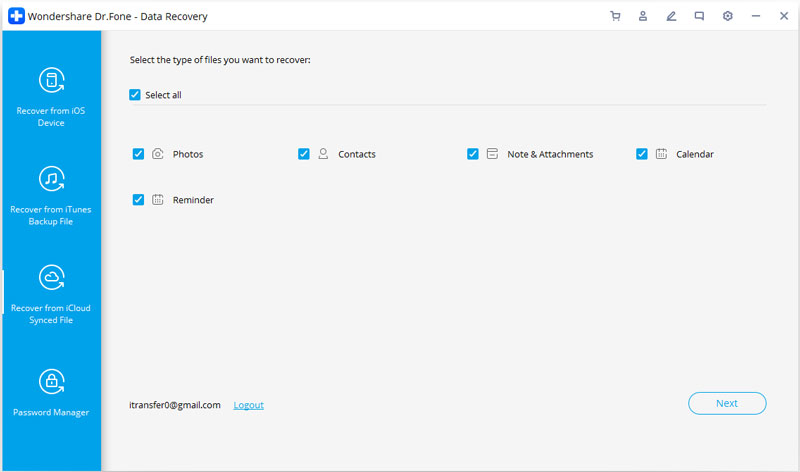
- The following pop-up will appear. From here, you can select the kind of data you wish to recover. To restore notes from iCloud synced files, make sure the option of “Notes” is enabled before clicking on the “Next” button.
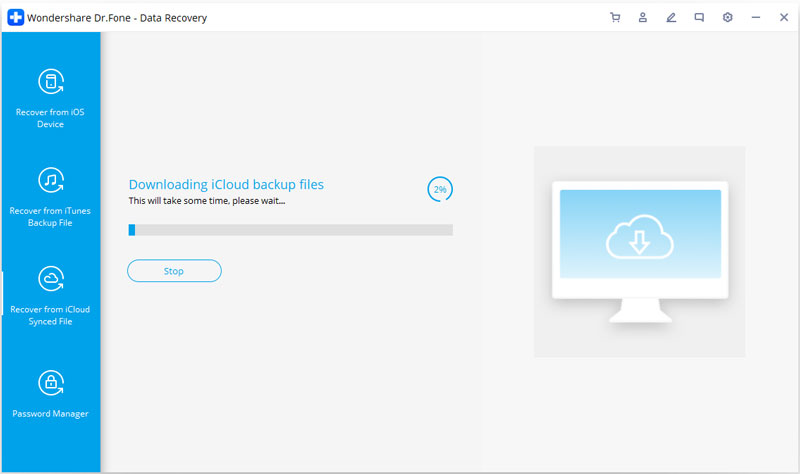
- Wait for a while as Dr.Fone would download the data and display it on the interface. You can just visit the respective category from the left panel and preview the data on the right. Select the notes that you wish to restore and click on the Recover button.
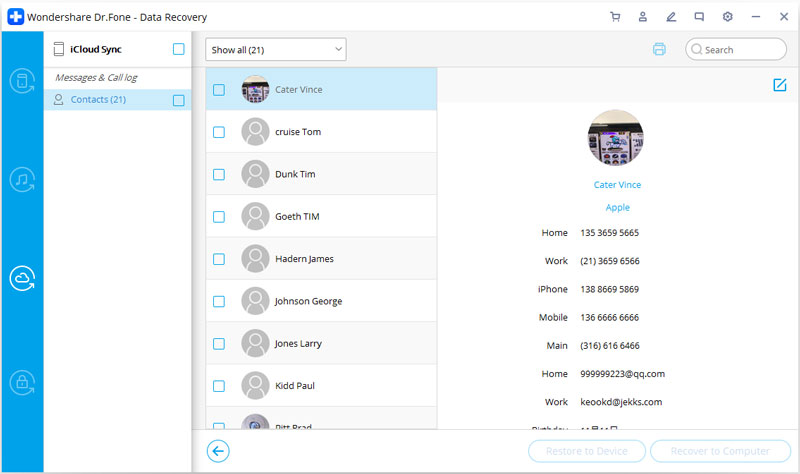
Not only to recover notes from iCloud, but you can also use Dr.Fone - Data Recovery (iOS) to restore iPhone photos, videos, Note, Remind, etc. from iCloud synced files.
Part 3. Other ways to recover deleted iPhone notes
Apart from the above-stated techniques, there are also tons of other ways to learn how to restore notes from iCloud. For instance, you can recover notes from your iPhone storage or an iTunes backup as well. Let’s discuss both of these scenarios in detail.
Recover notes from iPhone storage
If your notes are stored on your device storage instead of iCloud, then you need to take some added measures to recover these deleted notes. By using a data recovery tool like Dr.Fone - Data Recovery (iOS), you can easily retrieve the lost and deleted content from your phone. It is one of the first data recovery software for iOS devices with the highest success rate in the industry. By following these steps, you can recover the deleted notes from your device.
- Connect your device to the system and launch the Dr.Fone toolkit. Click on the “Data Recovery” option to get things started.
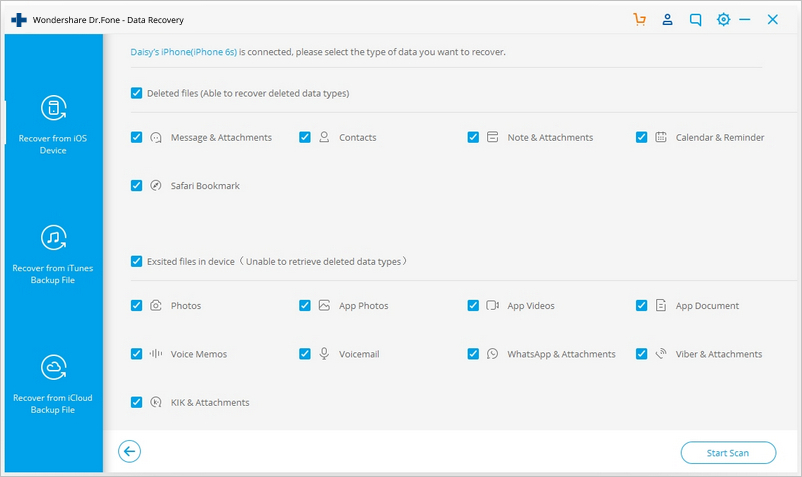
- Simply select the type of data you wish to scan. Enable the “Notes” option and click on the “Start Scan” button.
- Wait for a while as the application would scan your device for any lost or deleted content.
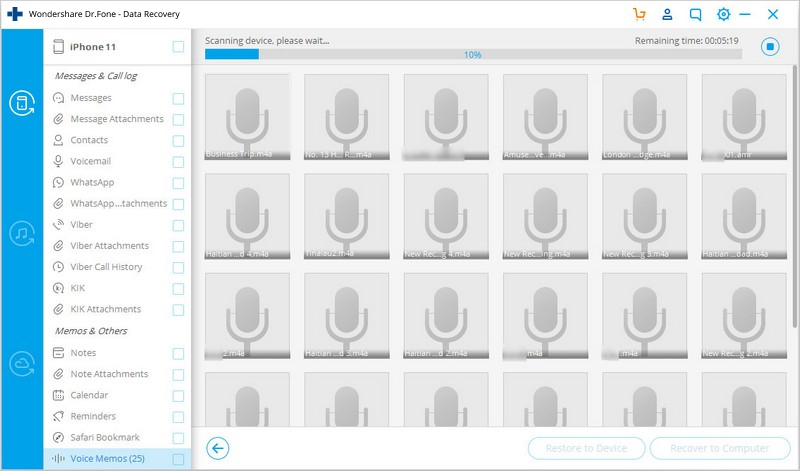
- Once the process is completed, you will be notified. Now, you can just preview your recovered notes and restore them to your phone or computer.
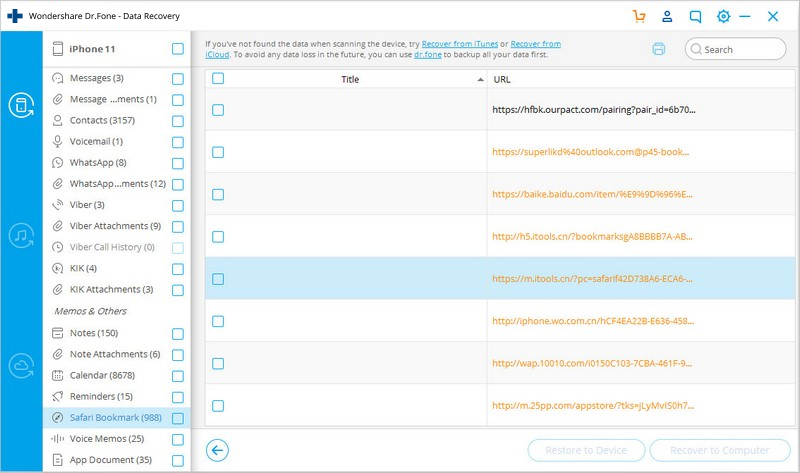
The best thing about this technique is that you can directly recover the notes to your iOS device without any hassle.
Recover notes from iTunes backup
If you have recently taken a backup of your data on iTunes, then you can also restore notes from it. Ideally, the existing data on your device would be deleted if you restore the backup using iTunes. Therefore, you can use Dr.Fone - Data Recovery (iOS) to simply recover selected content from iTunes backup without deleting any existing data.
- Launch the Dr.Fone toolkit on the system and connect your iOS device to it. From the welcome screen, choose the “Recover” module.
- From the left panel, choose to recover data from iTunes backup. The application will display a list of all the iTunes backup files stored on the system.
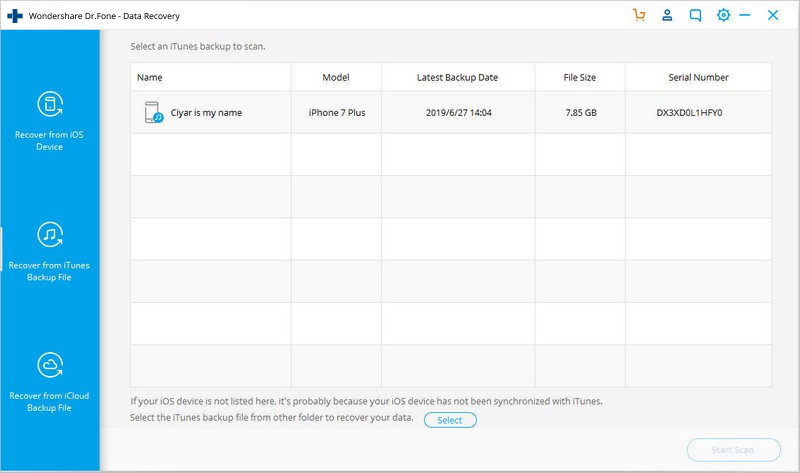
- Select the backup file of your choice and click on the “Start Scan” button. Wait for a while as the application would scan it.
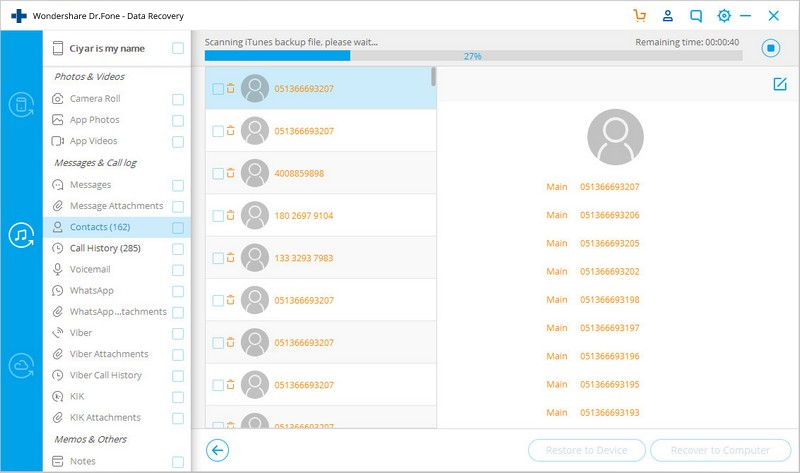
- Once it is done, all the data will be segregated into different categories. Just go to the “Notes” category to preview them. Select the notes you wish to recover and restore them to your computer or directly to your iOS device.
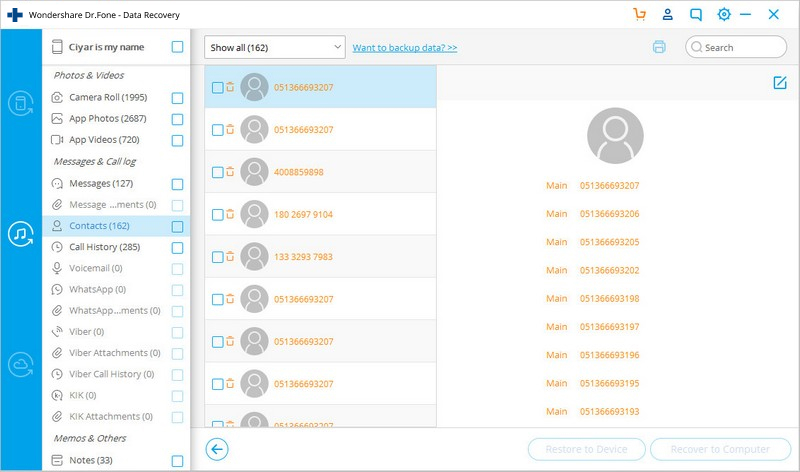
Therefore, by taking the assistance of Dr.Fone - Data Recovery (iOS), you can restore notes from iCloud backup, iTunes backup, or directly from the device storage.
Part 4. Tips for managing notes on iCloud
To make the most of your iPhone notes there are certainly some added measures that you can take. Simply follow these thoughtful suggestions for managing notes on iCloud.
1. Save new notes on iCloud
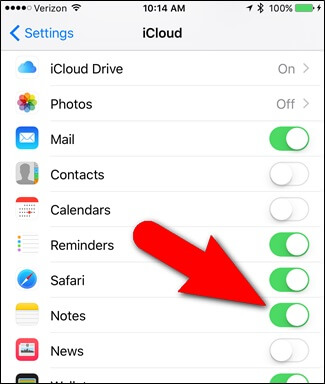
You won’t be able to recover notes from iCloud if you are not saving them on it. Therefore, before you proceed, you need to make sure that your notes are synced to iCloud. To do this, go to your device Settings > iCloud and turn on the “Notes” option. After that, whenever you create a new note, it will be uploaded to iCloud.
2. Move existing notes to iCloud
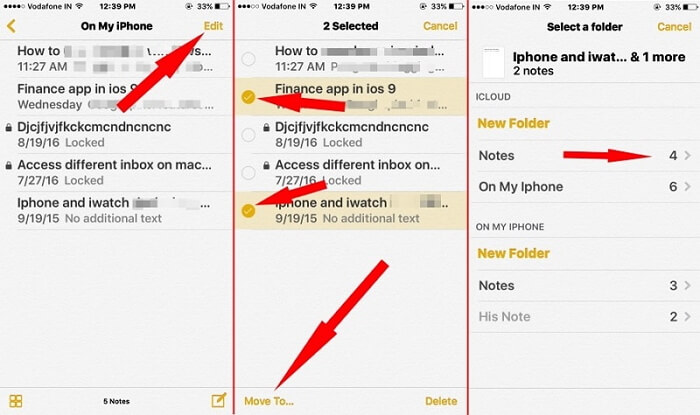
You can also move the existing notes from the phone storage to iCloud as well. To do this, launch the Notes app and tap on the “Edit” button. Select the notes you wish to move and tap on the “Move to” option. Now, you can simply choose where you wish to save your selected notes.
3. Add web pages to notes
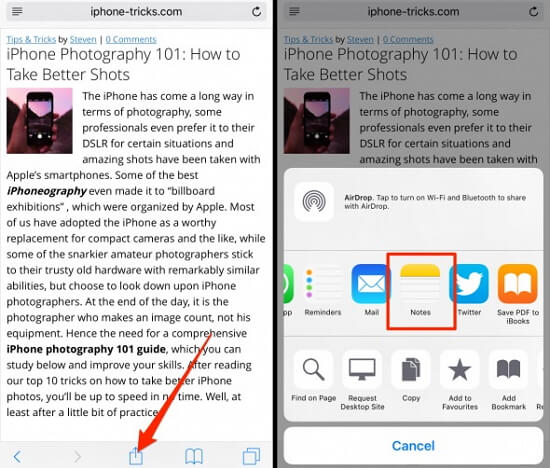
Just like Evernote, you can also add web pages on iOS notes as well. While visiting any web page, tap on the share icon. Out of all the provided options, tap on “Notes”. You can add the web page to a new or existing note.
4. Lock your notes
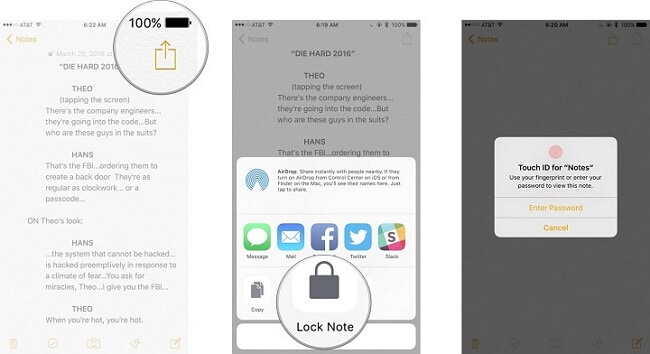
If you store important data on your notes, then you can choose to lock them as well. To do this, just open the note you wish to lock and tap on the share icon. After that, tap on the “Lock” option. You can lock a note by setting a passcode or using the Touch ID.
5. Move notes between folders
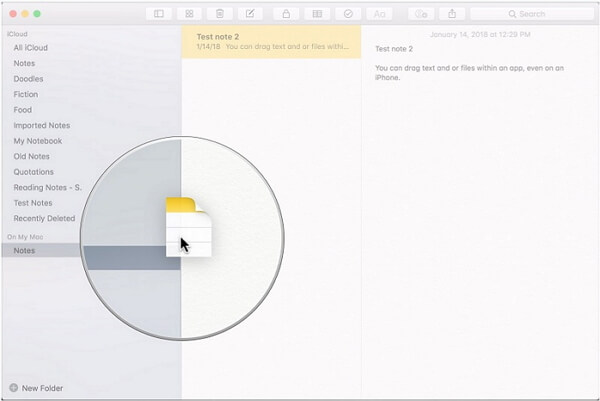
Moving notes between folders on iCloud has never been easier. Simply access your notes on your iOS device, Mac, or iCloud’s website. Now, you can just drag and drop any note from one folder to another to manage it. Yes - it is as simple as that!
Now when you know how to recover deleted notes from iCloud in different ways, you can easily meet your requirements. Besides that, if you have not stored your notes in iCloud, then you can use Dr.Fone - Data Recovery (iOS) to retrieve them from the phone storage or iTunes backup as well. Though you can also use Dr.Fone - Data Recovery (iOS) to restore notes from iCloud backup selectively as well. Go ahead and try some of these solutions and feel free to share your feedback with us in the comments below.
iCloud
- Delete from iCloud
- Fix iCloud Issues
- Repeated iCloud sign-in request
- Manage multiple idevices with one Apple ID
- Fix iPhone Stuck on Updating iCloud Settings
- iCloud Contacts Not Syncing
- iCloud Calendars Not Syncing
- iCloud Tricks
- iCloud Using Tips
- Cancel iCloud Storage Plan
- Reset iCloud Email
- iCloud Email Password Recovery
- Change iCloud Account
- Forgot Apple ID
- Upload Photos to iCloud
- iCloud Storage Full
- Best iCloud Alternatives
- Restore iCloud from Backup Without Reset
- Restore WhatsApp from iCloud
- Backup Restore Stuck
- Backup iPhone to iCloud
- iCloud Backup Messages


Alice MJ
staff Editor