Moto G'yi Başarıyla Köklendirmek İçin Çözümler
10 Mayıs 2022 • Dosya: iOS ve Android'i Sm Çalıştırmak için Tüm Çözümler • Kanıtlanmış çözümler
Moto G is probably one of the most widely used and popular smartphones made by Motorola. The device has different generations (first, second, third, etc.) and features a cutting-edge Android OS. It is also packed with plenty of features that include a fast processor and a reliable camera. Though, just like any other android device, in order to truly utilize its power, you need to root Moto G. Here, in this comprehensive article, we will provide two different ways to root Motorola Moto G. Also, we will make you familiar with all the prerequisites that one should take before performing any rooting operation. Let’s get it started.
Part 1: Prerequisites
One of the common mistakes that users do before they root Moto G or any other android phone is the lack of research. If not done correctly, you might end up corrupting your software and its firmware as well. Also, most of the users complain about the loss of data, as rooting mostly removes the user data from the device. To make sure that you don’t face an unforeseen situation like this, focus on these important prerequisites.
1. Make sure that you have taken a backup of your data. After performing the root, your device would remove all the user data.
2. Try to charge your battery 100% before the commencement of the root. The entire operation might get compromised if your battery dies in between. In any case, it should not be less than 60% charged.
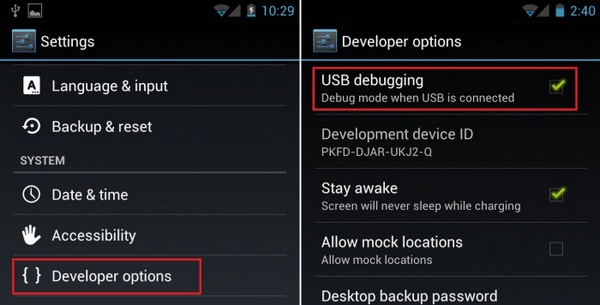
3. USB Hata Ayıklama seçeneği etkinleştirilmelidir. Bunu yapmak için, "ayarlar" a gitmeniz ve "Geliştirici seçeneği" nin sonuna kadar gitmeniz gerekir. Açın ve USB Hata Ayıklamayı etkinleştirin.

4. Telefonunuza gerekli tüm sürücüleri yükleyin. Resmi Motorola sitesini ziyaret edebilir veya sürücüleri buradan indirebilirsiniz .
5. Köklenme sürecini devre dışı bırakan bazı antivirüs ve güvenlik duvarı ayarları vardır. Motorola Moto G'yi köklendirmek için yerleşik güvenlik duvarını devre dışı bıraktığınızdan emin olun.
6. Ayrıca, cihazınızın önyükleyicisinin kilidi açık olmalıdır. Resmi Motorola web sitesini buradan ziyaret ederek yapabilirsiniz .
7. Lastly, use a reliable rooting software. It will make sure that your device won’t be harmed in the process. We have come up with two of the most trusted methods to root Moto G here. You can certainly give them a try.
Part 2: Root Moto G with Superboot
If you want to try something else, then Superboot would be a great alternative to Android Root. Though, it is not as comprehensive as Dr.Fone, but it is quite safe and used by plenty of Moto G users. Follow these stepwise instructions to root Moto G using Superboot:
1. Firstly, you need to install the Android SDK on your system. You can download it from here.
2. Download Supberboot from here. Unzip the file to a known location in your system. The filename would be “r2-motog-superboot.zip”.
3. Turn the power “off” of your Moto G and simultaneously press power and volume down button. This will put your device in the bootloader mode.
4. Now, you can simply connect your device with your system using a USB cable.
5. The procedure is quite different for Windows, Linux, and Mac users. Windows users simply need to run the command superboot-windows.bat on the terminal. Make sure that you have the administrator privileges while doing so.
6. If you are a MAC user, you need to open the terminal and reach the folder containing the newly extracted files. Simply run these commands:
chmod +x superboot-mac.sh
sudo ./superboot-mac.sh
7. Lastly, Linux users also need to reach the same folder containing these files and run these commands on the terminal:
chmod +x superboot-linux.sh
sudo ./superboot-linux.sh
8. Now, all you got to do is reboot your device. When it will turn on, you will realize that your device has been rooted.
One of the major drawbacks of using Superboot is its complexity. You might need to invest some time in order to perform this task flawlessly. If you think it is complicated, you can always root Motorola Moto G using Android Root.
Now when you have successfully rooted your device, you can simply use it to its true potential. From downloading the unauthorized apps to customizing the in-build apps, you can certainly make the most out of your device now. Have a great time using your rooted Moto G!
Android Kökü
- Genel Android Kökü
- Samsung Kökü
- Kök Samsung Galaxy S3
- Kök Samsung Galaxy S4
- Kök Samsung Galaxy S5
- 6.0'da Kök Not 4
- Kök Not 3
- Kök Samsung S7
- Kök Samsung J7
- Jailbreak Samsung
- Motorola Kökü
- LG Kök
- HTC Kök
- Nexus Kökü
- Sony Kökü
- Huawei Kökü
- ZTE Kökü
- Zenfone Kökü
- Kök Alternatifleri
- KingRoot Uygulaması
- Kök Gezgini
- Kök Ustası
- Tek Tıkla Kök Araçları
- kral kök
- Odin Kökü
- Kök APK'ları
- CF Otomatik Kök
- Tek Tıkla Kök APK
- Bulut Kökü
- SRS Kök APK
- APK
- Root Toplists
- Hide Apps without Root
- Free In-App Purchase NO Root
- 50 Apps for Rooted User
- Root Browser
- Root File Manager
- No Root Firewall
- Hack Wifi without Root
- AZ Screen Recorder Alternatives
- Button Savior Non Root
- Samsung Root Apps
- Samsung Root Software
- Android Root Tool
- Things to Do Before Rooting
- Root Installer
- Best phones to Root
- Best Bloatware Removers
- Hide Root
- Delete Bloatware


James Davis
personel editörü