
How to Transfer Music from iPad to iPhone 12/X/8/7/6S/6 (Plus) Easily

Apr 27, 2022 • Filed to: iPhone Data Transfer Solutions • Proven solutions
Lose your iPhone music by accident, but fortunately have all songs on your iPad? Purchase a brand-new iPhone 12, and can't wait to import your iPad songs to it? Want to share fair-sounding songs between iPad and iPhone 12/X/8/7/6S/6 (Plus)? No matter what it is, it's not difficult to transfer music from iPad (iOS 14 supported) to iPhone (iPhone X and iPhone 8/8Plus included). There are various solutions on how to overcome this obstacle, transfer music from iPad to iPhone 12/X/8/7/6S/6 (Plus), and enjoy your favorite songs on both of your Apple machines.
Probably, the most convenient solution of all is to use a professional program, such as Dr.Fone - Phone Transfer, with which you will have the option of moving the music between your devices without any limits. Another function of Dr.Fone that enables to selectively transfer files between phones and PC would be Dr.Fone - Phone Manager (iOS). And we will also present you with a method to synchronize your music libraries by using your iTunes, which might be a little tricky to do for novice users.
- Solution 1: Transfer Music from iPad to iPhone in 1 Click with Dr.Fone - Phone Transfer [iPhone 12 Included]
- Solution 2: Transfer Music from iPad to iPhone Using Dr.Fone - Phone Manager (iOS) [iPhone 12 Included]
- Solution 3: Transfer Music from iPad to iPhone Using iTunes
- Solution 4: Transfer Songs from iPad to iPhone with AirDrop Wirelessly
Solution 1: Transfer Music from iPad to iPhone in 1 Click with Dr.Fone - Phone Transfer [iPhone 12 Included]
Dr.Fone - Phone Transfer is a one-click phone transfer tool. It is specially designed to help you transfer music, video, photos, contacts, iMessages, and calendars from iPad to iPhone. Just download the right version of Dr.Fone (fully support iOS 14) and install it on your computer. You'll love it especially when you get a new phone and want to transfer files to the device quickly.
Dr.Fone - Phone Transfer
Transfer Music between iPad and iPhone in 1 Click!
- Easily transfer photos, videos, calendar, contacts, messages, and music from iPad to the new iPhone 12.
- Enable to transfer from HTC, Samsung, Nokia, Motorola, and more to iPhone 12/X/8/7S/7/6S/6 (Plus)/5s/5c/5/4S/4/3GS.
- Works perfectly with Apple, Samsung, HTC, LG, Sony, Google, HUAWEI, Motorola, ZTE, Nokia, and more smartphones and tablets.
- Fully compatible with major providers like AT&T, Verizon, Sprint, and T-Mobile.
- Fully compatible with iOS 14 and Android 10.0
- Fully compatible with Windows 10 and Mac 10.15.

The easy steps below tell you how to transfer music from iPad to iPhone 12/X/8/7/6S/6 (Plus) with the Windows version. The Mac version works similarly.
Step 1. Launch Dr.Fone on your computer
First of all, install and run Dr.Fone on your computer. Then, the primary window appears. Click Phone Transfer.

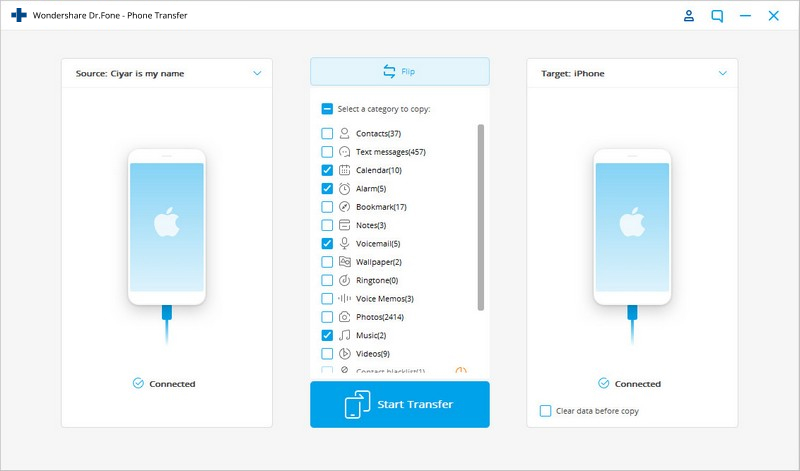
Step 2. Use the USB cables to connect your iPad and iPhone to computer respectively
Use the USB cables to connect your iPad and iPhone to the computer. By default, your iPad is shown on the left, and your iPhone on the right. If you'd like to change their places, you can click Flip. When you have many unwanted songs on your iPhone, you can check Clear data before copy. Or, let it alone.
Note: To transfer music from iPhone to iPad, you can click Flip to change the places of your iPhone and iPad.
Step 3. Transfer songs from iPad to iPhone 12/X/8/7/6S/6 (Plus)
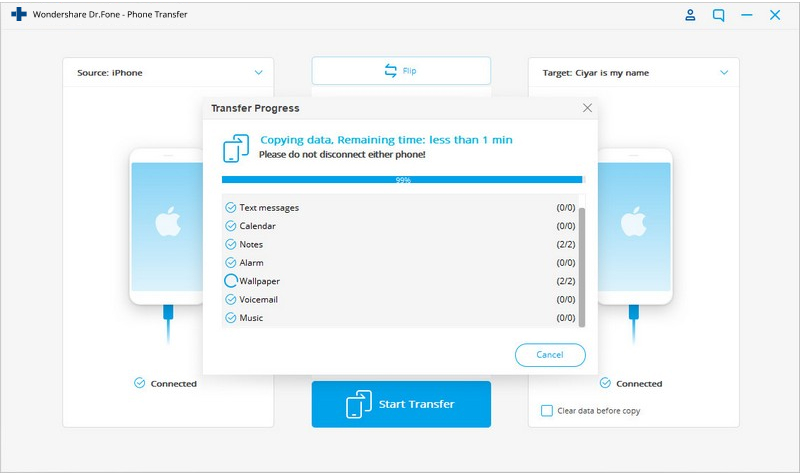
As you see, all data you can transfer are ticked. To transfer music, you need to uncheck the box before other contents. After that, click Start Transfer to transfer iPad music to iPhone. Don't forget to keep your iPad and iPhone connected all the time.
Solution 2: Transfer Music from iPad to iPhone Using Dr.Fone - Phone Manager (iOS) [iPhone 12 Included]
The first way of transferring music from iPad to iPhone 12/X/8/7/6S/6 (Plus) we will present is by using Dr.Fone - Phone Manager (iOS), the must-have Phone Manager, which lets you manage all data on your iPhone and iPad. It enables you to manage multiple Apple devices at the same time. Thus, you can use it to sync music from iPad to iPhone 12/X/8/7/6S/6 (Plus). It's absolutely the same steps with" Transferring Music between iPhone and Android". Check out the easy steps below. You will need to download the software and you will need two working USB cords to connect your devices to your desktop computer.
Dr.Fone - Phone Manager (iOS)
Transfer MP3 between iPhone/iPad/iPod without iTunes
- Transfer, manage, export/import your music, photos, videos, contacts, SMS, Apps, etc.
- Backup your music, photos, videos, contacts, SMS, Apps, etc. to computer and restore them easily.
- Transfer music, photos, videos, contacts, messages, etc from one smartphone to another.
- Transfer media files between iOS devices and iTunes.
- Fully compatible with iOS 7 to iOS 14 and iPod.
Steps on how to transfer music from iPad to iPhone by using iTunes Alternative iOS Transfer
Step 1. Install and launch Dr.Fone on your PC. You will see a welcome screen and then select the 'Phone Manager'.
Step 2. Next, Go ahead to connect both your iPad and your iPhone to your PC via the USB cables. So that you can transfer music from iPad to iPhone 12/X/8/7/6S/6 (Plus).
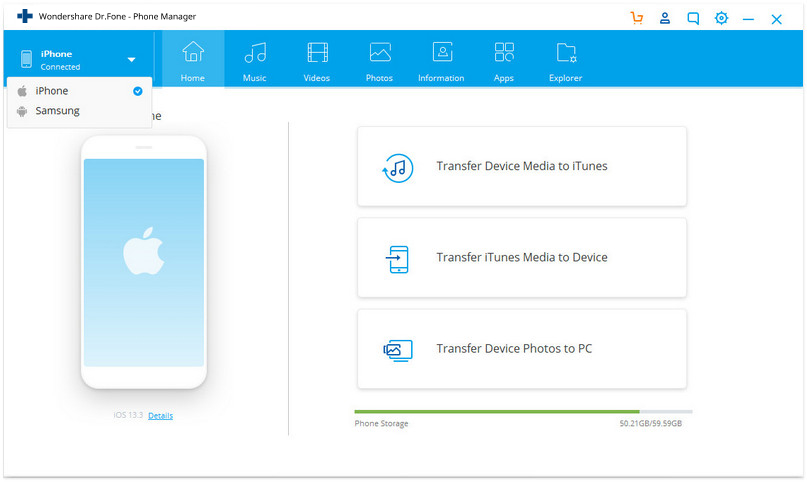
You will notice that both devices are connected by clicking the toggle button at the top-left corner of the above image.
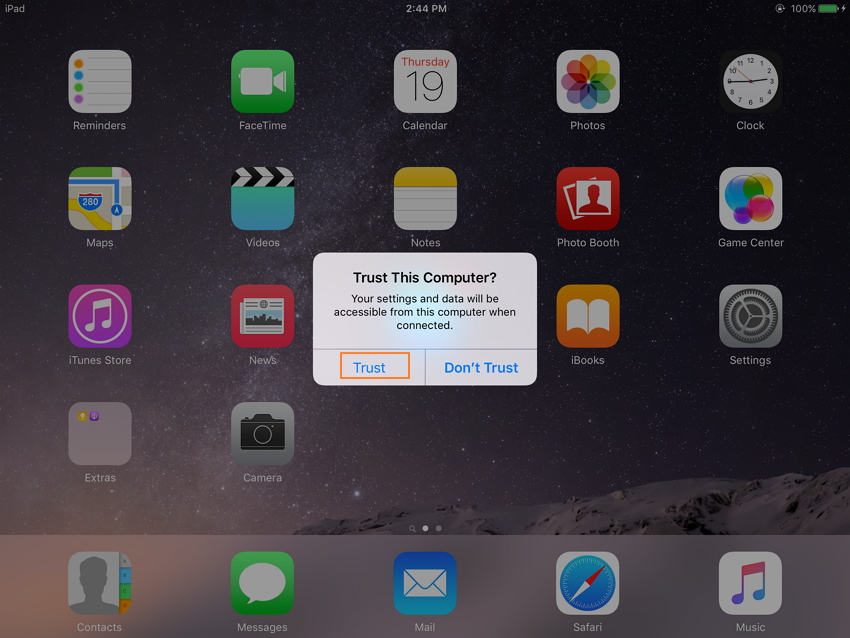
Note: If your devices are the first time to connect with the PC, you need to click "Trust This Computer" on the iOS device, then your device will be connected to PC/Mac successfully.
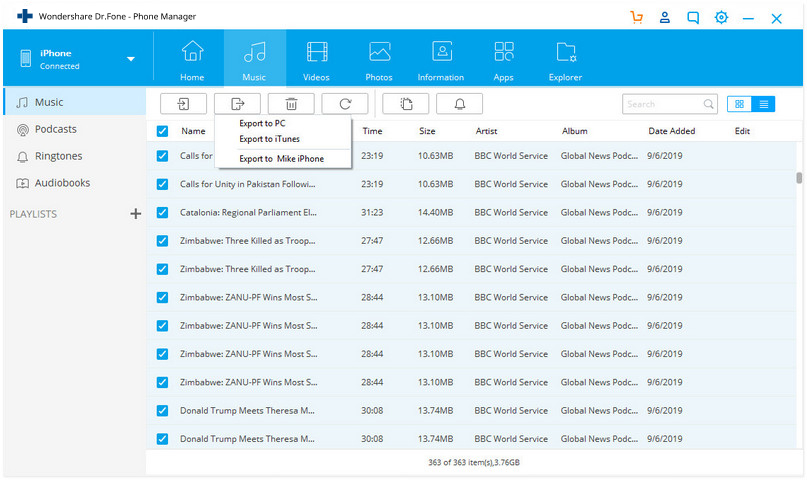
Step 3. Select the iPad device, and click the Music section at the top of the interface, then Music in the left sidebar(Usually it's the default option). You can preview all music files on your iPad (iOS 14 supported).
Make a selection of the songs you want to move to your iPhone 12/X/8/7/6S/6 (Plus).
Step 4. Once you have chosen the desired songs, click the Export letters at the top of the menu. When you click on it, choose your iPhone device from the drop-down list s and the process will begin.
This transfer tool starts to export music on the iPad to your iPhone 12/X/8/7/6S/6 (Plus). Don't forget to keep both of your iPad and iPhone connected with your PC during the music transfer process.
Note: All iPads and iPhones running iOS 14, iOS 13, iOS12, iOS 11, iOS10, iOS 9, iOS 8, iOS 7, iOS 6 and iOS 5 are compatible with Dr.Fone. They're iPhone 12/X/8/7/6S/6 (Plus)/5/4S/4/5s/5c/3GS, iPad Air, iPad mini with Retina display, iPad mini, iPad with Retina display, The new iPad, iPad 2, and iPad.
Well done! You have already transfer iPad songs to the iPhone. You can check it by selecting the iPhone. Under its directory, click Music to see the transferred music.
Solution 3: Transfer Music from iPad to iPhone 12/X/8/7/6S/6 (Plus) with iTunes
You have the option of synchronizing the content of your iPad and your iPhone by using official Apple software called iTunes. This is also one of the ways on how to transfer songs from iPad to iPhone, and you only need to have the latest version of iTunes software installed (get it for free from the Apple website) and to connect your devices to iTunes using USB cords. In this case, it is recommended for you to have original Apple USB cords. As if you don’t use the originals, something might go wrong during the process.
How to transfer music from iPad to iPhone by using iTunes
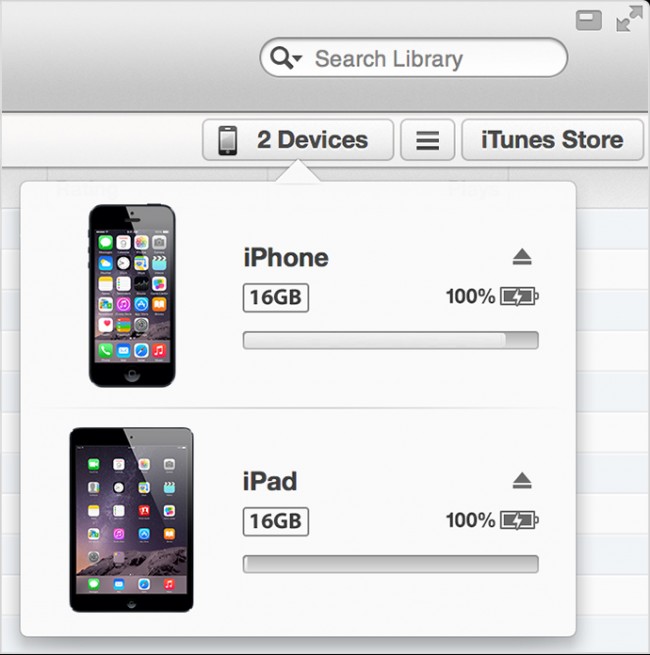
Step 1. Launch your iTunes software on your PC. Notice the phone icon on the top, where you can see all the devices you connected.

Step 2. Go ahead and connect your iPad and your iPhone. Then, click on the phone icon and select your desired device, in this case, iPad, since this is the device from which you want to transfer music.
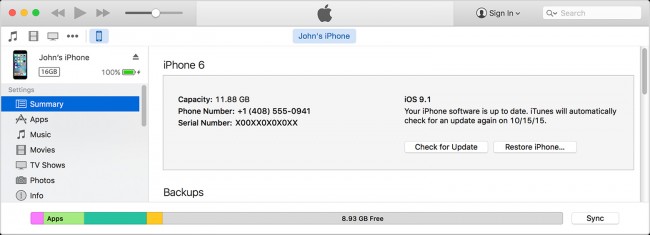
Step 3. Various tabs will appear on the left side menu. Take a look at the bottom right and notice the Sync button. Click it.
Step 4. Choose the content you want to synchronize. In this case, we want to choose the music and then the Entire music library.
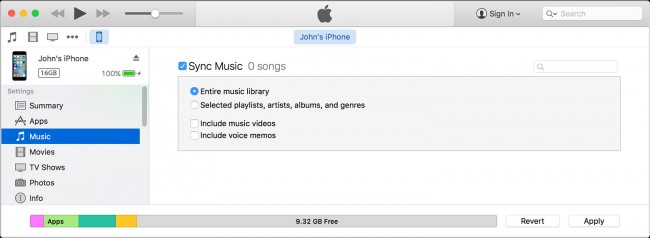
Step 5. Once you are satisfied with the selection, click the Apply button to finish the process and transfer songs from iPad to iPhone.
If you can't use iTunes on your computer, Dr.Fone software offers alternative solutions. Please install Dr.Fone - Phone Transfer to transfer music from iPad to iPhone without using iTunes.
Solution 4: Transfer songs from iPad to iPhone with AirDrop Wirelessly
It is also one of the features that most of the users are not aware of and therefore it is not used frequently. The steps that are involved are very easy and therefore it is advised to implement these so that a hassle-free experience is faced. This built-in AirDrop technology has revolutionized the overall file transfer between iDevices. The process is as follows:
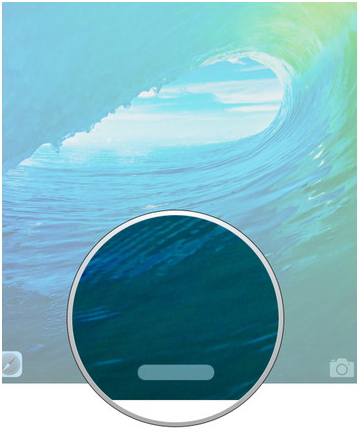
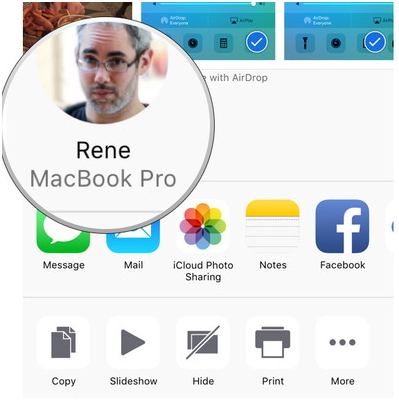
Step 1. The bottom of the iPad is to be tapped to launch the AirDrop feature of the phone:
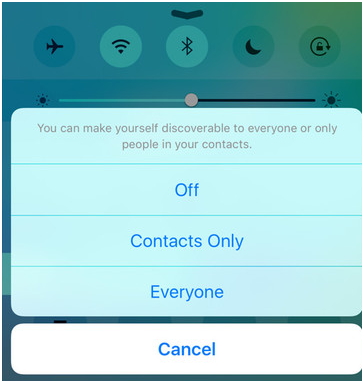
Step 2. Within the option, the AirDrop to everyone is to be selected to ensure that the user allows the device to communicate seamlessly.
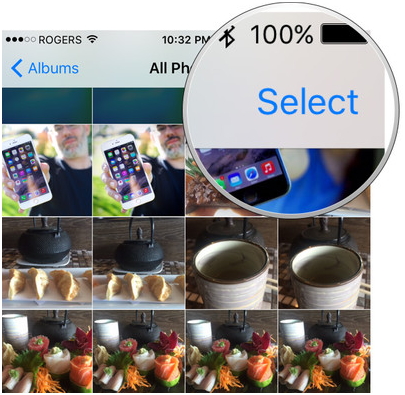
Step 3. The file that needs a transfer is to be selected.
Step 4. The AirDrop icon is then to be tapped to reveal the list of the contacts who use the same facility.
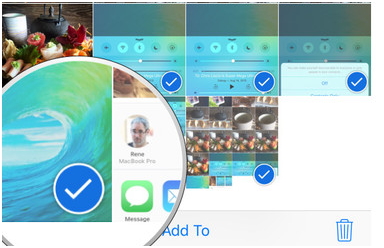
Step 5. The desired user is to be selected to ensure that the AirDrop from the iPad to the iPhone starts and the transfer has been completed.
Pros:
- As it is an Apple-based service so the users can practice the use without any issue of data or the quality loss as Apple keeps this idea the same across all platforms.
- The user can get the AirDrop facility on any iDevice, so this has made sure that the transfer has never been an issue at all.
Cons:
- The service at times does not work and during moisture season it is most likely to not work at all due to the air humidity which does not allow the signal passing.
- The data transfer is not secure in terms of security and therefore confidential data cannot be transferred using this channel.
It is not that stable and may interrupt if you transfer tens and thousands of songs wirelessly. Dr.Fone can help to transfer lots of songs with a USB cable. It's secure and fast.
If this guide helps, don't forget to share it with your friends.


iPhone Music Transfer
- Transfer Music to iPhone
- Transfer Music from iPad to iPhone
- Transfer Music from External Hard Drive to iPhone
- Add Music to iPhone from Computer
- Transfer Music from Laptop to iPhone
- Transfer Music to iPhone
- Add Music to iPhone
- Add Music from iTunes to iPhone
- Download Music to iPhone
- Transfer Music from Computer to iPhone
- Transfer Music from iPod to iPhone
- Put Music on iPhone from Computer
- Transfer Audio Media to iPhone
- Transfer Ringtones from iPhone to iPhone
- Transfer MP3 to iPhone
- Transfer CD to iPhone
- Transfer Audio Books to iPhone
- Put Ringtones on iPhone
- Transfer iPhone Music to PC
- Download Music to iOS
- Download Songs on iPhone
- How to Download Free Music on iPhone
- Download Music on iPhone without iTunes
- Download Music to iPod
- Transfer Music to iTunes
- More iPhone Music Sync Tips
Selena Lee
chief Editor