

How to Recover HEIC Photos on iPhone and iPad?

Apr 28, 2022 • Filed to: Tips for Different iOS Versions & Models • Proven solutions
If you are using a new iPhone or iPad version that runs on iOS 14/13.7, chances are that you must already be aware of the HEIC format. It is an advanced image container format that can store your photos at a lesser space than JPEG and in a better quality. Since our photos are of utmost importance, it is necessary to protect them. If you have lost your HEIC files, then you need to perform an HEIC photos recovery. Don’t worry! It might sound a little complicated, but you can recover HEIC photos iPhone without any trouble. We will provide a stepwise solution for the same in this guide.
Part 1: How to recover HEIC photos for iPhone from iTunes backup?
If you want to keep your photos safe, then we recommend taking a regular backup of your data. You can simply backup your photos via iTunes or iCloud and perform an HEIC photos recovery afterward. While performing a recovery operation with only iTunes, you won’t be able to select the kind of content you want to retrieve, as it restores your phone entirely. Therefore, you can simply take the assistance of Dr.Fone - iOS Data Recovery to recover HEIC photos iPhone.
A part of the Dr.Fone toolkit, it is an extremely reliable and secure tool that has been around for more than ten years. It can be used to recover almost every kind of data like photos, videos, messages, call logs, contacts, notes, and more. It is compatible with every leading iOS device and version with a dedicated desktop application available for Windows and Mac. To perform HEIC photos recovery via iTunes backup, simply follow these steps:
Dr.Fone - iPhone Data Recovery
World's 1st iPhone and iPad data recovery software
- Provide with three ways to recover iPhone data.
- Scan iOS devices to recover photos, video, contacts, messages, notes, etc.
- Extract and preview all content in iCloud/iTunes backup files.
- Selectively restore what you want from iCloud/iTunes backup to your device or computer.
- Compatible with latest iPhone models.
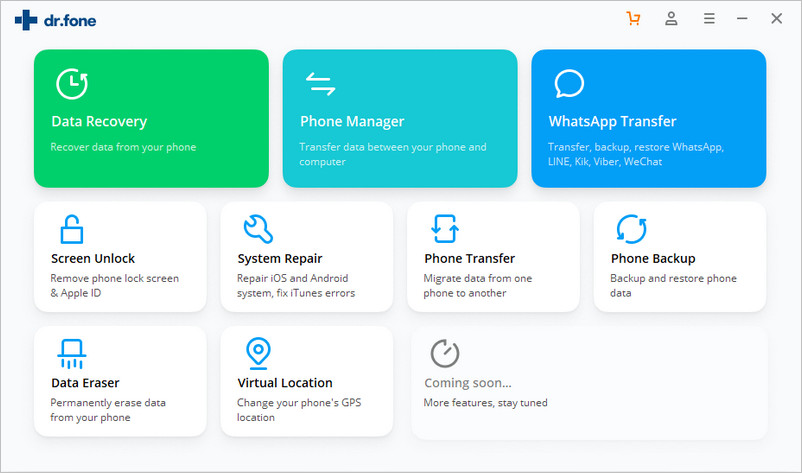
1. Visit Dr.Fone - iOS Data Recovery website and install it on your Mac or Windows PC. Launch it whenever you wish to recover HEIC photos iPhone and select the “Data Recovery” option from the home screen.
2. Connect your phone to the system and wait for the application to detect it automatically.
3. After opening the Data Recovery interface, choose “Restore from iTunes backup” from the list of options provided on the left panel.
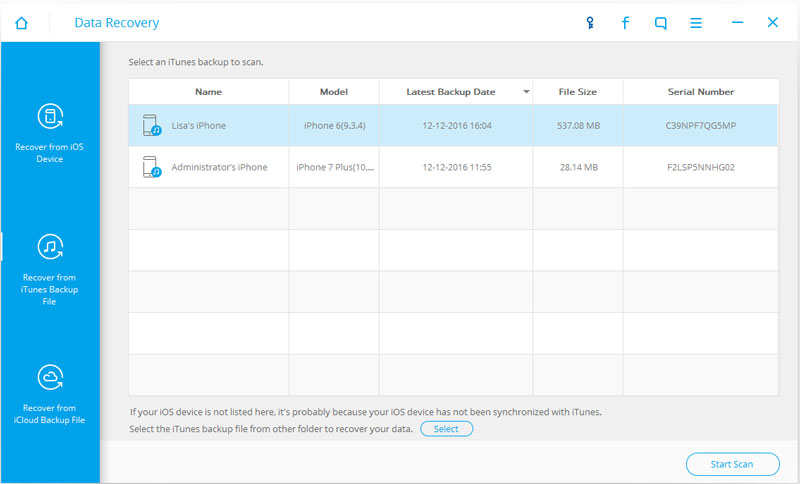
4. This will display all available iTunes backup files that are stored on your system. You can view its file size, backup date, device model, etc. Select the backup file you wish to restore and click on the “Start Scan” button.
5. This will scan the iTunes backup and provide a segregated view of your data listed under different categories. To recover HEIC photos iPhone, you can go to the “Photos” section from the left panel and select the files you wish to restore.
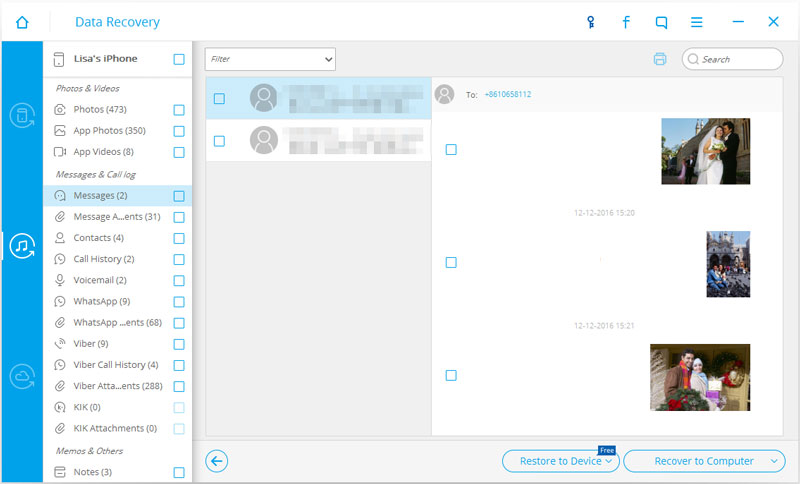
6. After selecting your photos, you can choose to recover them either on the local storage or transfer them directly to your connected iOS device.

In this way, you would be able to perform selective HEIC photos recovery from the iTunes backup.
Part 2: How to recover HEIC photos for iPhone from iCloud backup?
Just like iTunes, you can also use Dr.Fone - iOS Data Recovery tool to perform a selective recovery operation of the iCloud backup. If you are taking a backup of your photos on iCloud, then you never have to worry about losing your data. While setting up a new device, you can always restore your phone from iCloud backup. Though, this can only be done while setting up a new device (or after resetting it). Additionally, there is no way to selectively recover only HEIC photos from iCloud backup until you are using a third-party tool like Dr.Fone toolkit.
To perform a selective HEIC photos recovery of iCloud backup, you can take the assistance of Dr.Fone iOS Data Recovery tool. All you need to do is follow these steps:
1. Install Dr.Fone iOS Data Recovery on your Windows or Mac and launch it to recover HEIC photos iPhone. Connect your phone to the system and let the application detect it automatically.
2. After launching the application, choose the option of “Data Recovery” to proceed.
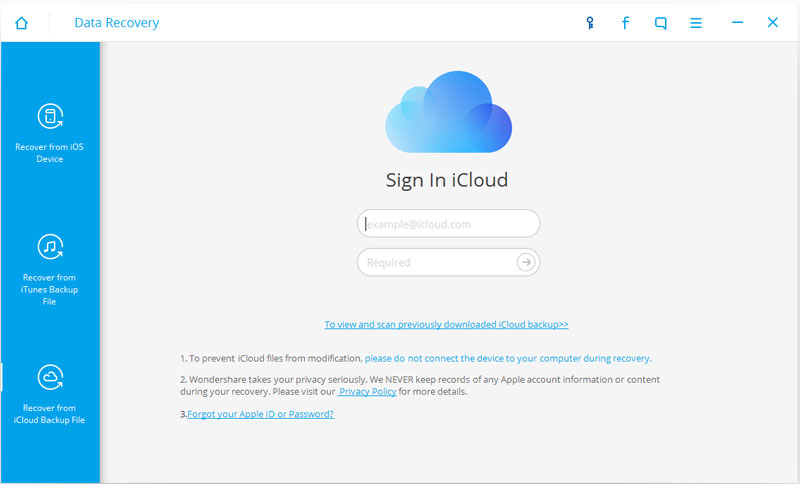
3. The interface will provide different options on the left panel. Select the option of “Recovery from iCloud Backup file”.
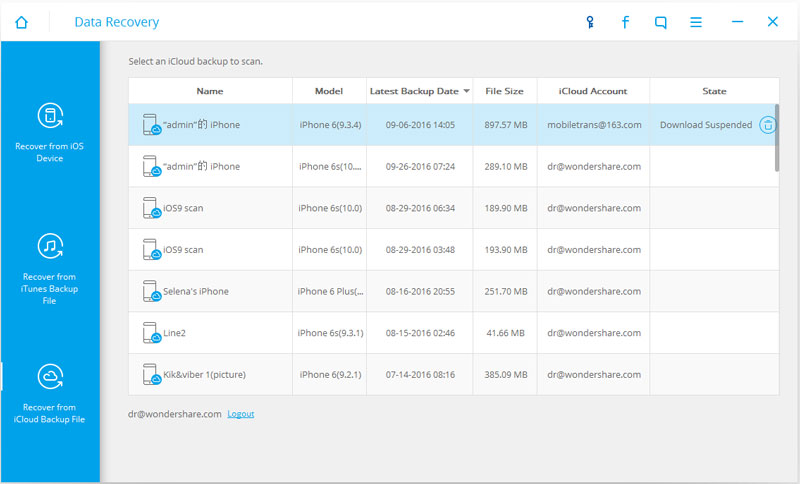
4. This will launch the following interface. Provide your iCloud credentials to sign-in and access your backup files.
5. After successfully signing-in, the interface will provide a list of all the iCloud backup files with their details regarding device model, file size, date, account, and more. Simply select the backup file you wish to recover.
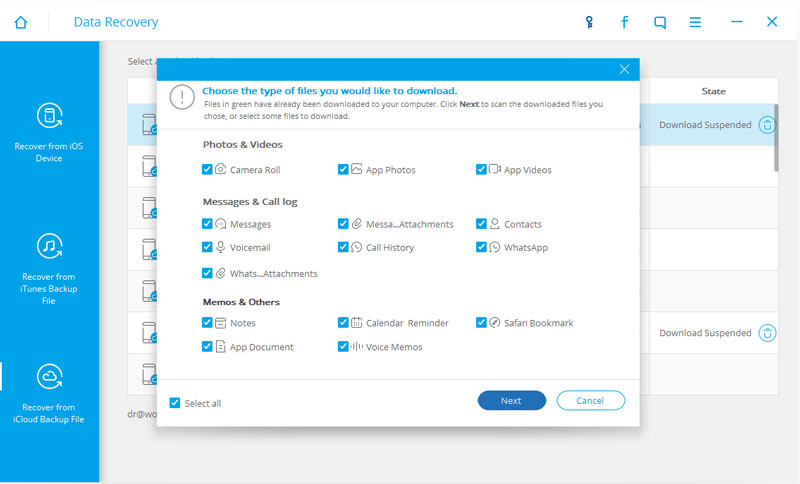
6. It will generate the following pop-up message. From here, you can select the kind of data files you wish to restore. To recover HEIC photos iPhone, enable “Photos” and proceed.
7. Wait for a while as the application will download your relevant backup data to restore it. Once it is done, it will provide its segregated preview in the following way.
8. Simply select the data files you wish to recover and restore them to your device or your local storage.
Part 3: iPhone HEIC photos managing tips
After performing the HEIC photos recovery operation, you would be able to easily retrieve your lost photos. Though, if you wish to manage your HEIC photos, then consider following these suggestions.
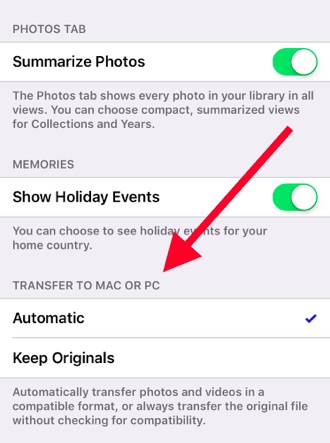
1. There are times when users don’t know how to convert HEIC photos to JPEG. To do this, go to your phone’s Settings > Camera > Formats and under the Transfer to PC or Mac section, select “Automatic”. This will automatically convert your HEIC photos to a compatible format.
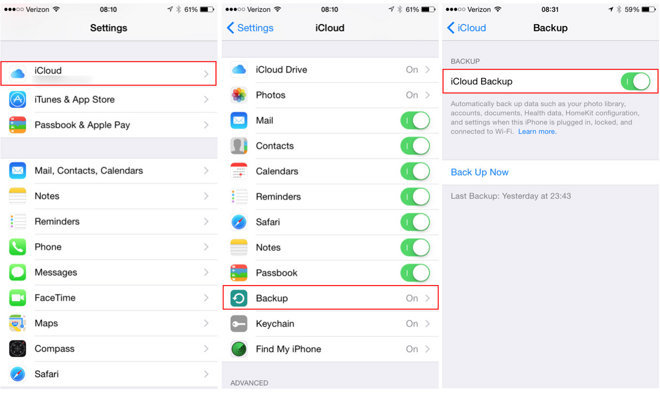
2. To make sure that you never lose your photos, you should take their backup on iCloud. Go to Settings > iCloud > Backup and turn on the option of iCloud Backup. Make sure that you are taking a backup of your Photos on iCloud as well.
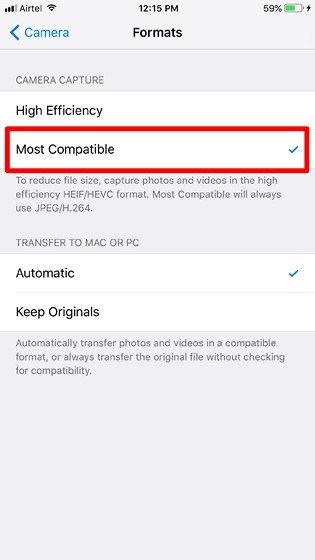
3. You can also switch between HEIC and JPEG photos as well. Go to your phone’s Settings > Camera > Formats and choose “Most Compatible” under Camera Capture to click photos in JPEG and other compatible formats. To click photos in HEIF/HEVC format, select “High Efficiency”.
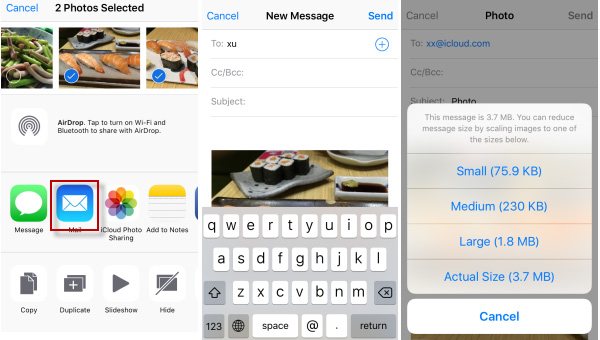
4. One of the quickest ways of managing your photos is by taking the assistance of your Mail. If you wish to compress or convert your photos, then simply select them and share them via Mail. This will launch the native Mail app on your device. As your photos would be uploaded, you will get to compress them readily.
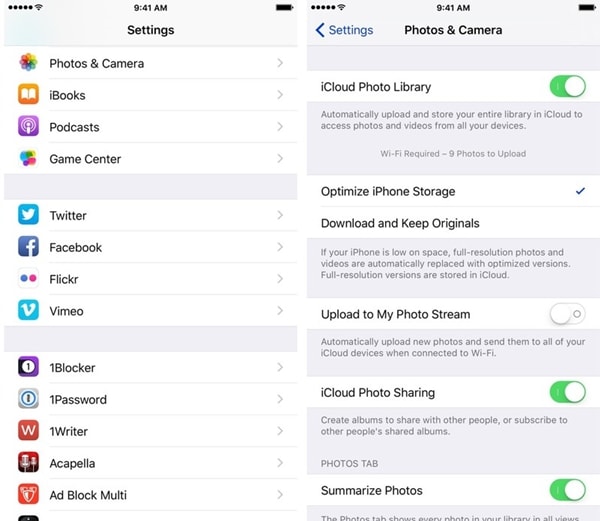
5. If you have a limited storage on your device, then you should optimize its free space. To do this, go to its Settings > Photos & Camera and choose to optimize iPhone Storage. This will only store optimized versions of photos and videos on your device, while the full resolution will be uploaded to the cloud.
By following this guide, you would be able to recover HEIC photos iPhone without facing any setback. Simply use Dr.Fone iOS Data Recovery tool to perform HEIC photos recovery and never lose your important data files. The tool also supports HEIC images, letting you make the most of your device in no time!


iOS 11
- iOS 11 Tips
- iOS 11 Troubleshootings
- Software Update Failed
- iPhone Verifying Update
- Software Update Server Couldn't Be Contacted
- iOS Data Recovery
- App Store Not Working on iOS 11
- iPhone Apps Stuck on Waiting
- iOS 11 Notes Crashing
- iPhone Won't Make Calls
- Notes Disappeard After iOS 11 Update
- iOS 11 HEIF
Selena Lee
chief Editor