iOS 15 alandamine: kuidas seda ohutult ja lihtsalt teha

1. osa. Kas olete iOS 15 alandamiseks hästi ette valmistatud?

Uusim iOS-i värskendus on välja antud, kuid kasutajad kurdavad juba mõne selle tõrgete üle. Nendest probleemidest ülesaamiseks võiksite kaaluda iOS 15 versiooni üleviimist. Siiski peaksite astuma sammu tagasi ja mõistma selle tagajärgi. Näiteks võib madalamale versioonile üleminek kustutada kõik teie telefonis olevad andmed, sealhulgas teie fotod, rakendused, kontaktid jne. Seetõttu on oluline võtta vajalikud ettevaatusabinõud enne iOS 15 värskenduse iPhone'is tagasivõtmist.

1.1 Varundage oma seade

See on kõige olulisem asi, mille eest peaksite hoolitsema enne iOS 15 varasemale stabiilsele versioonile üleminekut. Kui muudame iOS-i seadme vanemale versioonile, võib see lõppeda kõigi sellesse salvestatud andmete kustutamisega. Alates meediumifailidest kuni rakenduste andmeteni – võite selle käigus kaotada kogu telefonis oleva sisu. Seetõttu on parim viis iOS 15-lt stabiilsele versioonile ülemineku õppimiseks telefonist varukoopia tegemine. Sel viisil saate pärast alandamise lõpetamist oma olulised andmed hõlpsalt tagasi saada, taastades nende varukoopia.
Varundage iDevice rakendusega Dr.Fone
  • 1Ühendage oma iPhone või iPad arvutiga.
  • 2Valige käsitsi andmete tüüp või valige kõik.
  • 3Seadme andmete kohalikuks varundamiseks klõpsake nuppu "Varunda".
Ainulaadsed omadused:
  • Varundage kogu iOS-seade, sealhulgas selle kontaktid, kõnelogid, sõnumid, fotod, videod jne.
  • Varundage ja taastage oma andmed ühest seadmest teise (või ühest iOS-i versioonist teise) ilma ühilduvusprobleemideta.
  • Ekstraktige olemasolev iCloudi või iTunesi varukoopia ja taastage see meie valitud seadmesse.
  • Varukoopiafaili andmete eelvaade, et neid valikuliselt taastada. Varukoopia taastamisel säilitatakse olemasolevad andmed.

Varundage iDevice iTunesiga

  • 1Käivitage iTunes'i värskendatud versioon ja ühendage iOS-i seade sellega.
  • 2Minge selle vahekaardile "Kokkuvõte" ja leidke vahekaardil "Varukoopiad" vastav valik.
  • 3Seadme varukoopia salvestamiseks klõpsake nuppu Varunda kohe.
Asjad, mida tähele panna:
  • iTunes ei saa taastada madalama versiooni kõrgema versiooni varukoopiat. Seetõttu peate enne iOS 15 versioonile üleviimist oma seadmest varukoopia tegema.
  • Andmete eelvaate ja valikulise taastamise sätet pole.
  • iTunes kustutab varukoopia taastamise ajal teie iPhone'is olevad andmed.

1.2 Mõistke iOS-i versioonile ülemineku ajapiirangut

Kogu iOS-i versiooni alandamise protsess on ajatundlik, millest paljud kasutajad ei tea. Räägime sellest üksikasjalikult.

  • Kui teil on iOS-i beetaversioon installitud, saate iOS-i beetaversiooni igal ajal alandada eelmisele stabiilsele versioonile (kuni ametliku avaliku iOS-i versiooni avaldamiseni).
  • Pärast stabiilse avaliku iOS-i versiooni avaldamist on teil vaid 14 päeva aega oma seadme varasemale iOS-i versioonile üle minna.

1.3 Valige iOS 15-st madalamale versioonile üleminekuks õige versioon

Ideaalis saate iOS 15 alandada ainult eelmisele stabiilsele versioonile. Näiteks kui soovite iOS 15 versiooni alandada, saate naasta ainult selle eelmisele stabiilsele versioonile, millele on alla kirjutanud Apple. Külastage veebisaiti IPSW.me , et kontrollida, kas ühilduv püsivara on saadaval.

1.4 Teadke, kuidas minna üle versioonile, millele Apple pole enam alla kirjutanud (vajadusel)

Nagu teate, peate iOS 15 versioonile üleviimiseks tegema vajalikud toimingud 14 päeva jooksul pärast selle ametlikku avaldamist. Samuti saavad kasutajad naasta ainult eelmisele stabiilsele versioonile. Kui aga 14-päevane kestus on möödunud ja soovite minna üle versioonile, millele Apple enam alla ei kirjuta, peate kasutama kolmanda osapoole tööriista. Kasutades tööriistu, nagu TinyUmbrella või TaigOne Downgrader, saate seadmesse installida mis tahes toetatud iOS-i versiooni. Need jäljendavad Apple'i allkirja, võimaldades meil installida iDevices'i isikupärastatud püsivara (iOS-i versioon).

Kuigi kogu protsess oleks üsna tehniline ja see ei pruugi anda positiivseid tulemusi. Kuna Apple neid kolmandate osapoolte tööriistu ei toeta, peate selle tegemiseks oma seadme jailbreakima. See ei ole soovitatav, kuna see mõjutab teie seadme garantiid ja teil pole enam juurdepääsu ka ametlikele iOS-i versioonidele. Lisaks muudab see teie seadme haavatavaks soovimatute turvaohtude suhtes.

2. osa. Kuidas iOS 15 ohutult alandada?

Nüüd, kui olete teadlik kõigist iOS 15 versioonile ülemineku eeltingimustest, saate hõlpsalt oma nõuded täita. Ideaalis võite kasutada iTunes'i või mõne muu kolmanda osapoole tööriista, et õppida, kuidas iOS 15-lt alandada. Igal juhul veenduge, et teie seadmest oleks eelnevalt tehtud varukoopia. Asjade lihtsustamiseks oleme pakkunud iOS 15 versioonile üleminekuks kaks lahendust.

2.1 Ühe klõpsuga lahendus iOS 15 alandamiseks

Toimingud iOS 15-le värskendamiseks:
  • Ühendage oma iOS-seade arvutiga ja käivitage Dr.Fone.
  • Klõpsake moodulil "Remont" ja minge iOS-i remondivalikule.
  • Valige üks režiim ja kinnitage oma valik, valides kuvatud iOS-i versiooni ja klõpsake nuppu "Start".
  • Istuge ja oodake mõnda aega, kuna rakendus hakkab teie iOS-i seadme jaoks ühilduvat püsivara alla laadima.
  • Märkus . Enne madalamale versioonile üleminekut kontrollige saidil https://ipsw.me/product/iPhone , et ühilduv püsivara oleks saadaval.

drfone android box
Dr.Fone – süsteemi remont (iOS)
  • Värskendage iOS-i, välgutades eelmist püsivara.
  • Saate värskendada ka iOS-i oma iDevices.
  • Ei sõltu iTunesist.
  • Parandage kõik iOS-i süsteemiprobleemid, nagu iOS-i külmutamine, valge Apple'i logo jne.

2.2 Värskendage iOS 15 iTunes'i abil

Though, there are a lot of users who wish to take the assistance of iTunes to do the same. While you can perform iOS 15 downgrade with iTunes, it has its own cons. For instance, you might end up losing the existing data on your phone as it would restore your device to its factory settings. The process is also a bit technical, and you might end up damaging your device in the process.
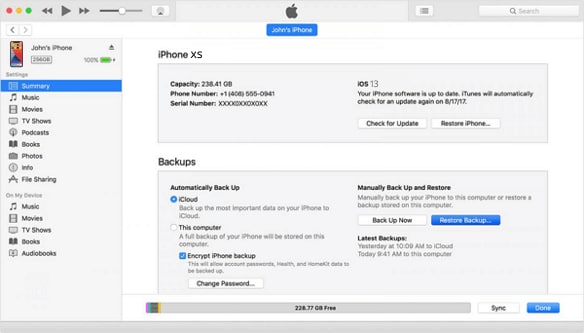
What you need:
  • The latest version of iTunes
  • IPSW file you wish to install
Steps to downgrade iOS 15 with iTunes
  • Beforehand, Find my iPhone service on your device should be turned off. To do this, unlock it and go to its iCloud Settings > Find my iPhone to disable it. You need to enter your Apple ID and password to confirm this.
  • Now, connect your iOS device to the system and launch an updated version of iTunes on it. Click on the device icon and select your iPhone/iPad.
  • Go to its “Summary” tab and hold the Option Key (on Mac) or the Shift Key (on Windows) while clicking on the “Update” button.
  • This will open a browser window, letting you go to the location where the downloaded IPSW file is saved.
  • Select and load the IPSW file on iTunes and confirm your choice to forcefully update the connected device. Wait for a while and let iTunes complete the iOS 15 downgrade.
operate with itunes

Part 3. Best iOS 15 Downgrading Tools

As you can see, sometimes it can be tough to undo an iOS 15 update on iPhone or iPad. To make the entire process simpler, there are tons of third-party tools that you can try. Not only will they let you downgrade iOS version without losing data, but they would also yield better results. Also, if you have a jailbroken device, then you can even downgrade it to any previous iOS version. Let’s get to know more about the features and flexibility of some of these readily available tools.

3.1 Downgrading Tools for Common People (Fast & Easy to Use)

If you are a beginner and do not have a lot of technical knowledge about iOS downgrading, then consider picking either of the following tools.

3.2 Downgrading Tools for Tech-savvy Users (Complex But Can Achieve More)

If you want more flexibility with your device and have decent technical experience, then you can also explore some of these options too.

tips

What are SHSH blobs for iPhone?

Both SHSH and SHSH2 blobs are referred to digital signatures deployed by Apple on respective IPSW files. This protects the authenticity of the IPSW files and only signed software would be installed on the device. When Apple releases a new iOS version, it stops signing the previous version. In this way, users need to upgrade to the latest public iOS version. This is where previously saved SHSH blobs are used to forge these signatures in order to downgrade our devices.

Part 4. iOS 15 Downgrading Troubleshooting

4.1 iOS 15 Downgrade Failed Many Times

This is one of the most common issues that users face while downgrading their iOS devices. The chances are that while downgrading your device, the process would stop in between unexpectedly.

It happens when we try to downgrade the device to an incompatible iOS version. A faulty internet connection or low free space on the device can also trigger it.

Quick Fixes:
  • Check the iOS version: Needless to say, if you are trying to downgrade your device to an iOS version it no longer supports, then you might face unwanted issues. Ideally, you should try to downgrade iOS 15 to a previous version and not any other existing one.
  • Have a stable internet connection: An inconsistent internet connection is another prominent cause for this error. It happens when the download of the iOS update is halted in between (due to a poor connection). Therefore, make sure that the device stays connected to a working and fast internet connection for a seamless downgrading. You can go to your phone’s WiFi settings to further diagnose this.

4.2 iOS Stuck in Recovery/DFU Mode/Apple Logo

While downgrading your device, your phone might get stuck in the recovery mode, Apple logo, or the DFU mode screen. The situation might seem a bit tedious, but you can try to resolve it by forcefully restarting your phone in most of the cases.

Downgrading from an unstable version, the download process of the firmware update has been halted in between, or any other firmware related issue.

Quick Fixes:
  • Forcefully restart your device: By applying the correct key combinations, we can forcefully restart an iOS device and resolve this issue. Since it resets the current power cycle of the device, it is also known as a soft reset. If you own an iPhone 6s or an older generation phone, then long press the Power and Home button for at least 10 seconds. Users with an iPhone 7 or iPhone 7 Plus can press the Power and the Volume Down button. Keep pressing them until your phone restarts. For iPhone 8 and newer versions, you need to quick-press the Volume Up button first. Let it go and quick-press the Volume Down button. Subsequently, hold the Side button and let it go once the phone restarts.
  • Connect it to iTunes: In case if your phone is stuck in recovery or DFU mode, and you haven’t connected it to iTunes, then do the same. In no time, iTunes will automatically detect that your device is in the recovery mode and display the following prompt. Just confirm your choice and restore your device to factory settings to fix this.

4.3 iOS 15 Downgrade stuck on “Attempting data recovery”

v

The final step in the downgrading process is when the existing data on the device is recovered. Though, while doing so, the device might get stuck in the process and end up in the same loop.

An incompatible iOS version, loose connections, jailbroken device, lack of free storage, or any other related issue.

Quick Fixes:
  • Check whether your iPhone is jailbroken: Mostly, users get this error while performing iOS 15 downgrade on a jailbroken device. If your device is jailbroken, then you should not use iTunes to downgrade it. Instead, use a readily available tool like iFaith or TinyUmbrella to do the same.
  • Boot your iPhone in Recovery Mode: You can also take the assistance of iTunes and boot your device in the Recovery Mode to resolve this problem. To do this, just launch iTunes on your system and connect your phone to it. Now, using the correct key combinations, forcefully restart your device (already listed above). Subsequently, iTunes will detect as soon as your phone boots in the Recovery Mode. When you get the following prompt, click on the “Restore” button to reset your device.

4.4 iOS 15 Downgrade with iTunes won’t work

Most of the users take the assistance of iTunes (and an IPSW file) to downgrade iOS 15. Though, if there is a problem with the file, your device, or iTunes, then the process might not work.

An unsupported version of iTunes, corrupt IPSW file, or conflict with the device itself can result in this error.

Quick Fixes:
  • Check the IPSW file: Firstly, make sure that you have downloaded the correct IPSW file from a trusted source. Also, the IPSW file should be compatible with your iOS device else you might face this issue.
  • Disable Find my iPhone: Before you connect your device to iTunes, make sure that the Find my iPhone feature is disabled in it. To do this, go to its iCloud Settings > Find my iPhone and simply turn off this feature. This will not cause any conflict when you undo an iOS 15 update on iPhone.
  • Update iTunes: Needless to say, you should use an updated version of iTunes to downgrade iOS 15. Just launch iTunes on your system and go to Help > Check for Updates. This will make iTunes check for any available update. After finishing the update, you can restart your system and reconnect your device.

4.5 iPhone stuck in a loop trying to restore during downgrade

While restoring the device during the downgrading process, your device might get stuck. For instance, it can get stuck in a restart loop, not letting you access the device.

Lack of free space on the device, corrupt storage, incomplete update, bad IPSW file use, or any other compatibility issue.

Quick Fixes:
  • Force restart your device: This will reset the present power cycle of your device and will let you fix any minor issue related to it. To do this, you need to press certain keys on your device. We have already listed the correct key combinations to force restart a device in the previous sections.
  • Restart the process: If the downgrading process has been halted in between and your phone keeps restarting, then force restart it first. Now, connect it to iTunes or use any other third-party tool to undo an iOS 15 update on iPhone all over again.
  • Use a 3rd party tool: If nothing else seems to work, then consider using a dedicated iOS repairing tool like Dr.Fone - System Repair (iOS). It can fix all kinds of iOS and iTunes related issues without causing any harm to your device. Just launch the application and follow a simple click-through process to put your phone out of the loop and downgrade it to a stable iOS version.

4.6 iOS 15 Downgrade won’t work using SHSH

SHSH Blobs are Apple signatures that are needed to downgrade iOS 15 in a timely manner. Their absence or a wrong SHSH entity can tamper with the downgrading process.

Wrong SHSH blob, corrupt unit by a third-party dump, or an expired SHSH blob can be some of the major reasons for this.

Quick Fixes:
  • Use an SHSH blobs dumper: There are tons of readily available third-party SHSH dumpers (like iFaith) that you can try. Though, most of these applications will require a jailbroken device. You can simply connect your device or provide its model to obtain an ideal SHSH blob.
  • Obtain your device’s SHSH blob: You can connect your iPhone/iPad to the system and launch iTunes on it. Select your device and go to its Summary. Click on the “Serial Number” field a few times, till it displays the ECID number. Now, copy the ECID code and go to any online source to convert it into hexadecimal code.

4.7 Lost all data after iOS 15 Downgrade

This is one of the worst nightmares for any iOS user. After completing the downgrade, the chances are that you might end up losing all the saved photos, videos, contacts, messages, and other important files from your phone.

The process could be halted in between, a corrupt device, bad firmware, and so on. An upgrade to an unstable release of iOS can also cause data loss on your device.

Quick Fixes:
  • Use a data recovery tool ASAP: If you have suffered from an unwanted data loss on your device, then take the assistance of an iOS data recovery program . A part of the Dr.Fone toolkit, it is one of the first and the most successful data recovery tools for iOS devices. All you need to do is connect your device and launch the application. Follow a simple click-through process to extract all kinds of lost or deleted data from your device. The application will let you preview the extracted data, letting you selectively save it to the location of your choice.

4.8 Backup cannot be restored after iOS 15 downgrade

Even after losing their data while downgrading an iOS device, users try to restore an existing backup. Sadly, there are times when the previous iTunes or iCloud backup ceases to restore on the downgraded device.

The problem usually occurs due to a compatibility issue among various iOS versions. For instance, you could have taken the backup of your device when it was running on another iOS version and now you are trying to restore it on an unsupported iOS version.

Quick Fixes:
  • You can load a previous iTunes or iCloud backup using a iOS restoring tool and even preview its data on its interface. For instance, to restore an iCloud backup, you simply need to log-in to your iCloud account. The application will list the available backup files for you pick an ideal option. In this way, you can easily restore your data without erasing the existing content on your device.

Part 5. FAQs about iOS 15 Downgrade

Yes, you can downgrade iOS to a previous version signed by Apple. Users get 14 days after a public official release to do it. If you have upgraded your device to a version, then you can downgrade to a stable version easily (until 14 days after the release of its stable version).

There are all kinds of ways to undo an iOS 15 update on iPhone. If you want, you can take the assistance of iTunes to do the same. Though, to downgrade iOS 15 without losing data, consider using a more sophisticated tool like Dr.Fone - System Repair (iOS). In case if you have a jailbroken device, then you can even give tools like TinyUmbrella a go.

When we install an iOS version on the device, the Apple server asks for a digital signature to authenticate it. A signed IPSW file would have a verified signature issued by Apple, letting us upgrade/downgrade the device without any hassle. Therefore, if an IPSW file is not signed by Apple, then it will not be recognized by the server and the upgrading/downgrading process won’t be completed.

There are all kinds of SHSH dumps and readily available third-party tools that can help us force Apple’s signature and create SHSH blobs even after Apple stops signing them. Though, you should know that Apple might revoke the authentication of such SHSH blobs anytime. To do this, you need to have a jailbroken device and use a dedicated tool like iFaith or FutureRestore.

The Apple Software Program lets us test the releases of iOS before the public availability. You can join or leave the program anytime you want without spending anything. If you want to leave it, then go to the Unenroll section of the website.
apple beta program

Ideally, you can’t downgrade your device to an unsigned iOS version. This is because the Apple server won’t authenticate your downloading request without a valid SHSH blob. That is why users take the assistance of a previously saved SHSH blob to do the same. You can also use a third-party downgrading tool to do it as well.

After downgrading an iOS update, you might find an existing software profile on your device storage. To remove this, just go to your device’s Settings > General > Profile and select the iOS profile from here. Tap on the “Delete Profile” option and confirm your choice to remove it.

You can restore a previously stored SHSH blob from your device or forge Apple’s signature. There are a few third-party tools like FutureRestore that can help you do the same. You can also choose to dump your SHSH blobs in order to use them afterward. Though, in most of the cases, users have to jailbreak their device in order to do it.

e