3 Solutions to Delete Photos from iPhone/iPad Quickly
Mar 07, 2022 • Filed to: Erase Phone Data • Proven solutions
Apple Inc. never stops to amaze its users by churning out continuously the new versions of OS. Starting from iPhone OS 1 to the latest one- iOS 11, the journey has always remained outstanding and more importantly cherished by iPhone or Mac users. Delivery of the distinguished ‘Mobile Experience’ is what differentiate all the Apple products and services from the others.
Nevertheless, some of the monotonous and unavoidable tasks will always remain and to remove photos from iPhone can be such an action or task. Just imagine that you are out for celebrating a special occasion with your loved ones and at an instant, you take out your iPhone to capture a special moment. However, due to no memory space, a clicked photo can’t be saved and disrupts the joy of that moment, too. But, you can avoid such incident if you know how to delete all photos from iPhone. When you remove photos from iPhone, it frees a lot of storage space for you and you can carry on using your phone as usual, without any disruptions. Do note that the below solutions are written with respect to iOS 8.
- Part 1: How to delete multiple photos from iPhone/iPad Camera Roll
- Part 2: How to delete all photos from iPhone using Mac or PC
- Part 3: How to permanently delete photos from iPhone (Unrecoverable)
Part 1: How to delete multiple photos from iPhone/iPad Camera Roll
Are you still struggling on- how to delete photos from iPhone? Then, follow below steps to do it easily. Remember that below steps will endall your hassles of- how to delete photos from iPhoneparticularly in iOS 8. Nevertheless, below steps will at least acquaint you to delete photos from iPhone of any version you own.
1. Begin by launching ‘Photos’ application.
2. Having done that, now look for ‘Camera Roll’ Album.
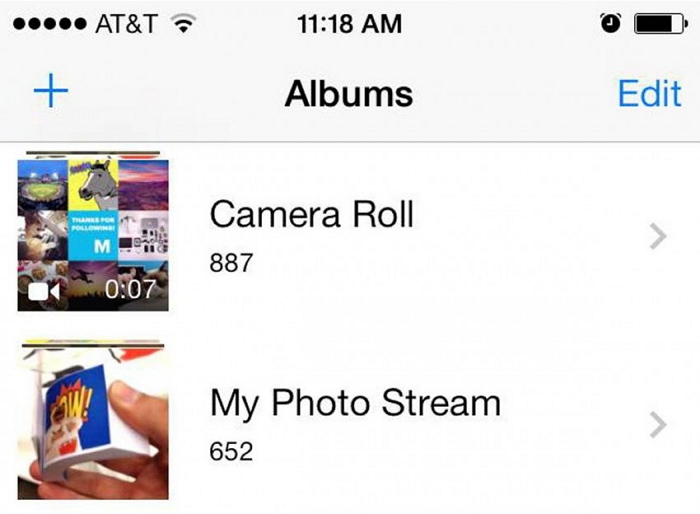
3. Here,at Camera Roll, you will see the ‘Select’ button. The ‘Select’ button is located at mobile screen’supper-right corner. See in below image.
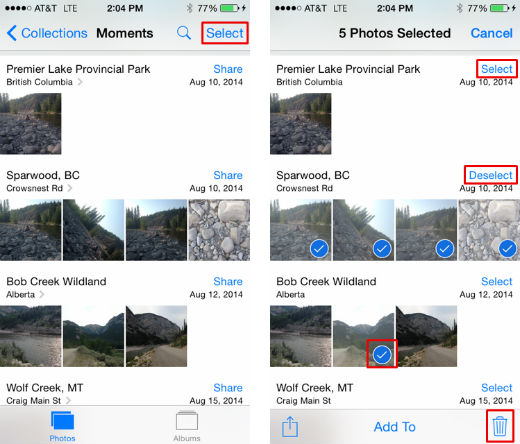
4. Now, click on “Select” button and proceed with the individual selection of photos, which you want to delete. You do itby tapping on such photos one-by-one. Alternatively, for faster manual selection of photos, use the sliding technique; just slide your own fingers over a single row of photos. Or, perform the same over a column of photos. The latter one makes selection faster than former one; as latter technique will let you select the multiple rows at once.
5. Now, just click on the ‘Trash’ icon(as above image) in order to remove photos from iPhone (iOS 8 version).
6. On clicking ‘Trash’ icon, a pop-up will be displayed. It will ask you for the final confirmation. Accept that and successfully remove photos from iPhone.
Part 2: How to delete all photos from iPhone using Mac or PC
Well! it is easy to remove photos from iPhone itself. However, even sliding technique become tedious when there are around or more than the six-digited number of photos in your iPhone. In such case, using Mac or PC is the best option to quickly delete all photos from iPhone. If you want to know that how to delete all photos from iPhoneat once, then read and follow below steps.
Using Mac
1. Begin by connecting your iPhone to the computer. You do it with the help of USB.
2. Now, by launching the ‘Image Capture,’ which you will find in the Applications Folder, you are ready to delete all photo from iPhone.
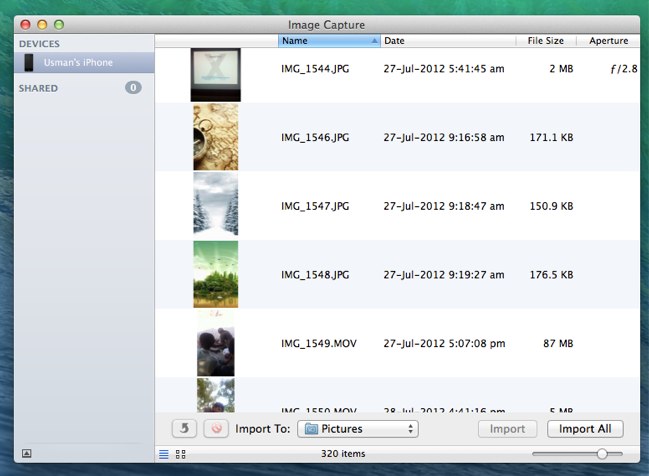
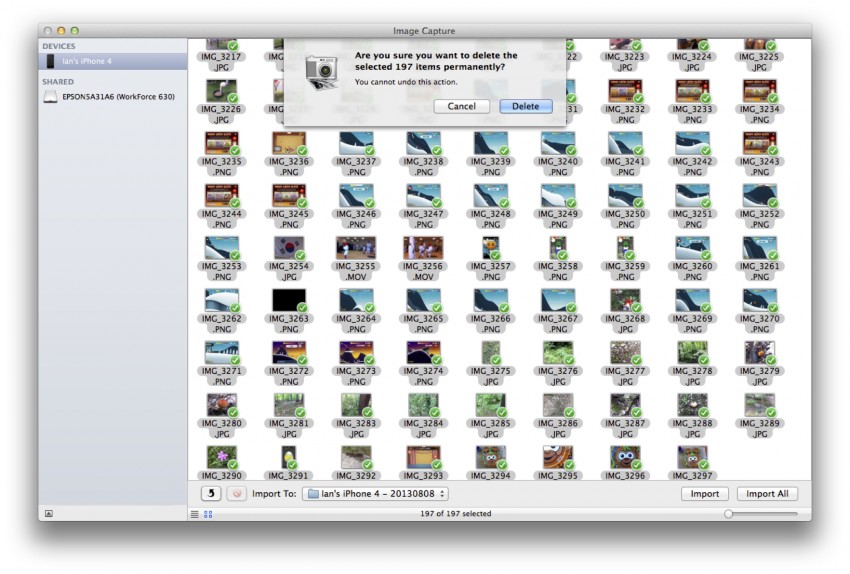
3. Now, just use hot-keys ‘Command+A’ for selection of all the pictures.
4. As soon as you perform above action, a red button will appear. On clicking this red button, all the photos inside ‘Image Capture’ are deleted at once. See below.
Using Windows PC
Here, same steps are to be performed as above but interface icons are different.
1. Just like above, take help of USB to connect your iPhone to PC.
2. Now, select ‘My Computer’ and open it to choose ‘Apple iPhone’.
3. Proceed by opening ‘Internal Storage’folder and then ‘DCIM’ folder. After all these steps, you will land to a folder, which shows you all the photos and videos of your iPhone.
4. Once again go for hotkeys ‘Ctrl+A’ to select all the photos. And, right click anywherein that folder to delete them all.
To be clear, the above-defined steps that guide you on how to delete photos from iPhone and how to delete all photos from iPhone, they don’t care about your Privacy. It is a fact that even after deleting photos or any data via general ways, photos or data can be recovered. So, if you want to permanently erase or remove photos from iPhone, then have a look at below toolkit software.
Part 3: How to permanently delete photos from iPhone (Unrecoverable)
The above two methods will not permanently delete photos from iPhone. So, if you want to remove photos from iPhone that are unrecoverable, then a software named ‘Dr.Fone - Data Eraser (iOS)’ is what you need. Privacy is something that we don’t want to compromise upon. General ways like above ones actually do not permanently delete files, and thus, makes it vulnerable to identity thieves.
‘Dr.Fone - Data Eraser (iOS)’ is purposely made keeping in mind above factors. With this software, you can permanently delete your private information (that are recoverable even after deletion) on your phone; as private information may be stored in deleted messages, photos, call history, contacts, notes, reminders, etc. The best part of this software toolkit is that you can select the data you want to permanently delete. Also, the good part is that Data Recovery tool is available is this same software along with the other tools like Full Data Erase, Screen Recorder, System Recovery and many more.

Dr.Fone - Data Eraser (iOS)
Easily Wipe Your Personal Data from Your Device
- Simple, click-through, process.
- You select which data you want to erase.
- Your data is permanently deleted.
- Nobody can ever recover and view your private data.
- Supported iPhone X/8 (Plus)/7 (Plus)/SE/6/6 Plus/6s/6s Plus/5s/5c/5/4/4s that run iOS 11/10/9.3/8/7/6/5/4
- Fully compatible with Windows 10 or Mac 10.11.
Now, let us see how to delete photos from iPhone permanently leaving no traces behind for identity thieves (to recover it) with ‘Dr.Fone - Data Eraser (iOS)’. Before you begin to completely remove all photos from iPhone with this software toolkit,download it from its official website .
Tip: The Data Eraser software can help to erase phone data. If you forgot the Apple ID password and want to remove it, we recommended you to use Dr.Fone - Screen Unlock (iOS). It'll erase the iCloud account from your iPhone/iPad.
1. Having downloaded the software, install and run ‘Dr.Fone’ on your Mac or Windows PC. On opening this toolkit, you will find the Data Eraser tool at the right side of the interface.

2. Now, it is time to get connect your iPhone to your Mac or Windows PC. Just take help of a digital USB cable to connect the both. And as soon as this toolkit recognises it, select Erase Private Data to continue, the following will be displayed.
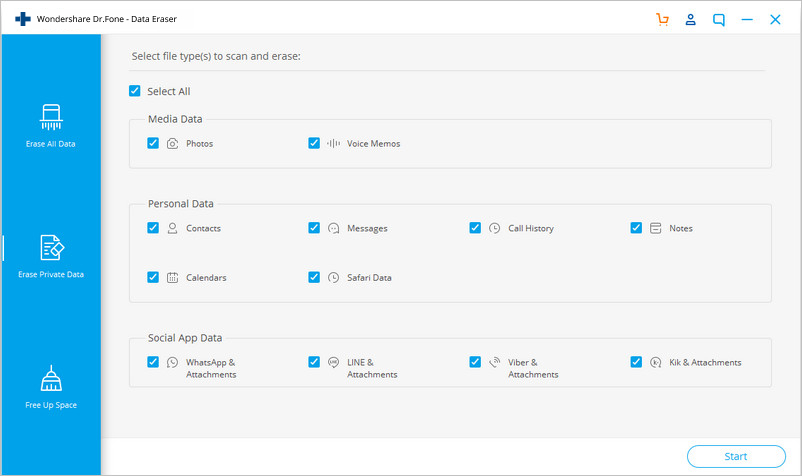
3. To completely remove photos from iPhone, it is required that this toolkit scans and looks for the private data on your iPhone. It is done when you click the ‘Start’ button. Just wait for a couple of seconds as the ‘Dr.Fone’ toolkit is fetching your private data.
4. After a little waiting time, this toolkit will show you the scan results of private data in form of photos, call history, messages, videos, and much more. As said earlier, it is time to leverage the best feature of it. Just check on items that you want to delete and just click on "Erase" button.
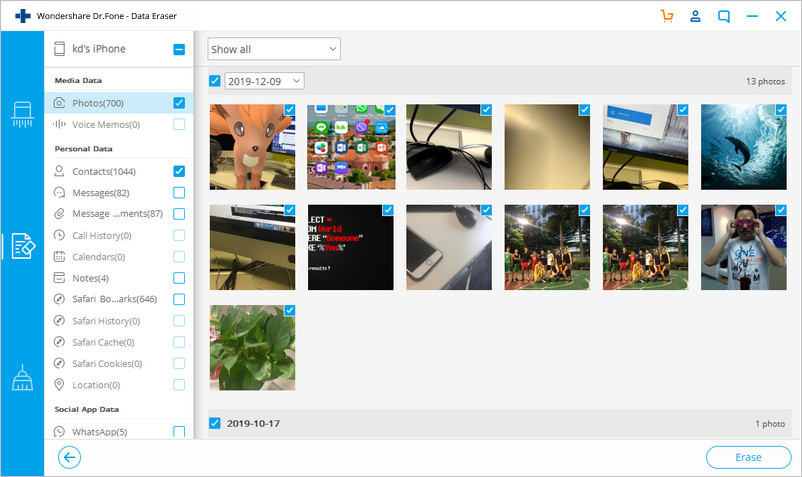
5. Within a couple of minutes, ‘Dr.Fone - Data Eraser’ will delete all photos from iPhone for you.
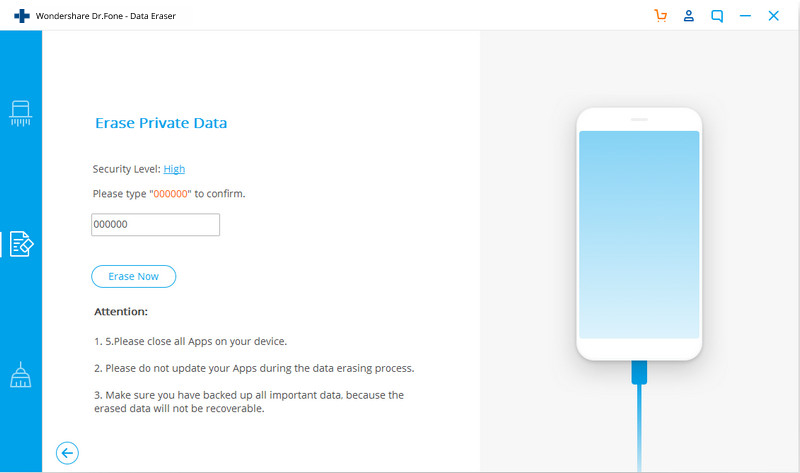
Note: This toolkit will ask for your confirmation before permanently deleting photos from your iPhone. So, after entering/typing ‘000000,’ give your confirmation by clicking ‘Erase Now’.
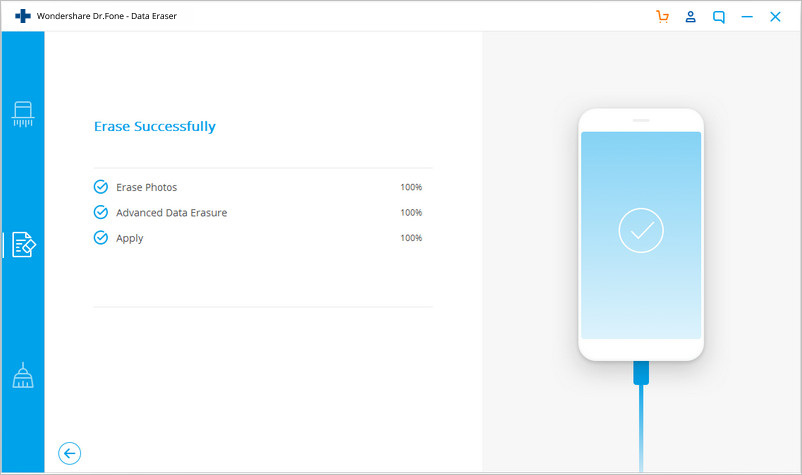
6. After giving a confirmation to ‘Dr.Fone - Data Eraser (iOS)’ for completely deleting photos from iPhone and waiting for few minutes, a message on the window of this software will pop-up. It says ‘Erase Successfully’.
So, in this article we learnt about 3 methods to delete photos from iPhone. However, in order to remove photos from iPhone and at the same time safeguard it from any kind of theft in future, one should go for ‘Dr.Fone - Data Eraser (iOS)’.
Erase Phone
- 1. Wipe iPhone
- 1.1 Permanently Wipe iPhone
- 1.2 Wipe iPhone Before Selling
- 1.3 Format iPhone
- 1.4 Wipe iPad Before Selling
- 1.5 Remote Wipe iPhone
- 2. “iPhone” -y pozuň
- 2.1 “iPhone” jaň taryhyny pozuň
- 2.2 “iPhone” senenamasyny pozuň
- 2.3 “iPhone” -yň taryhyny pozuň
- 2.4 “iPad” e-poçtalaryny pozuň
- 2.5 iPhone habarlaryny hemişelik pozuň
- 2.6 “iPad” taryhyny hemişelik pozuň
- 2.7 “iPhone Voicemail” -ni pozuň
- 2.8 “iPhone” aragatnaşyklaryny pozuň
- 2.9 iPhone suratlaryny pozuň
- 2.10 iMessages-i pozuň
- 2.11 Aýdym-sazy iPhone-dan pozuň
- 2.12 “iPhone” programmalaryny pozuň
- 2.13 “iPhone” belliklerini pozuň
- 2.14 iPhone beýleki maglumatlary pozuň
- 2.15 iPhone resminamalaryny we maglumatlary pozuň
- 2.16 “iPad” -dan filmleri pozuň
- 3. “iPhone” -y pozuň
- 3.1 Conthli mazmuny we sazlamalary pozuň
- 3.2 Satmazdan ozal “iPad” -y pozuň
- 3.3 Iň oňat iPhone maglumatlary pozmak programma üpjünçiligi
- 4. “iPhone” -y arassalaň
- 4.3 “iPod touch” -y arassalaň
- 4.4 “iPhone” -da gutapjyklary arassalaň
- 4.5 “iPhone” keşini arassalaň
- 4.6 Iň ýokary iPhone arassalaýjylary
- 4.7 “iPhone” ammaryny boşadyň
- 4.8 iPhone-da e-poçta hasaplaryny pozuň
- 4.9 “iPhone” -y çaltlaşdyryň
- 5. “Android” -i arassalaň / süpüriň
- 5.1 Android Keşini arassalaň
- 5.2 Keş bölümini süpüriň
- 5.3 Android suratlaryny pozuň
- 5.4 Wipe Android Before Selling
- 5.5 Wipe Samsung
- 5.6 Remotely Wipe Android
- 5.7 Top Android Boosters
- 5.8 Top Android Cleaners
- 5.9 Delete Android History
- 5.10 Delete Android Text Messages
- 5.11 Best Android Cleaning Apps


James Davis
staff Editor