How to Transfer Photos from iPad to USB Flash Drive
Apr 27, 2022 • Filed to: iPhone Data Transfer Solutions • Proven solutions
Still tearing your hair out for trying to transfer photos from iPad to USB Flash Drive? It's known that you can directly export photos in iPad Camera Roll to USB Flash Drive by plugging into a USB cable to the PC. However, there is no available way to transfer photos from iPad Photo Library. In this case, it's good to try a professional third-party tool, like Dr.Fone - Phone Manager (iOS) for both Windows and Mac. With this nice iPad Transfer tool, you can easily transfer photos from both iPad Camera Roll and iPad Photo Library to the USB Flash Drive easily.
Part I: Transfer Photos from iPad to USB Flash Drive without iTunes Easliy
Dr.Fone - Phone Manager (iOS) does not only support iPad users transferring photos but also music, videos, books. It achieves the purpose of transferring files as well as the varies transferring destinations. With this iPad transfer tool, you can manage your files between iPad and iTunes,iPad and PC, iDevice to iDevice.

Dr.Fone - Phone Manager (iOS)
Transfer iPod/iPhone/iPad Photos to USB Flash Drive
- Transfer, manage, export/import your music, photos, videos, contacts, SMS, Apps etc.
- Backup your music, photos, videos, contacts, SMS, Apps etc. to computer and restore them easily.
- Transfer music, photos, videos, contacts, messages, etc from one smartphone to another.
- Transfer media files between iOS devices and iTunes.
- Fully compatible with iOS 7, iOS 8, iOS 9, iOS 10, iOS 11 and iPod.
Note: Both Windows version and Mac versions are fully compatible with the iPad Pro, iPad Air 2, iPad Air 1, iPad mini 4, iPad mini 3, iPad mini 2, iPad mini running iOS 11, iOS 10.3, iOS9, iOS8 &all the iOS systems. In this article, we'll try the Windows version, that is, Dr.Fone - Phone Manager (iOS).
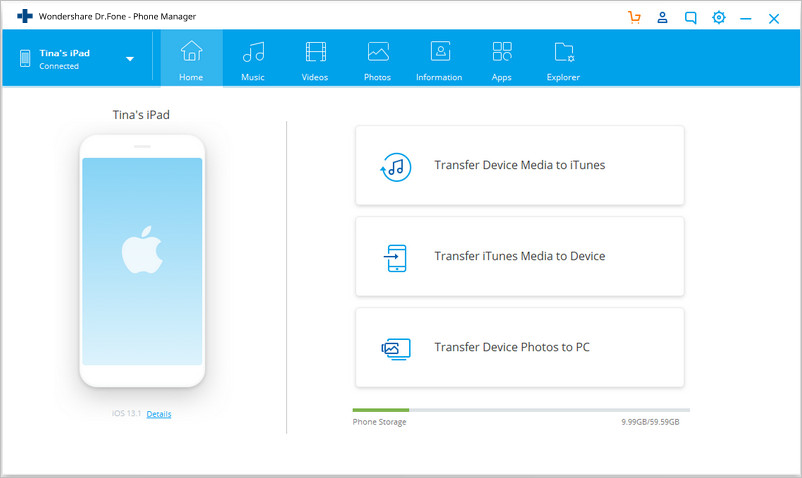
Step 1 Download and install Dr.Fone - Phone Manager (iOS)The first thing you should do is to install the iPad Transfer tool on your computer. Run it and select "Phone Manager" from the primary window on the computer screen. Then, connect the USB Flash Drive to the computer with a USB cable. After it's detected, you should open the flash drive disk on the computer.

Step 2 Connect your iPad to the computer
Then, a USB cable should be used to connect your iPad with the computer. The iPad Transfer tool will detect your iPad at once, and then show it in the primary window. At the top of the primary window, you can view Music, Videos, Photos, Information etc. on your iPad.

Step 3. Copy photos from iPad to USB Flash Drive
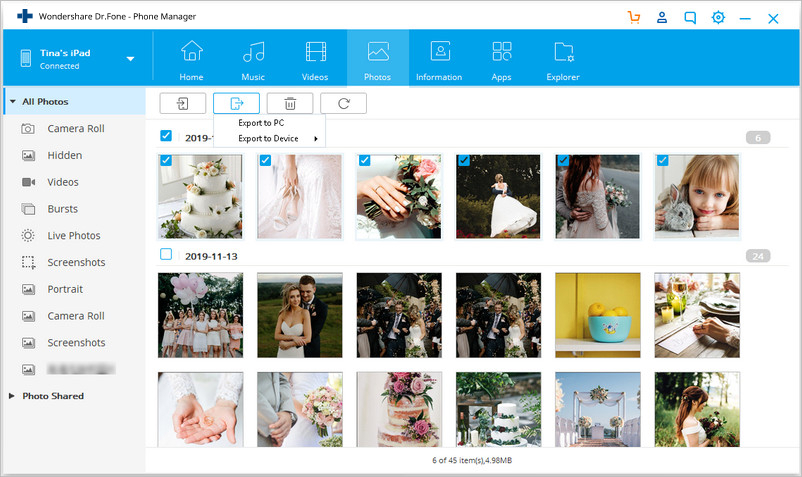
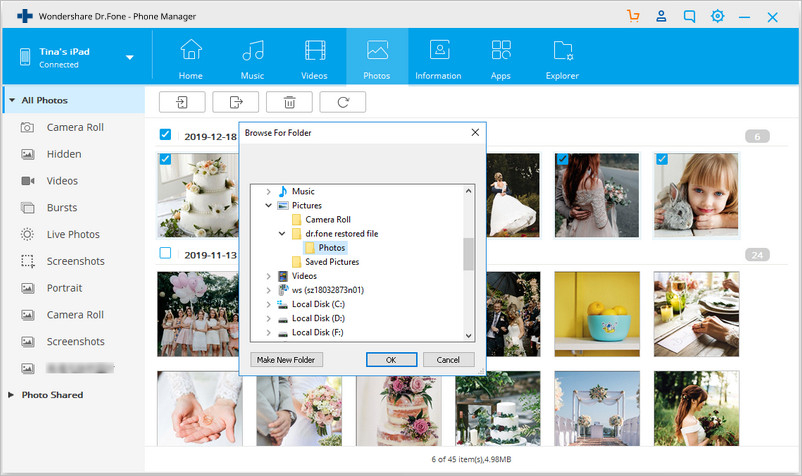
And then,users should click "Photos" at the top of the main interface. The photo types will be shown in the left sidabar: Camera Roll, Photo Library, Photo Stream, Photo Shared. Select one of the types you want, and the related photos will be shown on the right pane. In this step you can choose the photos that you want to transfer from iPad to USB flash drive, and then drag and drop the photos to the disk flash drive. You can also choose the photos and then click Export > Export to PC, another window will pop up.

In the pop-up file browser window, you need to find the USB Flash Drive disk. And then, click "OK" to transfer photos from iPad to USB flash drive.

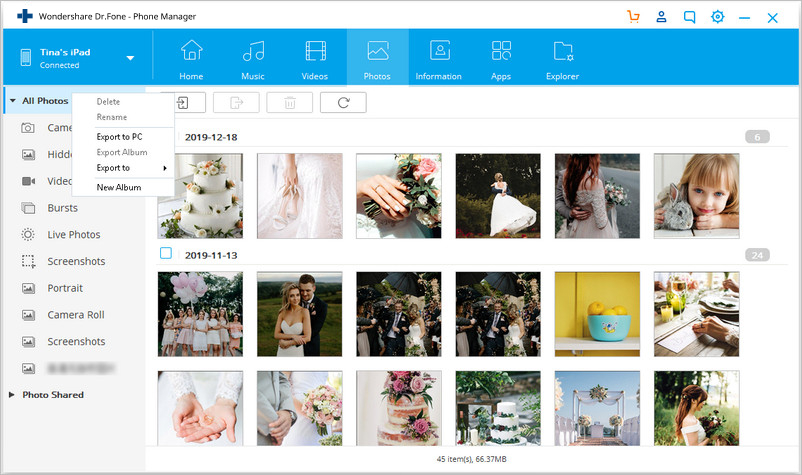
To export photos, you can open the Camera Roll or Photo Library, and select your targeted photos, then export them to USB Flash Drive.
Note: The albums under Photo Library category can also be exported to USB Flash Drive.

Well done! Now you can manage to transfer photos from iPad to USB flash drive. Actually, besides photos, Dr.Fone - Phone Manager (iOS) empowers you to move music files, videos, contacts and SMS to the flash drive for backup. So, download Dr.Fone - Phone Manager (iOS) now to export photos to USB Flash Drive all in one click.
Part II: Transfer Photos from iPad to PC and then from PC to USB Flash Drive
There are two solutions to transfer photos to USB Flash Drive manually diredtly via computer:
Finally transfer the photos to Flash Drive from PC which it's almost the same with transferring " transfer photos from iPhone to USB Flash Drive". So here we can refer to this Guide: How to Photos from iPhone to PC and Then from PC to USB Flash Drive.
If this guide helps, don't forget to share it with your friends.
iPad Tips & Tricks
- Make Use of iPad
- iPad Photo Transfer
- მუსიკის გადატანა iPad-დან iTunes-ზე
- გადაიტანეთ შეძენილი ნივთები iPad-დან iTunes-ში
- წაშალეთ iPad-ის დუბლიკატი ფოტოები
- ჩამოტვირთეთ მუსიკა iPad-ზე
- გამოიყენეთ iPad როგორც გარე დისკი
- გადაიტანეთ მონაცემები iPad-ზე
- გადაიტანეთ ფოტოები კომპიუტერიდან iPad-ზე
- MP4 გადაიტანეთ iPad-ზე
- გადაიტანეთ ფაილები კომპიუტერიდან iPad-ზე
- გადაიტანეთ ფოტოები Mac-დან ipad-ზე
- გადაიტანეთ აპლიკაციები iPad-დან iPad/iPhone-ზე
- გადაიტანეთ ვიდეოები iPad-ზე iTunes-ის გარეშე
- მუსიკის გადატანა iPad-დან iPad-ზე
- გადაიტანეთ შენიშვნები iPhone-დან iPad-ზე
- iPad-ის მონაცემების კომპიუტერზე/მაკზე გადატანა
- გადაიტანეთ ფოტოები iPad-დან Mac-ზე
- გადაიტანეთ ფოტოები iPad-დან კომპიუტერზე
- გადაიტანეთ წიგნები iPad-დან კომპიუტერზე
- გადაიტანეთ აპლიკაციები iPad-დან კომპიუტერზე
- მუსიკის გადატანა iPad-დან კომპიუტერზე
- PDF-ის გადატანა iPad-დან კომპიუტერზე
- გადაიტანეთ შენიშვნები iPad-დან კომპიუტერზე
- გადაიტანეთ ფაილები iPad-დან კომპიუტერზე
- გადაიტანეთ ვიდეოები iPad-დან Mac-ზე
- გადაიტანეთ ვიდეოები iPad-დან კომპიუტერზე
- iPad-ის ახალ კომპიუტერთან სინქრონიზაცია
- iPad-ის მონაცემების გარე საცავში გადატანა


Daisy Raines
staff Editor