

Best Way to Bypass Google Account Verification After Reset

Apr 28, 2022 • Filed to: Bypass Google FRP • Proven solutions
Since Android version 5.1 has been introduced, Google has introduced a more advanced security feature that makes it impossible for folks to access their phone when they forget the details of their Google account.
Perhaps you've factory reset your Samsung device, Samsung S22 for example. Unfortunately, it'll be impossible for you to get past the Google account verification phase if you don't remember the Password ID or Gmail ID to your Google account. Thus, if you're caught up in such a situation, you will need to bypass the Google account verification process to get access to your device.
In this article, we will introduce you to simple steps on how to bypass Google account verification after Samsung S22/A21s reset. So, let's dive in to get cracking without wasting much time.
- Part 1: How to Bypass Google Account Verification After Reset
- Method 1: Bypass Google account verification after reset with PC [Most Straitforward]
- Method 2: How to bypass Google account verification by Google keyboard
- Method 3: Bypass Google verification without Internet access
- Method 4: How to disable Google account lock with a SIM card
- Method 5: Bypass Google account verification via SMS
- Part 2: How to Remove Google Account from Phone before Factory Reset
- Hot FAQs: People Also Ask About Bypassing FRP
Part 1: How to Bypass Google Account Verification After Reset
The reason why Samsung phones enable the Google activation lock is that we have done an abnormal factory reset. In most cases, we don't suggest you deactivate the google lock due to data privacy protection. But, if this feature has affected your daily use, there are several ways to bypass Google account verification after reset. You can either use an advanced unlock software, Google Keyboard, SIM card, SMS, etc. All you just have to do is to stick to this page to find out the simple steps to bypass google account verification after resetting using these methods.
Method 1: Bypass Google Account Verification After Reset with PC [Most Straitforward]
The best and most recommended method to bypass google account verification after resetting with PC is the advanced Wondershare Dr.Fone - Screen Unlock software.
Yes, Dr.Fone - Screen Unlock enables you to bypass all kinds of Android lock screens. Be it Pin, passwords, fingerprints, or patterns, Dr.Fone - Screen Unlock is the perfect go-to tool to help you bypass all kinds of lock screens hindering you from getting access to your phone. Besides, you don't need any advanced knowledge to employ Dr.Fone - Screen Lock tool to bypass Google account verification, as it supports an advanced FRP bypass feature. Thus, enabling you to get the Google verification bypass job done like a pro.
Key Features of Dr.Fone - Screen Unlock
- Supports all Android devices, including Samsung, LG, Huawei, Xiaomi, etc.
- Unlock your Android phone without data loss.
- Support removal of all kinds of screen lock - PIN, Password, Fingerprints, Patterns.
- It's easy to navigate and can be employed by users at all levels.
If you hope to disable FRP on Android 7/8 OS devices, or if you have not figured out the version of your Samsung operating system, don't worry. Check our complete guide to unlock FRP on Android 7/8. The initial steps are the same while different at the later stages. The following are the steps to disable FRP on Android 6/9/10 devices using Dr. Fone-Screen Unlock
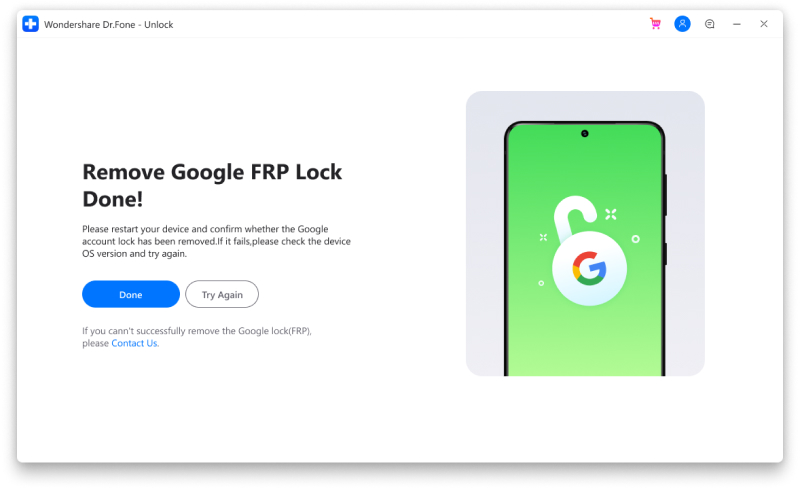
Step-by-step Guide to Bypass Google Account Verification After Reset Using Dr.Fone - Screen Unlock
Before proceeding to the steps, make sure you've downloaded and installed the Wondershare Dr.Fone software on your Mac or Windows computer.
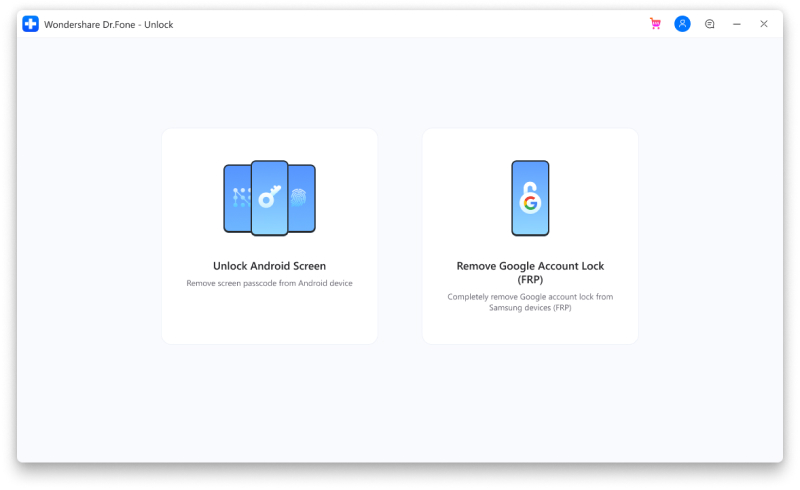
Step 1. Download Dr. Fone software on your PC, and choose “Screen Unlock”.

Step 2. Choose the “Remove Google Account Lock (FRP)” option.
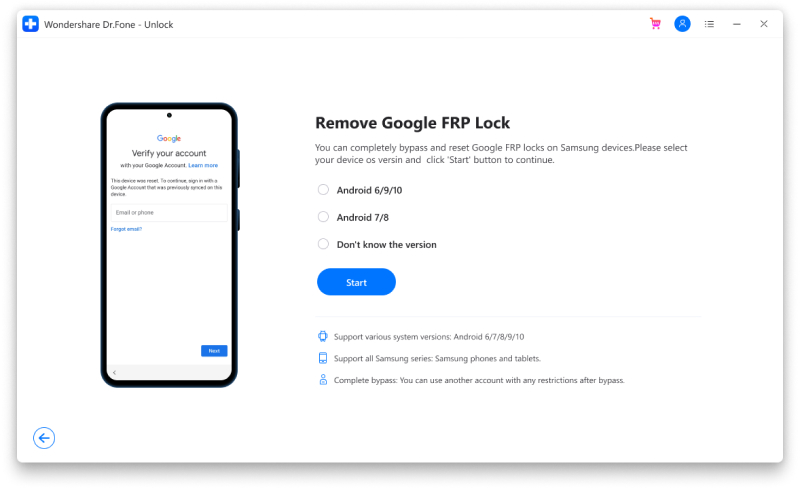
Step 3. Also, make sure that your Android phone is connected to the WiFi network.
Step 4. Now four types of OS versions will appear for you to choose from. Select the first circle for the devices running on 6,9, or 10 performances. If you are not aware of the OS version of your device, select the third option.
Step 5. Please connect your phone to the computer via a USB cable.
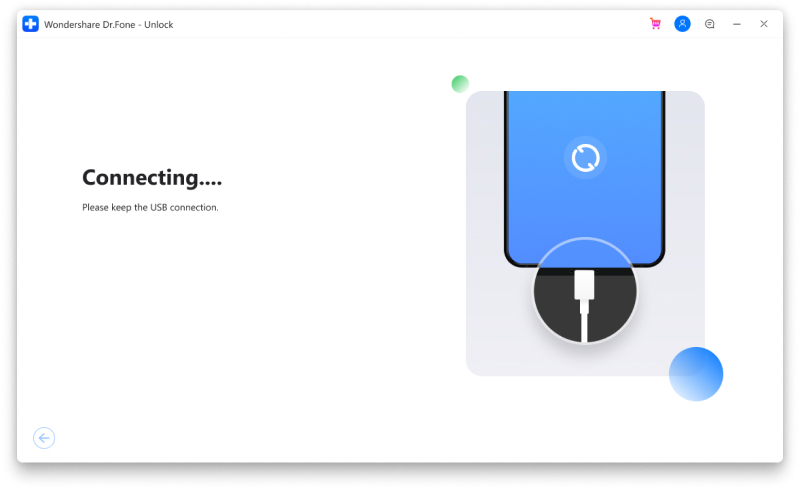
Step 6. After the phone is connected, a notification will appear on your locked Android device from Screen Unlock.
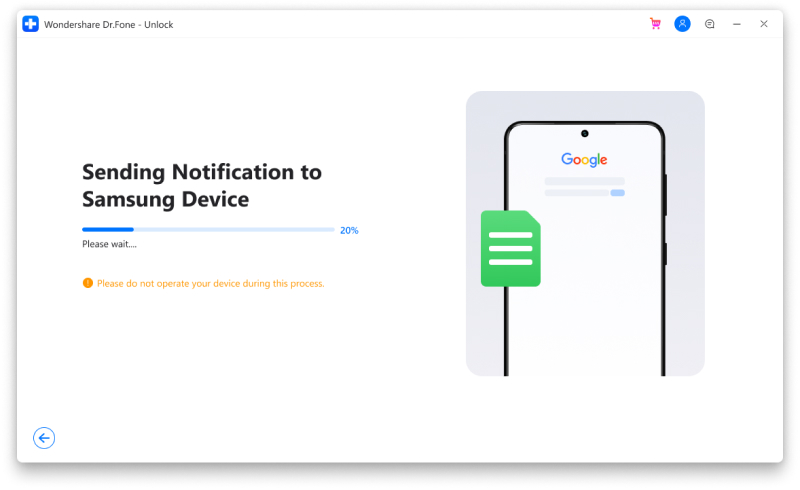
Step 7. Next, to remove the FRP, follow the notifications and the steps as they appear. Then, click on the “View” button to move ahead. You will now be guided to the Samsung App Store.
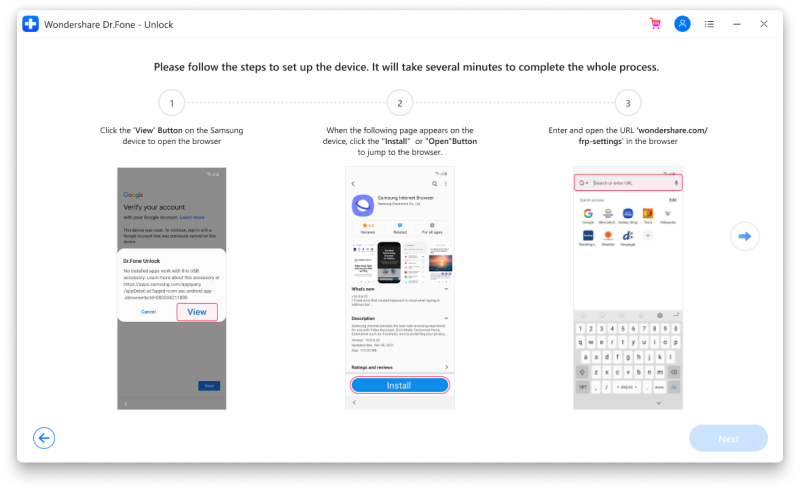
You now need to install and open the Samsung Internet browser. At the browser, enter the URL- drfonetoolkit.com.
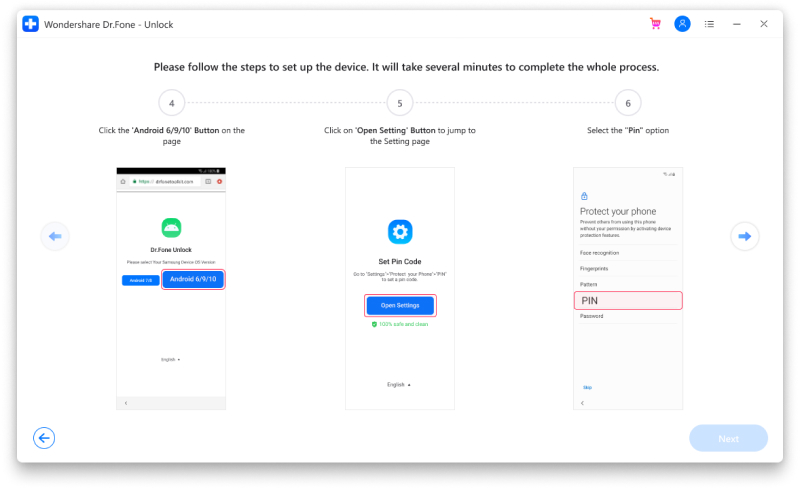
Step 8. Choose the “Android 6/9/10” button on the interface and then tap on the Open Settings button to continue. Choose the Pin option now.
Step 9. Next select “Do not require” by default and click on CONTINUE.
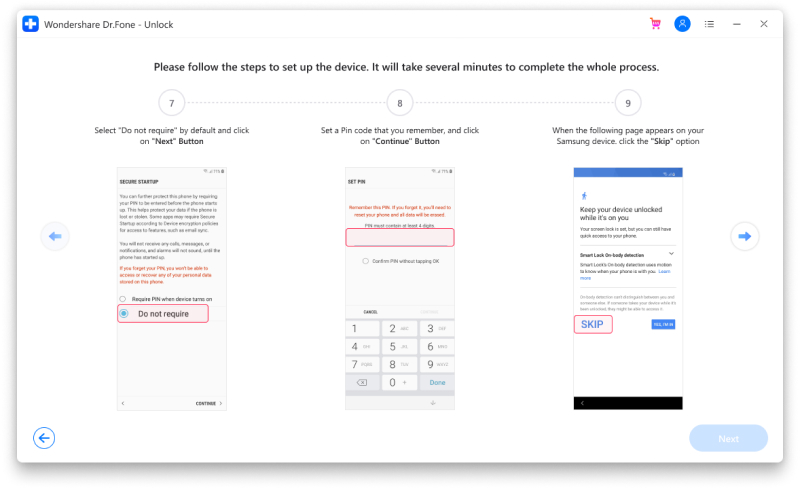
Step 10. Now you need to set a PIN for the next steps. (Make sure to remember this PIN that you have selected).
Step 11. Click on the Skip option and move ahead.
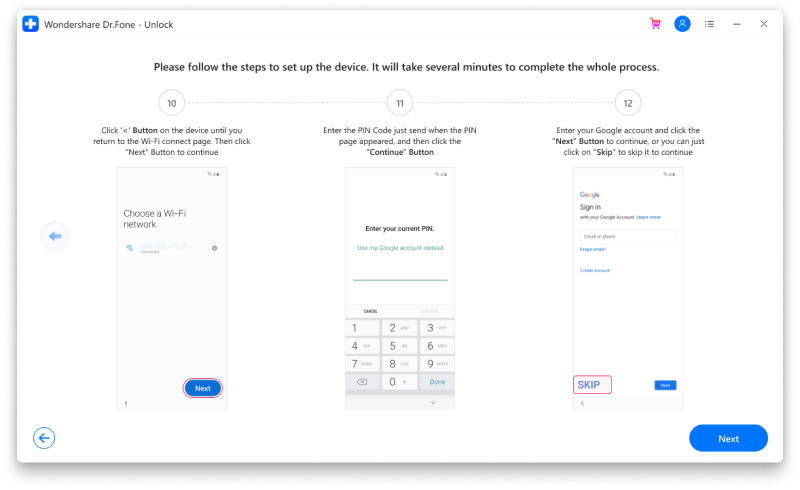
Step 12. Click on the “<” button on your device till you go back to the WiFi connect page. Tap on Next to move ahead.
Step 13. Now enter the PIN that you have set and click on Continue.
Step 14. A Google Account Sign-In page will appear along with the skip option. Click on the Skip the button and move ahead. This will bypass google account verification.
Step 15. The FRP lock is now successfully removed from your Android device.
Method 2: How to bypass Google account verification by Google keyboard
If you're looking to opt-in for this Google account verification bypass method, you must ensure your phone is connected to a stable internet connection. Then, follow the procedure below to bypass Google account verification by Google Keyboard.
Step 1: Tap on Option on the Google account verification screen to access the Google Keyboard. Then, hold firm the @ symbol until the Settings appear > Select ‘Google Keyboard Settings to proceed.
Step 2: Navigate to the top-right corner of the interface and click on the ‘Three dots’. Then, select ‘Help & Feedback’ next.
Step 3: Select ‘Using Google Keyboard’ in the help section. On selecting that, hold firm any text on the page, then click on ‘Web search next.
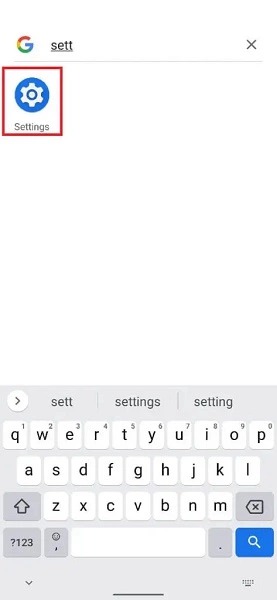
Step 4: Type ‘Settings’ in the search box. Then, scroll down and select ‘About Phone’ on the next page.
Step 5: Locate the ‘Build Number’ > Tap on it seven times to enable the Developer options.
Step 6: Now, navigate back to the menu and select ‘Developer’ from the options. Then tap on the ‘OEM Unlocking and tap ‘Back’ twice.
Step 7: Lastly, restart your mobile device and connect it to a stable Wi-Fi network. After that, just add a new Google Account, and you're good to start using your device once again.
Method 3: Bypass Google verification without Internet access
Have you ever imagined bypassing Google verification without requiring an internet connection? Well, the truth is, you can disable Google verification without internet access! So, just read on. Let's walk you through the process.
Step 1: Insert a working SIM card into the locked Android device. Then, dial the number of the inserted SIM from another mobile device.
Step 2: Answer the call on the lock device, then save the contact by clicking on ‘Add new contact’.
Step 3: Up next, add a String number in the opened contact form and tap ‘Save’. Then, select Google to create a new account.
Step 4: Afterward, restart your mobile device. Congrats, you've successfully bypassed Google verification without an internet connection!
Method 4: How to Disable Google Account lock with a SIM card
Did you just consider this method to be similar to ‘Method 2’? No, they are not, though both ways require a SIM card to be executed successfully.
Step 1: Remove the SIM card from the device you want to bypass FRP and restart it instantly.
Step 2: Just choose the preferred language once the device has restarted.
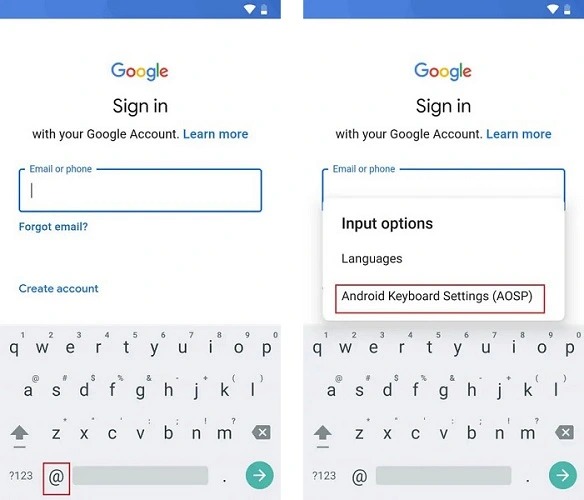
Step 3: On doing that, you'll notice a form where you need to enter your Email and Phone number. Just hold down the @ symbol for a few seconds, then from the Settings menu that appears, select ‘Android Keyboard Settings’.
Step 4: Now press Back, then Home next. By doing so, the Google Search engine will be activated and will be displayed on your screen just as it's shown on your device's home screen.
Step 5: Type ‘Settings’ in the search box. Then click on it and the following interface, turn off the ‘Saving Backups and Auto Restore’ option.
Step 6: Finally, Hard reset your device to reset the settings. After that, your device will become accessible.
Method 5: Bypass Google account verification via SMS
You can also bypass Google account verification via SMS. However, it would help if you had a stable internet connection to execute this operation successfully. The steps below explain the process of bypassing Google account verification via SMS.
Step 1: Connect to a stable internet connection and try to enter any email. Then, find the option to send it via SMS.
Step 2: Next, type a message and it to 112 in the window that appears on the screen.
Step 3: A notification will pop up saying an error occurred and your message was not delivered. A call button will also be next to it, just click on the button.
Step 4:Dial *#*4636#*#*. Dialing this code will prompt you to the settings section, where you'll have to do a hard reset. After you've successfully hard reset the device, your phone will become accessible.
Part 2: How to Remove Google Account from Phone before Factory Reset
Anytime you set up a device with a Google account, the Factory Reset Protection (FRP) is automatically enabled. Thus, to avoid going through the Google account verification phase after a factory reset, you must ensure to turn off ‘Factory Reset Protection before executing the operation.
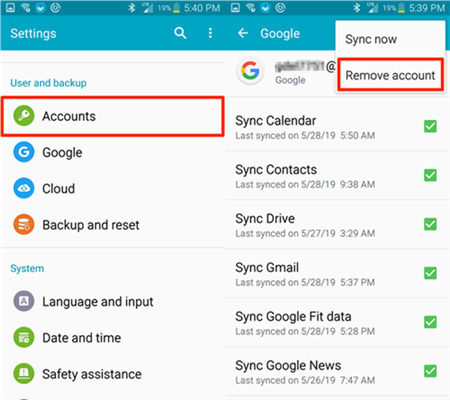
See the steps below to remove the Google account from the phone before the factory reset.
Step 1: Launch the ‘Settings’ app on your Android device, navigate to ‘Cloud & Accounts’, and tap on ‘Accounts’.
Step 2: Select ‘Google Account’ next, then click on the three dots at the top-right corner of the page.
Step 3: Select ‘Remove Account’. You might get a verification request by doing that. All you just have to do is to confirm the request to delete the Google account from the device. Yay, you've successfully removed the FRP function from your device.
Hot FAQs: People Also Ask About Bypassing FRP
1. What should I do if the phone doesn’t have a Google keyboard?
It's simple. Just try other methods that don't require using your mobile device keyboard. The best use method we recommend is using advanced software like Dr.Fone - Screen Unlock.
2. Is it possible for Google verification to be removed on Android completely?
Yes, of course. All you need is robust software that can bypass Google account verification. But, again, Dr.Fone is the best option for you to reach out to if you want a seamless bypass operation.
3. What can I do if the keyboard menu does not show up?
You can use Dr.Fone - Screen Unlock tool to get the job done in such a scenario.
4. Does Factory Reset Remove Google Account?
Factory reset only removes the Google account from your phone. However, you can still access the account and all info on it by signing in using the email and password used in creating it.
Wrap it Up!
It can be very annoying to get stuck in the Google verification phase after resetting your Android device. Luckily, several effective methods are available to help you solve such problems. It doesn't matter if you're looking to use advanced software or not. This article has explained different methods that you can employ to bypass google account verification within a few minutes. Then, you just have to choose your preferred methods, and you're good to bypass the Google verification on any Android device. However, we recommend using Dr.Fone - Screen Unlock for a faster and more convenient bypass operation.


Bypass FRP
- Android Bypass
- 1. Disable Factory Reset Protection (FRP) for Both iPhone and Android
- 2. Best Way to Bypass Google Account Verification After Reset
- 3. 9 FRP Bypass Tools to Bypass Google Account
- 4. Bypass Factory Reset on Android
- 5. Bypass Samsung Google Account Verification
- 6. Bypass Gmail Phone Verification
- 7. Solve Custom Binary Blocked
- iPhone Bypass
James Davis
staff Editor
Generally rated4.5(105participated)