Tips Center: How to Use iCloud, iCloud Backup and iCloud Storage

Mar 07, 2022 • Filed to: Manage Device Data • Proven solutions
iCloud, Apple launched it as the easiest way to manage your content: share files among iPhone, iPad, iPod and computer, backup important data on iPhone, iPad and iPod, restore iOS device with backup files and locate and wipe data on lost iOS device remotely. If you have an iOS device, iPhone, iPad, or iPod, you should learn how to use iCloud. This article mainly focuses on 3 parts.
Part 1: How to Use iCloud
From the above, you can see the structure of this article. To take a look at each part, please click the navigation bar on the left.
1.1 How to Set up and Sign in iCloud
It’s free to sign up with iCloud. Your Apple ID will do. For people who do not have any preference for a special iCloud ID, an Apple ID could be your iCloud account. So, in this case, you don’t need to sign up a new account for iCloud, but sign in iCloud with your Apple ID. If you haven’t had an Apple ID yet, don’t worry, there are so many accesses to the sign up window for Apple ID I’ll mention below. Let’s take a look at how to set up iCloud on your computer and iOS devices first. Only after successfully setting up iCloud on your computer and iPhone, iPod touch, and iPad, you can use iCloud fully.
*On iPhone, iPod touch, and iPad:
Step 1. Connect your iPhone, iPod touch or iPad with Wi-Fi or a stable network.
Step 2. Tap Settings > General > Software Update to see whether there is an update available on your iOS device. If there isn’t, it means the software is the latest one. If there is, you should update your iOS to the latest one.
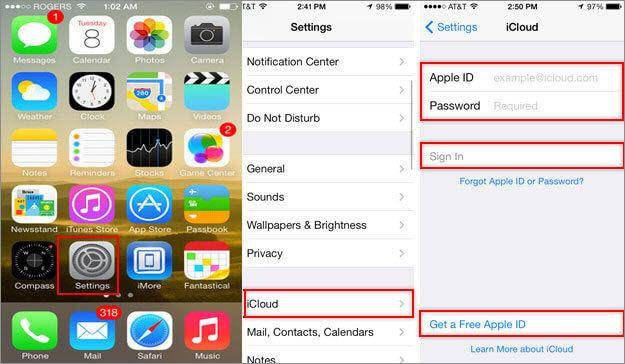
Step 3. Tap Settings > iCloud > enter your Apple ID. If you haven’t had an Apple ID yet, tap “Get a Free Apple ID” in the same window and follow the setup assistant to create an Apple ID with your email address.
Step 4. Enable iCloud services for apps by swiping the button to ON besides each app: Mail, Contacts, Calendars, Reminders, Safari, Notes, Passbook, Keychain, Photos, Documents & Data, Find My iPhone, etc.
*On Mac:
Step 1. Click the little apple icon on the very top left of your Mac computer and select Software Update. If there is an update available, click UPDATE to update the OS X to the latest version. If there isn’t, skip to step 2.
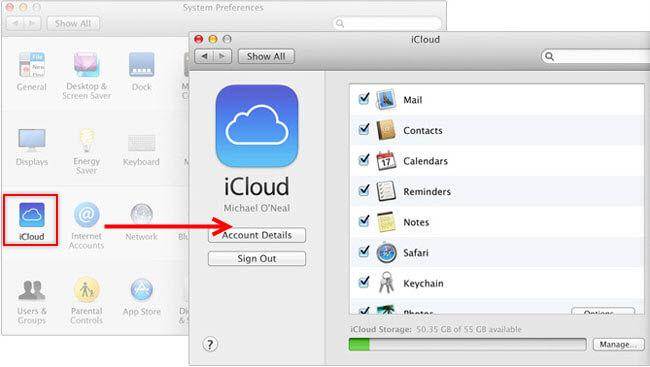
Step 2. Click the little apple icon again and choose System Preferences. Click iCloud and sign in with your Apple ID (haven’t gotten one? Just spend a few minutes to create one). Select the services you like to enable by checking the box for each service respectively.
Step 3.(Optional) Launch iPhoto or Aperture on your Mac. Click the Photo Stream icon on the left sidebar to turn it on.
*On Windows PC:
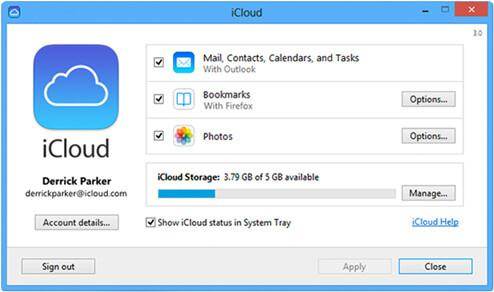
Step 1. Download iCloud Controal Panel on Windows and install it on your Windows PC. Step 2. Open iCloud Controal Panel and sign in with your Apple ID. Check the box before the iCloud services you like to enable. Click Apply to finish the settings.
1.2 How to set up and use iCloud service
Below are detailed information about how to setup and use, iCloud services:
- 1.2.1 Photo Stream
- 1.2.2 Mail/Contacts/Calendars/Notes/Reminders
- 1.2.3 Automatic Downloads
- 1.2.4 Find My iPhone (Device)
- 1.2.5 Safari
- 1.2.6 Documents & data
 Photo Stream:
Brief Introduction: Photo Stream allows users to share photo albums with people, store photos in iCloud for 30 days, and access to photos on any iCloud-enabled device.
How to Set up:
- On iPhone/iPod/iPad device: tap Settings >Photos & Camera, swipe My Photo Stream and Photo Sharing, to ON.
- On Mac: Click little apple icon on the top left of the window > System Preferences > check Photos > click the Options button > check My Photo Stream and Photo Sharing.
- On PC: Open iCloud Control panel on your PC > check Photo Stream. Click Options, in the new window check My Photo Stream and Shared Photo Streams.
How to Use:
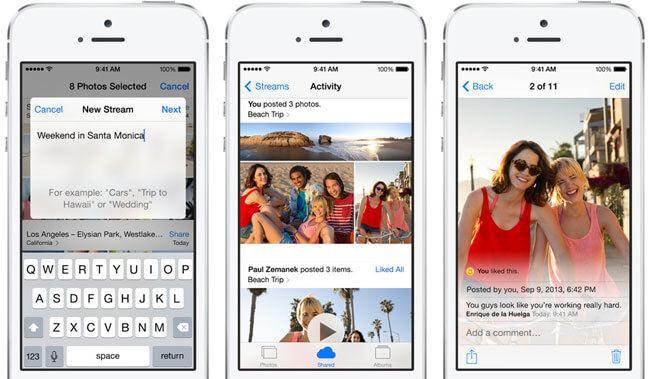
- On iPhone/iPad/iPod: tap the Photo app > tap Shared at the bottom > tap Create New Stream, name the new stream and click Next. In the next window To area, click the little round icon with + to add your contacts. Click Create to finish this setting up.
- On Mac: launch iPhoto or Aperture. Click Events or Photos to select events/photos and click the Sharebutton at the bottom right. Click New Photo Stream, add contacts and comment to the share. Click Share.
- On PC: once you’ve installed iCloud Controal Panel and enabled the Photo Stream feature on your computer, a new Photo Streams section will appear after you opening Computer in Windows Explorer. Open it and click New Photo Streambutton. Name the photo stream and add other iCloud users to the To box to share with.
 Mail/Contacts/Calendars/Notes/Reminders:
Brief Introduction: iCloud allows you to share your contacts, mail, calendars, notes and reminders among iPhone, iPad, iPod, and computers in real time.
How to Set up:
- On iPhone/iPad/iPod:tap Settings > iCloud > Swipe all button for Mail, Contacts, Calendars, Notes, and Reminders to ON.
- On Mac:click apple icon at the top left of window on Mac > System Preferences > iCloud > check Mail, Contacts, Calendars, Notes, and Reminders respectively.
- On PC: Open iCloud Control Panel > check the box before Mail, Contacts, Calendars, Notes, and Reminders respectively
How to Use: After setting up, whenever you make an update for Mail, Contacts, Calendars, Notes, or Reminders, the update will appear on your iPhone, iPad, iPod and computer.
 Automatic Downloads:
Brief Introduction: Automatic Downloads in iCloud will add any item you’ve purchased to your iPhone, iPad, iPod and iTunes on computer wherever you purchase the item.
How to Set up:
- On iPhone/iPad/iPod: tap Settings > iTunes & App Store, scroll down and swipe the button for Update to ON.
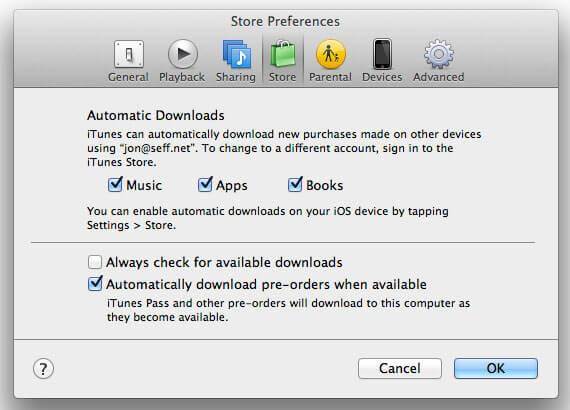
- On Mac: launch iTunes > click Preferences > click Store. Check Music, Books and Apps in Automatic Downloads area.
- On PC: launch iTunes > click Edit > Preferences > click Store. Check Music, Apps, Books, et. in Automatic Downloads area.
How to Use: After enabling Automatic Downloads on your iPhone, iPod, iPad and iTunes on computer, whenever a download occurs, it will be downloaded to all of your devices and computer automatically.
 Find My iPhone (Device):
Brief Introduction: Find My iPhone (iPad or Mac) makes it easy for you to locate your device when you lost it (hate to say it, but it’s true we always lose things). Even when you can’t get them back, you can use Find My iPhone to erase all data remotely, preventing other people peeping at your personal data.
How to Set up:
- On iPhone/iPad/iPod: tap Settings > iCloud > toggle Find My iPhone to ON.
- On Mac: click apple icon on Mac > System Preferences > select the checkbox Find my Mac
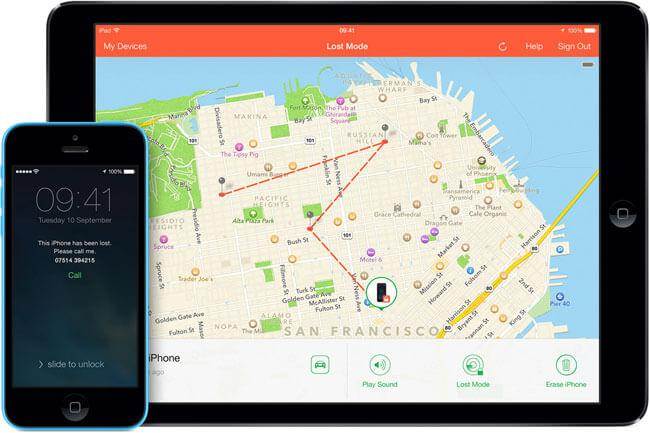
How to Use: Whenever you need to track your iOS device or Mac, open iCloud webpage on any computer with a web browser > log in iCloud with your Apple ID > click Find My iPhone > Click the Devices option and select your device from the drop-down list. Next, additional options for forcing your device to play a sound, initiating Lost Mode and remotely wiping the device will appear. Choose the option that’s right for you.
 Safari:
Brief Introduction: After setting up Safari, you can view all the webpages once you have opened on any of your devices.
How to Set up:
- On iPhone/iPad/iPod: tap Settings > iCloud > toggle Safari to ON.
- On Mac:click apple icon on Mac > System Preferences > select the checkbox Safari
- On PC:open iCloud Controal Panel > check the checkbox of Bookmarks
How to Use: After setting up, Safari will syncs the reading list items and bookmarks you created on any device to all devices. To refresh Safari bookmarks on iOS device, launch Safari > click the book icon at the button. On Mac, launch Safari > click the books icon on the very top left.
> Documents & Data:
Brief Introduction: On iCloud, your documents, like Pages, Numbers, and Keynotes are shared via the Documents & Data. It’s integrated with iWork and Microsoft Office suites.
How to Set up:
- On iPhone/iPad/iPod: tap Settings > iCloud > toggle Documents & Data to ON.
- On Mac: click apple icon on Mac > System Preferences > select the checkbox Documents & Data.
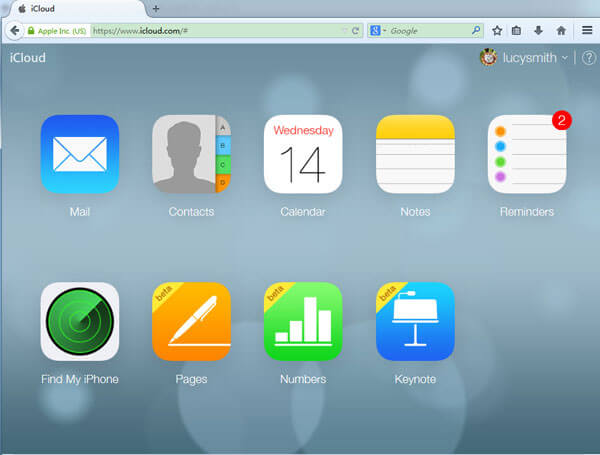
How to Use: Open iCloud web pages with a web browser on your computer > log in with your Apple ID > choose the file type you’re going to upload (Pages: word, RTF, Text documents, Numbers: Excel spreadsheets, Keynotes: presentations files). Drag and drop a file from your computer local hard drive to the webpage.
Part 2: How to Use iCloud Backup
This page covers the following parts:
- 2.1 How to Backup Data to iCloud
- 2.2 How to Restore iOS from iCloud Backup
- 2.3 How to Selectively Recover Data from iCloud Synced File
2.1 How to Backup Data to iCloud
Taking the data security issues into consideration, if you’ve enabled iCloud services, you should backup your iOS device to iCloud regularly. Whenever you find some important data on your iCloud is missing, you can get it back by restoring your device from iCloud or selectively pick up data from iCloud backup. Below are the simple steps to backup iOS to iCloud:
Step 1. Connect your iPhone, iPad or iPod with Wi-Fi.
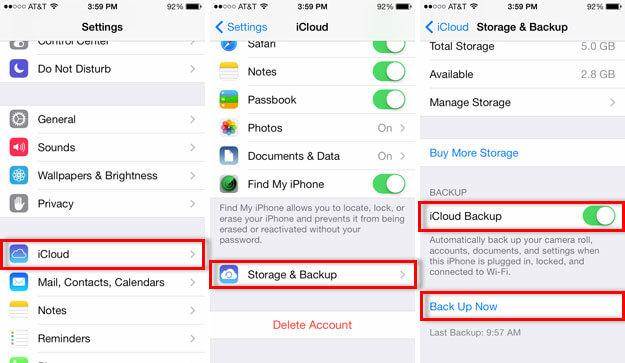
Step 2. Tap Settings > iCloud > Storage and Backup on your iOS device.
Step 3. Swipe iCloud Backup to ON. Click OK to the infor “Your iPhone will no longer backup to your computer automatically when you sync with iTunes”. Tap Backup Now.
2.2 How to Restore iOS from iCloud Backup
Whenever you need some old data from iCloud backup to your iPhone, iPad or iPod, you can follow the steps below to restore your iPhone, iPad, or iPod from iCloud backup.
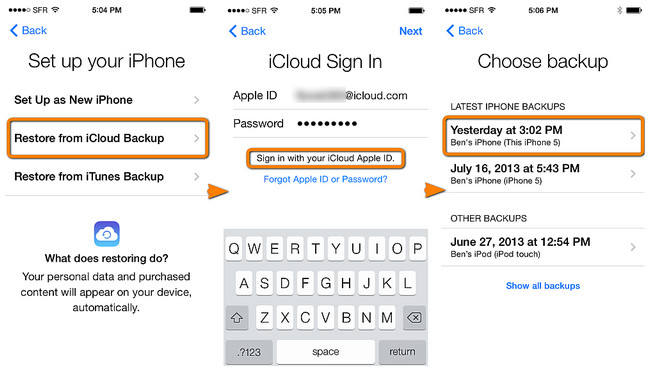
Step 1. Tap Settings > General > Reset > Erase All Content and Settings on your iOS device.
Step 2. Choose Restore from iCloud Backup, sign in with your Apple ID and choose an iCloud backup to restore.
2.3 How to Selectively Recover Data from iCloud Synced File
Besides getting your missing data back by restoring your iOS device, you can also selectively recover data from the iCloud synced file by Dr.Fone - Data Recovery (iOS). This way is especially useful when you decide to ditch iOS devices for Android phones (tablets) or lose your iOS devices while wanting to pick data from your iCloud synced file.
Dr.Fone - Data Recovery (iOS)
Selectively recover data from iCloud synced file.
- Highest recovery rate in the industry.
- Recover photos, videos, contacts, messages, notes, call logs, and more.
- Preview and selectively restore iCloud synced file.
- Export and print what you want from the iCloud synced file to your computer.
- Supports iPhone 8/iPhone 7(Plus), iPhone11/12/13 and the latest iOS 15 fully!


Steps to selectively recover data from iCloud backup
Step 1. Download and install Dr.Fone on your computer. Select the "Recover" function and click “Recover Data from iCloud Synced File”.
Step 2. Sign in iCloud with your Apple ID and download iCloud synced file.
Step 3. Click Scan to let this program scan your iCloud backup file, sort all data into categories. And then, you can select wanted data, like contacts, photos, videos, notes, calendar, etc. and click Recover to save them to your computer.
Part 3: How to Use iCloud Storage
- 3.1 How to Check iCloud Storage
- 3.2 How to Free up iCloud Storage
- 3.3 How to Upgrade iCloud Storage
- 3.4 How to Downgrade iCloud Storage
3.1 How to Check iCloud Storage:
Want to see how much of your iCloud Storage is left? Check iCloud storage:
- On iPhone/iPod/iPad: Tap Settings > iCloud > Storage & Backup
- On Mac: Click apple icon on your Mac window > System Preferences > iCloud > Manage
- On Windows PC:
- Windows 8.1: Go to the Start window and click the down arrow. Click the iCloud app and click Manage.
- Windows 8: Go to the Start window and click the iCloud title. Click Manage.
- Windows 7: Click to open the start menu > All Programs > iCloud, then click Manage.
3.2 How to Free up iCloud Storage:
Each Apple ID grants you with 5GB space for iCloud for free. However, you’ll find that after backing up your iOS to iCloud for a few times, the storage is too small to store anything. In this case, if you don’t have any plan for upgrading iCloud storage, the only way to free iCloud storage is to delete old iCloud backup files:
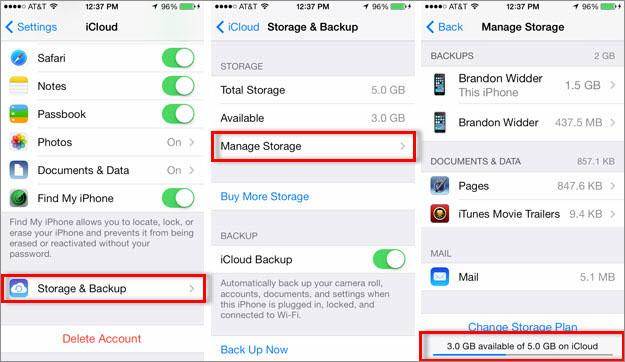
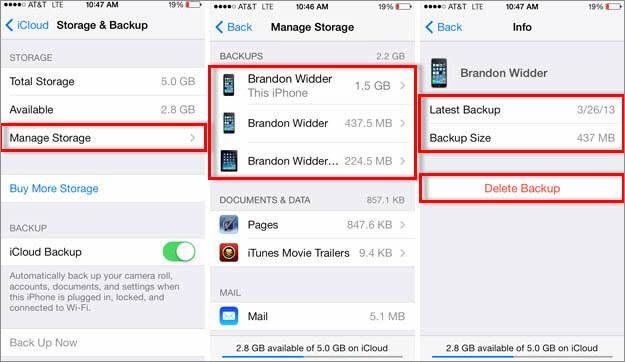
Step 1. Tap Settings > iCloud > Storage & Backup > choose Manage Storage on your iPhone, iPad or iPod.
Step 2. Select the old backup you want to delete and tap the red Delete Backup option. And then confirm the deletion by tapping Turn Off & Delete. (Note: just remember not to delete the most recent backup.)
3.3 How to Upgrade iCloud Storage
If you find the iCloud storage is too small to use, besides the above mentioned to delete iCloud backup files, can also upgrade iCloud Storage by paying for it. You can upgrade iCloud storage on your iPhone, iPad, iPod, and computer.
- On iPhone/iPod/iPad: Tap Settings > iCloud > Storage & Backup > Buy More Storage. Choose an upgrade, tap Buy and enter your apple id password.
- On Mac: Click the apple icon on the very top left of Mac window > System Preferences > choose iCloud; Click Manage at the bottom > click Change Storage Plan > choose an upgrade and click Next. Enter your apple id password.
- On PC: Open iCloud Control Panel > click Manage > click Change Storage Plan > choose an upgrade and then click Next. Enter your Apple ID and click Buy.
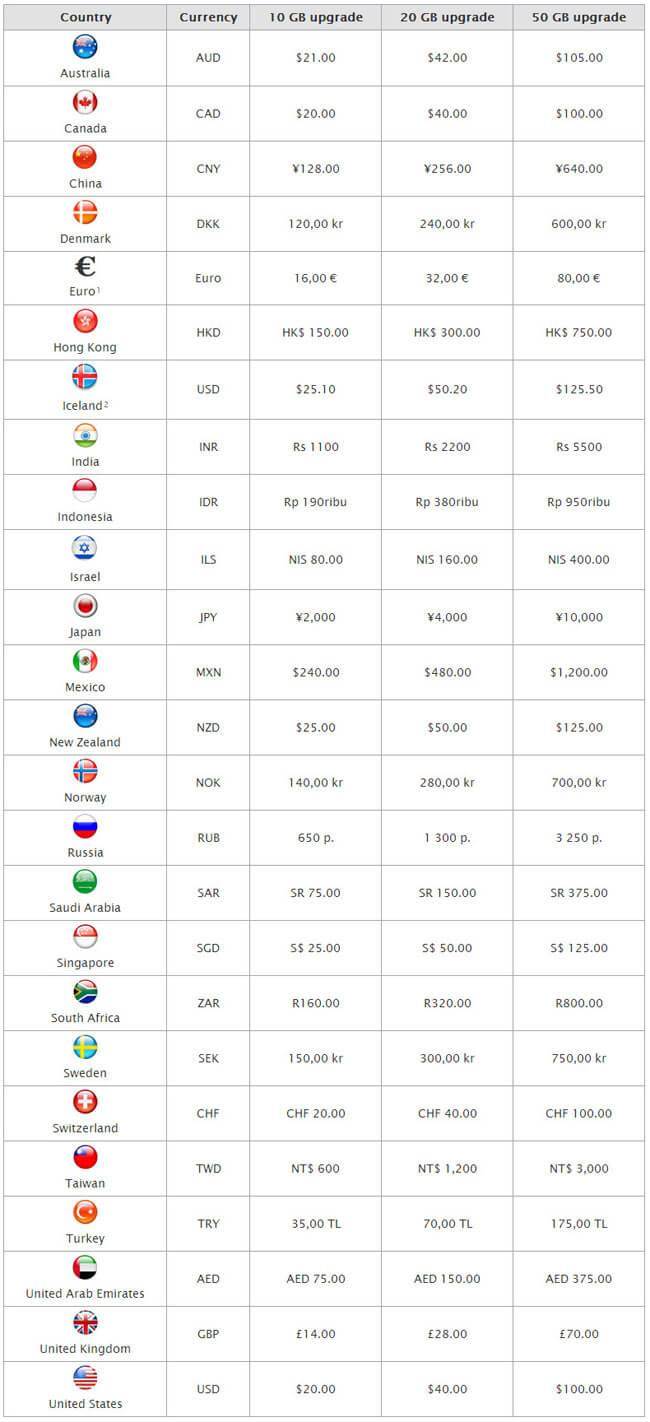
Below is a chart for iCloud upgrade. You can check the price.
3.4 How to Downgrade iCloud Storage:
- On iPhone/iPod/iPad: Tap Settings > iCloud > Storage & Backup. Tap Change Storage Plan > Downgrade Options. Enter your Apple ID and choose a different plan to use your iCloud storage.
- On Mac: Click the apple icon on your Mac > System Preferences > iCloud. Click Manage > Change Storage Plan > Downgrade Options. Enter your Apple ID and click Manage. Choose a different plan for iCloud storage and click Done.
- On PC: Open the iCloud Controal panel > Manage > Change Storage Plan > Downgrade Options. Enter your Apple ID and click Manage. Choose a new plan for your iCloud Storage and click Done.


iCloud
- Delete from iCloud
- Fix iCloud Issues
- Repeated iCloud sign-in request
- Manage multiple idevices with one Apple ID
- Fix iPhone Stuck on Updating iCloud Settings
- iCloud Contacts Not Syncing
- iCloud Calendars Not Syncing
- iCloud Tricks
- iCloud Using Tips
- Cancel iCloud Storage Plan
- Reset iCloud Email
- iCloud Email Password Recovery
- Change iCloud Account
- Forgot Apple ID
- Upload Photos to iCloud
- iCloud Storage Full
- Best iCloud Alternatives
- Restore iCloud from Backup Without Reset
- Restore WhatsApp from iCloud
- Backup Restore Stuck
- Backup iPhone to iCloud
- iCloud Backup Messages
James Davis
staff Editor