

iPhone 13'e Geçmeden Önce Eski Cihazdaki Veriler Nasıl Silinir: Adım Adım Kılavuz

07 Mart 2022 • Dosya: Telefon Verilerini Silme • Kanıtlanmış çözümler
It's September, that time of the year again - the Apple Christmas, if you will - where new iPhones are released like clockwork and we are tempted like hell to upgrade. That means it is also that time of the year again where we do not look forward to the ordeal that is backing up data on the old iPhone, transferring it to the new iPhone, erasing data on the old iPhone before trading it off, etc. You are all too familiar with it, but this year, you've come to the right place, and we have just the tool you need to make your life as easy as 123.
Part I: Transfer Data from Old Device to iPhone 13 with Dr.Fone - Phone Transfer
You've pre-ordered the new iPhone 13, right? Now is the time to start thinking about backing up your data on your current device and transferring data from your old device to the new iPhone 13. If you have an iPhone that you are upgrading from, you might also use the built-in utility Apple provides when you set up a new iPhone, but what if you are not using an iPhone? How do you transfer your data from your old device to iPhone 13 then? Then, you use the wonderfully simple-to-use but powerful and feature-packed tool called Dr.Fone, specifically, the Dr.Fone - Phone Transfer module.
Kindly note that you will need a computer with two (2) free USB or USB-C ports for this.
Here are steps to transfer data from your old device to the new iPhone 13 using Dr.Fone - Phone Transfer:
Step 1: Download Dr.Fone.
Step 2: After Dr.Fone installation, launch Dr.Fone and select the Phone Transfer module.

Step 3: Connect your old device to the computer and wait for Dr.Fone - Phone Transfer to recognize it.
Step 4: Connect your new iPhone 13 to the computer and wait for Dr.Fone - Phone Transfer to recognize it.
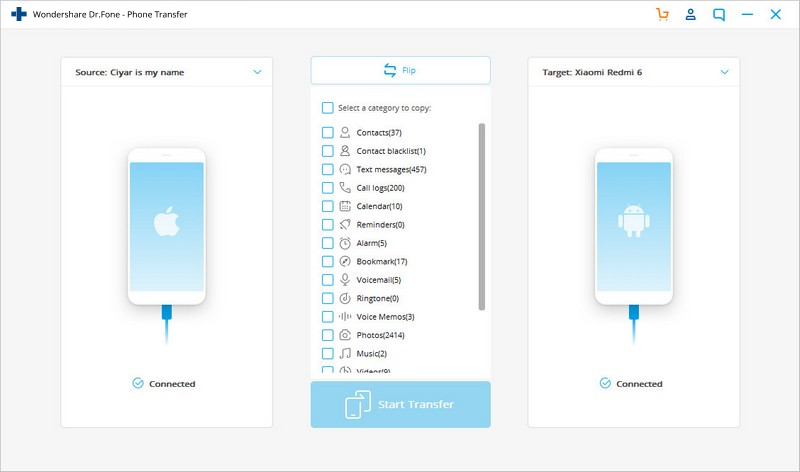
Step 5: Ensure that the Source Device is your old device, and the Target Device is your new iPhone 13. If not, you can use the Flip button to flip the source and target devices to match the requirement (the old device needs to be the source device in this case).
Step 6: Start by checking the data you want to transfer from your old device to your new iPhone 13.
There is a long list of data you can copy, ranging from contacts, text messages, bookmarks, photos, etc. to other data such as call logs, calendar items, reminders, alarms, etc. Choose what you want to transfer from your old device to the new iPhone 13.
Step 7: After selection, click the big Start Transfer button below the list.
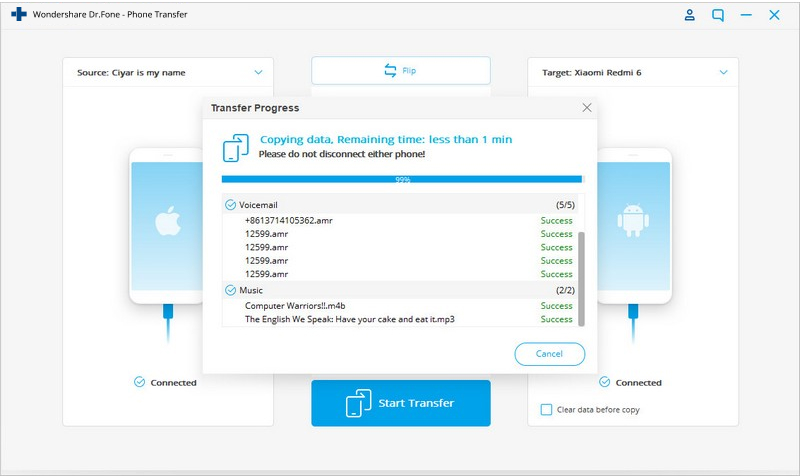
Wait for the transfer to finish. Do not remove the devices before the transfer is complete, and for good measure, avoid using the devices as well.
And, just like that, you have transferred data from your old device to the new iPhone 13, using a state-of-the-art software called Wondershare Dr.Fone.
Part II: Backup Data on Old Device and Restore the Backup to iPhone 13
Eski aygıtınız bir iPhone ise, kurulum sırasında eski aygıtınızdaki verileri yedeklemek ve yeni iPhone 13'ünüze geri yüklemek için iTunes ve iCloud Yedekleme'yi kullanabilirsiniz. Bir Android cihazınız varsa, gidebileceğiniz birkaç yol vardır.
iTunes/iCloud Yedekleme Kullanarak iPhone'da Verileri Yedekleme
Herhangi bir ayarı özellikle değiştirmediyseniz, iTunes, bağlandıktan sonra iPhone'unuzu otomatik olarak yedekleyecek şekilde yapılandırılmıştır. Bu, iTunes kullanarak eski iPhone'unuzdaki verileri yedeklemek için yapmanız gereken tek şey, eski iPhone'unuzu bilgisayara bağlamak ve otomatik olarak başlamazsa iTunes'u başlatmaktır.
Herhangi bir nedenle otomatik yedekleme başlamadıysa, manuel talimatlar şunlardır:
Adım 1: Cihazınızı bilgisayara bağlayın ve iTunes'u başlatın.
Adım 2: Cihaz başarıyla bağlandığında, iTunes'da sol üst köşeye yakın bir yerde, içinde bir iPhone bulunan bir düğme olacaktır.

O düğmeye tıklayın.
Adım 3: Varsayılan olarak, iPhone özetiniz görüntülenmelidir, ancak yine de kenar çubuğundan Özet seçeneğini tıklayın.
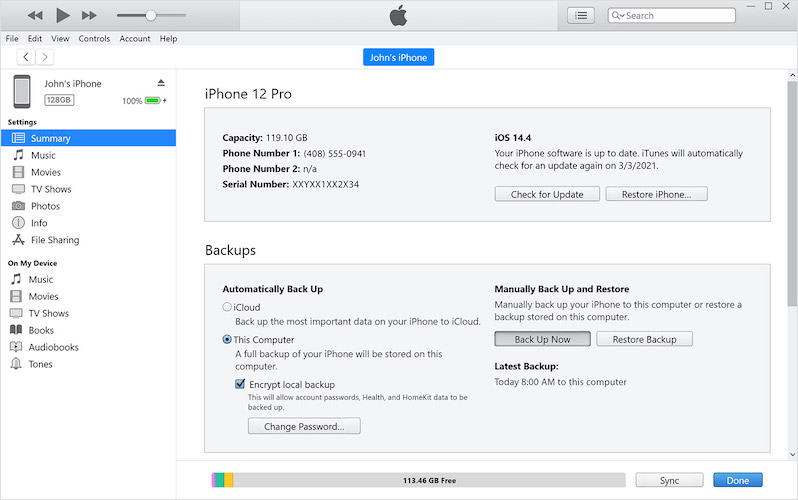
Adım 4: Otomatik Olarak Yedekle altında, bilgisayarınızda yerel yedeklemeler oluşturmak için Bu Bilgisayar'ı seçin, aksi takdirde, iCloud'da yeni iPhone 13'ünüzün kurulumu sırasında kablosuz olarak geri yüklenebilecek bir yedekleme oluşturmak için iCloud'u tıklayın.
Adım 5: Yedeklemeler altında, yedekleme işlemini başlatmak için Şimdi Yedekle'ye tıklayın. Ayrıca yedeklerinizi buradan şifreleyebilirsiniz ve burada verdiğiniz şifreyi hatırlamanız gerekecektir. Bu şifreyi unutursanız, yeni iPhone 13'ünüze geri yüklemek için şifresini çözemeyeceğiniz için bu yedekleme işe yaramaz hale gelir.
Bu şekilde yapılan yedeklemeler, seçilmişse iCloud'da veya yerel olarak bilgisayarınızda (Bu Bilgisayar'ı seçtiyseniz) saklanır. Yerel yedeklemelere menü çubuğundan Düzenle menüsü kullanılarak Düzenle > Tercihler kısmından ve açılan pencereden Cihazlar seçilerek erişilebilir.
Google Drive'ı Kullanarak Android Cihazda Verileri Yedekleme
Anlaşılır bir şekilde, bir Android cihazınız varsa, iTunes veya iCloud Yedekleme'yi kullanarak bunu yedekleyemezsiniz. Ancak, Android cihazınızı Google'a yedeklemek için Google'ın bazı araçlarını kullanabilirsiniz.
Şimdi, günlük (ve önemli) verilerinizin büyük bir kısmı muhtemelen Google Hesabınıza ve Google Drive'a otomatik olarak yedekleniyor olacaktır. Örneğin, kişileriniz muhtemelen otomatik olarak yedekleniyor ve Gmail'de ve çevrimiçi Kişiler uygulamasında mevcut olacak. Aynı şey Keep Notlarınız için de geçerlidir. Google Drive, doğası gereği, belirli bir yedekleme rutinine ihtiyaç duymadan çevrimiçi olacaktır. Uygulama verileriniz ve uygulamalarınız, rutin olarak yedeklemek için yapılandırmanız gerekebilecek şeylerdir. Google Fotoğraflar için de aynı şekilde, muhtemelen seçtiğiniz çözünürlükte yedekleniyorlar.
All this is great, but Google being Google, there are caveats - on the whole, Google's backup systems are fragmented. This means that what you might understand as a device backup in the Settings app would only be backing up your apps and settings along with the phone settings. If you want to backup user data (aka Contacts, Drive contents, Photos, etc.) you have to specify that separately or do that in their own apps. Awkward, right?
Thus, this guide about backing up the Android device to Google Drive will need to be fragmented as well, in line with Google's own fragmentation.
Backup Phone Settings and App Data
Here is what you do to backup app data and phone settings on an Android device:
Step 1: Launch Settings.
Step 2: Scroll down and tap Google.
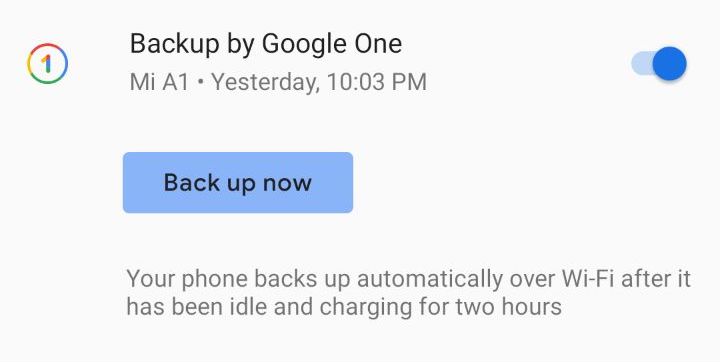
Step 3: Scroll down and make sure that Backup by Google One is enabled.
Adım 4: Yedeklemeyi hemen başlatmak için Şimdi Yedekle'ye dokunun.
Adım 5: Mobil veri kullanmak istiyorsanız, aşağı kaydırıp Mobil Veriyi Kullanarak Yedekleme seçeneğini etkinleştirebilirsiniz.
Google Fotoğraflarını ve Videolarını Yedekle
Adım 1: Aynı ekranda (Ayarlar > Google), aşağıdakiler için doğrudan yedekleme ayarlarına götürülmek üzere Fotoğraflar ve Videolar'a dokunun:
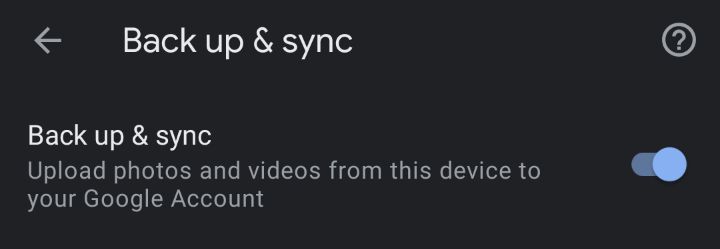
Adım 2: Yedekle ve Senkronize Et'i etkinleştirin.
Her Şeyin Düzgün Bir Şekilde Yedeklendiğinden Nasıl Emin Olabilirsiniz?
Tüm önemli verilerinizin Google Hesabınıza/Google Drive'ınıza yedeklendiğinden emin olmak için Ayarlar'da aşağıdakileri kontrol edin:
Adım 1: Ayarlar > Hesaplar'a gidin.
2. Adım: Google Hesabınıza dokunun.
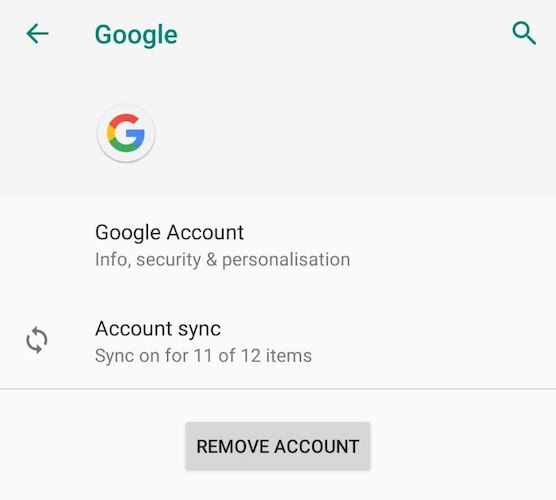
Adım 3: Hesap Senkronizasyonu'na dokunun ve yedeklemeye dahil edilmesi için bulutla senkronize etmek istediğiniz şeyin işaretli olduğundan emin olun.
Dr.Fone Kullanarak iPhone 13'e Verileri Yedekleyin ve Geri Yükleyin - Telefon Yedekleme (iOS)
Hem Apple hem de Google, cihazlarını yedeklemenin ve bu yedeği başka bir cihaza geri yüklemenin yollarını sunar. Böylece, isterseniz yalnızca iCloud ve iTunes'u kullanarak iPhone 12 yedeklemenizi kolayca bir iPhone 13'e geri yükleyebilirsiniz. Aynı şey, parçalı bir şekilde de olsa Google için de geçerlidir. Bu süreçlerin kontrolünü biraz daha elinizden almak istediğinizde ve Android verilerini yeni iPhone 13'ünüze aktarmak istediğinizde ne olur? İşte burada Dr.Fone - Telefon Yedekleme (iOS) devreye giriyor.
With this one piece of software, you can say goodbye to all hassles that create headaches for you when you want to backup and restore devices, be it iPhone or Android. Whether you want to back up your old iPhone and restore the backup to your new iPhone 13 or you want to backup your Android device and restore data to your new iPhone 13, you can do that in a seamless, hassle-free, joyous manner.
Here is how to use Wondershare Dr.Fone to backup and restore data to your new iPhone 13, without worrying about iOS and Android processes and fragmentation.
Step 1: Get Dr.Fone.
Step 2: Connect your old iPhone to the computer.
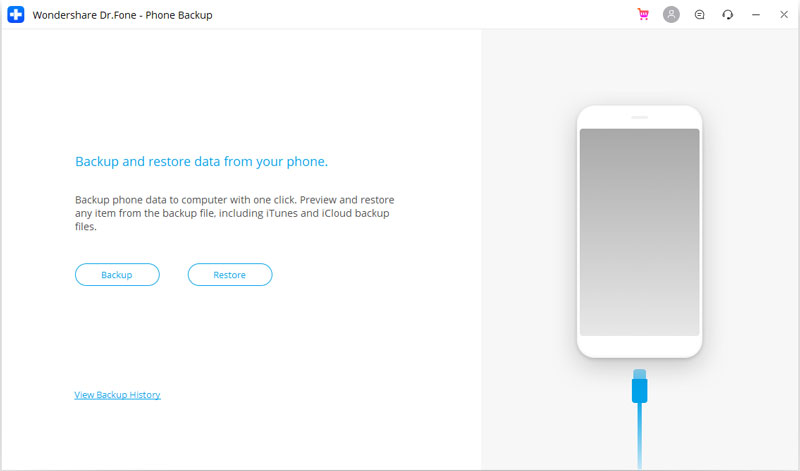
Step 3: Launch Dr.Fone and select the Phone Backup module.
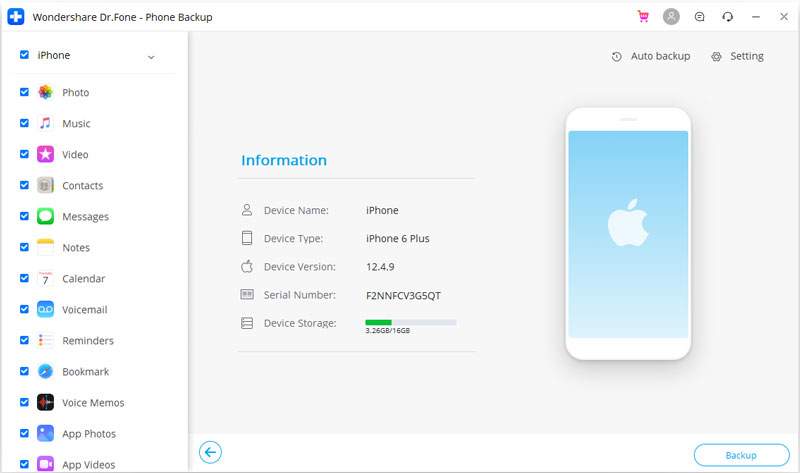
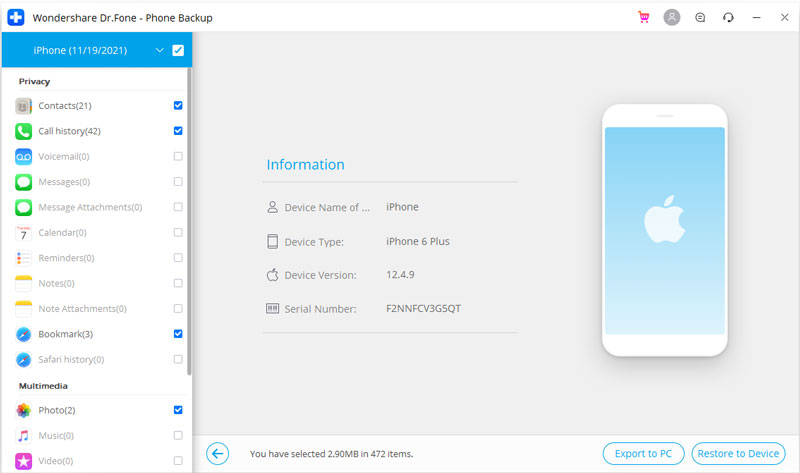
Adım 4: Dr.Fone, eski iPhone'unuzdaki dosyaların sayısını ve türlerini algılayacak ve gösterecektir. Sol üstte Tümü'nü seçin veya tek tek kontrol edin.
Adım 5: En alttaki Yedekle'yi tıklayın.
Yedekleme, tutulan veri miktarına bağlı olarak birkaç dakika sürecek ve işlem tamamlandığında size bildirilecektir. Bittiğinde, eski iPhone'u çıkarabilir ve Dr.Fone'u kapatabilirsiniz.
Yedeklemeyi yeni bir iPhone 13'e geri yüklemek için:
Adım 1: Yeni iPhone 13'ü bilgisayara bağlayın.
Adım 2: Dr.Fone'u başlatın ve Telefon Yedekleme modülünü seçin.
Adım 3: Geri Yükle'yi seçin.
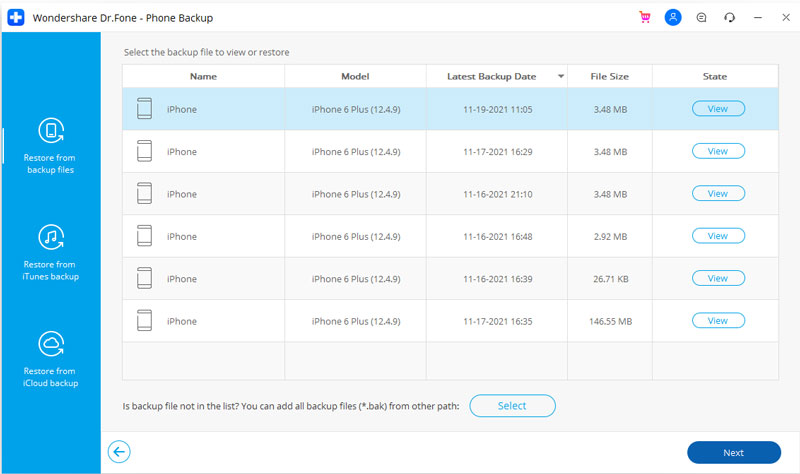
Adım 4: Daha önce oluşturduğunuz yedeği seçin ve İleri'ye tıklayın.
Adım 5: Yedekleme analiz edilecek ve görüntülenecektir.
Artık yeni iPhone 13'e geri yüklemek istediğiniz her şeyi seçebilir ve ardından Cihaza Geri Yükle'yi tıklayabilirsiniz.
Dr.Fone - Phone Backup (iOS) will now start restoring your backup from the old device to the new iPhone 13. It is a seamless, painless, easy-to-use, and quick process that gets the job done without hassles and headaches. You can even export the selected files from the backup to your computer, using the Export to PC button beside the Restore to Device button!
Part III: Erasing Data on Old Device
Apple has always provided users with options and functionality that Apple thinks is the best way for users of a certain mindset, and for those who want more, Apple devices are often found limiting in terms of features and options. Advanced users who demand more options will find the same philosophy extends into outlining the way you erase data on your iPhone. When you are talking about data erasure on your iPhone, Apple provides only two options - you can either erase all settings on your iPhone or you can erase all data and settings on your iPhone. There is no customization here to allow you to delete only what you want. But, depending on what you are looking for, there are things you can do.
III.I Using Apple Files
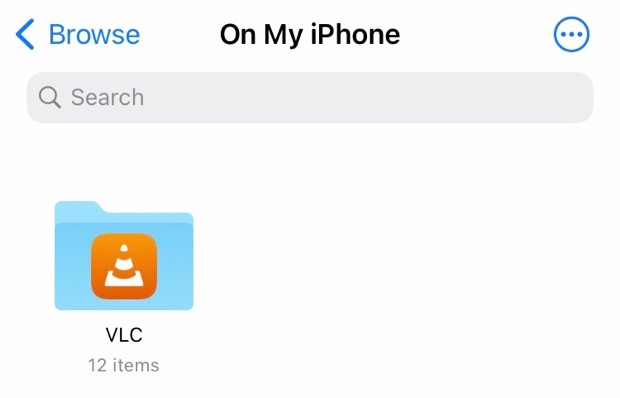
Using the Apple Files app, you can browse data that may reside on your device, such as when you use apps like VLC for watching videos. If you transferred videos to your iPhone to watch them using VLC, they would be stored locally on your iPhone. Instead of opening all apps to see which ones are storing large amounts of data locally, you can use Apple Files to see what is on your device (that Apple allows you to delete):
Step 1: Launch Apple Files.
Step 2: Tap the Browse tab at the bottom. It should open in iCloud Drive. Tap it again to go to the Browse section.
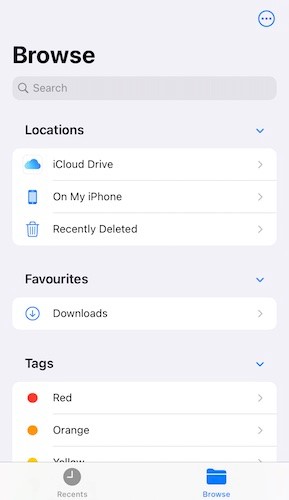
Step 3: Tap On My Phone and you will see local app folders and if they have some data inside that you might want to consider removing, to free up space on your device.
Adım 4: Artık klasöre gitmek için öğesine dokunabilir ve öğelere uzun süre basıp, bunları tek tek silmek için Sil öğesine veya sağdaki dairesel elipslere dokunup Seç öğesine dokunarak birden fazla öğeyi seçmeye başlayabilir ve dokunarak toplu olarak silebilirsiniz. alttaki çöp kutusu simgesi.
Adım 5: İşiniz bittiğinde, Gözat bölümüne dönene kadar alttaki Gözat sekmesine dokunun ve Son Silinenler'e gidin. Oradaki her şeyi silin.
III.II Dr.Fone - Data Eraser (iOS) gibi Üçüncü Taraf Araçlarını Kullanma
Şimdiye kadar fark etmiş olabileceğiniz gibi, Apple'ın bir kullanıcının bir iPhone'daki önbellek dosyalarını veya uygulama verilerini veya günlükler gibi günlük teşhisleri silmesine olanak tanımaz. Ancak Dr.Fone - Data Eraser (iOS) gibi üçüncü taraf yazılımlar bunu ve daha fazlasını yapmanıza olanak tanır.
Dr.Fone may be the ultimate toolkit in your fanny bag when dealing with all kinds of mobile devices and operations you want to perform on them. Dr.Fone - Data Eraser (iOS) allows you to both wipe all data from the device and lets you do what you cannot do otherwise, which is wipe selective data from the iPhone, for example, if you only want to remove junk files.
Dr.Fone - Data Eraser (iOS)
Permanently delete data and protect your privacy.
- Delete junk files to speed up iOS devices.
- Erase iOS SMS, contacts, call history, photos & video, etc selectively.
- 100% wipe 3rd-party apps: WhatsApp, LINE, Kik, Viber, etc.
- Works greatly for iPhone, iPad, and iPod touch, including the latest models and the latest iOS version fully!

Cihazlardan Tüm Verileri Kaldır
Adım 1: Cihazınızı bilgisayara bağlayın ve Dr.Fone'u başlatın.
Adım 2: Veri Silici modülünü seçin.
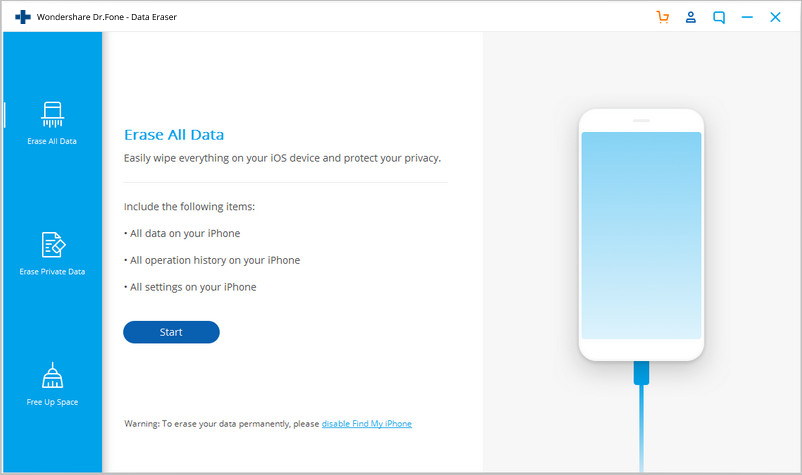
Adım 3: Tüm Verileri Sil'e ve ardından Başlat'a tıklayın.
Adım 4: 3 ayardan güvenlik seviyesini seçebilirsiniz. Varsayılan Orta'dır.
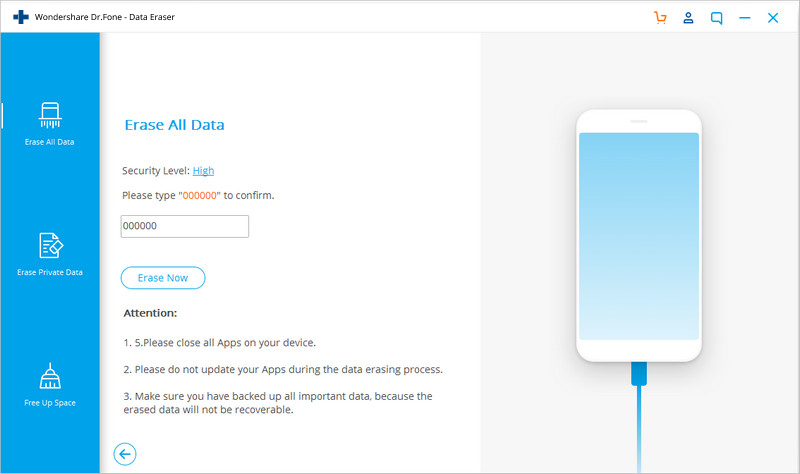
Adım 5: Hazır olduğunuzda, onaylamak için sıfır (0) rakamını altı kez (000000) girin ve cihazı tamamen silmeye başlamak için Şimdi Sil'i tıklayın.
Adım 6: Cihaz silme işlemi bittiğinde cihazı yeniden başlatmak için onaylamanız gerekir. Cihazı yeniden başlatmaya devam etmek için Tamam'ı tıklayın.
Cihaz yeniden başlatıldığında, fabrikada olduğu gibi kurulum ekranında başlayacaktır.
Cihazlardan Seçerek Verileri Kaldırın
Adım 1: Cihazı bilgisayara bağladıktan ve Dr.Fone'u başlattıktan sonra Data Eraser modülünü seçin.
Adım 2: Boş Alan Aç'ı seçin.
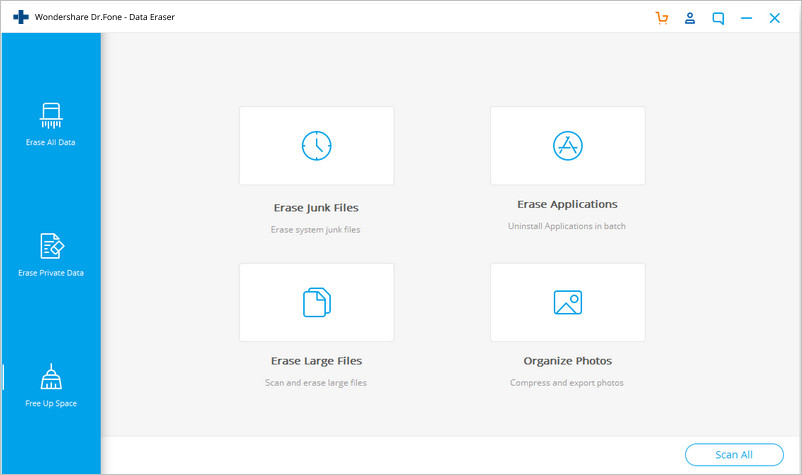
Adım 3: Artık cihazınızdan ne silmek istediğinizi seçebilirsiniz - gereksiz dosyalar, belirli uygulamalar veya büyük dosyalar. Hatta fotoğrafları cihazdan sıkıştırabilir ve dışa aktarabilirsiniz.
Adım 4: Herhangi birini seçin, örneğin Önemsiz Dosyalar. Bu, cihazınızı tarayacak ve cihazınızdaki gereksiz dosyaları gösterecektir.

Her zaman olduğu gibi, listeyi gözden geçirmek ve yanlışlıkla önemsiz olarak işaretlenmiş önemli bir şey olup olmadığını görmek iyi bir uygulamadır.
Adım 5: Kurtulmak istediğiniz tüm dosyaları seçin ve sağ alttaki Temizle'ye tıklayın. Tüm çöpler temizlenecek.
Değişikliklerin tamamen etkili olması için cihazı yeniden başlatmanız gerekir.
Bölüm IV: Sonuç
While both Apple and Google provide ways to create backups and allow for restoring data from old devices to the new, there is a lot that people are missing out on, that they do not even realize. There is a big difference between offering these tools as afterthoughts and providing professional tools to take care of every possible requirement that a user might have. That is the difference between these tools by Apple and Google and Wondershare Dr.Fone, a professional toolkit for users of both iOS and Android devices. Comprising of a suite of modules that take care of virtually all possible user requirements, the software allows for quick backups of both Android and iOS devices and for restoring the backups to new devices. This time, when you get your hands on your new iPhone 13, try Dr.Fone to backup and restore data from the old device to iPhone 13 or to transfer your data to iPhone 13 and erase data on the old device using Dr.Fone - Data Eraser (iOS).


Telefonu Sil
- 1. iPhone'u silin
- 1.1 iPhone'u Kalıcı Olarak Silin
- 1.2 Satmadan Önce iPhone'u Silin
- 1.3 iPhone'u Biçimlendir
- 1.4 Satmadan Önce iPad'i Silin
- 1.5 Uzaktan Silme iPhone
- 2. iPhone'u Sil
- 2.1 iPhone Çağrı Geçmişini Sil
- 2.2 iPhone Takvimini Sil
- 2.3 iPhone Geçmişini Sil
- 2.4 iPad E-postalarını Sil
- 2.5 iPhone Mesajlarını Kalıcı Olarak Silme
- 2.6 iPad Geçmişini Kalıcı Olarak Silme
- 2.7 iPhone Sesli Mesajını Sil
- 2.8 iPhone Kişilerini Sil
- 2.9 iPhone Fotoğraflarını Sil
- 2.10 iMesajları Sil
- 2.11 iPhone'dan Müziği Sil
- 2.12 iPhone Uygulamalarını Sil
- 2.13 iPhone Yer İmlerini Sil
- 2.14 iPhone Diğer Verilerini Sil
- 2.15 iPhone Belgelerini ve Verilerini Silme
- 2.16 Filmleri iPad'den Silme
- 3. iPhone'u Sil
- 3.1 Erase All Content and Settings
- 3.2 Erase iPad Before Selling
- 3.3 Best iPhone Data Erase Software
- 4. Clear iPhone
- 4.3 Clear iPod touch
- 4.4 Clear Cookies on iPhone
- 4.5 Clear iPhone Cache
- 4.6 Top iPhone Cleaners
- 4.7 Free Up iPhone Storage
- 4.8 Delete Email Accounts on iPhone
- 4.9 Speed Up iPhone
- 5. Clear/Wipe Android
papatya yağmurları
personel editörü