Eski iPhone'umu Satmadan Önce Ne Yapmalıyım?
07 Mart 2022 • Dosya: Telefon Verilerini Silme • Kanıtlanmış çözümler
If you wish to sell your old iPhone, then you need to perform a few basic operations beforehand. After all, in order to migrate to a new device, you should have a complete backup of your data and erase the device’s storage before giving it to someone else. We are here to help you, explaining what to do before selling iPhone. Simply go through this informative guide and follow our stepwise instructions to learn what to do before selling iPad or iPhone.
Tip #1: Backup Your iPhone
The first thing to do before selling iPhone is to take a complete backup of your data. By doing so, you would be able to transfer your data to a new device without much trouble. Ideally, you can take a backup of your data in three ways: by using iCloud, iTunes, or Dr.Fone iOS Data Backup & Restore tool. There are plenty of other ways as well, but these techniques are considered most reliable and safe.
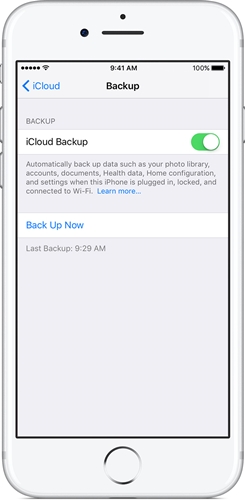
Too often, iOS users end up losing their precious data while moving from one phone to another. After learning what to do before selling iPhone, you would be able to retain your data without much trouble. To start with, you can take the assistance of iCloud. By default, Apple provides a space of 5 GB on the cloud to every user. All you got to do is visit Settings and turn on the feature to auto-sync your data on iCloud. While it is comparatively easy, it has its own restrictions. Firstly, you have a limited space of 5 GB on the cloud, which restricts the storage. Furthermore, you need to invest a lot of internet bandwidth to transfer your information to the cloud.
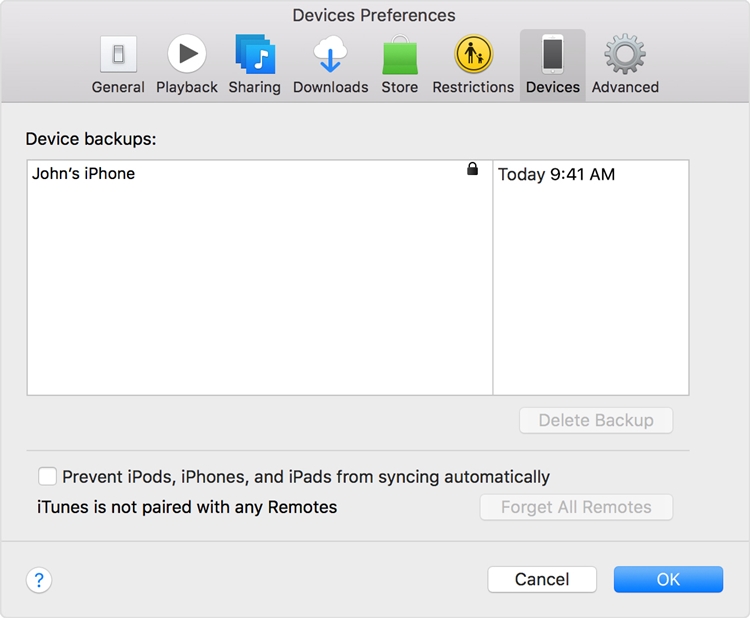
Another popular alternative to taking a backup of your data is iTunes. With it, you can take a backup of all your major data, such as photos, books, podcasts, music, etc. Though, it is quite restricted when it comes to restoring data. Too many times, users find it hard to migrate to any other operating system and retrieve their data from iTunes backup.
To take a complete backup of your data, you can take the assistance of Dr.Fone - Phone Backup. It is compatible with all the major iOS versions (including iOS 10.3) and will make sure that you don’t lose your data while moving to a new device. Backup your data with just one click before selling your iPhone and store it wherever you want. Afterward, you can restore the backup to any device of your choice. The application takes a complete backup of your data. Also, it makes it easier for you to restore your backup to almost any other device. Its flexibility, security, and plenty of added features make it a must-have application for all iOS users out there.
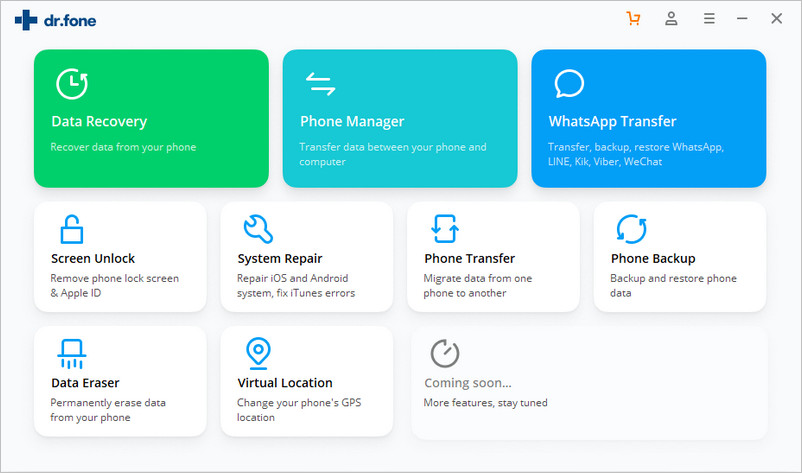
This will help you retain your data, letting you decide what to do before selling iPad or iPhone.
Tip #2: Completely Wipe iPhone before selling
There are times when even after manually deleting your data or resetting your phone, your information can still be recovered. Therefore, before selling iPhone, make sure that you completely wipe its data. This is one of the essential things in order to learn what to do before selling iPhone.
Take the assistance of Dr.Fone - Data Eraser to permanently delete your data with just one click. The application is compatible with every major iOS version and runs on both, Windows and Mac. Afterward, no one would be able to recover your data for sure. Follow these steps and wipe your iPhone data in no time.

Dr.Fone - Data Eraser
Easily Delete All Data from Your Device
- Simple, click-through, process.
- Your data is permanently deleted.
- Nobody can ever recover and view your private data.
1. Download Dr.Fone - Data Eraser (iOS) from its official website here. After installing, launch it on your system to get the following screen. Click on the “Full Data Eraser” option to continue.

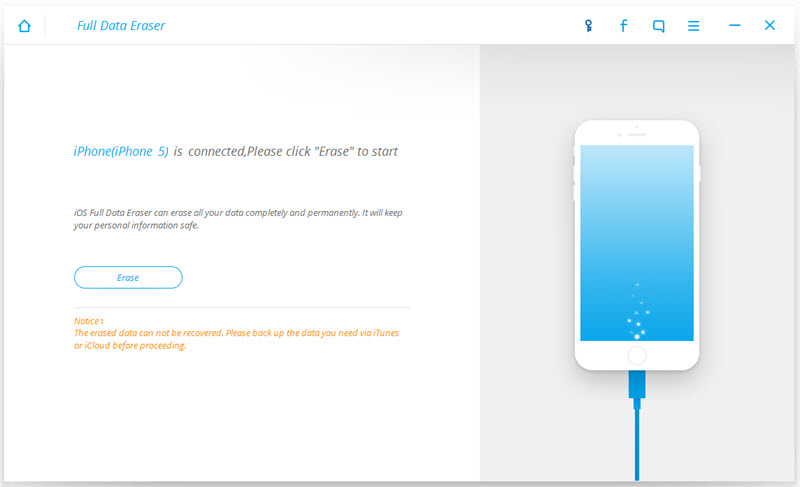
2. Simply connect your iOS device to your system and wait for the interface to automatically detect your phone (or tablet). You will get the following screen in a while. Just click on the “Erase” button to get rid of your data permanently.
3. You will get the following pop-up message. Now, in order to permanently delete your data, you need to type the keyword “delete” and click on the “Erase now” button.
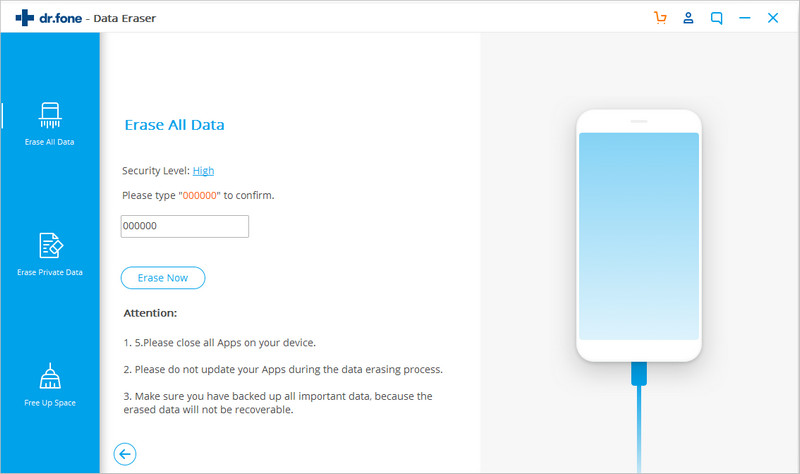
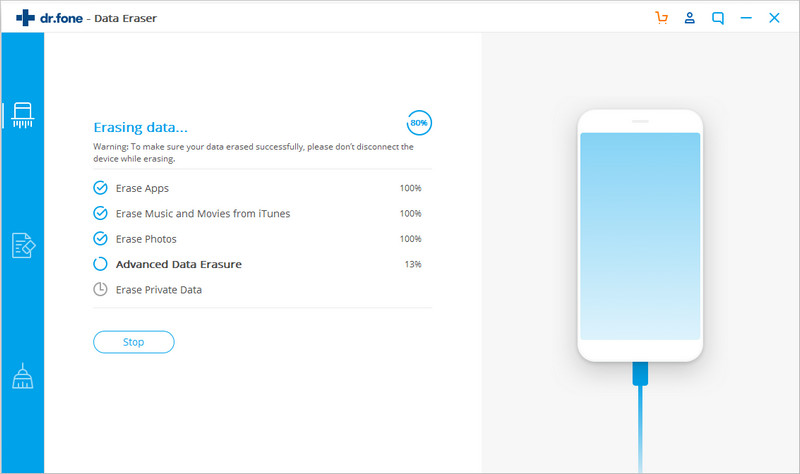
4. As soon as you will click on the “Erase now” button, the application will start removing your data permanently. Wait for a while as it will perform all the needed steps. Make sure that you don’t disconnect your device before the entire operation is completed. You can get to know about its progress from an on-screen indicator as well.
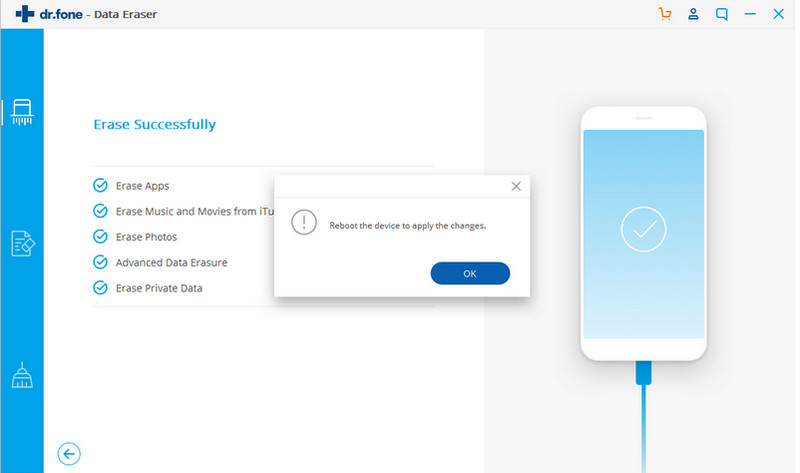
5. You will get the following window when the entire erasing process would be completed successfully. Your device would have no personal data and can easily be given to someone else.
Tip #3: Other things to do before selling iPhone
Taking a comprehensive backup of your data and wiping it afterward are some of the essential things to do in order to learn what to do before selling iPad or iPhone. Besides that, there are plenty of other things that you should also do before selling iPhone. We have listed them here to make it easier for you.
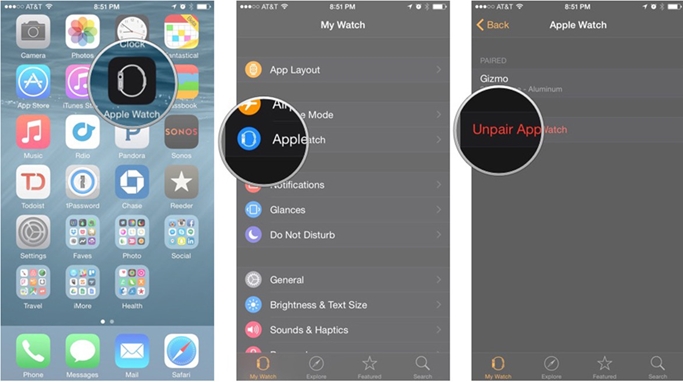
1. Firstly, you need to make sure that you have removed all the other devices that were automatically paired with your iPhone. Unpair your phone with all the other devices that it was earlier linked with (for instance, your Apple watch). If you wish, you can take a backup of your data before unpairing them. To do it, simply visit the dedicated app of that device and choose to unpair (or unsync) it from your phone.
2. Turn off the Activation lock feature on your device, so that the new user of your device can implement it. It can be done by visiting Settings > iCloud and turning off the feature of “Find My Phone”.
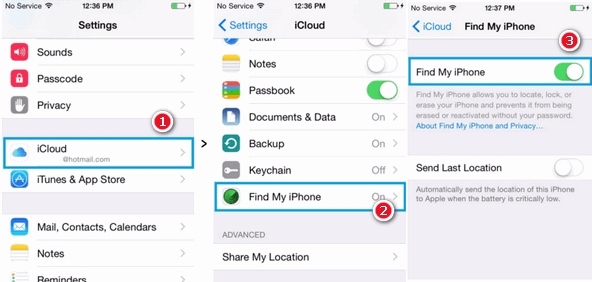
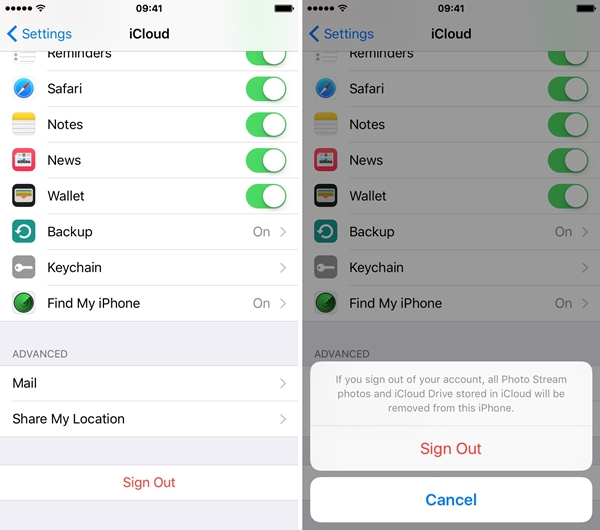
3. If your phone is automatically synced to your iCloud, then your personal information can be accessed by a new user as well. You should also sign out of your iCloud before selling your device. Simply visit Settings > iCloud and Sign Out from the device. You can also choose to “Delete Account” as well.
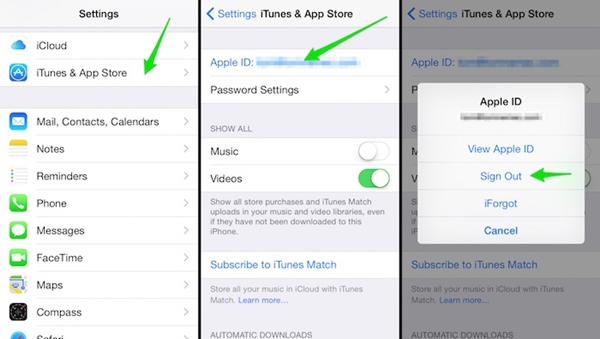
4. Not just iCloud, you need to sign out from iTunes and App store as well. This can be done by visiting Settings > iTunes & Apple Store > Apple ID and choosing the option of “Sign out”.
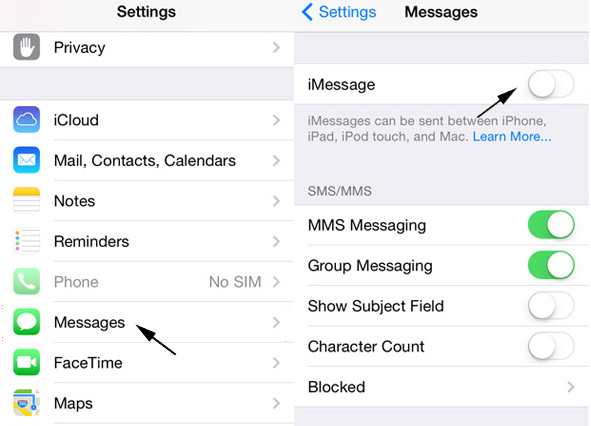
5. Most of the times, users forget to turn off iMessage feature on their device as well. Before selling iPhone, turn it off by visiting Settings > Messages > iMessage and toggle the option to “off”.
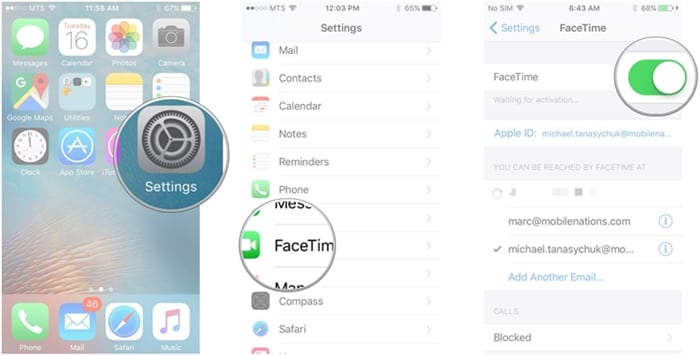
6. Also, turn your FaceTime off as well. It is a crucial step which is mostly forgotten by lots of the users. This can be done by visiting Setting > FaceTime and turning it off.
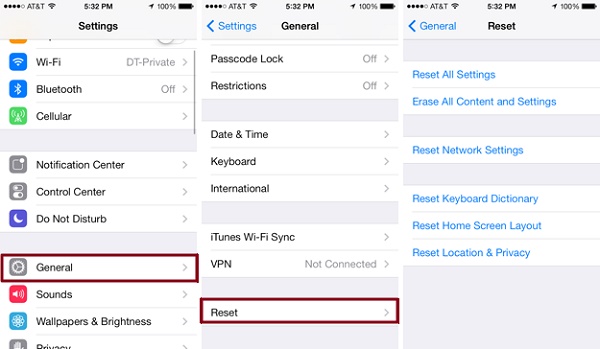
7. Now, you need to factory reset your device. This is one of the final steps and you need to perform it to double-check everything. To do this, visit Settings > General > Reset > Erase All Content and Settings. Simply provide your Apple ID and passcode to reset your device. Give your phone a while as it will restart and factory reset your device.
8. Lastly, call your operator and ask them to unlink your device from your account. You should also unregister your account from Apple Support as well.
That’s it! You are now good to go and know what to do before selling iPhone. After performing all the above-mentioned steps, your phone can be easily given to someone else without any trouble. Furthermore, you can easily migrate to any other device and restore your data in no time.
Erase Phone
- 1. Wipe iPhone
- 1.1 Permanently Wipe iPhone
- 1.2 Wipe iPhone Before Selling
- 1.3 Format iPhone
- 1.4 Wipe iPad Before Selling
- 1.5 Remote Wipe iPhone
- 2. Delete iPhone
- 2.1 Delete iPhone Call History
- 2.2 Delete iPhone Calendar
- 2.3 Delete iPhone History
- 2.4 Delete iPad Emails
- 2.5 iPhone Mesajlarını Kalıcı Olarak Silme
- 2.6 iPad Geçmişini Kalıcı Olarak Silme
- 2.7 iPhone Sesli Mesajını Sil
- 2.8 iPhone Kişilerini Sil
- 2.9 iPhone Fotoğraflarını Sil
- 2.10 iMesajları Sil
- 2.11 iPhone'dan Müziği Sil
- 2.12 iPhone Uygulamalarını Sil
- 2.13 iPhone Yer İmlerini Sil
- 2.14 iPhone Diğer Verilerini Sil
- 2.15 iPhone Belgelerini ve Verilerini Silme
- 2.16 Filmleri iPad'den Silme
- 3. iPhone'u Sil
- 4. iPhone'u Temizle
- 4.3 iPod touch'ı temizle
- 4.4 iPhone'da Çerezleri Temizle
- 4.5 iPhone Önbelleğini Temizle
- 4.6 En İyi iPhone Temizleyicileri
- 4.7 iPhone Depolama Alanını Boşaltın
- 4.8 iPhone'da E-posta Hesaplarını Silme
- 4.9 iPhone'u Hızlandırın
- 5. Android'i Temizle/Sil
- 5.1 Android Önbelleğini Temizle
- 5.2 Önbellek Bölümünü Sil
- 5.3 Android Fotoğraflarını Sil
- 5.4 Satıştan Önce Android'i Silin
- 5.5 Samsung'u Sil
- 5.6 Android'i Uzaktan Silme
- 5.7 En İyi Android Güçlendiriciler
- 5.8 En İyi Android Temizleyiciler
- 5.9 Delete Android History
- 5.10 Delete Android Text Messages
- 5.11 Best Android Cleaning Apps


Alice MJ
staff Editor