How to Unsync iPhone from Computer
Apr 27, 2022 • Filed to: Backup Data between Phone & PC • Proven solutions
Sometimes when you are using an iPhone, then usually you sync it with your laptop or PC or Mac. Then maybe you change your computer, then you face so many issues getting back, like your data from your old computer to a new one or there are chances that you lost your device. That time it is a very big problem to recover your data to your new device because according to the iPhone system, whenever you will connect you iPhone to any other new device, then it will erase your data of your iPhone because on your new computer your iTunes is blank with nothing there, that’s why it will erase the whole data of your mobile. So, in that case, what to do to save data on your mobile? Today we are going to discuss how to unsync the iPhone from the computer.
Part 1. How Do I Unsync My iPhone from My Old Computer and Sync It to My New One
Best way to sync your iPhone data to your new computer - iPhone Transfer
Dr.Fone - Phone Manager (iOS) is the best available solution for you to solve this problem when you are connecting your iPhone to a new computer. This software supports all iOS devices. It allows you to transfer your data to your computer without using iTunes. So by using this software, you can transfer data of your phone to your computer or Mac, then you can add your data to your iTunes library from your system which data you have saved using Dr.Fone - Phone Manager (iOS). So by doing this you can save your data from losing. There is no need to remove this software after using it from your system because you can use it forever. You can use it later to transfer your iPhone data to PC and vice versa. Dr.Fone - Phone Manager (iOS) doesn’t require iTunes to manage your data. To get help from this software, first of all, download it from the given link. Now we are going to show you how you can sync your data to your computer by using this software, but before that let’s discuss the key features of this software.

Dr.Fone - Phone Manager (iOS)
Transfer iPhone/iPad/iPod Files to Computer without iTunes
- Transfer, manage, export/import your music, photos, videos, contacts, SMS, Apps, etc.
- Backup your music, photos, videos, contacts, SMS, Apps, etc. to computer and restore them easily.
- Transfer music, photos, videos, contacts, messages, etc from one smartphone to another.
- Transfer media files between iOS devices and iTunes.
- Fully compatible with iOS 7, iOS 8, iOS 9, iOS 10, iOS 11,iOS 12, iOS 13 and iPod.
How to Unsync iPhone from Computer using Dr.Fone - Phone Manager (iOS)?
Now we are going to tell you can do these all things by this single software.
Step 1. With Dr.Fone downloaded and installed on your computer, launch it, select "Phone Manager" from all the functions, and connect your iPhone with the computer via a USB cable which came with your iDevice. Dr.Fone will automatically detect your iPhone and show it like this on the user interface as below.

Step 2. Copy iPhone Media files to iTunes but unsync iPhone from the computer.
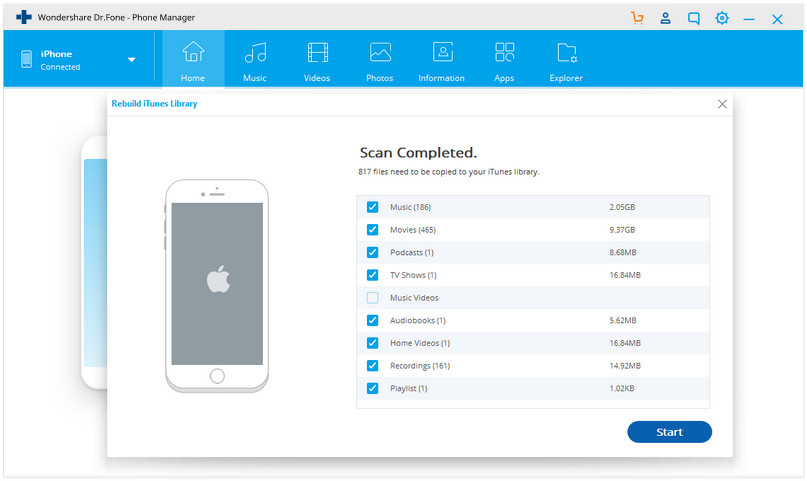
After iPhone connected, click Transfer Device Media to iTunes, Dr.Fone will start scanning for the available files on your iPhone and after finishing scanning, it will show you like this in the below screenshot. Now all files of your iPhone are there. If you want to manage your iPhone also with iTunes in the feature, you just need to click on the “Rebuild iTunes Library” button on the main interface, then click Start > Start on the coming windows. It will transfer all your media files to iTunes automatically. Then sync your iPhone with iTunes will not lose any iPhone data.

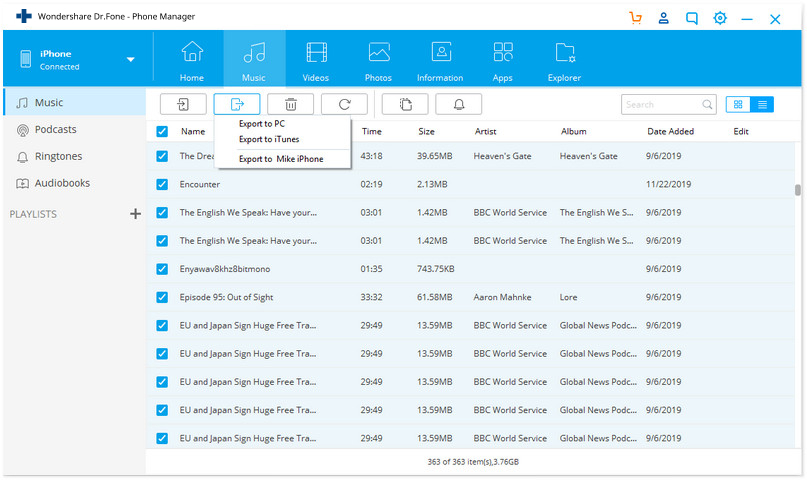
You can also go to the Music tab, select the music files and click Export > Export to PC, the data will be saved on your computer. Manage your data in your iOS device using Dr.Fone is much easier than using iTunes.

Part 2. How to Unsync the iPhone from iTunes Manually
Transferring data from an old computer to a new one is possible with iTunes also. You can do it by using iTunes without losing your data. Usually, every iTunes comes with the default setting in the Summary that says automatically sync data when your iDevice is connected. You just need to change this setting only to sync your iPhone without losing your data. Let’s discuss how you can do it in some steps in an easy way.
Step 1 To sync your iPhone with your new computer from old one, you need to open iTunes first on your computer, but before doing any other thing, you must make sure that you are using the latest version of iTunes and then connect your iPhone by using a USB cable and do not sync your phone just connect it with iTunes.

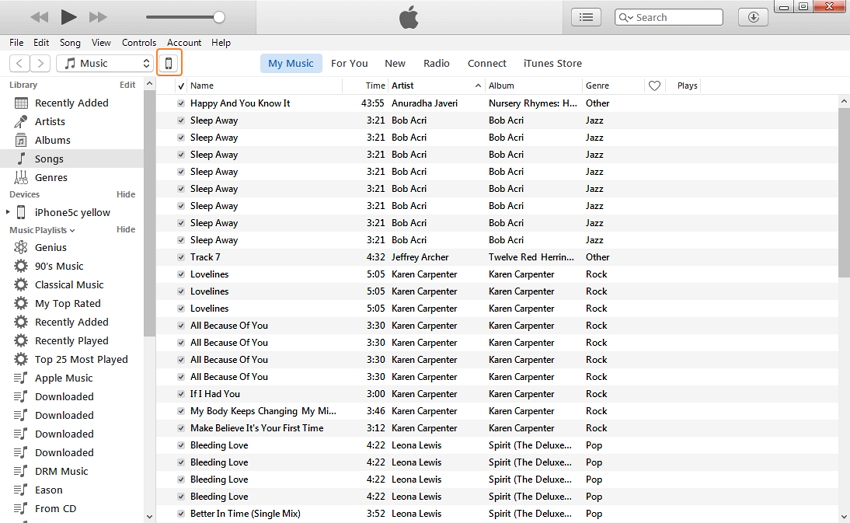
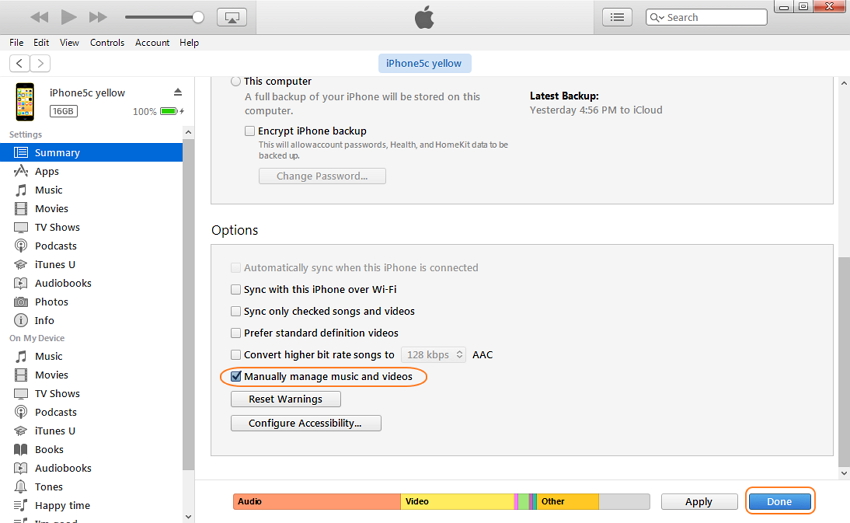
Step 2 Once your iTunes is started on your computer, click iPhone icon > Summary > Tick the option "Manually manage music and videos".

Step 3 After checking it, in the end, Click on the “Done” button to save those changes and now you are able to transfer your iPhone data to iTunes without losing it. Now you can transfer your iPhone data to your iTunes manually. You will not lose anything by using these steps.
iPhone ფაილის გადაცემა
- iPhone მონაცემების სინქრონიზაცია
- Ford Sync iPhone
- iPhone-ის კომპიუტერიდან სინქრონიზაციის გაუქმება
- iPhone-ის სინქრონიზაცია მრავალ კომპიუტერთან
- Ical-ის სინქრონიზაცია iPhone-თან
- ჩანაწერების სინქრონიზაცია iPhone-დან Mac-ზე
- გადაიტანეთ iPhone აპლიკაციები
- iPhone ფაილების მენეჯერები
- iPhone ფაილის ბრაუზერები
- iPhone ფაილების მკვლევარები
- iPhone ფაილების მენეჯერები
- CopyTrans Mac-ისთვის
- iPhone გადაცემის ინსტრუმენტები
- გადაიტანეთ iOS ფაილები
- გადაიტანეთ ფაილები iPad-დან კომპიუტერზე
- გადაიტანეთ ფაილები კომპიუტერიდან iPhone-ზე
- iPhone Bluetooth ფაილის გადაცემა
- გადაიტანეთ ფაილები iPhone-დან კომპიუტერზე
- iPhone ფაილის გადაცემა iTunes-ის გარეშე
- მეტი iPhone ფაილის რჩევები


ჯეიმს დევისი
პერსონალის რედაქტორი