How to Move iPhone Photos to an External Hard Drive
Apr 27, 2022 • Filed to: iPhone Data Transfer Solutions • Proven solutions

"How do I move iPhone photos to an external hard drive? I have more than 5,000 pictures saved on my iPhone. Now I need to free up more space for music and videos, so I have to save these iPhone photos to an external hard drive. Please help me. I'm running in Windows 7." - Sophie
When saving iPhone photos to an external hard drive, some people will suggest that you connect your iPhone XS (Max) / iPhone XR/ X/8/7/6S/6 (Plus) with the computer and get the iPhone photos out before putting them in an external hard drive. The truth is that iPhone can be used as an external hard drive to export photos in Camera Roll to the computer and to anexternal hard drive. However, when it comes to transfer your iPhone Photo Library, it fails. To get all your iPhone photos to an external hard drive, you need some help from a professional iPhone Transfer tool. The following are examples showing you how to save iPhone photos to an external hard drive.
Transfer photos from iPhone XS (Max) / iPhone XR/X/8/7/6S/6 (Plus) to an external hard drive
Dr.Fone - Phone Manager (iOS) is the best iPhone Transfer tool we're going to use to backup iPhone photos to an external hard drive. It has a separate version for Windows and Mac. Below, we focus on the Windows version. This iPhone Transfer tool allows you to copy photos, music, playlists, and videos from iPod, iPhone & iPad to iTunes and your PC for backup.
Also Dr.Fone - Phone Manager (iOS) is optimized to be compatible with iPhone XS (Max) / iPhone XR/X, iPhone 8/8 Plus, iPhone 7/7 Plus, iPhone 6S Plus, iPhone 6, iPhone 5, iPhone 4 and iPad, iPod, provided they are running iOS 5, 6, 7, 8, 9, 10, 11 or 12.

Dr.Fone - Phone Manager (iOS)
Transfer iPhone XS (Max) / iPhone XR/X/8/7/6S/6 (Plus) Photos to External Hard Drive Eaisly
- Transfer, manage, export/import your music, photos, videos, contacts, SMS, Apps etc.
- Backup your music, photos, videos, contacts, SMS, Apps etc. to computer and restore them easily.
- Transfer music, photos, videos, contacts, messages, etc from one smartphone to another.
- Transfer media files between iOS devices and iTunes.
-
Fully compatible with the latest iOS version fully!

How to Transfer photos from iPhone to an external hard drive
Step 1. Connect your iPhone with PC after running this iPhone Transfer program
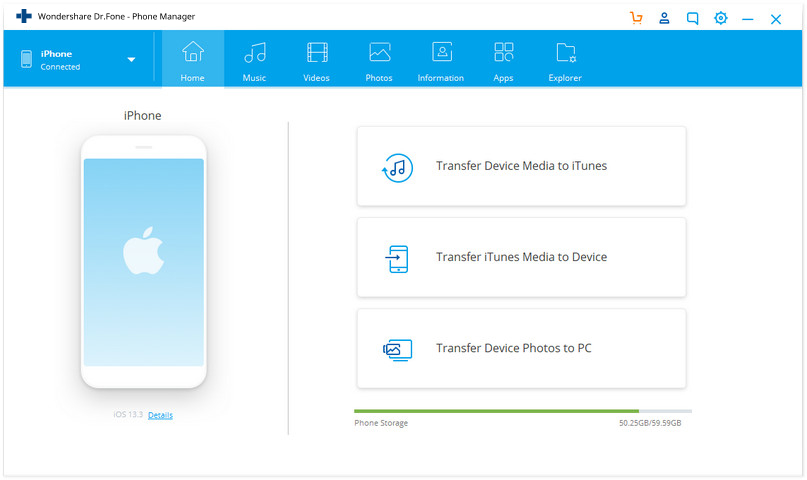
At the beginning, run Dr.Fone on your PC after installing it. Choose "Phone Manager" and then connect your iPhone to your computer via a USB cable. Once your iPhone is connected, this program will detect it immediately. Then, you get the primary window.

Step 2. Connect your external hard drive
Connect your external hard drive to the computer, depending on the operating software you use. For Windows, it will appear under “My Computer”, while for Mac users, the USB external hard drive will appear on your desktop.
Making sure that the external hard drive has enough memory for the photos you want to transfer. As a precaution, scan your flash drive for viruses to protect your PC.
Step 3. Backup iPhone photos to external hard drive
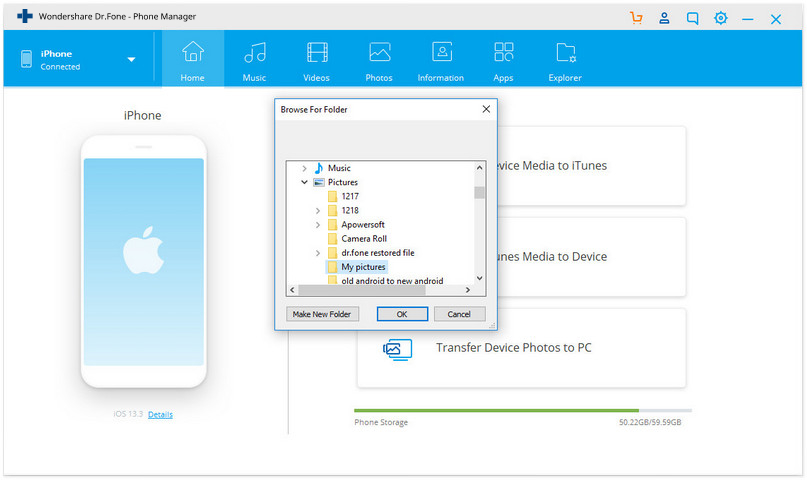
When your phone is showing on the window of Dr.Fone - Phone Manager (iOS), and your external hard drive is connected to your computer. To backup all iPhone photos to external hard drive with one click, simply click the Transfer Device Photos to PC. A pop-up window will appear. Select your USB external hard drive and click to open so that you can save the photos there.

Step 4. Transfer iPhone photos to external hard drive
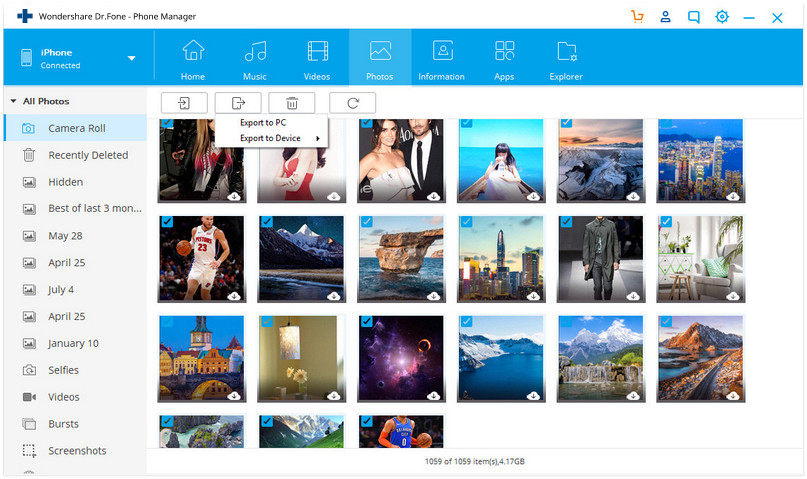
You can also preview and select the photos you would like to transfer from iPhone XS (Max) / iPhone XR/X/8/7/6S/6 (Plus) to external hard drive. Select “Photos”, which is on the top of Dr.Fone's main window. iPhones running iOS 5 to 11 will have photos saved in folders named “Camera Roll” and “Photo Library”. “Camera Roll” stores photos that you capture using your phone while “Photo Library” stores photos that you synced from iTunes, if you have created personal folders on your phone, they will also appear here. When you click any of the folders (discussed above) with photos, the photos in the folder will appear. You can select the folder or the photos you need to transfer to your external hard drive, and then click the “Export > Export to PC” option, which is visible on the top bar. A pop-up window will appear. Select your USB external hard drive and click to open so that you can save the photos there.

iPhone Photo Transfer
- Import Photos to iPhone
- Transfer Photos from Mac to iPhone
- Transfer Photos from iPhone to iPhone
- Transfer Photos from iPhone to iPhone without iCloud
- Transfer Photos from Laptop to iPhone
- Transfer Photos from Camera to iPhone
- Transfer Photos from PC to iPhone
- Export iPhone Photos
- Transfer Photos from iPhone to Computer
- Transfer Photos from iPhone to iPad
- Import Photos from iPhone to Windows
- Transfer Photos to PC without iTunes
- გადაიტანეთ ფოტოები iPhone-დან ლეპტოპზე
- გადაიტანეთ ფოტოები iPhone-დან iMac-ზე
- ამოიღეთ ფოტოები iPhone-დან
- ჩამოტვირთეთ ფოტოები iPhone-დან
- ფოტოების იმპორტი iPhone-დან Windows 10-ში
- მეტი iPhone ფოტო გადაცემის რჩევები


Alice MJ
staff Editor