How to Transfer Photos from iPhone to iPhone without iCloud [iPhone 12 Included]
Apr 27, 2022 • Filed to: Data Recovery Solutions • Proven solutions
This article content focuses on the importance of the photos, and the techniques and tools you require to transfer photos from iPhone to another iPhone without iCloud including iPhone 12.
Photos are important because they reflect our memories, we have so many memories in our brain and it is not easy to pull them all up when required, but photos can help a lot to remember. Photos invoke emotions, sometimes photos are important to remember details, for example, “what did I wear on my last Christmas?”.
Method 1: How to Transfer Photos from iPhone to iPhone without iCloud (All in One Click) [iPhone 12 Included]
The top method to transfer photos from iPhone to iPhone without iCloud is to transfer all the photos in one click. With this method, you can complete the photo transfer even within seconds without any photo loss. All you need are two lightning cables to connect both iPhones to your PC or Mac, and the Dr.Fone - Phone Transfer (iOS&Android) software.

Dr.Fone - Phone Transfer
Easiest Way to Transfer Photos from iPhone to iPhone without iCloud
- Transfer photos from an old iPhone to a new iPhone within seconds.
- Support the transfer of more data like contacts, messages, files, videos, etc. from phone to phone.
- Transfer everything from iPhone to new iPhone, from Android to Android, from iPhone to Android, and from Android to iPhone.
- Fully compatible with iOS 14 and Android 10.0.
- Work well with Windows 10 and Mac 10.15.
Here are the simple steps to transfer photos from iPhone to iPhone without iCloud:
Step 1: Download the Dr.Fone software, open it, and you can see the following interface.

Step 2: Connect both iPhones to your PC and click "Phone Transfer".
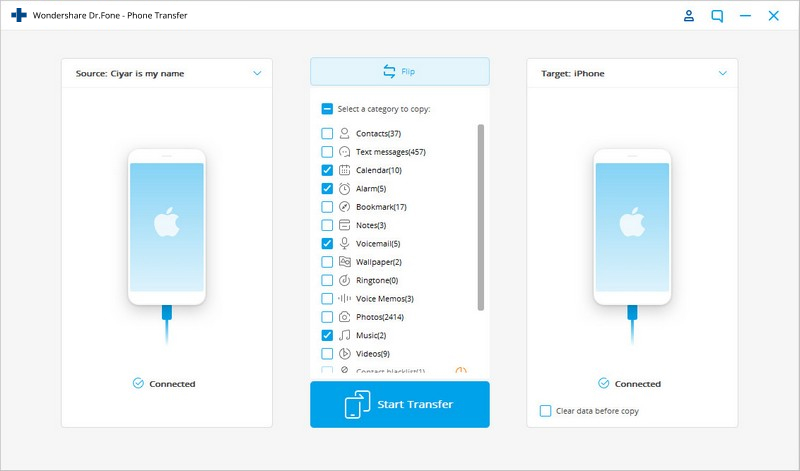
Note: Confirm which iPhone is your destination device and which one is the source. Click "Flip" to swap their positions if necessary.
Step 3: Select the "Photos" option and click "Transfer". Then you can find all photos are transferred from iPhone to iPhone without iCloud.
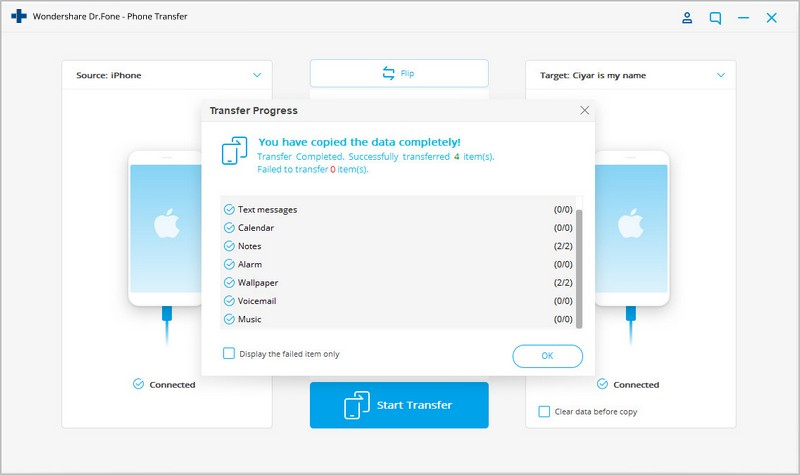
Video Guide: Transfer photos from iPhone to iPhone without iCloud
Method 2: How to Transfer Photos from iPhone to iPhone without iCloud (Selective Transfer) [iPhone 12 Included]
At times, you may not want to transfer photos from iPhone to iPhone in an indiscriminate manner.
If you are looking to selectively transfer photos from iPhone to iPhone without iCloud, Dr.Fone - Phone Manager (iOS) is an app you must have. The iPhone Transfer tool can transfer Photos, contacts, messages, call logs, videos, pictures, apps, and apps data. With a simple and easy interface, you can transfer the selected data in no time. The most impressive thing about Dr.Fone - Phone Manager (iOS) is throughout the process of iPhone to iPhone data transfer, there is no data loss at all.

Dr.Fone - Phone Manager (iOS)
Selectively transfer photos from iPhone to iPhone without iCloud
- Preview and select only the wanted photos to transfer to another iPhone.
- Transfer music, photos, videos, contacts, messages, etc from any phone to PC, or from PC to any phone.
- Transfer media files between iOS devices and iTunes.
- Fully compatible with iOS 7, iOS 8, iOS 9, iOS 10, iOS 11, iOS 12, iOS 13, iOS 14 and iPod.
Guide of How to Selectively Transfer Photos from iPhone to iPhone without iCloud
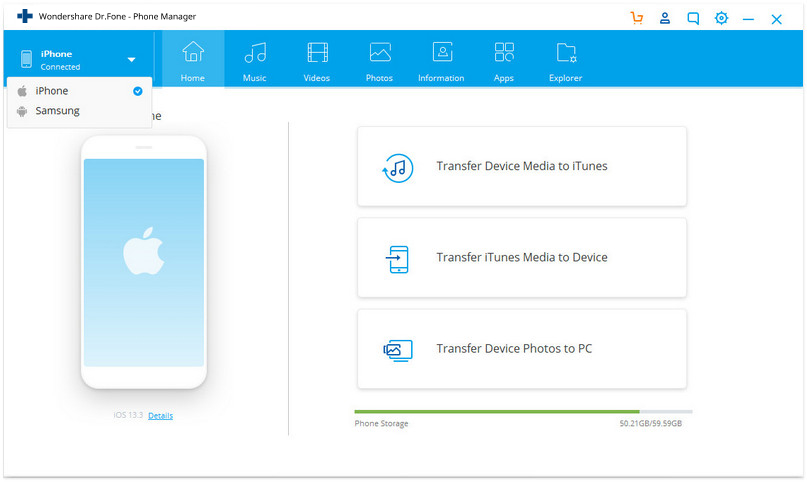
Step 1. Install and launch the Dr.Fone, and make sure you have connected both iPhones: source iPhone which contains photos, and target iPhone to which you can transfer photos. You can connect more than one iPhone to your computer since in this case, we have connected to devices for the iPhone photos transfer.
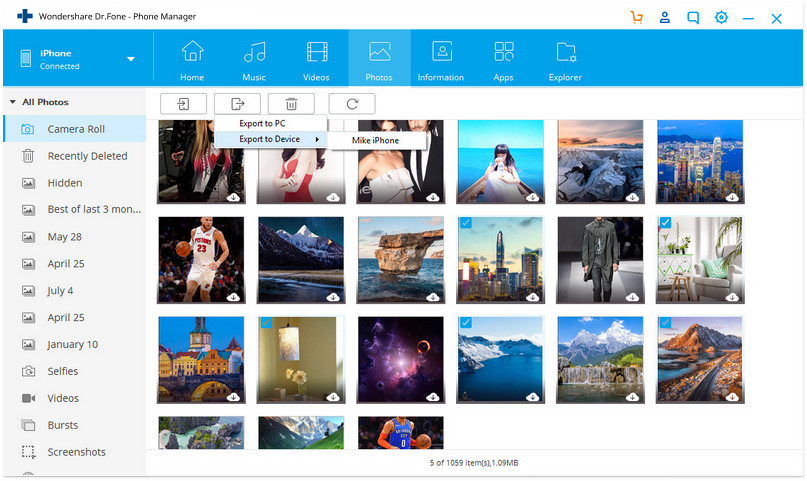
Step 2. Now that you have selected the source iPhone, click the Photos tab on the top, and click on the type of photo it can be from camera Roll (pictures are taken from your camera) or it can be a photo in a library. In this case, we will select a photo library, mark the photos to be transferred and click "export". In the drop-down menu, go to "export to device" and select the device. All of the selected photos will be transferred to the target iPhone.
Though there is much software that can help you to transfer your photos from iPhone to iPhone without iCloud, Dr.Fone - Phone Manager (iOS) stands way above all, due to a very friendly interface and ease of use. You can effectively transfer your photos to your device or your PC in no time without worrying about any data loss.
Tip: How to Transfer Photos from iPhone to iPhone using iCloud
Step 1. To transfer the photos from your iPhone to another iPhone you must make sure that you make a backup through iCloud.
Step 2. On the home screen tap Settings. Once entered in settings tap iCloud.
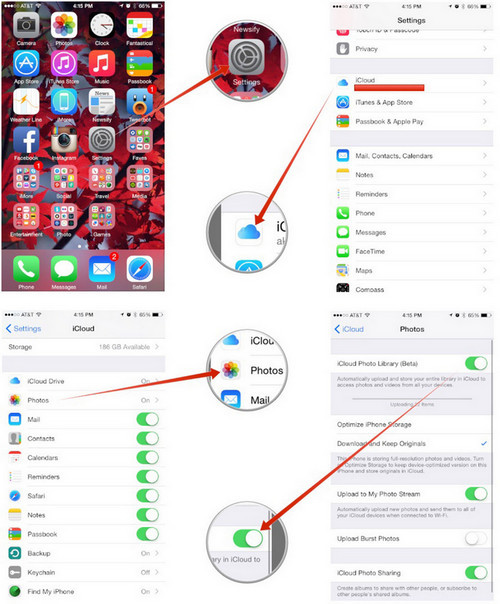
Step 3. In the iCloud menu, you need to click on photos. Once entered in photos turn on the iCloud Photo Library option along with upload my photostream.
Step 4. When you are done your photos will be uploaded to iCloud and you can restore them by simply adding the iCloud id to the new iPhone device.
Editor's Picks:
- 5 Ways to Transfer Everything from Old iPhone to your new iPhone
- 5 Ways to Transfer Photos from iPhone to PC with/without iTunes
თუ არ გსურთ iCloud-ის გამოყენება მონაცემთა გადაცემისთვის, გაუშვით Dr.Fone - Phone Transfer თქვენს კომპიუტერზე და გადაიტანეთ მონაცემები ერთი დაწკაპუნებით სწრაფად.
iPhone ფოტო გადაცემა
- ფოტოების იმპორტი iPhone-ზე
- გადაიტანეთ ფოტოები Mac-დან iPhone-ზე
- გადაიტანეთ ფოტოები iPhone-დან iPhone-ზე
- გადაიტანეთ ფოტოები iPhone-დან iPhone-ზე iCloud-ის გარეშე
- გადაიტანეთ ფოტოები ლეპტოპიდან iPhone-ზე
- გადაიტანეთ ფოტოები კამერიდან iPhone-ზე
- გადაიტანეთ ფოტოები კომპიუტერიდან iPhone-ზე
- iPhone ფოტოების ექსპორტი
- გადაიტანეთ ფოტოები iPhone-დან კომპიუტერში
- გადაიტანეთ ფოტოები iPhone-დან iPad-ზე
- ფოტოების იმპორტი iPhone-დან Windows-ში
- გადაიტანეთ ფოტოები კომპიუტერში iTunes-ის გარეშე
- გადაიტანეთ ფოტოები iPhone-დან ლეპტოპზე
- გადაიტანეთ ფოტოები iPhone-დან iMac-ზე
- ამოიღეთ ფოტოები iPhone-დან
- ჩამოტვირთეთ ფოტოები iPhone-დან
- ფოტოების იმპორტი iPhone-დან Windows 10-ში
- მეტი iPhone ფოტო გადაცემის რჩევები


სელენა ლი
მთავარი რედაქტორი