Solution for Cannot Unlock iPhone With Apple Watch After Update

Apr 27, 2022 • Filed to: Fix iOS Mobile Device Issues • Proven solutions
iOS 15 has landed, and unsurprisingly, this update is chockfull of features that make life easier for us in newfound ways. Particularly so if we are embedded deep into the Apple ecosystem. For example, if we have the Apple Watch and an iPhone, we can now unlock our iPhone with the Apple Watch! This is true only for Face ID-equipped iPhones only, though.
Why did Apple bring this particular feature only to Face ID-equipped iPhone models? This was a direct response by Apple to the global coronavirus pandemic wherein people with Face ID-equipped phones found themselves unable to unlock their phones due to the face masks. This was a sad, unforeseen reality of the times that no one could have predicted back in 2017 when the first Face ID-equipped iPhone X came out. What did Apple do? Apple made it easy for people with an Apple Watch to be able to unlock their Face ID-equipped iPhone simply by raising the device and glancing at it (if you have your Apple Watch on you). Only, as many users have painfully discovered, this much-coveted feature is far from functional for a growing number of people out there. What to do when you cannot unlock iPhone with Apple Watch in iOS 15?
Requirements To Unlock iPhone With Apple Watch
There are some hardware compatibility requirements and software requirements you must meet before using the unlock iPhone with the Apple Watch feature.
Hardware- It would be best if you had an iPhone that has a Face ID. This would currently be the iPhone X, XS, XS Max, XR, the iPhone 11, 11 Pro and Pro Max, the iPhone 12, 12 Pro and Pro Max, and the iPhone 12 mini.
- You must have an Apple Watch Series 3 or later.
- The iPhone ought to be running iOS 15 or later.
- The Apple Watch must be running watchOS 7.4 or later.
- Bluetooth and Wi-Fi must be enabled on both the iPhone and Apple Watch.
- You must be wearing your Apple Watch.
- Wrist Detection must be enabled on the Apple Watch.
- The passcode must be enabled on the Apple Watch.
- Apple Watch and the iPhone must be paired together.
Besides these requirements, there is one other requirement: your mask should be covering both your nose and your mouth for the feature to function.
How Does Unlock iPhone With Apple Watch Work?

Users who follow Apple know that similar functionality exists for unlocking the Mac with an Apple Watch, much before the pandemic came to be. Only, Apple has brought that feature to the Face ID-equipped iPhone lineup now to help users unlock their phones faster without the need to take their masks off. This feature is not needed for those with Touch ID-equipped phones, such as every iPhone model released before the iPhone X and the iPhone SE released later in 2020.
This feature works only on an unlocked Apple Watch. This means that if you unlock your Apple Watch using the passcode, you can now lift your Face ID-equipped iPhone and glance at it as you do, and it will unlock, and you can swipe up. Your watch will get a notification that the iPhone was unlocked, and you can choose to lock it if this was accidental. Though, it must be noted that doing this will mean that the next time you want to unlock your iPhone, you will need to key in the passcode.
Also, this feature is, literally, to only unlock the iPhone using Apple Watch. This won’t allow access to Apple Pay, App Store purchases, and such other authentications that you’d normally do with Face ID. You can still double-press the side button on your Apple Watch for that if you wish.
What To Do When Unlock iPhone With Apple Watch Does Not Work?
There may be instances when the feature does not work. You must ensure that the requirements listed at the start of the article are met to a tee. If everything seems to be in order and you are still unable to unlock iPhone with Apple Watch after the iOS 15 update, there are a few steps you can take.
1. Restart the iPhone and key in your passcode when it boots up.
2. Restart the Apple Watch similarly.
3. Ensure that Unlock With Apple Watch is activated! This sounds funny, but it is true that often in excitement, we miss the most basic things.
Enable Unlock iPhone With Apple Watch
Step 1: Scroll down and tap Face ID and Passcode
Step 2: Key in your passcode
Step 3: Get into the Settings app on your iPhone
Step 4: Scroll and find Unlock With Apple Watch option and toggle it On.
4. the watch may have lost connection with the iPhone, and hence the feature is not working.
Check iPhone Pairing With Apple Watch.
Step 1: On your watch, tap and hold the bottom of the screen until the Control Centre pops up. Swipe it up fully.
Step 2: A tiny green iPhone should be at the top left corner of your Apple Watch that signifies that the watch and the iPhone are connected.
Step 3: If the icon is there and the feature does not work, disconnect Bluetooth and Wi-Fi on both the watch and the iPhone for a few seconds and toggle them back. This would likely establish a fresh connection and fix the issue.
5. Sometimes, Disabling Unlock With iPhone On Apple Watch Helps!
Now, this can sound counter-intuitive, but that is how things go in the software and hardware world. There are two places where Unlock With Apple Watch is enabled, one in the Face ID and Passcode tab under Settings on your iPhone and another under the Passcode tab in the My Watch settings on the Watch app.
Step 1: Launch the Watch app on iPhone
Step 2: Tap Passcode under the My Watch tab
Step 3: Disable Unlock With iPhone.
You will need to restart your Apple Watch post this change and hopefully everything will work as intended and you will be unlocking your iPhone with the Apple Watch like a pro!
How To Install iOS 15 On Your iPhone and iPad
Device firmware can be updated in two ways. The first method is the independent, over-the-air method that downloads the requisite files on the device itself and updates it. This takes a minimal amount of download but requires you to plug your device in and have a Wi-Fi connection. The second method involves a laptop or a desktop computer and the use of iTunes or Finder.
Installing Using Over-The-Air (OTA) Method
This method uses the delta update mechanism to update iOS on the iPhone. It downloads only the files that require updating and updates the iOS. Here is how to install the latest iOS using the OTA method:
Step 1: Launch Settings app on iPhone or iPad
Step 2: Scroll down to General and tap it
Step 3: Tap Software Update
Step 4: Your device will now search for an update. If available, the software will give you the option to download. Before downloading, you must be on a Wi-Fi connection and the device must be plugged into a charger to begin installing the update.
Step 5: When the device is finished preparing the update, it will either prompt you that it will update in 10 seconds, or if not, you can tap the Install Now option, and your device will verify the update and reboot to continue with the installation.
Advantages and DisadvantagesThis is the fastest method to update iOS and iPadOS on your devices. All you need is a Wi-Fi connection and a charger connected to your device. It could be a personal hotspot or a public Wi-Fi and a battery pack plugged in and you could be sitting in a coffee shop. So, if you do not have a desktop computer with you, you can still update your device to the latest iOS and iPadOS without an issue.
There is a disadvantage, such as one that since this method downloads only the necessary files and that method sometimes causes issues with the files already in place.
Installing Using IPSW File On macOS Finder Or iTunes
Installing using the complete firmware (IPSW file) requires a desktop computer. On Windows, you need to use iTunes, and on Macs, you can use iTunes on macOS 10.15 and earlier or Finder on macOS Big Sur 11 and later.
Step 1: Connect your device to your computer and launch iTunes or Finder
Step 2: Click on your device from the sidebar
Step 3: Click Check for Update. If an update is available, it will show. You can then proceed and click Update.
Step 4: When you proceed, the firmware will download, and your device will be updated to the latest iOS or iPadOS. You will be required to enter the passcode on your device before the firmware gets updated if you are using one.
Advantages and DisadvantagesThis method comes highly recommended because since this is a full IPSW file, there are few chances of something going wrong during the update as against the OTA method. However, the full installation file is usually nearly 5 GB now, give or take, depending on the device and model. That is a large download if you are on a metered and/ or slow connection. Furthermore, you do need a desktop computer or a laptop for this. It is possible you do not have one with you right now, so you cannot use this method to update firmware on your iPhone or iPad.
Fix iOS Update Issues With Dr.Fone - System Repair
Dr.Fone - System Repair
Fix iPhone Stuck on Apple Logo without Data Loss.
- Only fix your iOS to normal, no data loss at all.
- Fix various iOS system issues stuck in recovery mode, white Apple logo, black screen, looping on start, etc.
- Fixes other iPhone errors and iTunes errors, such as iTunes error 4013, error 14, iTunes error 27,iTunes error 9, and more.
- Works for all models of iPhone, iPad, and iPod touch.
- Fully compatible with the latest iOS version.


If you get stuck in a boot loop or recovery mode during the course of updating your device or anything that was not expected, what do you do? Do you frantically search for help on the internet or do you go out to the Apple Store in the middle of a pandemic? Well, you call the doctor home!
Wondershare Company designs Dr.Fone - System Repair to help you fix issues on your iPhone and iPad easily and seamlessly. Using Dr.Fone - System Repair you can fix the most common issues on your iPad and iPhone that you would otherwise need to know more about technology or have to visit an Apple Store to get rectified.
Step 1: Download Dr.Fone - System Repair here: ios-system-recovery.html

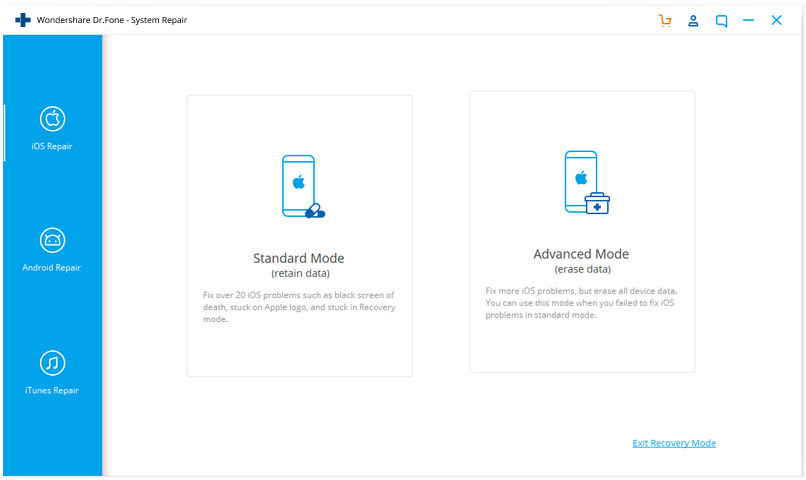
Step 2: Click System Repair and then connect your device to the computer with a data cable. When the device is connected and Dr.Fone detects the device, the Dr.Fone screen will change to show two modes - Standard Mode and Advanced Mode.
What Are Standard and Advanced Modes?Standard Mode fixes issues that do not require the deletion of user data whereas Advanced Mode will wipe user data in a bid to resolve more complex issues.
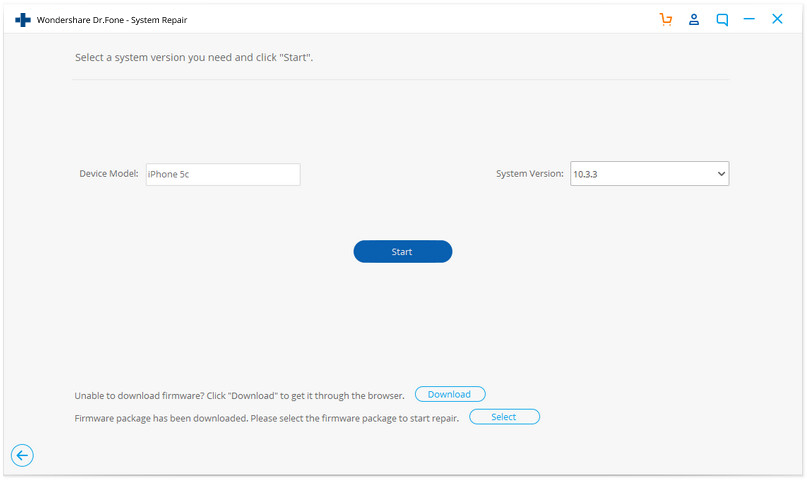
Step 3: Clicking Standard Mode (or Advanced Mode) will take you to another screen where your device model and a list of available firmware to which you can update your device are displayed. Select the latest iOS 15 and click Start. The firmware will start downloading. There is also a link provided at the bottom of this screen to download the firmware manually if Dr.Fone is unable to download the firmware automatically for some reason.
Step 4: After the firmware download, Dr.Fone will verify the firmware and stop. When you are ready, you can click Fix Now to begin fixing your device.
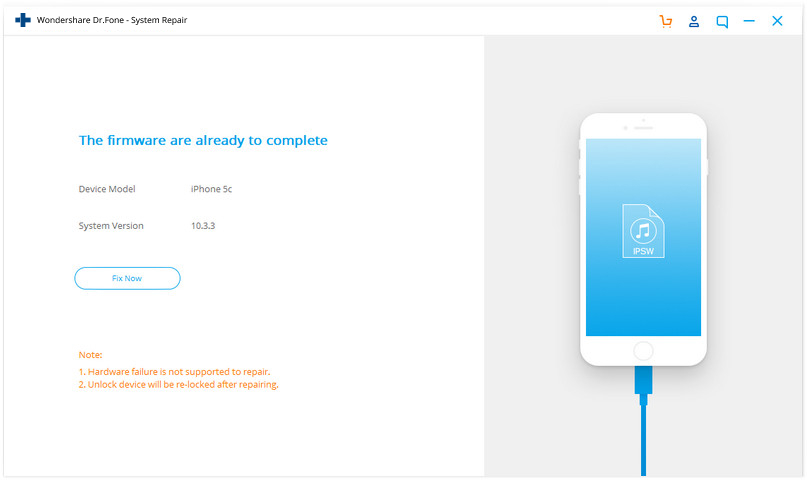
When the process is finished, your device will be fixed and reboot to the latest iOS 15.
Advantages of Dr.Fone - System Repair
Dr.Fone - System Repair provides three distinct advantages over the traditional method you are accustomed to: using Finder on macOS Big Sur or iTunes on Windows and versions of macOS and earlier.
ReliabilityDr.Fone - System Repair is a quality product from the stables of Wondershare, makers of high-quality, user-friendly software for decades. Their product suite includes not just Dr.Fone but also InClowdz, an app for both Windows and macOS that you can use to sync data between your cloud drives and from one cloud to another in the most seamless manner in just a few clicks, and at the same time, you can manage your data on those drives from within the app, using advanced functions such as creating files and folders, copying, renaming, deleting files and folders, and even migrating files and folders from one cloud drive to another using a simple right click.
Dr.Fone - System Repair is, needless to say, a reliable software. On the other hand, iTunes is notorious for crashing during update processes and being bloatware, so much so that even Apple’s own Craig Federighi mocked iTunes in a keynote!
Ease of UseWould you happen to know what Error -9 in iTunes is, or what Error 4013 is? Yeah, thought so. Dr.Fone - System Repair speaks English (or whichever language you want it to speak) instead of speaking Apple code and allows you to understand clearly what is going on and what you need to do, in words that you understand. So, when you connect your iPhone to your computer when Dr.Fone - System Repair is active, it tells you when it is connecting, when it has detected your device, what model it is, what OS it is on at the moment, etc. It guides you step by step towards fixing your iPhone or iPad to iOS 15 reliably and with confidence. It even provides for manual downloading of firmware if it fails to download on its own, and if it fails to detect the device itself, it even gives you clear instructions right there on-screen to help you fix the probable cause. iTunes or Finder do nothing of the sort. Considering that Apple is one of those providers in the industry that release updates like clockwork and frequently, with beta updates being released as early as weekly, Dr.Fone - System Repair is less of an expense and more of an investment that pays for itself several times over.
Time-Saving, Thoughtful FeaturesDr.Fone - System Repair goes over and beyond what Finder and iTunes can do. Using this tool you can downgrade your iOS or iPadOS as needed. This is an important feature since it is possible that updating to the latest iOS might cause some apps to not function. In that case, for quick restore of functionality to save time, Dr.Fone allows you to downgrade your operating system to the previous version.


iPhone Problems
- iPhone Hardware Problems
- iPhone Home Button Problems
- iPhone Keyboard Problems
- iPhone Headphone Problems
- iPhone Touch ID Not Working
- iPhone Overheating
- iPhone Flashlight Not Working
- iPhone Silent Switch Not Working
- iPhone Sim Not Supported
- iPhone Software Problems
- iPhone Passcode Not Working
- Google Maps Not Working
- iPhone Screenshot Not Working
- iPhone Vibrate Not Working
- Apps Disappeared From iPhone
- iPhone Emergency Alerts Not Working
- iPhone Battery Percentage Not Showing
- iPhone App Not Updating
- Google Calendar not Syncing
- Health App Not Tracking Steps
- iPhone Auto Lock Not Working
- iPhone Battery Problems
- iPhone Media Problems
- iPhone Echo Problem
- iPhone Camera Black
- iPhone Won't Play Music
- iOS Video Bug
- iPhone Calling Problem
- iPhone Ringer Problem
- iPhone Camera Problem
- iPhone Front Camera Problem
- iPhone Not Ringing
- iPhone Not Sound
- iPhone Mail Problems
- Reset Voicemail Password
- iPhone Email Problems
- iPhone Email Disappeared
- iPhone Voicemail Not Working
- iPhone Voicemail Won't Play
- iPhone Can't get Mail connection
- Gmail Not Working
- Yahoo Mail Not Working
- iPhone Update Problems
- iPhone Stuck at the Apple Logo
- Software Update Failed
- iPhone Verifying Update
- Software Update Server Couldn't Be Contacted
- iOS update Problem
- iPhone Connection/Network Problems
Alice MJ
staff Editor
Generally rated4.5(105participated)