4 Ways to Backup Contacts on Samsung Galaxy S9/S20
Mar 07, 2022 • Filed to: Tips for Different Android Models • Proven solutions
Many of us have been stuck in a kind of technological blind spot where we rely so much on technology, especially our smartphones, that traditional methods of recording data have become lost.
Think about how you never remember birthdays now; you just wait for Facebook to tell you.
The same can be said for our contacts. We’re so used to have them readily available on our phones that we don’t write them down, meaning that a situation where our device breaks or becomes unusable, we’ve ultimately lost said contacts.
But this doesn’t have to be the case if you back them up, storing a hard copy of them to ensure that we always have the contact information we need when we need it most. Not sure how to back them up yourself? Here are four easy methods to get you started when learning how to backup contacts from Samsung S9/S20.
Method 1. Backup Contacts on Samsung S9/S20 using with 1 Click
Of course, you’re going to want a simple option where you can simply click a button, and your contacts are backed up. This will save you time and ensure backing your contacts up is never a problem.
The answer to this is using software known as Dr.Fone - Backup and Restore (Android). This third-party software is compatible with both Mac and Windows computers, comes with a full range of features to help you seamlessly back up and restore your phone’s data and even comes with a free trial period so you can make sure this software is right for you.

Dr.Fone - Phone Backup (Android)
Flexibly Backup and Restore Contacts on Samsung S9/S20
- Selectively backup Android data to computer with one click.
- Preview and restore backup to any Android devices.
- Supports 8000+ Android devices.
- There is no data lost during backup, export or restore.
Here’s what you do to back up contacts from Samsung S9/S20.
Step 1. Download and install the Dr.Fone - Phone Backup (Android) from the official website.
Step 2. Connect your Galaxy S9/S20 to your computer using a USB cable and then open the Dr.Fone software.
Step 3. On the main menu, click the Phone Backup option.

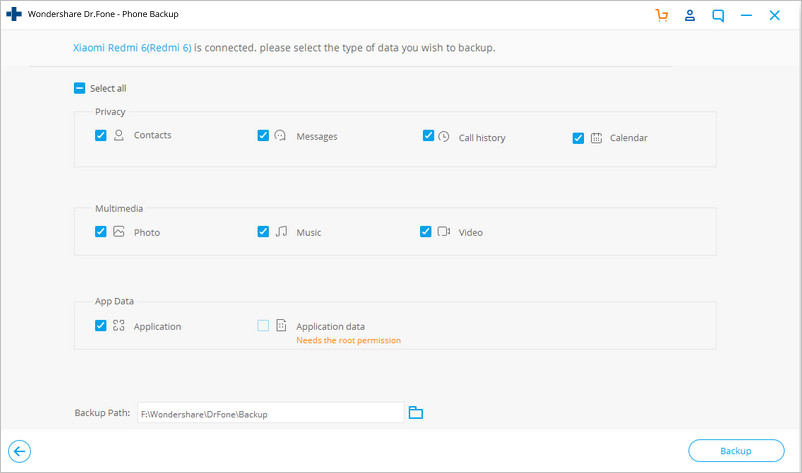
Step 4. On the next page, click the Backup option. Then select the data types you want to backup, in this case, Contacts.
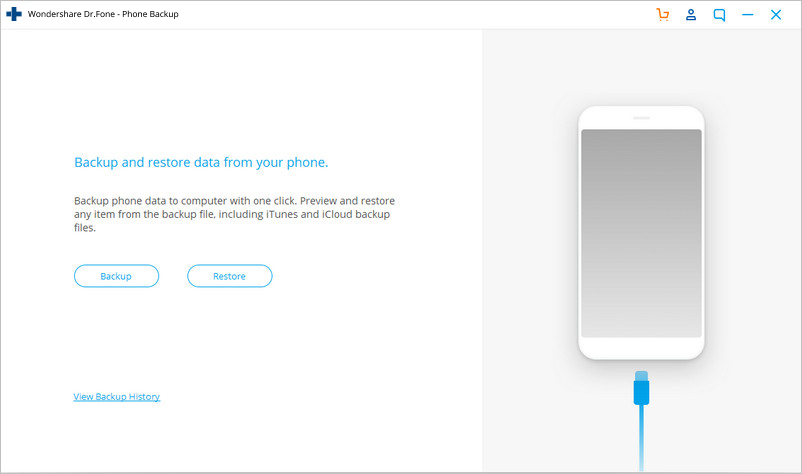
Step 5. When you’re happy with your selection, click the Backup option, and the software will back up your files and contacts. Once completed, you’ll be able to access the backup folder and view your backup history.
Method 2. Backup Contacts on Samsung S9/S20/S20 to SIM Card
One of the more traditional ways to back up your contacts is using the SIM card. This way, if your phone does break or you replace your device, you can simply take out the SIM card and insert into your new device.
However, if your phone is damaged, such as water damage, the SIM card may become unusable.
Step 1. On your Samsung device, open your contacts application.
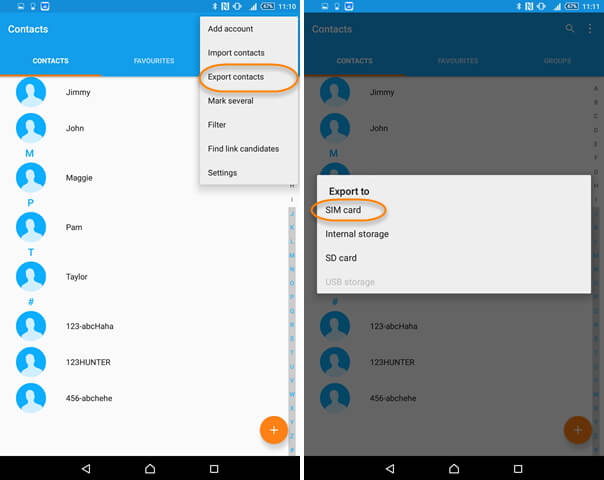
Step 2. Using the menu buttons, find the Import/Export option, usually under the Settings tab. Then tap the ‘Contacts’ option.
Step 3. Tap the Import/Export option, followed by Export to Device Storage.
Step 4. You’ll then be able to choose the location that you want to save your contacts to, in this case, choose Device, or Export to SIM Card, depending on the operating system you’re running.
Step 5. Saving your contacts to your device will save them to the SIM card, giving you a solid backup of your contact information.
Method 3. Backup Contacts on S9/S20/S20 to SD Card
If you don’t fancy using your SIM card to backup contacts on Samsung S9/S20, or your SIM card simply isn’t compatible with another device, or you just want a hard copy of your contacts, you could think about backing them up to an SD card.
Here’s what you need to do;
Step 1. Make sure you have an SD card inserted into your Samsung S9/S20 device.
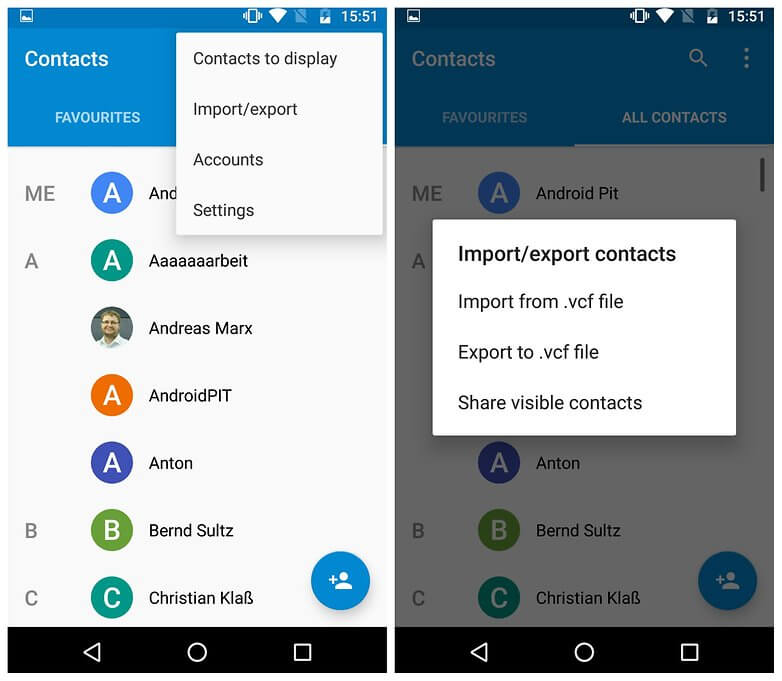
Step 2. Turn on your phone and navigate to your main menu, tap the Contacts option, followed by Import/Export Contacts.
Step 3. Tap Export and select SD Card.
Step 4. This will then export all your contacts to your SD card, allowing you to remove it and store them on your computer or another mobile device.
Method 4. Backup Contacts on Samsung S9/S20/S20 to Gmail Account
If you don’t have an SD card to hand, don’t trust your SIM card or simply want to handle your contacts in a different way, you always have the option to backup contacts from Samsung S9/S20 in a .VCF file format to your Gmail account.
Step 1. Start on the main menu of your device and open Contacts.
Step 2. Use the menu buttons on the top right to select the Settings option.
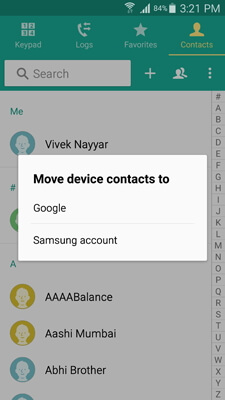
Step 3. Tap Move device contacts.
Step 4. Tap the Google or Gmail account that you wish to export your contacts to.
Step 5. This will then merge your contacts and back them up into your Gmail account, enabling you to access them on your computer or on another mobile device.
As you can see, there are many methods you can employ when it comes to backing up the contacts on your Samsung Galaxy S9/S20 device.
Dr.Fone - Phone Backup (Android) is still our favorite approach as you can manage and handle all your contact data, and other files type, all from one central location, regardless of whether you’re using your S9/S20 or any other phone brand that you or your friends and family use.
Samsung S9
- 1. S9 Features
- 2. Transfer to S9
- 1. Transfer WhatsApp from iPhone to S9
- 2. Switch from Android to S9
- 3. Transfer from Huawei to S9
- 4. Transfer Photos from Samsung to Samsung
- 5. Switch from Old Samsung to S9
- 6. Transfer Music from Computer to S9
- 7. Transfer from iPhone to S9
- 8. Transfer from Sony to S9
- 9. Transfer WhatsApp from Android to S9
- 3. Manage S9
- 1. Manage Photos on S9/S9 Edge
- 2. Manage Contacts on S9/S9 Edge
- 3. Manage Music on S9/S9 Edge
- 4. Manage Samsung S9 on Computer
- 5. Transfer Photos from S9 to Computer
- 4. Backup S9


Alice MJ
staff Editor