

Two Ways to Move All Photos from Google Photos to Phone

Apr 27, 2022 • Filed to: Data Transfer Solutions • Proven solutions
Google Photos is a great backup solution for the photos on your phone and lets you manage them on a computer or other devices, including Apple devices. However, Google Photos does not offer a clear way to download all your photos to your device, Android or iPhone, in one go, directly. You can save every photo in Google Photos on your device directly, only one by one, and that is more incredulous on part of Google than it sounds. You need to navigate your way around apps to download or move your photos from Google Photos to your phone directly.
Google Photos works under an assumption that you will click photos, have your phone upload them to Google’s servers and that’s it - that’s the primary job. However, often we also need to download our photos, Google! We may need to download a bunch of old photos to share with someone else, we may want to download them to a flash drive and watch them on the big screen instead of using a smart TV option to do that, there are lots of reasons why people search for ‘how to move photos from Google Photos to my phone’. So how do you download Google Photos to phone or more clearly, move photos from Google Photos to a new phone or a computer?
Downloading from Google Photos to Android Phone Directly
Google makes downloading photos from Google Photos to phone a child’s play. If you want to download photos from Google Photos to your phone directly, you have the option of downloading each photo you have one by one. Not interested? There is a workaround that transfers photos from Google Photos to your device’s internal storage. This is still tedious enough, but it works reliably and is free.
Part 1: Copying Photos from Google Photos to Google Drive
Step 1: Open Google Photos
Step 2: If you just want to save some photos from Google Photos to your phone directly, you are in luck, you won’t have to go through the hoops a lot. For this piece, it is assumed you want to transfer all your photos from Google Photos to your device. Tap on Photos tab at the bottom. Long-press the first photo in your library.
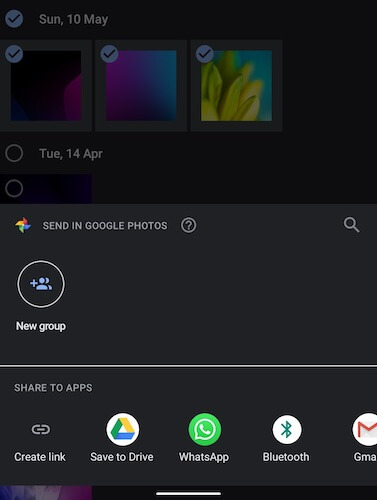
Step 3: You will note that the photo, as well as the date above it, has a checkmark now. What you can do is that now you can simply keep scrolling down and tapping on the dates. Tapping on the dates selects all the photos under that date, saving you some time and heartache.
Step 4: After you are done scrolling and tapping dates till the end, tap the Share icon at the top ad select Save to Drive
Step 5: You will be asked to select the size you want to save as, large or the actual. Select your preferred size
Step 6: Now, you will see that some or all of the images are being downloaded, depending on which ones were already on your device and which need to be pulled from the cloud. After this is done, you will see a list of image titles along with your Google Account email address and the location the files will be saved to on Google Drive. You can change the location and tap Save to proceed. It is advised that you select a separate unique folder to save your photos into, this will help later on to download photos from Google Drive to phone.
Your selected photos will now be uploaded to Google Drive.
So far you have only transferred the actual photos from Google Photos to Google Drive. The photos are now available both in Google Photos and in Google Drive but are still in the cloud. Now, in the second part, you want to download the photos to your device storage.
Part 2: Downloading Photos From Google Drive To Phone’s Storage
In this part, you will download your photos from Google Drive onto your device’s storage so you know you have a local copy with you and are not tied up with Google’s ecosystem in any way.
Step 1: Open Google Drive Step 2: From the tabs at the bottom, select the Files tab that looks like a folder
Step 2: Navigate to the folder you saved your photos to from Google Photos
Step 3: Open the folder and long-press any image
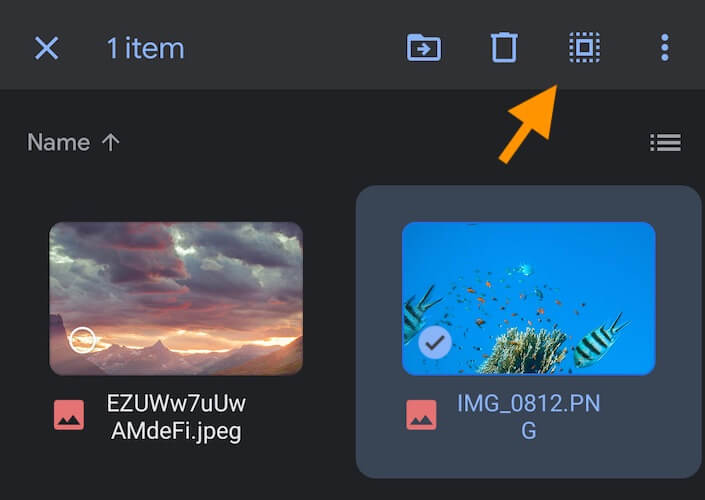
Step 4: Tap the icon at the top that looks like a square surrounded by dots. You will see that all your photos are now selected
Step 5: Tap the 3-dot menu on the top-right, and select Download from the list
Photos will be downloaded to the default ‘download’ folder on your device’s internal storage.
Part 3: Viewing Files on Your Device Using A File Explorer
Step 1: If you do not have the Files by Google app on your phone already, head over to the Play Store and download the app. This is a file explorer by Google that lets you browse and manage the files and folders on your Android device
Step 2: Open Files by Google app
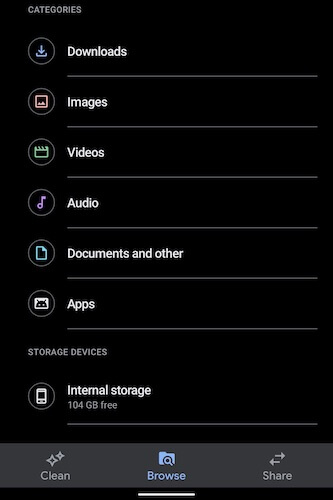
Step 3: From the tabs at the bottom, select Browse.
Step 4: From the list of categories, select Images
Step 5: Here, images are shown as large thumbnails you can browse through
Step 6: To see (and make sure) where exactly are the files stored on your device, tap on any image, tap the 3-dot menu at the top-right and tap File Info.
Step 7: Head back to Browse using the tab at the bottom
Step 8: Scroll down and tap Internal Storage. This is where you can see and browse through all files and folders on your Android in a desktop-like way
Step 9: Scroll down to the Download folder. This is where the files you downloaded from Google Drive will be.
Transfer Photos from Google Photos to Phone Using A Computer
As you would have become aware, the direct way to transfer photos from Google Photos to phone can be painful if you have years’ worth of photos. To transfer some photos or a couple of photos here and there, that method is a quick way to go about, but in case you are looking to have copies of your photos with you locally, that method falls short. It consumes internet data for downloading, then uploading, and then downloading again. For a large number of photos or if you want to transfer your photo library from Google Photos to your device, that is a lot of data consumption we are looking at. Fortunately, there is an easier way to go about it, and it involves only a one-time download of photos from the cloud, saving you a lot of data.
Part 1: Downloading Photos from Google Photos to Computer
Google provides a service it calls Google Takeout, which essentially allows you to download a copy of all your data with Google onto your computer. You can select which data you want to download, so for this piece, we will download just the photos.
Step 1: Open your web browser and visit https://takeout.google.com
Step 2: Sign in if you are not already signed in to your Google account
Step 3: You will see the option to Create a New Export, and to select data to include
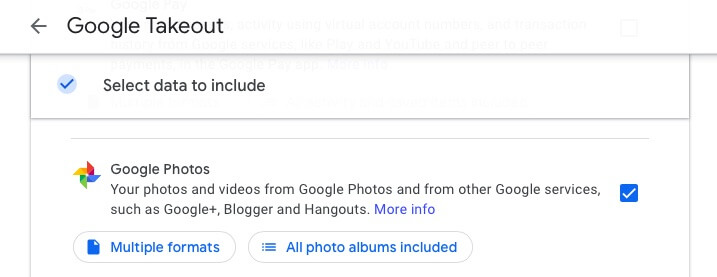
Step 4: Click Select All and then click Deselect All to ensure we select just what we want to download - our photos and nothing else for now
Step 5: Scroll down and check Google Photos
Step 6: By default, all photo albums are included. If you do not want to download a specific album or two, you can deselect from the list.
Step 7: Scroll down till the end and select Next Step
Step 8: In the next part, by default, the option is to send an email link. Leave it intact for now. Frequency is set to once by default, and that is what we want today. The file type is ZIP by default. Change the size setting from 2 GB to 50 GB to minimize the number of files to download.
Step 9: Lastly, click Create Export. Depending on the size of the export, after a while, you will see the export listed right here. A link to download would also be emailed to your Gmail address.
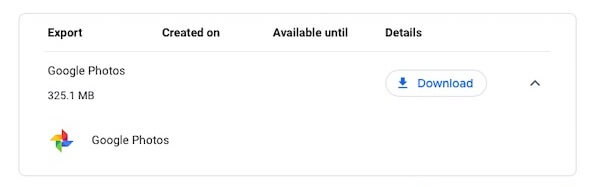
Step 10: Click download and the ZIP file will be downloaded to your computer.
Part 2: Move Photos From Computer To Phone Using Dr.Fone
Now it is time to transfer photos from computer to the phone. How do you do this? The best way to do this is with Dr.Fone - Phone Manager (Android). It is a fast, easy way to manage data on your phone from your computer and is easy to use.
Dr.Fone - Phone Manager (Android)
Transfer Data Between Android and Mac Seamlessly.
- Transfer files between Android and computer, including contacts, photos, music, SMS, and more.
- Manage, export/import your music, photos, videos, contacts, SMS, Apps etc.
- Transfer iTunes to Android (vice versa).
- Manage your Android device on computer.
- Fully compatible with Android 8.0.
დაიმახსოვრეთ ჩამოტვირთული ZIP ფაილი? გახსენით იგი და ის მოგცემთ საქაღალდეს სახელად Takeout. ამ საქაღალდის შიგნით არის სხვა საქაღალდე, სახელწოდებით Google Photos, რომელიც შეიცავს კიდევ უფრო მეტ საქაღალდეს, რომელიც შეიცავს Google Photos-ში შენახულ თქვენს ყველა ფოტო ალბომს.
ნაბიჯი 1: ჩამოტვირთეთ და დააინსტალირეთ Dr.Fone თქვენს კომპიუტერში

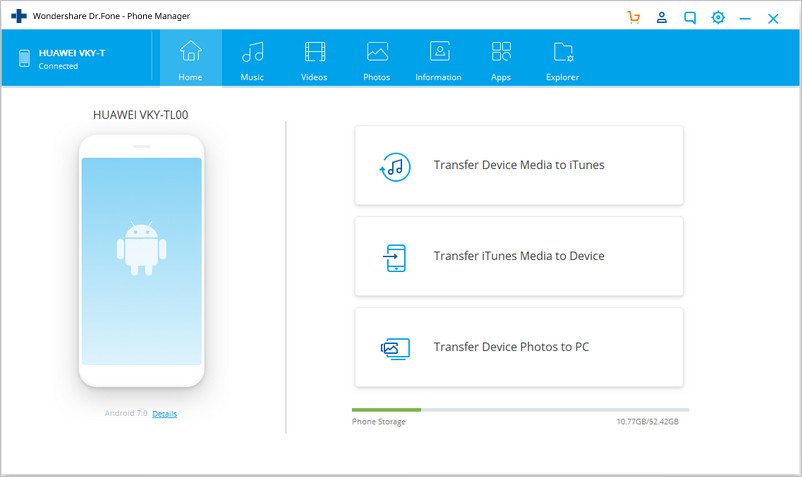
ნაბიჯი 2: გახსენით Dr.Fone თქვენს კომპიუტერზე და აირჩიეთ Phone Manager
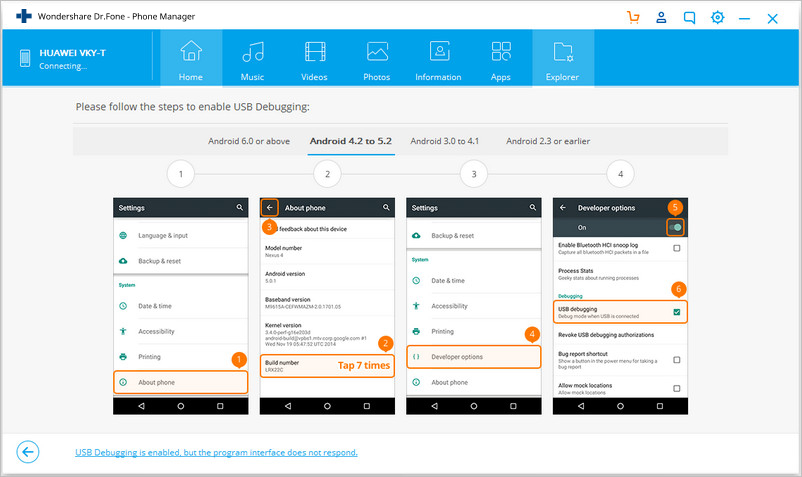
ნაბიჯი 3: შეაერთეთ თქვენი ტელეფონი კომპიუტერთან და ჩართეთ USB გამართვა
ნაბიჯი 3.1: როდესაც თქვენი ტელეფონი კომპიუტერთან არის დაკავშირებული, გადაფურცლეთ ზემოდან ქვემოთ, რათა შეტყობინებების ჩრდილი მოიტანოთ და აირჩიეთ USB პარამეტრები
ნაბიჯი 3.2: აირჩიეთ ფაილის გადაცემა
ნაბიჯი 3.3: გადადით თქვენი ტელეფონის პარამეტრებში და ტელეფონის შესახებ
ნაბიჯი 3.4: გადადით ქვემოთ build-ის ნომერზე და შეეხეთ მას, სანამ დეველოპერის ოფციები არ ჩაირთვება
ნაბიჯი 3.5: პარამეტრების განყოფილებაში გადადით სისტემაში და თუ დეველოპერის პარამეტრები იქ არ ჩანს, აირჩიეთ Advanced და გადადით Developer Options-ში USB გამართვის ჩასართავად. მიეცით ნებისმიერი ნებართვა, რომელიც შეიძლება მოგთხოვოთ ტელეფონმა.
ნაბიჯი 4: Dr.Fone ამოიცნობს თქვენს ტელეფონს და წარმოგიდგენთ სასიამოვნო, სუფთა ინტერფეისს
ნაბიჯი 5: აირჩიეთ ფოტოები ზედა ჩანართებიდან
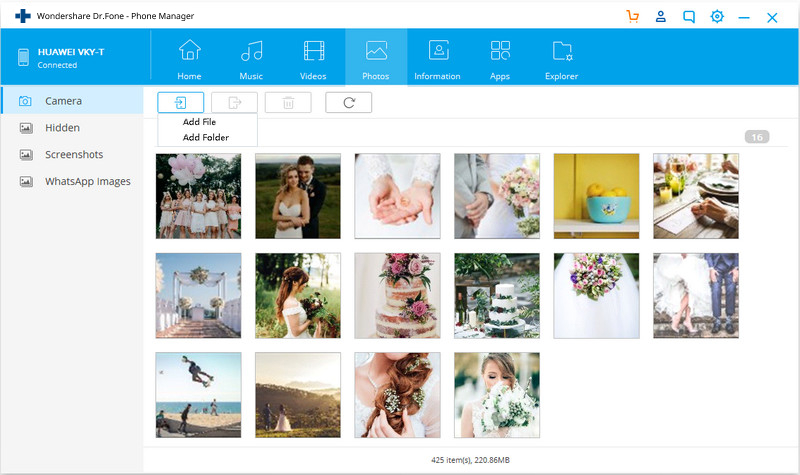
ნაბიჯი 6: დააჭირეთ ღილაკს დამატება და აირჩიეთ საქაღალდის დამატება
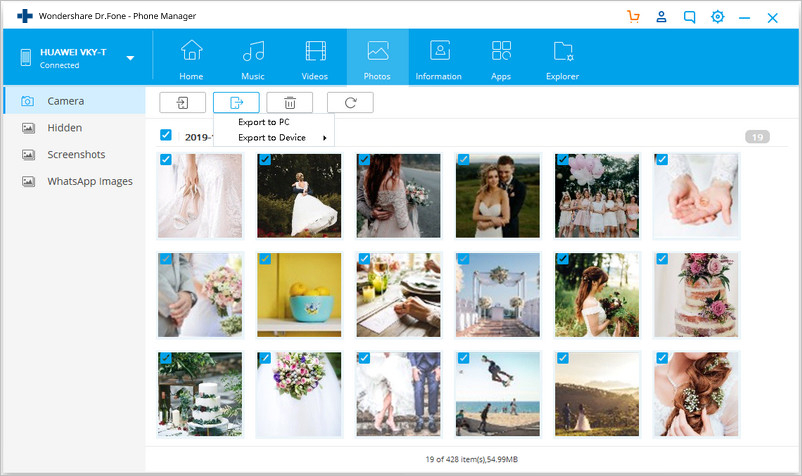
ნაბიჯი 7: გადადით Takeout საქაღალდეში და აირჩიეთ Google Photos და დააჭირეთ გახსნას
ფოტოები ახლა გადაეცემა თქვენს ტელეფონში.
დასკვნა
Google არ უადვილებს ფოტოების Google Photos-დან თქვენს მოწყობილობაში ან კომპიუტერში ჩამოტვირთვას. Google ურჩევნია შეინახოს ისინი და ნახოს მათ აპებში. თქვენ უნდა გადახტეთ რამდენიმე აპს შორის, რომ ჩამოტვირთოთ ფოტოები Google Photos-დან პირდაპირ ტელეფონში. თუმცა, თუ კომპიუტერთან ხართ, ისინი ასევე გთავაზობენ Google-იდან თქვენი მონაცემების ჩამოტვირთვის საშუალებას, სახელწოდებით Takeout. ამ ფუნქციის გამოყენებით თქვენ შეგიძლიათ შექმნათ თქვენი ყველა მონაცემის ექსპორტი ან უბრალოდ ის, რაც გირჩევნიათ, როგორიცაა ფოტოები, და ჩამოტვირთოთ თქვენს კომპიუტერში და იქიდან შეგიძლიათ შეინახოთ იგი სხვაგან ან გადაიტანოთ ფოტოები თქვენს ტელეფონში Dr.Fone Phone Manager-ის გამოყენებით. (Android), რომელიც არის ერთ-ერთი საუკეთესო აპი, რომელიც ხელმისაწვდომია თქვენი ტელეფონის მონაცემების სამართავად კომპიუტერისა და USB კავშირის გამოყენებით.


Android Transfer
- ტრანსფერი ანდროიდიდან
- ანდროიდიდან კომპიუტერზე გადატანა
- გადაიტანეთ სურათები Huawei-დან კომპიუტერზე
- სურათების გადატანა LG-დან კომპიუტერზე
- გადაიტანეთ ფოტოები ანდროიდიდან კომპიუტერში
- გადაიტანეთ Outlook კონტაქტები Android-დან კომპიუტერზე
- ანდროიდიდან Mac-ზე გადატანა
- გადაიტანეთ ფოტოები Android-დან Mac-ზე
- გადაიტანეთ მონაცემები Huawei-დან Mac-ზე
- გადაიტანეთ მონაცემები Sony-დან Mac-ზე
- გადაიტანეთ მონაცემები Motorola-დან Mac-ზე
- Android-ის სინქრონიზაცია Mac OS X-თან
- აპები Android-ისთვის გადატანა Mac-ზე
- მონაცემთა გადაცემა Android-ზე
- CSV კონტაქტების იმპორტი Android-ში
- სურათების გადატანა კომპიუტერიდან ანდროიდზე
- გადაიტანეთ VCF ანდროიდზე
- მუსიკის გადატანა Mac-დან Android-ზე
- მუსიკის გადატანა ანდროიდზე
- გადაიტანეთ მონაცემები ანდროიდიდან ანდროიდზე
- გადაიტანეთ ფაილები კომპიუტერიდან ანდროიდზე
- გადაიტანეთ ფაილები Mac-დან Android-ზე
- Android ფაილების გადაცემის აპლიკაცია
- Android ფაილის გადაცემის ალტერნატივა
- Android-დან Android-ზე მონაცემთა გადაცემის აპები
- Android ფაილის გადაცემა არ მუშაობს
- Android ფაილის გადაცემა Mac არ მუშაობს
- Android ფაილის გადაცემის საუკეთესო ალტერნატივები Mac-ისთვის
- Android მენეჯერი
- იშვიათად ცნობილი Android რჩევები
Alice MJ
პერსონალის რედაქტორი