Best Way of How to Erase iPad without Apple ID
Apr 28, 2022 • Filed to: Remove Device Lock Screen • Proven solutions
Are you planning to replace your iPhone with a new one? If so, then you must have thought of selling the old one. Removing your data from the old device is mandatory to remove before you hand over the device to someone else. You must not want anyone else to have access to your documents and personal files. Therefore, you must clean up the old device for your own security. The problem begins when you can’t remember your Apple ID passcode. Let us know all about erasing the iPad without Apple ID.
In such a case, it becomes troublesome for you to delete all your personal files and folders from your phone. Anyway, there are different techniques to remove all your folders from your iPad without Apple ID. Here we are going to explain all the efficient methods of cleaning your iPad without an Apple ID.

Part 1: How to erase iPad without Apple ID by removing Apple ID (the best)
There are several techniques that you can apply while erasing an iPad without your Apple ID. But you must take care of the security of your device at first. There are several third-party applications in the market for erasing iPads without Apple IDs. But are all of those safe to us? You have to ensure that the third-party application that you’re using to remove your iPad won’t harm your phone anyway. When it comes to the most trusted application for such an operation, we commend you to use Dr. Fone - Screen Unlock (iOS) software. This is one of the most reputed and most used applications in terms of erasing iPads without Apple IDs. The advanced technology behind this software allows you to unlock your iPad comfortably and then you become able to erase your iPad. Even those who don’t possess adequate technical knowledge can also use this software without having issues. Let’s have a look at the steps on how you can complete the operation.
Step 1 Forgetting your Apple ID can put you into serious trouble as you become unable to get access to your data that is inside the phone. In such a situation, the Dr. Fone- Screen Unlock software can be the best helping hand for you. To unlock your iPad using the software, you have to download the original version of the software on your PC from the authorized website. Once you have the software downloaded, use a USB or data cable to connect your iPad with your PC. After that, you have to run the software on your PC. The interface of the software will show up with several tools. You have to select the ‘Screen Unlock’ tool among all the tools to start the operation.

After that, another window will pop up showing three different options. Among those three options, you must select the ‘Unlock Apple ID’ option. Once you click on that option, the software will start initiating the operation.
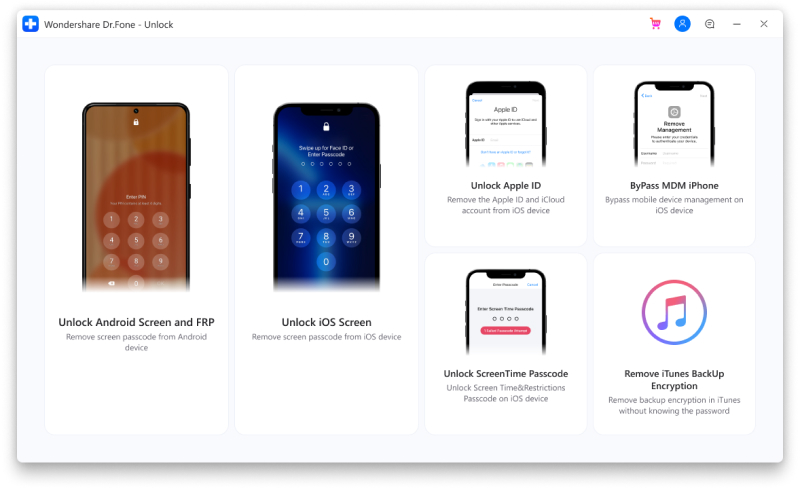
Step 2 After you have completed the previous step, the software will ask you to put the password of the iPad. You have to input the password correctly and unlock the screen of the phone. This will allow the computer to scan your device for unlocking your Apple ID.
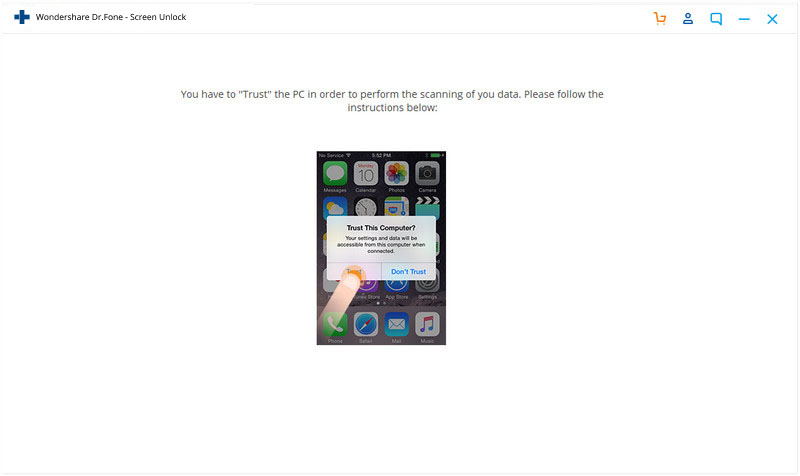
Anyway, you must back up all your phone data before you proceed with the further step. Because you will lose all the data once the Apple ID gets unlocked.

Step 3 Before the unlocking process gets started, you have to open the ‘Settings’ of your iPad. The software will generate on-screen guidelines to help you in changing the settings of your iPad properly. Unless you change the settings of your device, the software won’t be able to function and unlock your Apple ID. Once you change the settings of your iPad according to the on-screen instructions and restart the device, the software will start functioning itself.

Step 4 Once the process gets completed, you will get a notification that your Apple ID has been unlocked completely. There you will also see an option to check whether your Apple ID got removed from the iPad or not. If it’s not done properly, you must tap on the ‘Try Again’ option to operate.

Part 2: How to erase the iPad without Apple ID by restoring via iTunes?
Erasing your iPad using iTunes is a convincing idea. In this process, you don’t even have to use any third-party software that can be dangerous for your device. The following steps will describe how you can erase your iPad using iTunes.
Step 1 At first, you have to connect your iPad to your PC using a USB cable and run iTunes on your PC. Before you do so, make sure that your PC includes the latest version of iTunes. Once you connect your iPad with your PC and launch iTunes, the program will automatically detect your iPad. Then you will find an iPad logo at the top left corner of the iTunes interface.
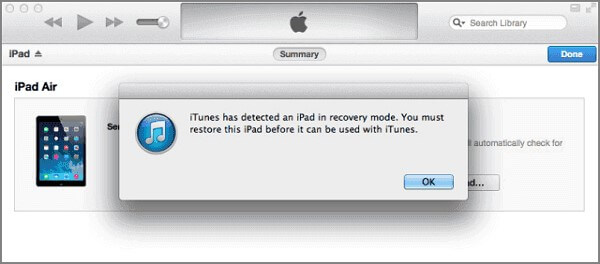
Step 2 You have to press and hold the home button and the power button of your iPad simultaneously. After holding both the key for some seconds, you will see a pop-up on your laptop screen- ‘iTunes has detected an iPad in recovery mode’. Underneath the pop-up, you will see the ‘OK’ option and you need to hit that for starting the recovery.
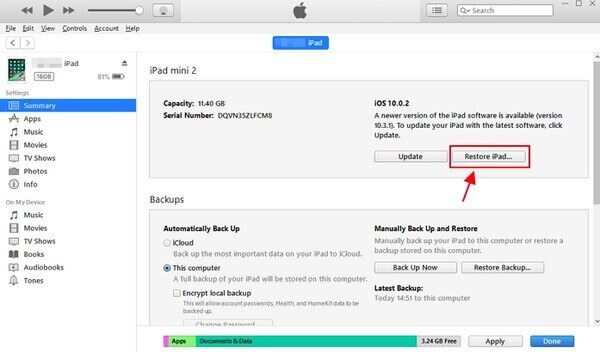
Step 3 Once you have performed the above-mentioned steps, you should go back to the iTunes interface. There you have to click on the ‘Summary’ option. After that, you will get an option- ‘Restore iPad’. You have to click on the ‘Restore’ option to erase your iPad easily.
Part 3: How to erase iPad from settings without Apple ID?
If you don’t remember the passcode of your Apple ID, you can erase your iPad from the settings itself. In this process, you don’t have to engage any third-party application. Even users with minimum technical knowledge can apply this method to erase their iPads. Just go through the following steps to understand how this method works. Let us get an insight into resetting the iPad without Apple ID Password.
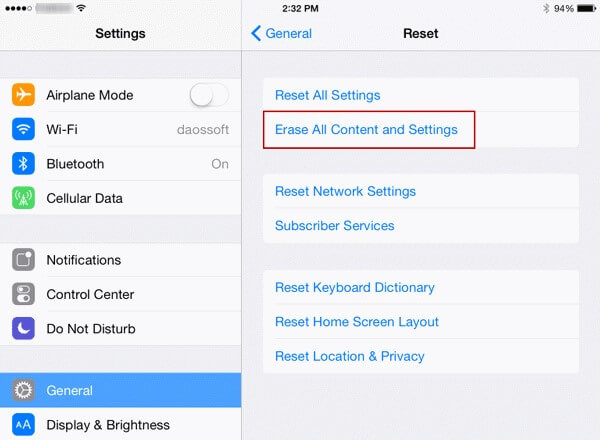
Step 1 You have to go to you’re the ‘Settings’ option of your phone to start the process. Once you go to ‘Settings’, you will find the ‘General’ option over there. You should click on that option and a new screen will be there in front of you. On the new screen, you will see the ‘Reset’ option. Just tap on that option to move on to the next step.
Step 2 After clicking on the ‘Reset’ option, you will get a new screen where you will find the ‘Erase All Content and Settings’ option. You have to click on that option for erasing all the data of your phone and the Apple ID as well.
Part 4: Erase iPad remotely with the iCloud website [Password needed]?
It is also a decent idea to erase your iPad via the iCloud website with many efforts. In this process, you won’t need the Apple ID password if you have already enabled the ‘Find My iPhone’ feature on your iPad. But if you haven’t done that yet, you will have to input the password of your Apple ID to start the operation. If you have forgotten the password already, you will have to reset the password using any of the first two methods. Once you have your password reset, perform the following steps to erase your iPad effortlessly.
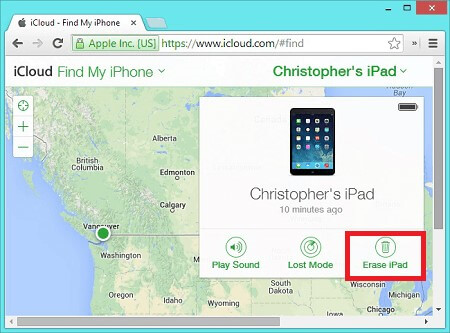
Step 1 First of all, you have to go to the iCloud website to start the erasing process. On the website, you will find a section named ‘Find My iPhone’. You have to enter the section and click on the ‘All Devices’ option.
Step 2 In this step, you have to select the particular device that you want to erase. You’ll get a list of registered iPads over there, select your iPad over there and click on the ‘Erase iPad’ option. Once you do that, the website will ask you to confirm your selection. Once you confirm the device that you have selected, the iPad will be erased.
Conclusion
These are the top methods that most iPad users apply while erasing their iPads. Apart from these methods, numerous technical methods are also efficient for erasing iPads. All these methods are more or less effective in terms of erasing iPads without Apple IDs. Whatever method you apply, make sure that you get the desired result at the end. Never sell or hand over your iPad to anyone before you erase the iPad. Otherwise, your privacy can get compromised due to your carelessness. Even if you are unable to access your Apple ID, follow one of the above-mentioned techniques to erase your iPad.
iCloud
- iCloud Unlock
- 1. iCloud Bypass Tools
- 2. Bypass iCloud Lock for iPhone
- 3. Recover iCloud Password
- 4. Bypass iCloud Activation
- 5. Forgot iCloud Password
- 6. Unlock iCloud Account
- 7. Unlock iCloud lock
- 8. Unlock iCloud Activation
- 9. Remove iCloud Activation Lock
- 10. Fix iCloud Lock
- 11. iCloud IMEI Unlock
- 12. Get Rid of iCloud Lock
- 13. Unlock iCloud Locked iPhone
- 14. Jailbreak iCloud Locked iPhone
- 15. iCloud Unlocker Download
- 16. Delete iCloud Account without Password
- 17. Remove Activation Lock Without Previous Owner
- 18. Bypass Activation Lock without Sim Card
- 19. Does Jailbreak Remove MDM
- 20. iCloud Activation Bypass Tool Version 1.4
- 21. iPhone can not be activated because of activation server
- 22. Fix iPas Stuck on Activation Lock
- 23. Bypass iCloud Activation Lock in iOS 14
- iCloud Tips
- 1. Ways to Backup iPhone
- 2. iCloud Backup Messages
- 3. iCloud WhatsApp Backup
- 4. Access iCloud Backup Content
- 5. Access iCloud Photos
- 6. Restore iCloud from Backup Without Reset
- 7. Restore WhatsApp from iCloud
- 8. Free iCloud Backup Extractor
- Unlock Apple Account
- 1. Unlink iPhones
- 2. Unlock Apple ID without Security Questions
- 3. Fix Disabled Apple Account
- 4. Remove Apple ID from iPhone without Password
- 5. Fix Apple Account Locked
- 6. Erase iPad without Apple ID
- 7. How to Disconnect iPhone from iCloud
- 8. Fix Disabled iTunes Account
- 9. Remove Find My iPhone Activation Lock
- 10. Unlock Apple ID Disabled Activation Lock
- 11. How to Delete Apple ID
- 12. Unlock Apple Watch iCloud
- 13. Remove Device from iCloud
- 14. Turn Off Two Factor Authentication Apple


James Davis
staff Editor
Generally rated4.5(105participated)