

[Proved Tips]How to Unlink iPhones

Apr 28, 2022 • Filed to: Remove Device Lock Screen • Proven solutions
iPhones have held the contemporary market and have provided the world with exquisite handsets and devices containing state-of-the-art features and specifications for the world to savor. iPhone is considered among the most popular smartphone brands for many reasons. One effective reason that has been acknowledged and appreciated throughout the globe was the security protocol followed by Apple for its devices. Apple, known for providing its own operating system, covers its own security protocol that is concealed with its cloud service, iCloud. Apple constitutes its own Apple ID that provides distinctiveness to the device itself and allows the user to operate it properly. Apple ID, in simple words, is known for connecting the application interface with the data across the iPhone or iPad. This article particularly discusses the method to unlink iPhones from their older Apple IDs along with a detailed guide on how to unlink iPhones along with the associated data for paving a way to enter a new Apple ID for a similar device.
Part 1. How to unlink iPhones from Apple ID without a password?
- You might have come across a variety of remedies that would have offered a mechanism to unlink iPhones from Apple ID. These remedies, however, users have their own downsides in the application. In such cases, third-party applications can provide impressive services in protecting your iPhone along with the completion of the operation. The selection of the most appropriate platform is yet necessary. For this, while believing the existing saturation of third-party platforms in the market, this article looks forward to introducing you to
- . Dr.Fone has ensured the best of services with its toolkit and has considered offering you unique services that would guide you in unlinking your iPhones properly. There are several reasons that allow Dr.Fone to outsmart major platforms in the market, which can be described as:
- You can easily unlock your iPhone by slipping it from memory.
- This platform provides you with effective tools that help you protect the iPhone from its disabled state.
- It can be used to unlock all kinds of iPhones, iPads, and iPod Touch.
- Compatible across the latest version of iOS.
- You do not require iTunes for unlocking your iPhone.
- Requires no technical expertise over its usage.
Dr.Fone can be referred to as the best option for unlinking iPhones from Apple ID; however, it is significant to understand its operation that would help you cater to the complete procedure with ease. The following step-by-step guidelines explain the complete function of unlinking the iPhone without a password using Dr.Fone – Screen Unlock (iOS).
Step 1: Download and Connect your Device
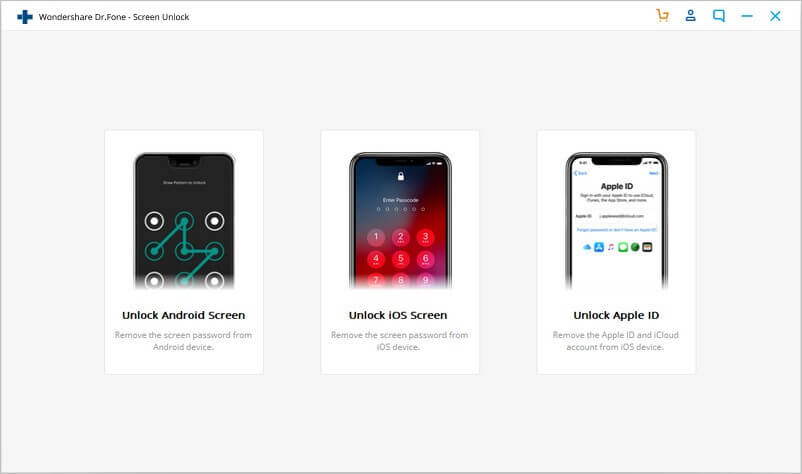
Download the original platform from the official website and install it over the desktop. Following this, connect your Apple device with the help of a USB cable and launch the platform. You need to select the ‘Screen Unlock’ feature that appears on the home interface of the platform.

Step 2: Initiate Process
With a new screen on your front, you need to select the “Unlock Apple ID” feature from the provided options to start the procedure of unlinking your Apple ID from the device.
Step 3: Trust the Computer
Over accessing your iPhone or iPad, you might have received notification over trusting the computer. Tap "Trust" on the pop-up and proceed.

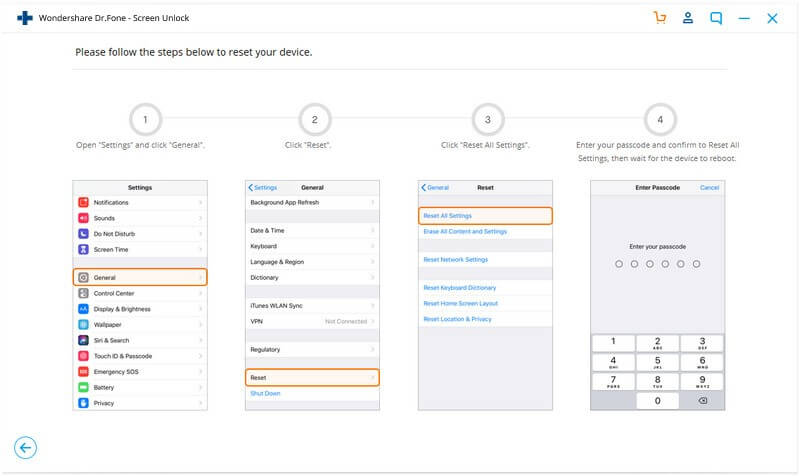
Step 4: Reset your device
Open the ‘Settings’ of the device and successfully initiate its reboot by following the on-screen instructions. The unlinking process immediately starts once the reboot is initiated.
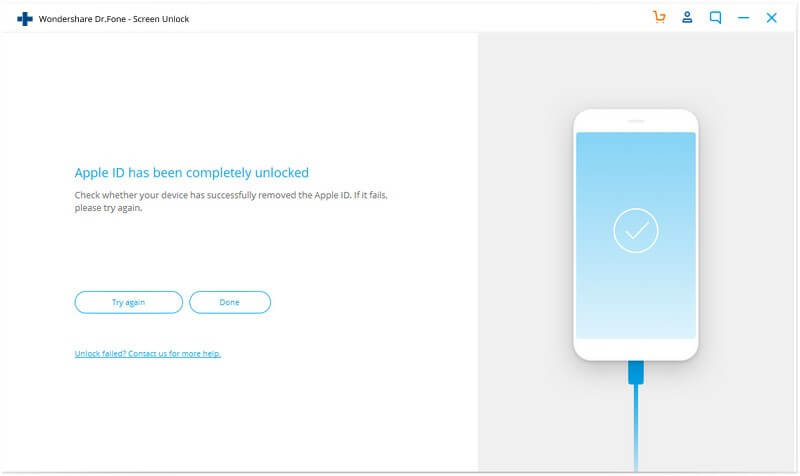
Step 5: Execution
The process successfully executes and is presented in the form of a prompt window on your desktop screen. The Apple ID is successfully unlinked from your device.
Part 2. How to unlink iPhones on the device directly?
There are numerous conventional methods that can be adopted for unlinking an iPhone from its Apple ID. Among the most common methods, accessing the Settings of the iPhone itself is considered the easiest of the mechanisms. However, it follows a certain protocol that needs to be efficiently covered. For this, you need to follow the guide declared as follows.
Step 1: Access Settings
Unlock your iPhone and open the "Settings" of the device. With a new screen on the front, you need to tap on the top of the screen, comprising of a tab that contains your name. Tap on the “iTunes & App Store” banner to proceed.
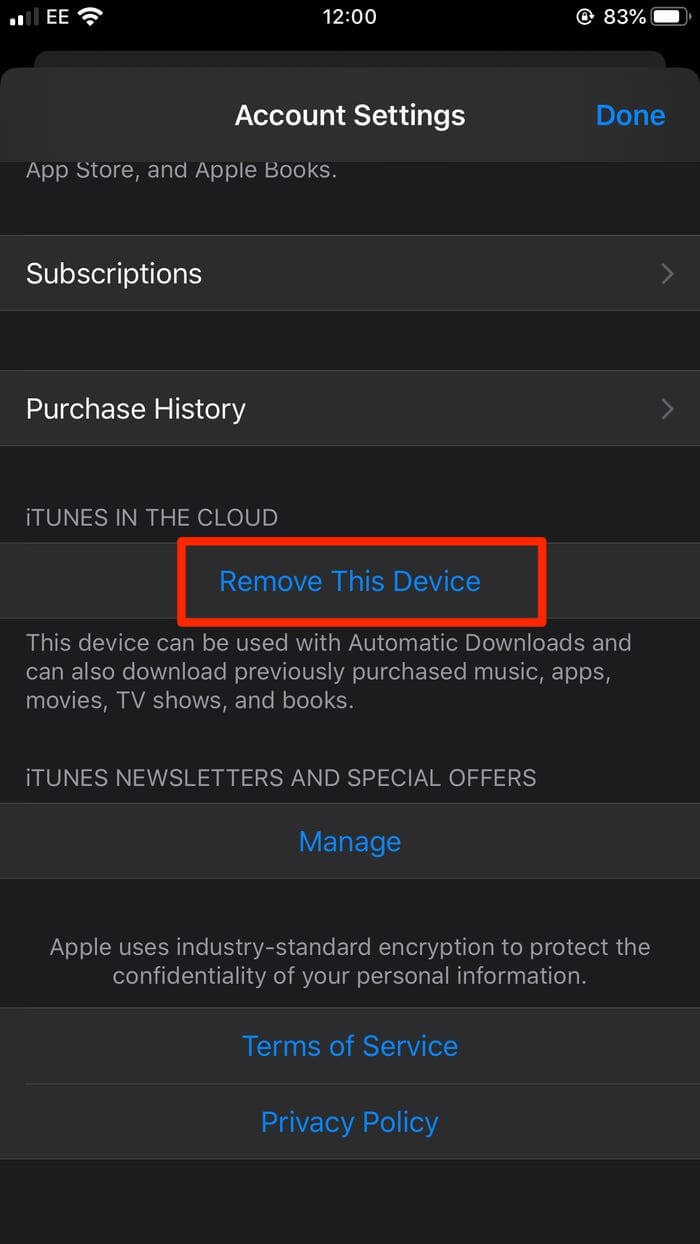
Step 2: Provide Apple ID credentials
With a new window opened, you need to tap on the Apple ID and provide the appropriate password if inquired. After providing the password the ID, scroll down to the bottom of the window and tap on the option of “Remove This Device” in the “iTunes in the Cloud” section.
Step 3: Provide Credentials on Website
Tapping on the respective option takes you to the external Apple ID website through a pop-up. In the following window, you are required to provide your username and password. After a successful login, tap “Devices” to open up the list of devices connected with the respective ID.
Step 4: Remove Device
The device that you seek to remove from the Apple ID needs to be selected, followed by selecting “Remove” from the list of options to confirm the unlinking of your iPhone with the Apple ID.
Part 3. How to unlink iPhones using iTunes remotely?
Another conventional method that can be taken into consideration is utilizing iTunes for unlinking iPhones from the respective Apple ID. iTunes has been referred to as a very cohesive platform providing a wide variety of practical applications to its users, which can allow them to manage their data efficiently. When it comes to unlinking iPhones from a certain Apple ID, iTunes can provide you with effective services that can be covered by following a series of different steps, which are explained as follows:
Step 1: Open iTunes on desktop
Initially, it is important to have the platform installed on your desktop. Download and install the platform and launch them to proceed towards unlinking your iPhone from the Apple ID.
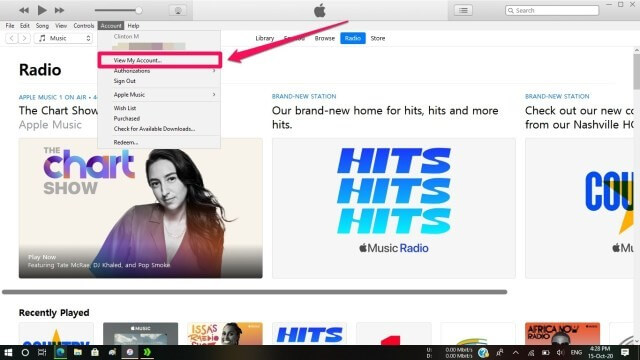
Step 2: Launch and Proceed
With the homepage of iTunes on your front, you need to tap on "Account," followed by the option of "View My Account" to log in with your Apple ID and its password. As soon as it authenticates itself, you will be directed to the next window.
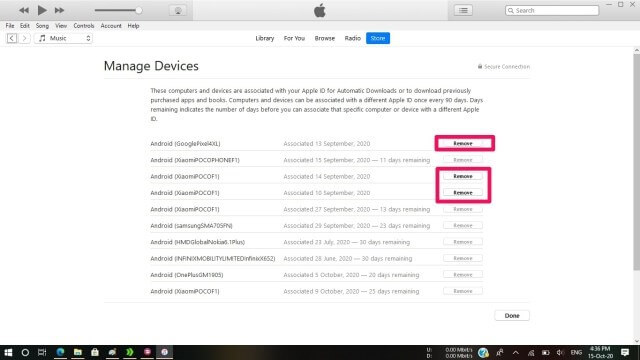
Step 3: Find the Devices Connected
You need to hover across the option of “Manage Devices” from the list. This would open a series of different devices that have been connected across the specific Apple ID. Locate the device that you seek to unlink, and tap 'Remove' from the options that are provided. The device is successfully removed, and it's now disassociated with the Apple ID.
Bonus Tip: How to fix when it keeps receiving each other’s messages after unlinking iPhones?
Despite the fact that you successfully unlinked the iPhone from your previous Apple ID, there are still several cases that reported the receival of messages even after the complete execution of the unlinking procedure. There might be a slight chance that the Apple ID has been completely disassociated from the iPhone and is still connected with it somehow. For such cases, there are a few tests and confirmation that can be undertaken for efficiently confirming the unlinking of the device from the Apple ID. The basic cause for such a problem can be the iCloud, which is usually connected with the iMessage since a similar Apple ID is used for the feature. There are two different directions that can be covered by any user to counter this issue:
- Open the Settings of your iPhone and proceed towards selecting “Messages” from the options. Tap “Send & Receive” on the next window and locate your ID. Sign out the Apple ID and log in with a different credential.
- Similarly, you need to open the Settings of your iPhone and locate the “Messages” option from the list. Select “Send & Receive” from the next window and uncheck the email addresses showing the message “You can be reached by iMessage at:” across both devices.
You need to ensure that the similar Apple IDs are not connected over FaceTime, which would make the other user receive the other device’s FaceTime call.
Conclusion
This article has particularly discussed the method of how to unlink iPhones in detail and provide you with a variety of methods that can be tested across various platforms to successfully execute the operation and disconnect your Apple ID from a certain device. You need to look over the guide to develop a better understanding of the procedures that are involved.


iCloud
o- iCloud Unlock
- 1. iCloud Bypass Tools
- 2. Bypass iCloud Lock for iPhone
- 3. Recover iCloud Password
- 4. Bypass iCloud Activation
- 5. Forgot iCloud Password
- 6. Unlock iCloud Account
- 7. Unlock iCloud lock
- 8. Unlock iCloud Activation
- 9. Remove iCloud Activation Lock
- 10. Fix iCloud Lock
- 11. iCloud IMEI Unlock
- 12. Get Rid of iCloud Lock
- 13. Unlock iCloud Locked iPhone
- 14. Jailbreak iCloud Locked iPhone
- 15. iCloud Unlocker Download
- 16. Delete iCloud Account without Password
- 17. Remove Activation Lock Without Previous Owner
- 18. Bypass Activation Lock without Sim Card
- 19. Does Jailbreak Remove MDM
- 20. iCloud Activation Bypass Tool Version 1.4
- 21. iPhone can not be activated because of activation server
- 22. Fix iPas Stuck on Activation Lock
- 23. Bypass iCloud Activation Lock in iOS 14
- iCloud Tips
- 1. Ways to Backup iPhone
- 2. iCloud Backup Messages
- 3. iCloud WhatsApp Backup
- 4. Access iCloud Backup Content
- 5. Access iCloud Photos
- 6. Restore iCloud from Backup Without Reset
- 7. Restore WhatsApp from iCloud
- 8. Free iCloud Backup Extractor
- Unlock Apple Account
- 1. Unlink iPhones
- 2. Unlock Apple ID without Security Questions
- 3. Fix Disabled Apple Account
- 4. Remove Apple ID from iPhone without Password
- 5. Fix Apple Account Locked
- 6. Erase iPad without Apple ID
- 7. How to Disconnect iPhone from iCloud
- 8. Fix Disabled iTunes Account
- 9. Remove Find My iPhone Activation Lock
- 10. Unlock Apple ID Disabled Activation Lock
- 11. How to Delete Apple ID
- 12. Unlock Apple Watch iCloud
- 13. Remove Device from iCloud
- 14. Turn Off Two Factor Authentication Apple
James Davis
staff Editor
Generally rated4.5(105participated)