How to Screen Record on iPhone X?
Apr 27, 2022 • Filed to: Mirror Phone Solutions • Proven solutions
iPhones are state-of-the-art smartphones that have taken over the market for the past decade. Models such as iPhone 5S and iPhone 6 had provided Apple the chance to revamp the complete smartphone market, which was efficiently capitalized by the developers. Apple smartphones are considered the best throughout the world and are being recognized through their efficient toolkits and platforms. These toolkits and platforms are a product of Apple's own creation, the iOS. As iOS is associated with its own dedicated system, platforms such as iCloud, iTunes, and other impressive tools have been induced within the system for the ease of the iPhone users. This made iPhone to be included among the most impeccable technological products produced in the century. Out of many features that existed in the market, there were a few that made a progressive mark among the users. Screen recording, though minute and simple, has been acknowledged and taken into consumption by various users worldwide. This article features iPhone X and presents the user with a comprehensive guide explaining how to screen record on iPhone X.
Part 1: How to turn the on-screen record on iPhone X?
Screen recording was not a part of the iPhones for a long time. Many updates following the launch of the new iOS came without this feature. Although this feature has been in the market in the form of various third-party platforms, Apple came to realize the intensity of the requirements in screen recording and developed their own dedicated screen recording tool in the launch of the iOS 11. Rather than going for various third-party platforms, Apple induced its own system and presented the market with a particular remedy of recording important moments within their iPhone without downloading any third-party platform on your device. However, before you get to know more about the screen recording feature within your iPhone X, you should look across the process of turning on the screen recording feature on your device by setting up the steps defined as follows.
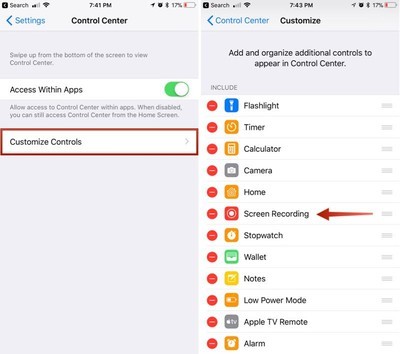
Step 1: Open the 'Settings' app within your iPhone and proceed towards the 'Control Center' option in the list. You would be led to a new screen where you should select 'Customize Controls.' This option is presented as "More Controls" on the latest update of iOS 14.
Step 2: Before leading towards adding 'Screen Recording' in the list, you need to cross-check whether the option is already present on the 'Include' list. If the option is not available in the 'Include' category, you should lead to the next section and find the option of 'Screen Recording.'
Step 3: Tap on the “+” icon adjacent to the option to add it within the list of included tools in the Control Center.
Part 2: How to record the screen on iPhone X with internal sound?
As you get to know more about accessing and turning on the screen recording feature across your iPhone X, the guide should proceed towards discussing the method that would explain to you how to record a screen on iPhone X using its built-in screen recording feature. The following steps discuss the procedure in detail.
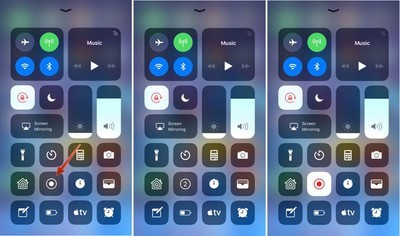
Step 1: Initially, open the screen that you wish to record on your iPhone X. Swipe down the screen to reach out to the Control Center of your iPhone X and proceed with selecting the 'Record' button represented through a nested-circle icon.
Step 2: Over a countdown of three seconds, the record button turns red, indicating that the screen recorder has been activated. You can exit the Control Center and proceed with your screen recording.
Step 3: Following this, if you wish to stop the recording of your iPhone's screen, you need to tap on the red timer displayed on the top left of the screen and select 'Stop' to conclude the screen recording. This will easily record your screen with the internal sound of your iPhone. However, if you wish to add an external sound into your screen recording, you need to long-tap the 'Record' button to open the settings of this feature. Turn on the 'Microphone' icon and proceed with initiating the recording of your screen.
Part 3: How to screen record on iPhone X and download on the computer?
Apple offers its own screen recording feature, but this tool comes with its own limitations. These limitations can be referred to as the fact that screen recording on iPhone and video transfer onto the computer is quite difficult and prolonged. For this, the use of third-party tools is preferred and encouraged across various platforms. There are multiple third-party tools that are available in the market featuring screen recording across iPhones. However, the selection for the optimal tool gets quite difficult to overcome. The article thus introduces you to a proficient tool that allows you to record your iPhone X’s screen and have the recorded video downloaded easily across the computer. Wondershare MirrorGo is an amazing screen desktop tool that allows you to record and mirror the screen over a very simple and intuitive interface.

MirrorGo - iOS Screen Recorder
Record iPhone screen and save on your computer!
- Mirror iPhone screen onto the big screen of the PC.
- Record phone screen and make a video.
- Take screenshots and save on the computer.
- Reverse control your iPhone on your PC for a full-screen experience.
The complete process of mirroring and recording your screen can be covered through three simple steps. While offering convenience to a very diverse set of users, you can consider recording your iPhone’s screen through the steps explained as follows.
Step 1: Connect Devices
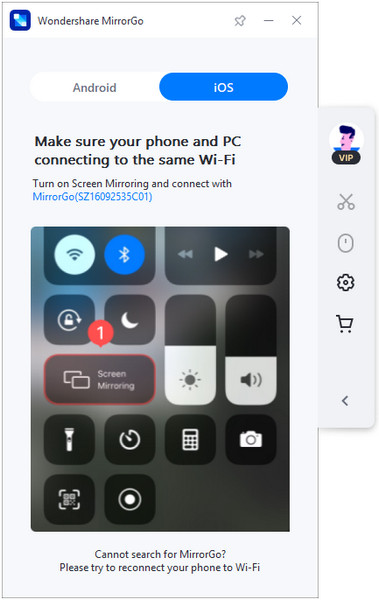
You need to download MirrorGo onto your desktop and proceed with connecting your desktop and iPhone across the same Wi-Fi connection.
Step 2: Mirror Device
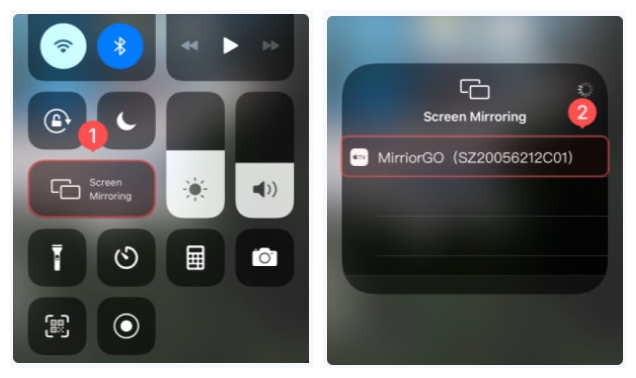
Proceeding onto the next step, you need to take your iPhone and open its ‘Control Center’ to access ‘Screen Mirroring’ from the options. Select ‘MirrorGo’ from the list that appears on the new screen.
Step 3: Set up Location
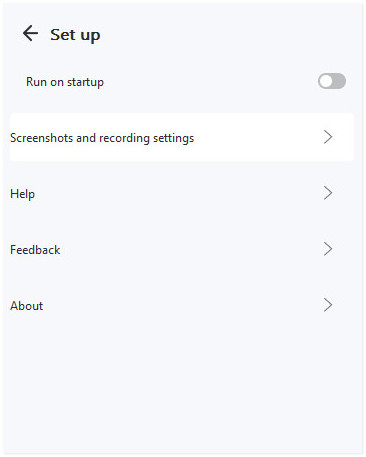
Before you record your iPhone’s screen, you may check the saving location for your screen recordings through the ‘Settings’ option within the left panel of MirrorGo’s interface. To check where you save your recordings, proceed to select ‘Screenshots and Recording Settings’ and set up an appropriate location under the options of the Screen Recording section.
Step 4: Record your Screen
After setting up an adequate location, you need to record the screen by tapping on the ‘Record’ button present on the right panel of the software’s interface.
Part 4: How to edit iPhone video on PC for free?
Using Wondershare MirrorGo is one option for an efficient screen recording across your iPhone X. However, there are several users who wish to create professional videos that would then be posted across certain platforms and forums. This leads to the need to edit the recorded iPhone video across the PC. For this, you may find several platforms quite efficient in editing your video. Despite this fact, this article introduces you to two diverse and extremely impressive iPhone video editors for PC.
Photos App
The Photos App within your computer can prove to be a great editor if a user is known to the fact of using the tool appropriately. To get to know about editing a video across Photos App with ease, you need to follow the steps explained below.
Step 1: Turn on your PC and tap on the search box present on the bottom-left of the screen. Search ‘Photos’ and tap on the application in the search results to open it across your PC.
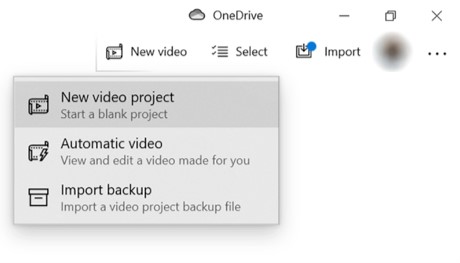
Step 2: Over launching the application, you may find the option of ‘New Video’ on the top of the interface. Open the drop-down menu to this option and select ‘New Video Project’ for initiating the video editing procedure.
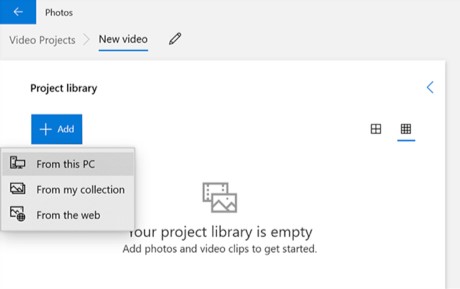
Step 3: Type in any name for the edited video to save it under the specific identity and proceed to add videos from your PC to edit in the newly created project. Tap ‘Add’ on the next screen and select ‘From this PC’ from the list of different options appearing. Import the appropriate recorded video from the computer.
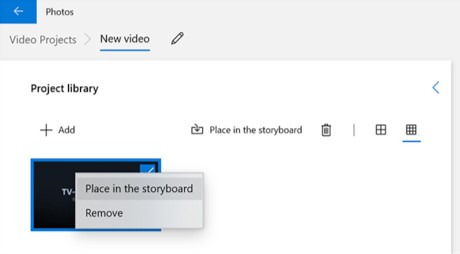
Step 4: As the video is added in the application, right-click on the video and select ‘Place in the storyboard’ from the provided options for adding it into the video timeline. Edit the video with the variety of tools available across the platform and save your results.
Adobe Premiere
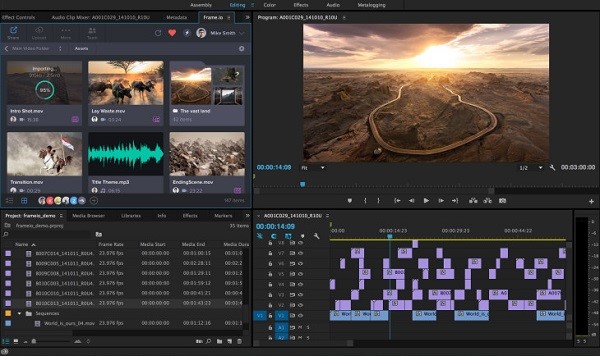
Another tool that can turn out to be extremely effective in terms of editing iPhone recorded videos is Adobe Premiere. This tool is marginalized as a professional editing tool and is recommended across various forums. However, over the question of editing iPhone videos on PC using this tool for free, you need to follow the steps as presented below.
Step 1: Download and install the application on your PC. Proceed with turning on the app on your PC.
ნაბიჯი 2: შეეხეთ ჩანართს "ფაილი" ეკრანის ზედა ნაწილში და აირჩიეთ "იმპორტი" ჩამოსაშლელი მენიუდან. თქვენ უნდა დაამატოთ ფაილი, რომლის რედაქტირებაც გსურთ ადექვატური დირექტორიადან.
ნაბიჯი 3: აპლიკაციის ვადებში იმპორტირებული ვიდეოს საშუალებით, თქვენ შეგიძლიათ მარტივად დაარედაქტიროთ და გამოიყენოთ სხვადასხვა ხელსაწყოები, რომლებიც ხელმისაწვდომია პლატფორმაზე.
დასკვნა
ეკრანის ჩაწერა შეიძლება საკმაოდ სახალისო იყოს, თუ თქვენ იცით შესაბამისი ინსტრუმენტები და პროცედურები, რომ შექმნათ და სრულყოფილი ვიდეო. ეფექტური რედაქტირების ხელსაწყოებისა და ეკრანის ჩაწერის ხელსაწყოების დახმარებით, შეგიძლიათ გაიგოთ თქვენი iPhone X ეკრანის ჩაწერის ძირითადი პროცესი.
ეკრანის ჩამწერი
- 1. ანდროიდის ეკრანის ჩამწერი
- საუკეთესო ეკრანის ჩამწერი მობილურისთვის
- Samsung ეკრანის ჩამწერი
- ეკრანის ჩანაწერი Samsung S10-ზე
- ეკრანის ჩანაწერი Samsung S9-ზე
- ეკრანის ჩანაწერი Samsung S8-ზე
- ეკრანის ჩანაწერი Samsung A50-ზე
- ეკრანის ჩანაწერი LG-ზე
- Android ტელეფონის ჩამწერი
- ანდროიდის ეკრანის ჩამწერი აპები
- ეკრანის ჩაწერა აუდიო საშუალებით
- ჩაწერეთ ეკრანი Root-ით
- ზარის ჩამწერი Android ტელეფონისთვის
- ჩაწერა Android SDK/ADB-ით
- Android სატელეფონო ზარის ჩამწერი
- ვიდეო ჩამწერი Android-ისთვის
- 10 საუკეთესო თამაშის ჩამწერი
- ტოპ 5 ზარის ჩამწერი
- Android Mp3 ჩამწერი
- უფასო Android ხმის ჩამწერი
- Android-ის ჩანაწერის ეკრანი Root-ით
- ჩაწერეთ ვიდეო შერწყმა
- 2 iPhone ეკრანის ჩამწერი
- როგორ ჩართოთ ეკრანის ჩანაწერი iPhone-ზე
- ეკრანის ჩამწერი ტელეფონისთვის
- ეკრანის ჩანაწერი iOS 14-ზე
- საუკეთესო iPhone ეკრანის ჩამწერი
- როგორ ჩაწეროთ iPhone ეკრანი
- ეკრანის ჩაწერა iPhone 11-ზე
- ეკრანის ჩაწერა iPhone XR-ზე
- ეკრანის ჩაწერა iPhone X-ზე
- ეკრანის ჩაწერა iPhone 8-ზე
- ეკრანის ჩაწერა iPhone 6-ზე
- ჩაწერეთ iPhone Jailbreak-ის გარეშე
- ჩაწერა iPhone აუდიოზე
- სკრინშოტი iPhone
- ეკრანის ჩანაწერი iPod-ზე
- iPhone ეკრანის ვიდეო გადაღება
- უფასო ეკრანის ჩამწერი iOS 10
- ემულატორები iOS-ისთვის
- უფასო ეკრანის ჩამწერი iPad-ისთვის
- უფასო დესკტოპის ჩამწერი პროგრამა
- ჩაწერეთ გეიმპლეი კომპიუტერზე
- ეკრანის ვიდეო აპლიკაცია iPhone-ზე
- ონლაინ ეკრანის ჩამწერი
- როგორ ჩაწეროთ Clash Royale
- როგორ ჩაწეროთ Pokemon GO
- Geometry Dash Recorder
- როგორ ჩაწეროთ Minecraft
- ჩაწერეთ YouTube ვიდეოები iPhone-ზე
- 3 ეკრანის ჩანაწერი კომპიუტერზე


ჯეიმს დევისი
პერსონალის რედაქტორი