How to Screen Record on iPod?
Apr 27, 2022 • Filed to: Mirror Phone Solutions • Proven solutions
If you only play music from your iPod, you probably haven’t upgraded to a newer version. Indeed, you can do more than playing music from that multipurpose device. For those who may not know, an iPod is a portable multimedia player and multipurpose device from the stable of Apple Inc. Over the years, the multipurpose device has undergone an upgrade to deliver immense value to its users.
While you can use it to enjoy your latest songs, Apple Inc. has incorporated a screen-recording feature into the device, allowing you to record your screen in a New York minute. In case you didn’t know that it is possible. In short, this article will show you how to achieve that in a jiffy. Just keep reading to learn how to screen record on iPod touch without technical expertise.

Part 1. Can you screen record on iPod touch?
Yes, you can. Truly, it feels great that you do not necessarily have to own an iPhone or iPad to do that. If you are using an iPod that runs iOS 11 or the later version, you can screen record on it. However, you will have to enable the built-in feature before you can do that. Interestingly enough, you can capture your screen and add music to it. When you do so, you will enjoy your iPod some more. No doubt, you can do many things on that device, and recording your screen is just one of them.
Part 2. How to enable and use screen record on iPod?
All the talks without some walks amount to nothing. In this segment, you will see how to do it yourself. That said, to capture your iPod’s screen, you should follow the outlines below:
Step 1: Well, use Settings > Control Center > More Controls> Screen Recording. Once you are there, you have to scroll down and then pat the round symbol with the + sign.
Step 2: From the bottom of your smartphone, swipe the screen upwards. You will notice that the icon has appeared on your screen. You can also rearrange it from the Control Center.
Step 3: By default, the microphone is not on, so you have to enable it manually. Hold on, you can record your screen without audio at this time. However, you need audio to capture the sound in the background. To do that, you should press the round icon with a hole in it. Once you hold the icon, it will enable your microphone, as the microphone option will pop up. The mic is off at this time, but you can also turn it on.
Step 4: Hit the Start Recording button tab. To start recording, the countdown will run in descending order like 3,2,1.
Step 5: To stop the activity, you should tap the red top of the Control Center and pat the round red button at the top of the screen. Your device will save the recorded clip in your photo gallery. To watch it, you should tap the file from your photo gallery and it starts playing. The mic becomes green once you enable it. You can play games and do other fun things while your iPod automatically captures and records those activities.
Part 3. Third-party screen recorder for iPod
Just like everyone else, you will be absolutely delighted to know that there are alternatives to accomplishing a task. Well, a screen recorder for iPod is no exception to this rule of thumb. Put simply, you have an alternative to fall back on if the built-in feature starts acting up. In addition to having an alternative way of recording your iPod’s screen, third-party apps come with other features that make your experience worth the while. For instance, they have premium versions that have extra features. With the extra features, you get to enjoy other fun things that the built-in feature does not offer. A good example is simple editing that allows you to modify and customize your video clip to your taste. Still, the third-party apps play a crucial role in older versions of iPods if they do not support the built-in screen recorder.
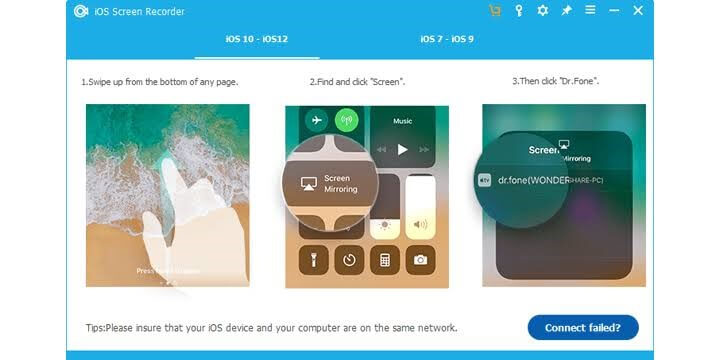
iOS Screen Recorder: Once an alternative to your built-in iPod screen recorder comes to mind, iOS Screen Recorder is the perfect answer. In fact, it is a top-notch iOS screen recorder by Wondershare Dr.Fone. Well, feel free to say that it is an all-in-one toolkit. The reason is that it performs many different tasks. In truth, you enjoy this app by going to its settings to customize its features. So, you can do much more with it. For example, you can record audio, perform HD mirroring, and customize your settings to your taste. With all those features and more, you can have your presentations, use it in the classroom, and use it for gaming.
In summary, the benefits of using this app include:
- A multipurpose toolkit
- It is fast, safe, secure, and simple
- Supports both jailbroken and non-jailbroken devices
- It also supports other iDevices like iPhone and iPad

With all these perks packed into one toolkit, there is no gainsaying that it is a must-have.

MirrorGo - iOS Screen Recorder
Record iPhone screen and save on your computer!
- Mirror iPhone screen onto the big screen of the PC.
- Record phone screen and make a video.
- Take screenshots and save on the computer.
- Reverse control your iPhone on your PC for a full-screen experience.
Conclusion
Apple Inc. does not look like it is ready to rest on its laurels. Hence, it keeps stepping up its game in the tech market. Today, the iPod touch allows users to screen record their iDevice on the go. The good thing is that doing so opens up the vista for third-party apps to improve on what Apple offers. Do you wish to learn how to screen record on iPod? If yes, this article has simplified it for you. Now, you can play your game, talk in the background and record the activities on the go. Still, you can show a friend how to perform some tasks on your device by recording them. Afterward, you save it and share it with them later. All this and more are possible because you can screen record your iDevice from the comfort of your home without asking for some core techie’s assistance. Now, give it a try!
ეკრანის ჩამწერი
- 1. ანდროიდის ეკრანის ჩამწერი
- საუკეთესო ეკრანის ჩამწერი მობილურისთვის
- Samsung ეკრანის ჩამწერი
- ეკრანის ჩანაწერი Samsung S10-ზე
- ეკრანის ჩანაწერი Samsung S9-ზე
- ეკრანის ჩანაწერი Samsung S8-ზე
- ეკრანის ჩანაწერი Samsung A50-ზე
- ეკრანის ჩანაწერი LG-ზე
- Android ტელეფონის ჩამწერი
- ანდროიდის ეკრანის ჩამწერი აპები
- ეკრანის ჩაწერა აუდიო საშუალებით
- ჩაწერეთ ეკრანი Root-ით
- ზარის ჩამწერი Android ტელეფონისთვის
- ჩაწერა Android SDK/ADB-ით
- Android სატელეფონო ზარის ჩამწერი
- ვიდეო ჩამწერი Android-ისთვის
- 10 საუკეთესო თამაშის ჩამწერი
- ტოპ 5 ზარის ჩამწერი
- Android Mp3 ჩამწერი
- უფასო Android ხმის ჩამწერი
- Android-ის ჩანაწერის ეკრანი Root-ით
- ჩაწერეთ ვიდეო შერწყმა
- 2 iPhone ეკრანის ჩამწერი
- როგორ ჩართოთ ეკრანის ჩანაწერი iPhone-ზე
- ეკრანის ჩამწერი ტელეფონისთვის
- ეკრანის ჩანაწერი iOS 14-ზე
- საუკეთესო iPhone ეკრანის ჩამწერი
- როგორ ჩაწეროთ iPhone ეკრანი
- ეკრანის ჩაწერა iPhone 11-ზე
- ეკრანის ჩაწერა iPhone XR-ზე
- ეკრანის ჩაწერა iPhone X-ზე
- ეკრანის ჩაწერა iPhone 8-ზე
- ეკრანის ჩაწერა iPhone 6-ზე
- ჩაწერეთ iPhone Jailbreak-ის გარეშე
- ჩაწერა iPhone აუდიოზე
- სკრინშოტი iPhone
- ეკრანის ჩანაწერი iPod-ზე
- iPhone ეკრანის ვიდეო გადაღება
- უფასო ეკრანის ჩამწერი iOS 10
- ემულატორები iOS-ისთვის
- უფასო ეკრანის ჩამწერი iPad-ისთვის
- უფასო დესკტოპის ჩამწერი პროგრამა
- ჩაწერეთ გეიმპლეი კომპიუტერზე
- ეკრანის ვიდეო აპლიკაცია iPhone-ზე
- ონლაინ ეკრანის ჩამწერი
- როგორ ჩაწეროთ Clash Royale
- როგორ ჩაწეროთ Pokemon GO
- Geometry Dash Recorder
- როგორ ჩაწეროთ Minecraft
- ჩაწერეთ YouTube ვიდეოები iPhone-ზე
- 3 ეკრანის ჩანაწერი კომპიუტერზე


ჯეიმს დევისი
პერსონალის რედაქტორი