[Solved] How to Record Facebook Messenger Calls?
Apr 27, 2022 • Filed to: Mirror Phone Solutions • Proven solutions
Facebook Messenger is one of the renowned social media platforms. It also lets you record Facebook Messenger calls. But there are many who are unable to record calls. If you are one of them and are struggling to find the right technique, you need to drop your worries. This has happened to me in the past until I figure out the right technique. The same technique I am going to share with you here. It doesn’t matter whether you are an iPhone user or an Android user. You are going to record calls easily after going through this dossier.
Part 1: How to record Facebook Messenger calls using MirrorGo?
Now, how to record a Facebook video call will not remain an issue after using Wondershare MirrorGo. This is so because the record feature in the MirrorGo lets you record the phone screen after you mirror the phone screen to the computer. As far as the recorded video is concerned, It will be stored on the computer itself.

Wondershare MirrorGo
Record your Android device on your computer!
- Record on the big screen of the PC with MirrorGo.
- Takescreenshots and save them to the PC.
- View multiple notifications simultaneously without picking up your phone.
- Use android apps on your PC for a full-screen experience.
To record a video call, you have to follow some simple steps.
Step 1: Connect MirrorGo with PhoneLaunch Wondershare MirrorGo on your PC and connect it to your Android Device. You can also use it for your iOS device.
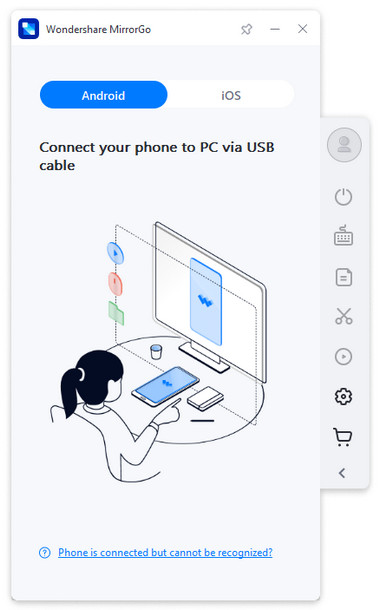
MirrorGo allows you to view your phone’s screen on your computer. But for this, you have to enable USB debugging on your phone. You can do this by going to “Settings” followed by “About Phone.” Then you have to select “Developer options.” Once “Developer Options” are turned ON, you can easily enable USB debugging by clicking in the box. You will be asked for confirmation for turning on USB debugging. Select “OK” to enable the mode. This will turn on the USB debugging.
Now, once your phone gets mirrored, you will be able to see your phone’s screen on the computer.
Step 3: Record a CallNow all you need to do is to click on the “Record” button to record the video. It doesn’t matter whether you want to record a Facebook video call or you want to record some other activity on your phone. You can easily do so by clicking the “Record” button.
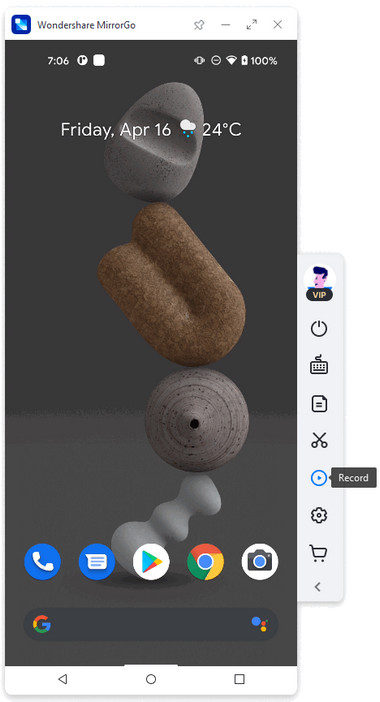
You can even start or stop the video recording anytime you want by clicking on the “Record” button.
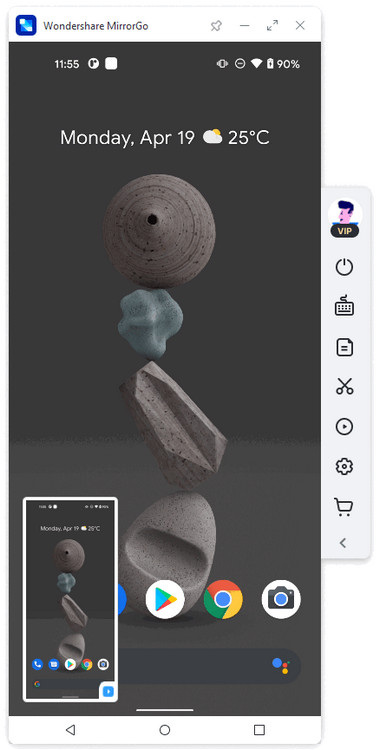
Once you are done with recording, the video will be stored in the default location. If you want to change the location, you can do so by going to “Settings.” This way, you can choose the path or the folder of your choice for storing the recorded video.
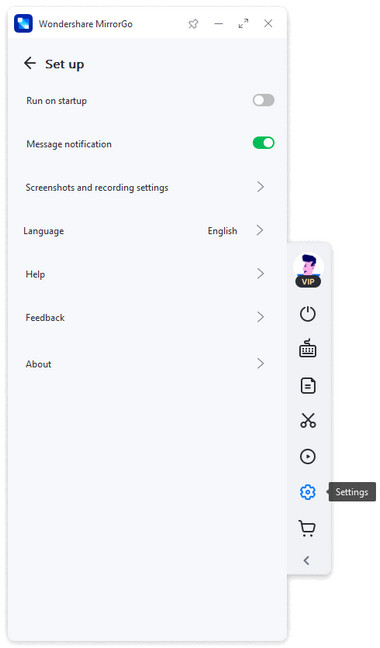
Once the video is recorded, you can access it the way you want. You can even share it.
Part 2: Record Facebook Messenger calls with just iPhone
Recording Facebook video calls how to record a Facebook video call is easier using iPhone. This is so because you are not required to use any third-party app for the same.
Now you might be wondering how it is possible.
Well, it is simple.
Do you remember the Screen Recorder option?
Yes, we are talking about the inbuilt screen recording function. But for this, you have to add the screen recording to the control panel, in case you haven’t added it earlier. You can easily do so by following some steps.
Note: The built-in Screen Recording option is available for iOS 11 and above.
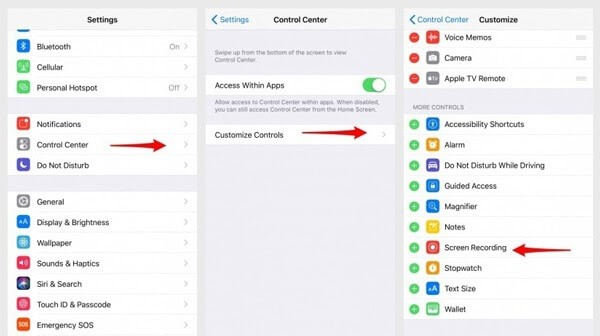
Step 1: Open the “Settings” app followed by a click on “Control Center.” Once clicked, select “Customize Controls” and scroll down to find “Screen Recording.” Once found, tap on the green plus to add this option to the Control Center.
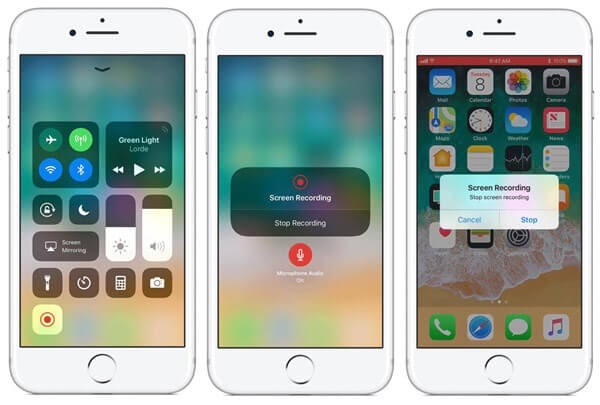
Step 2: Once the option is added successfully, open Control Center and select recording. For this, you have to have to tap and hold the screen recording button until you see a pop-up window. Now you have to tap on “Start Recording” to begin the recording. It doesn’t matter whether you have to record a Facebook messenger video call or some other screen activity. You will be able to do so. You can also tap “Microphone Audio” in case you want to record the audio-only.
Once your call is finished, you have to press the red blinking bar that is present at the top. Now select “Stop Recording.” You can also go to the Control Center and select the same options to stop recording. The video file will be stored at the default location. You can easily find the recorded video under the Photo Gallery.
Once the video is stored successfully, you can watch it, share it, edit it, etc.
Part 3: Record Facebook Messenger calls with just Android
Are you an Android user?
If yes, then you have to put some effort into recording a Facebook video call. This is so because the Android platform does not come with an inbuilt Screen Recording function. However, this feature starts rolling out in the latest Android versions (Android 11 or above) but not with the older android versions.
So, what is the solution?
Well, it is easy. Just go with a third-party app.
You can use an AZ screen recorder. It is one of the renowned video recording apps specifically designed for Android users. The good thing about this app is, it does not require any root and has no limit to the recording. Moreover, it provides you with high-quality screen recording.
“If you have a computer, then MirrorGo is best to go with. But if you don’t, the AZ screen recorder is a good option to go with.
To record a Facebook video call, you have to follow some steps.
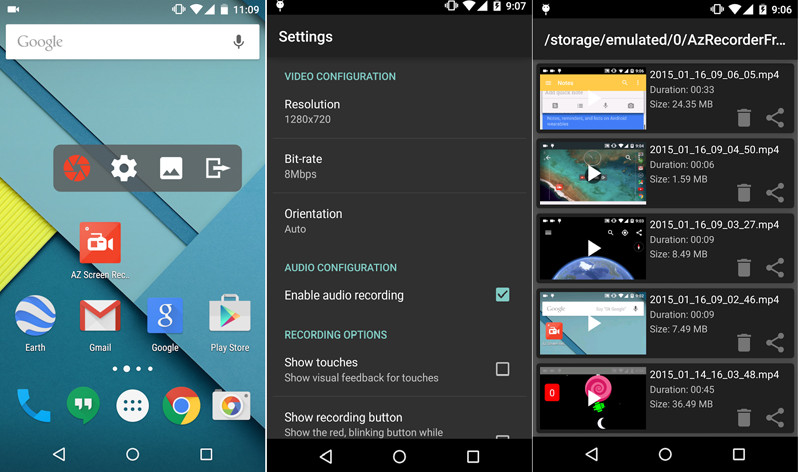
Step 1: Launch the AZ Screen recorder app, and you will see an overlay containing 4 buttons. Now tap on the gear icon to access video recording settings. You will have access to resolution, frame rate, bit rate, etc. When you are done with the settings, press the back button to return to the home screen.
Step 2:Now go to Facebook Messenger to record the video and click on the red camera shutter icon. It will be in the AZ overlay itself. On tapping the button, video recording will begin. You can continue to record as much video as you can, provided you have enough storage space available on your phone. Once you are done with recording, pull down the notification shade. You will be provided with the options of pause and stop. Select the stop option, and you are done with recording.
Conclusion:
Facebook Messenger ვიდეოზარი არის კარგი ვარიანტი, რომელიც გთავაზობთ Facebook-ს თქვენს ცნობილებთან ურთიერთობისთვის. ის ასევე საშუალებას გაძლევთ შეინახოთ თქვენი საყვარელი ადამიანების მოგონებები ვიდეოჩანაწერის სახით. მაგრამ რაც შეეხება ვიდეოს ჩაწერას, თქვენ უნდა იმოქმედოთ სწორი ტექნიკით, რომ ჩაწეროთ მაღალი ხარისხის ვიდეო აუდიო. თუ ადრე არ იცოდით ტექნიკის შესახებ, მაშინ მას უნდა მიაღწიოთ სრულყოფილებას სხვადასხვა ტექნიკის გავლის შემდეგ. ნუ?
ეკრანის ჩამწერი
- 1. ანდროიდის ეკრანის ჩამწერი
- საუკეთესო ეკრანის ჩამწერი მობილურისთვის
- Samsung ეკრანის ჩამწერი
- ეკრანის ჩანაწერი Samsung S10-ზე
- ეკრანის ჩანაწერი Samsung S9-ზე
- ეკრანის ჩანაწერი Samsung S8-ზე
- ეკრანის ჩანაწერი Samsung A50-ზე
- ეკრანის ჩანაწერი LG-ზე
- Android ტელეფონის ჩამწერი
- ანდროიდის ეკრანის ჩამწერი აპები
- ეკრანის ჩაწერა აუდიო საშუალებით
- ჩაწერეთ ეკრანი Root-ით
- ზარის ჩამწერი Android ტელეფონისთვის
- ჩაწერა Android SDK/ADB-ით
- Android სატელეფონო ზარის ჩამწერი
- ვიდეო ჩამწერი Android-ისთვის
- 10 საუკეთესო თამაშის ჩამწერი
- ტოპ 5 ზარის ჩამწერი
- Android Mp3 ჩამწერი
- უფასო Android ხმის ჩამწერი
- Android-ის ჩანაწერის ეკრანი Root-ით
- ჩაწერეთ ვიდეო შერწყმა
- 2 iPhone ეკრანის ჩამწერი
- როგორ ჩართოთ ეკრანის ჩანაწერი iPhone-ზე
- ეკრანის ჩამწერი ტელეფონისთვის
- ეკრანის ჩანაწერი iOS 14-ზე
- საუკეთესო iPhone ეკრანის ჩამწერი
- როგორ ჩაწეროთ iPhone ეკრანი
- ეკრანის ჩაწერა iPhone 11-ზე
- ეკრანის ჩაწერა iPhone XR-ზე
- ეკრანის ჩაწერა iPhone X-ზე
- ეკრანის ჩაწერა iPhone 8-ზე
- ეკრანის ჩაწერა iPhone 6-ზე
- ჩაწერეთ iPhone Jailbreak-ის გარეშე
- ჩაწერა iPhone აუდიოზე
- სკრინშოტი iPhone
- ეკრანის ჩანაწერი iPod-ზე
- iPhone ეკრანის ვიდეო გადაღება
- უფასო ეკრანის ჩამწერი iOS 10
- ემულატორები iOS-ისთვის
- უფასო ეკრანის ჩამწერი iPad-ისთვის
- უფასო დესკტოპის ჩამწერი პროგრამა
- ჩაწერეთ გეიმპლეი კომპიუტერზე
- ეკრანის ვიდეო აპლიკაცია iPhone-ზე
- ონლაინ ეკრანის ჩამწერი
- როგორ ჩაწეროთ Clash Royale
- როგორ ჩაწეროთ Pokemon GO
- Geometry Dash Recorder
- როგორ ჩაწეროთ Minecraft
- ჩაწერეთ YouTube ვიდეოები iPhone-ზე
- 3 ეკრანის ჩანაწერი კომპიუტერზე


ჯეიმს დევისი
პერსონალის რედაქტორი