Fix Unfortunately Camera Has Stopped Error on Android

Apr 27, 2022 • Filed to: Fix Android Mobile Problems • Proven solutions
The errors are such as “unfortunately camera has stopped” or “can’t connect to camera” are one of most common ones experienced by many Android users. It indicates that there is an issue with your device’s hardware or software. Generally, the problem is with software, and it can be solved. If you’re also going through this same situation, then you have come to the right place. Here, in this guide, we have covered various methods that can probably fix your problem with ease.
Part 1: Reasons why the Camera App does not Work
There are no particular reasons why your Camera app doesn’t work. But, here are some most common reasons for the camera has stopped problem:
- Firmware issues
- Low storage on the device
- Low RAM
- Third-party apps interruption
- Lots of apps installed on the phone can cause a problem in performance, which can be the reason why the camera app is not working.
Part 2: Fix the Camera App Crashing in Few Clicks
There is a high possibility that firmware has gone wrong and that’s why you are experiencing “unfortunately camera has stopped” error. Fortunately, Dr.Fone - System Repair (Android) can effectively repair the Android system with one-click. This reliable and powerful tool can fix various Android related problems and issues, such as app crashes, unresponsive, etc with so ease.
Dr.Fone - System Repair (Android)
Android repair tool to fix camera crashing on Android
- It is the industry’s first software that can repair the Android system with one-click.
- This tool can fix errors and issues with high success rate.
- Support a wide range of Samsung devices.
- No technical skills are required to use it.
- It is a adware-free software you can download on your computer.


To fix the error you’re facing now using Dr.Fone - System Repair (Android) software, you need to first download and install the software on your computer. Afterward, follow the below steps:
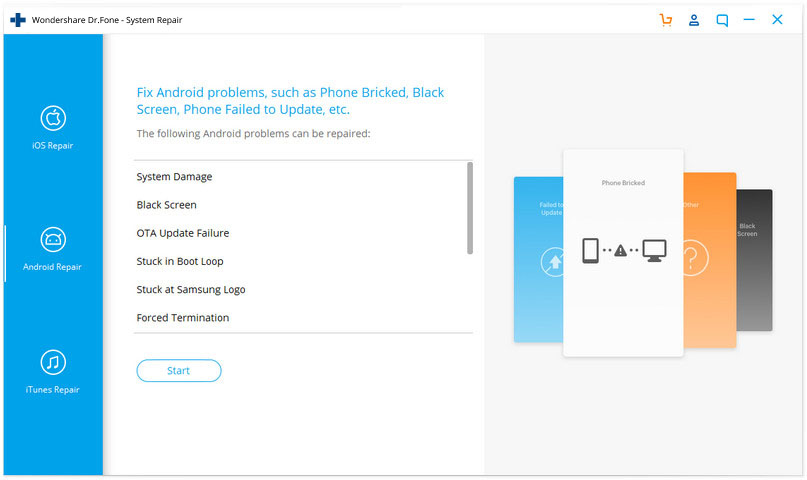
Step 1: To start with, run the software on your system, and choose the “System Repair” option from its main interface.

Step 2: Next, connect your Android device to the computer with the help of a digital cable. After that, click on the “Android Repair” tab.
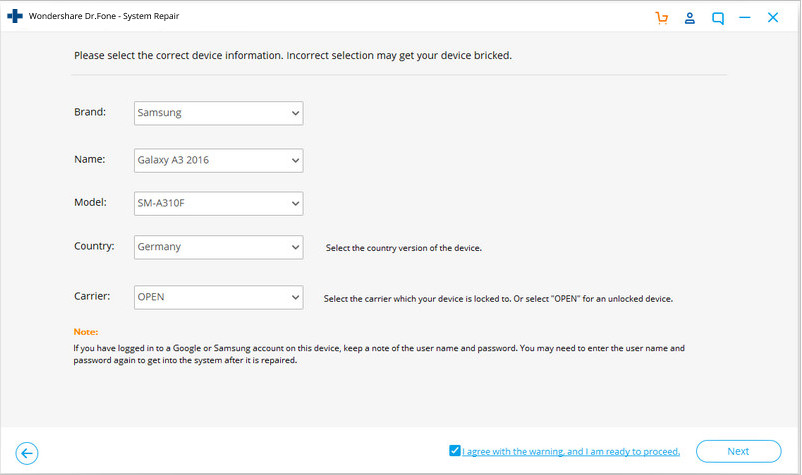
Step 3: Now, you need to provide your device information and make sure to provide the correct information. Otherwise, you can damage your phone.
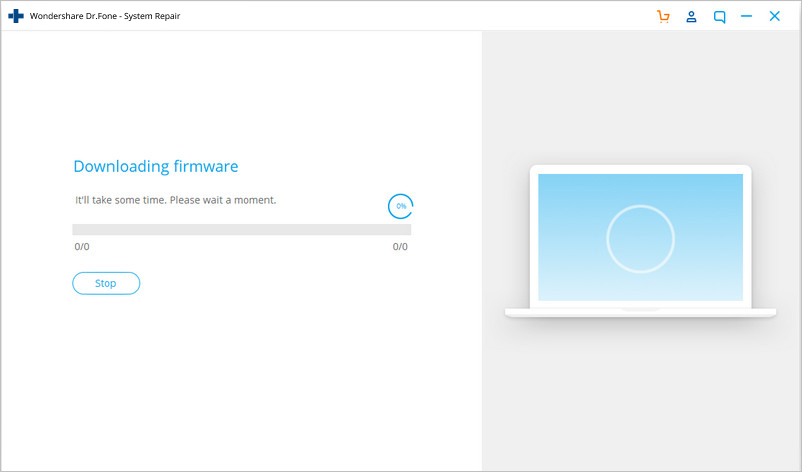
Step 4: After that, the software will download suitable firmware for your Android system repair.
Step 5: Once software download and verify the firmware, it begins repairing your phone. Within a few minutes, your phone will get back to normal and the error will be fixed now.
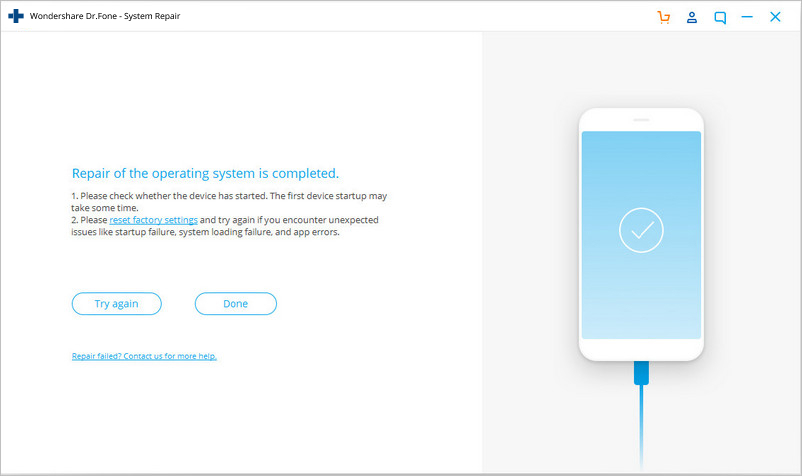
After using the Dr.Fone - System Repair (Android) software, you can probably resolve the “camera crashing” problem within a few minutes.
Part 3: 8 Common Ways to Fix “Unfortunately, Camera Has Stopped”
Don’t want to rely on any third-party software to fix “camera keeps crashing” problem? If so, then you can try below common methods to resolve it.
3.1 Restart the Camera
Are you using your Camera app for too long? Sometimes, the error can be caused by leaving your Camera app in standby mode for a much longer period of time. In this case, the best thing you can do is to simply exit the camera app, and wait for 10 seconds. Afterward, open it again and it should resolve your issue. Whenever you encounter the problems related to the camera, this method is the ultimate solution to fix it easily and quickly. But, the method may be temporary and that’s why if the issue doesn’t go away, then you can try the below-mentioned solutions.
3.2 Clear the Cache of the Camera App
There many users who have resolved this problem by simply clearing out a cache of the camera app. Sometimes, the cache files of the app get corrupted and start causing various errors which restricts you to use the camera app properly. By doing this, your videos and photos won’t be deleted.
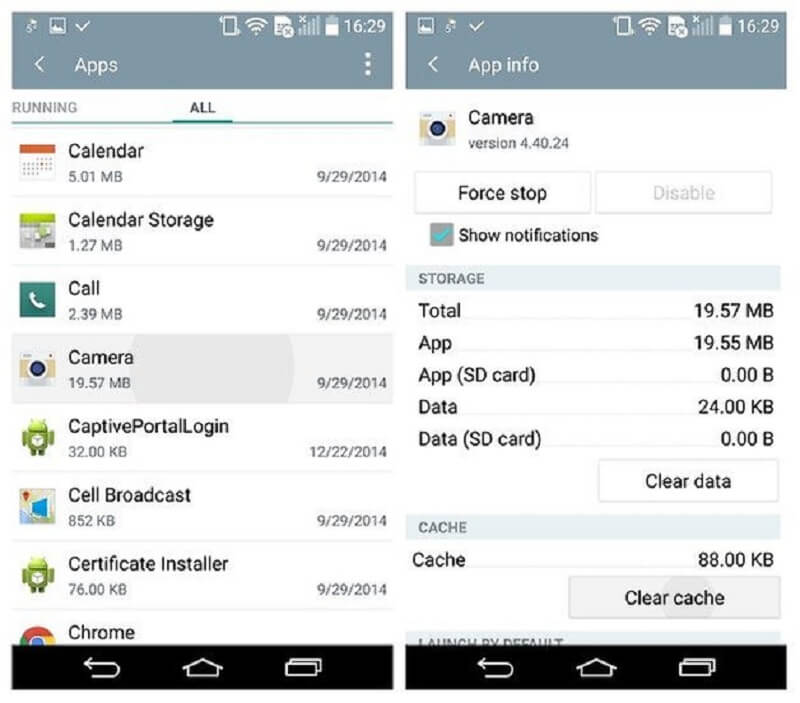
To clear the cache of the camera app, follow the below steps:
Step 1: To begin with, move to the “Settings” menu on your phone.
Step 2: After that, go to the “App” section, and next, click on the “Application Manager”.
Step 3: Thereafter, swipe the screen to go to the “All” tab.
Step 4: Here, locate the camera app, and click on it.
Step 5: Finally, click on the “Clear Cache” button.
3.3 Clear the Camera Data Files
If clearing cache files of the camera app won't help you to fix the error, then the next thing you can try is to clear the camera data files. Unlike, data files contain personal settings for your app, which means that you’ll delete your personal preferences if you clear the data files. So, users who have set preferences on their camera app, then they should keep in mind of this before they clear data files. Afterward, you can go back, and set preferences again.
To delete the data files, follow the below steps:
Step 1: Open the “Settings”, and move to the “Application Manager”.
Step 2: Afterward, move to “All” tab, and select the Camera app from the list.
Step 3: Here, click on “Clear Data” button.
Once you are done with the above steps, open camera to check whether the error is fixed. Otherwise, check out the next solutions.
3.4 Avoid using the Flashlight at the same time
Sometimes, using the Flashlight and camera at the same time can make go through the “camera crashing” error. That’s why it is recommended that you should avoid using both simultaneously, and this will probably resolve the problem for you.
3.5 Delete the Cache and Data Files for the Gallery App
The gallery is closely associated with the camera app. This means if there is a problem with the gallery app, then it can also bring up errors while using the camera app. In this case, the best thing you can do is deleting the cache and data files for the gallery app. It will also help you to know whether the gallery is the reasons behind the error you’re facing or something else.
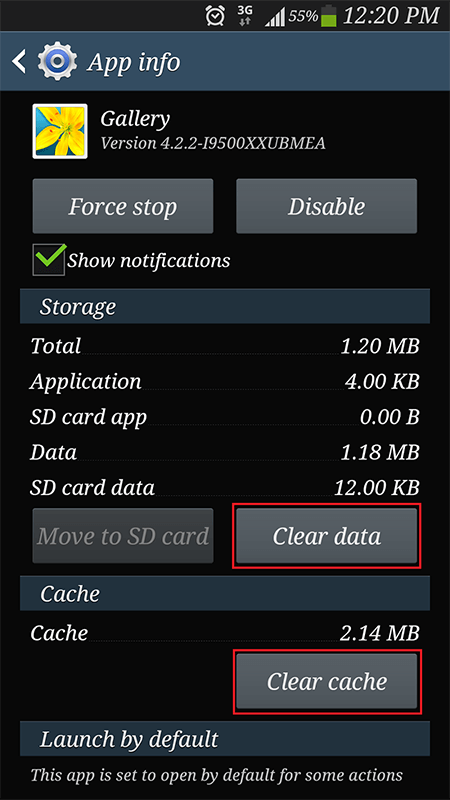
Here are steps on how to do it:
Step 1: To begin with, open the “Settings” menu, and then, navigate to “Application Manager”.
Step 2: Next, move to “All” tab, and look for the gallery app. Once you are able to locate it, open it.
Step 3: Here, click on the “Force Stop” button. Next, click on “Clear Cache” button to delete the cache files, and click on “Clear Data” to delete the data files.
Once you are done with above steps, reboot your phone, and check if the camera app is now working perfectly or not.
3.6 Avoid too many photos stored on phone or SD card
Sometimes, storing too many pictures on phone internal memory or inserted SD card can make you go through the “camera not responding” problem. In this scenario, the best thing you can do to avoid the problem is deleting unwanted or unnecessary photos from your phone or SD card. Or you can transfer some pictures to another storage device, such as a computer.
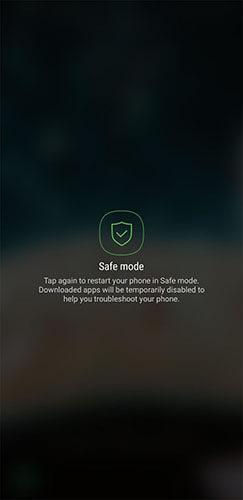
3.7 Use Camera in Safe mode
If the error you’re experiencing is due to third-party apps installed on your device, then you can use the camera in safe mode. This will disable all the third-party apps, and if the error goes away, then it means you have to delete third-party apps from your phone to ensure proper working of the Camera app.
Here are the steps on how to use the camera in safe mode:
Step 1: Press and hold down the Power button, and here, click on the “Power off” button to turn off your device.
Step 2: Next, you get a popup box and it asks you to reboot your phone in Sade Mode.
Step 3: Finally, tap on the “Ok” button to confirm it.
3.8 Backup and then format the SD
Last but not the least solution you can try is to backup and then format your SD card. It might be the case that some files present on SD card get corrupted, and it can cause the error you’re facing now. That’s why you need to format the card. Before you do, you should back up important files and data stored on the card to your computer because the format procedure will delete all the files.
Here are steps on how to format the SD card on Android device:
Step 1: Go to “Settings”, and then, go to “Storage”.
Step 2: Here, scroll down the screen to locate and choose the SD card.
Step 3: Next, click on “Format SD card/Erase SD card” option.
Conclusion
That’s all how to fix “unfortunately camera has stopped” error. Hopefully, the guide helps you to solve the error on your device. Among all methods discussed above, it is only Dr.Fone - System Repair (Android) that can resolve the problem by repairing the Android system in a much efficient way.


Android Stopping
- Google Services Crash
- Android Services Fail
- TouchWiz Home has stopped
- Wi-Fi not working
- Bluetooth not working
- Video not playing
- Camera not working
- Contacts not responding
- Home button not responding
- Can't receive texts
- SIM not provisioned
- Settings stopping
- Apps Keeps Stopping
Alice MJ
staff Editor
Generally rated4.5(105participated)