How to View iTunes Backup Files for Free
Apr 28, 2022 • Filed to: Manage Device Data • Proven solutions
“I backed up files of mine to iTunes recently. However, now I need to go through some of them and access them individually, but I’m not being able to do that. How do I view iPhone backup for free?”
I think we can all agree that Apple products are awesome, right? However, even the most awesome things aren’t perfect. One of the questions that people often ask about iPhone backups is “where to find iTunes backup files?” This is because iTunes doesn’t allow you to manually view the files. For that, you need an iTunes backup viewer, which comes in the form of third party softwares. Read More: 4 Tips for iTunes Backup Location
So if you want to view iPhone backup for free, this article will show you how to find iTunes backup.
- Part 1: How to view iTunes backup files on PC or Mac for free
- Part 2: Where to find iTunes backup on Windows and Mac
- Extra tips: How to delete iTunes backup
Part 1: How to view iTunes backup files on PC or Mac for free
iTunes backup files can’t be manually accessed. You can download the entire backup to your device, but you can’t view the gallery or messages individually. However, sometimes we don’t need all the data that has been backed up. In this case you would have to make use of a third party software such as Dr.Fone - Data Recovery (iOS). Such a software would help you view iPhone backup whenever you want, and all you have to do is follow a few simple steps.

Dr.Fone - Data Recovery (iOS)
View iTunes backup files easily & flexibly for free!
- Free to view iTunes backup files anytime you want.
- View and recover photos, videos, contacts, messages, notes, call logs, and more.
- Compatible with latest iOS devices.
- Preview and selectively recover what you want from iPhone, iTunes and iCloud backup.
- Export and print what you want from the iTunes backup to your computer.
Below you’ll find listed a detailed step-by-step guide on how to view iPhone backup on either Windows or Mac operating systems.
View iTunes backup on your computer for free
Step 1. Choose the iTunes backup you want to view.
Laun Dr.Fone on your computer and select Recover. Then select Recover iOS Data.
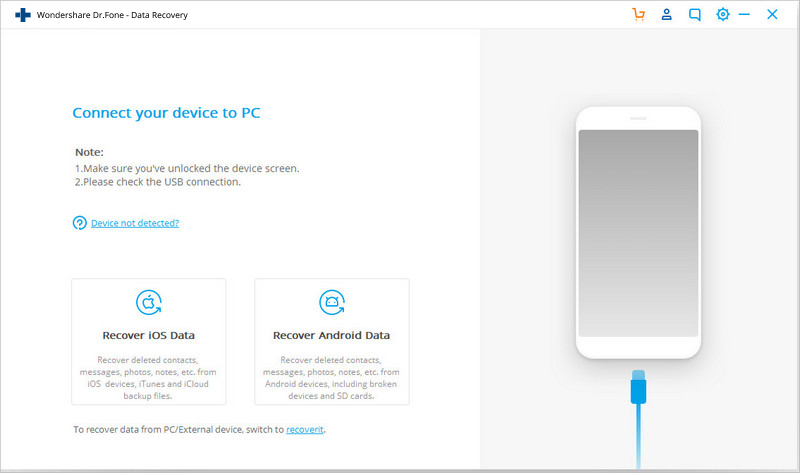
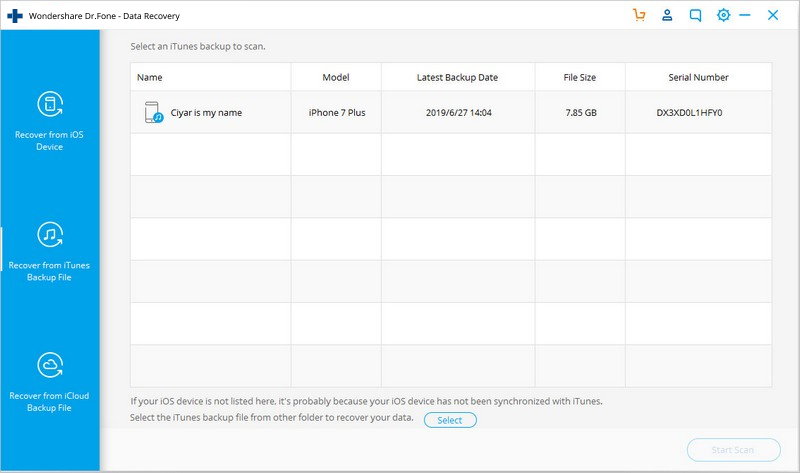
Choose "Recover from iTunes Backup Files” when you are given three options by Dr.Fone. You will then be able to access all the backup files that have been created by iTunes. You can access the iTunes backup file you want and then click on ‘Start Scan’ to start processing all your data.
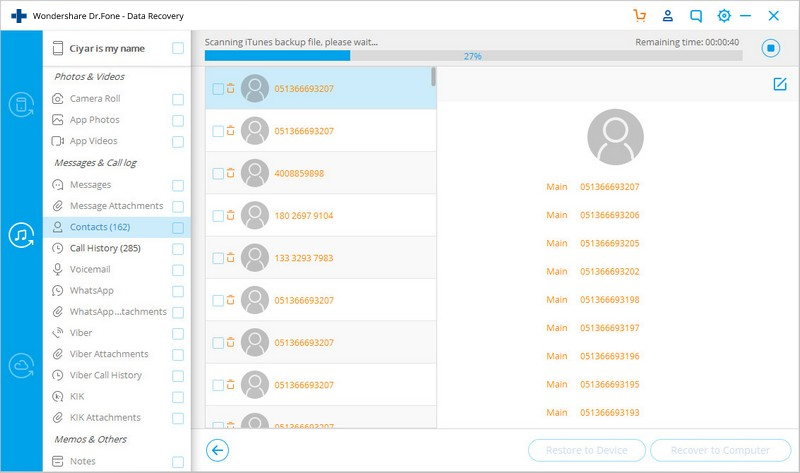
Step 2. Preview and recover data from iTunes backup
After Dr.Fone is done scanning the entire iTunes backup file, you’ll find a gallery with different categories such as ‘Photos’, ‘Messages, etc. You can choose the category you want to access, you’ll find a gallery with all its data on the right panel. You can tick the files that you would like to restore and then click ‘Recover.’
And voila! With that you will be able to view iTunes backup files for free and then save them to your computer!
Part 2: Where to find iTunes backup on Windows and Mac
In order to view iPhone backup using an iTunes backup viewer, you need to first know how to find iTunes backup file. Most people complain that they don’t even know where to find iTunes backup file on their computer. So read on to find out where to find iTunes backup in both Windows and Mac operating systems.
2.1 Directly find iTunes backup on the computer
Once you find the iTunes backup files using the following methods, you may copy them elsewhere, however don’t move them or rename them, or their folder, or anything. That might end up corrupting your file. However, in case you have a corrupted backup file, don’t fret, there are solutions for corrupted iTunes backup files as well.
2.1.1 Find iTunes backup files in Mac: Simply copy the following in your menu bar:
~/Library/Application Support/MobileSync/Backup/
2.1.2 Find iTunes backup files in Windows XP:
Go to Documents and Settings/users(username)/Application Data/Apple Computer/MobileSync/Backup
2.1.3 Find iTunes backup files in Windows 7, 8, or 10:
Step 1:
- • In Windows 7, click ‘Start.’
- • In Windows 8, click on the search icon.
- • In Windows 10, click on the search bar.
Step 2: Copy %appdata% to the search bar.
Step 3: Hit ‘Return’.
Step 4: Go to Apple Computer > MobileSync > Backup.
2.2 Find iTunes backup via iTunes
- Run iTunes and select to "Preferences" from the menu bar.
- Click on "Devices"
- You’ll find a list of your iTunes backup files. Choose the one you want based on the date of creation, and then right-click to get a drop-down menu. Choose ‘Show in Finder’ to be taken to the location of the folder.
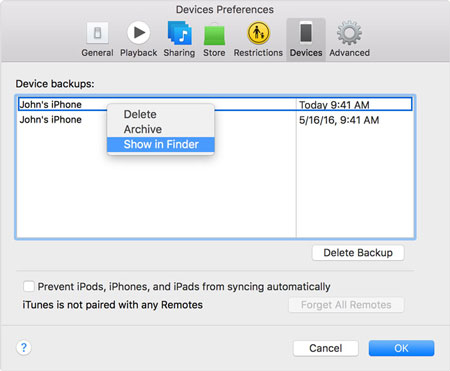
If you follow the above given steps you’ll be able to find iTunes backup files on your computer. However, these files can’t be accessed directly, as we already mentioned. In order to view iPhone backup files, you need to use the Dr.Fone tool we mentioned in the earlier portion.
Extra tips: How to delete iTunes backup
You can follow the previously mentioned steps to find out the location of the iTunes backup files on your computer and then delete them manually. However, you can delete the files more conveniently as well.
- Launch iTunes.
- For Mac, go to iTunes > Preferences. For Windows, go to Edit > Preferences.
- Click on “Devices.”
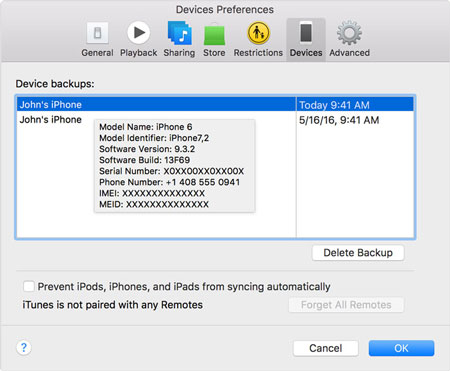
- After that, you’ll find a list of all the iTunes backup files. Hover your pointer over them to get their individual details. Once you’ve figured out which ones you want to get rid of, select them and hit ‘Delete Backup.’
For more on this you can click here >>
If you follow these steps you’ll conveniently be able to find iTunes backup files and then view iPhone backup and save the files you want and delete the rest! Do let us know down in the comments whether you found this guide to be helpful. We’d love to hear from you!
iTunes
- iTunes Backup
- Restore iTunes Backup
- iTunes Data Recovery
- Restore from iTunes Backup
- Recover Data from iTunes
- Recover Photos from iTunes Backup
- Restore from iTunes Backup
- iTunes Backup Viewer
- Free iTunes Backup Extractor
- View iTunes Backup
- iTunes Backup Tips


Selena Lee
chief Editor