How to Restore from iTunes Backup
Mar 07, 2022 • Filed to: Manage Device Data • Proven solutions
- Part 1. The official way to restore from iTunes backup
- Part 2. Restore from iTunes backup by Dr.Fone
Part 1. The official way to restore from iTunes backup
As we know, it will overwrite the existing data on your iPhone if you restore iPhone from iTunes backup directly. If you wish to restore iPhone from iTunes backup, you can follow this official procedure. Also you can follow this official link to ensure that you do it accurately: https://support.apple.com/en-us/HT204184
There are two available methods to backup and restore iPhone data:
- Using iCloud
- Using iTunes
We recommend iTunes (because you can have more space available for backup, you can access data in offline mode as well.). Follow these steps and you could restore from iTunes backup with ease.
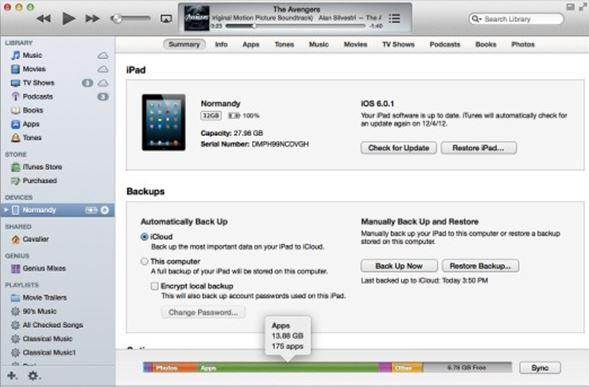
Step 1: connect your iOS device to your desktop, and launch the iTunes application.
Step 2: Open the File menu, go to devices and then select ‘Restore from Backup’.
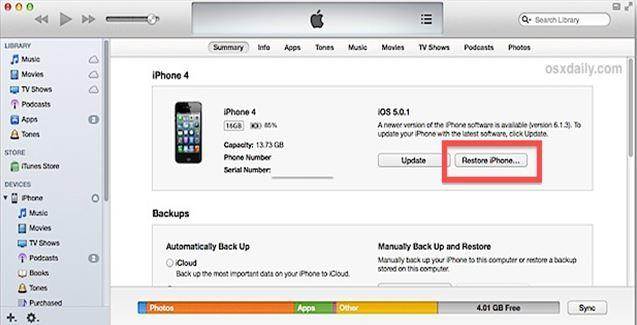
Note : For Mac users, the menu is simply visible on the left corner. But for windows or other OS users, press Alt key and you would see the menu bar appear.
Step 3: Select the backup options as per relevance.
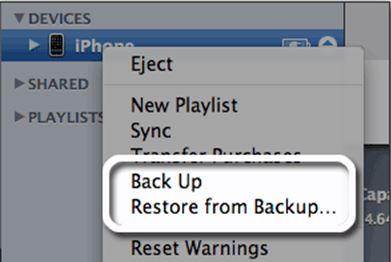
Step 4: Click on restore and let the restore proceed. At completion, the device restarts and automatically sync with the computer.
Please ensure that iTunes is updated for better performance. Also check for compatibility details before proceeding for backup. Data might get lost, if there are compatibility issues.
Part 2: Restore from iTunes backup by Dr.Fone
The official way to use iTunes to restore iPhone may fail to restore some files to the device, and, what's worse, delete all data from your device without a trace. Additionally, if you want to selectively restore iPhone from iTunes backup, you would not have a way out. So, is there a restoring way that covers all the incapabilities of iTunes itself? Here is a tool that can not only do these, but also help you preview the backup data from iTunes and iCloud and restore them easily.
If you are dreaming of more intelligent data restoring from iTunes, you can use Dr.Fone - Phone Backup (iOS) that makes iTunes data restoring very easy and handy. You will lose all the data when using the official iTunes way, while with this tool, you can restore from iTunes backup by keeping existing data intact.

Dr.Fone - Phone Backup (iOS)
World's 1st Tool to Restore iTunes Backup to iOS Devices Intelligently
- Provides with three ways to restore iPhone data.
- Restores photos, videos, contacts, messages, notes, call logs, and more.
- Compatible with latest iOS devices.
- Displays and selectively restores iPhone local, iTunes and iCloud backup data.
Steps to restore from iTunes backup by Dr.Fone
If you’re looking how to use Dr.Fone to selectively restore iPhone from iTunes backup, it’s simple. You can follow these steps to restore a backup of iTunes.
If you'd like to restore iTunes backup file, you can free download Dr.Fone by clicking the below button.
Step 1: Choose “Phone Backup” from the main screen after installing and launching the Dr.Fone.

Step 2: Connect your iPhone to the computer. After it is detected, select the "Restore" option.
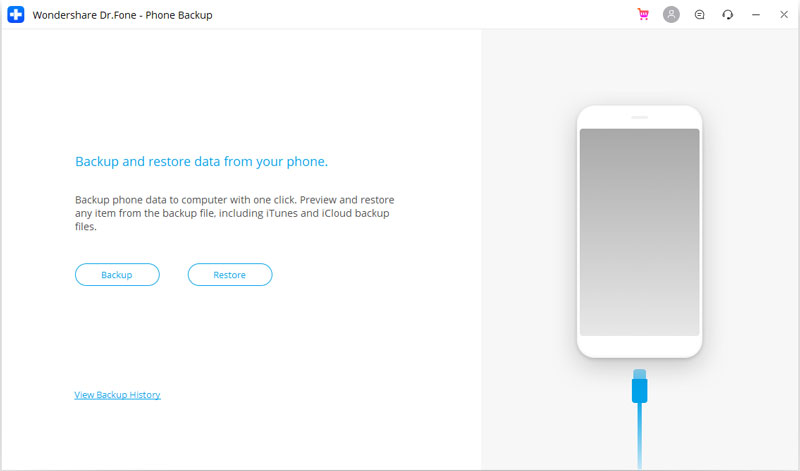
Step 3: In the new screen, click on the "Restore from iTunes backup" tab. Then you can see all your backup files in iTunes displayed in a list.
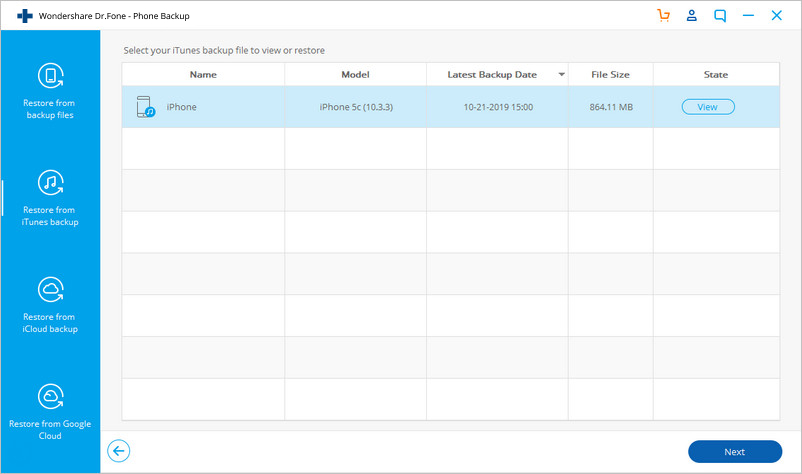
Step 4: Choose the backup file that you want to restore, and click on the “View” button. Then just wait for a moment until the scan is complete.
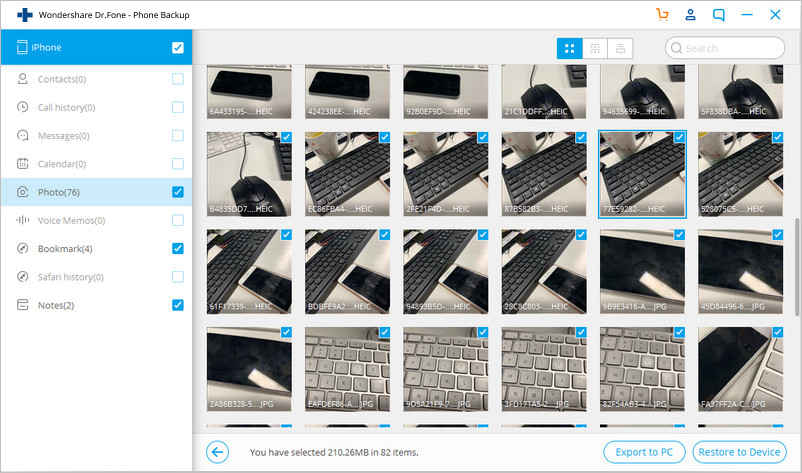
Step 5: Now, you can preview all content that is extracted from iTunes backup and select the data that you wish to recover. Click “Restore to Device” to save them directly to your device.
Note:The data restored to your device is simply added to your device. It won’t erase any existing data on your device, which is different from direct restoring from iTunes backup. If you want to restore your data from iCloud backup file, you can also do it in the similar way.
Using Dr.Fone gives you the freedom to restore files as per requirement (type specific). This prevents excessive network usage, quick access and easy download. You can download files without removing the files from the source (which might happen in case of the official procedure).
Conclusion
The above two options can help you restore from iTunes backup and recover your data in the most efficient way, and with extreme ease. However, please check the supporting file types before proceeding with the recovery procedure. If you want the lengthy way out, you can always use iTunes. However, using Dr.Fone is definitely the better way out. This is because Dr.Fone - Phone Backup (iOS) allows you to do a whole lot more than just restore files. Dr.Fone works across a range of devices and can work as your one-stop solution.
iTunes
- iTunes Backup
- Restore iTunes Backup
- iTunes Data Recovery
- Restore from iTunes Backup
- Recover Data from iTunes
- Recover Photos from iTunes Backup
- Restore from iTunes Backup
- iTunes Backup Viewer
- Free iTunes Backup Extractor
- View iTunes Backup
- iTunes Backup Tips


Alice MJ
staff Editor