2 Solutions for iTunes Corrupt Backup
Mar 07, 2022 • Filed to: Manage Device Data • Proven solutions
One of the most important things for everyone is security. We all want our precious memories and data to be safe all the time, even if something happens to our iOS devices. Trust me, I’ve seen people quite literally have a panic attack and break down all MeanGirls style when they lost their iPhone or their data! That’s why the Cloud was created, a place where people can keep their memories safe. But most people still prefer to restore data with iTunes because, well, because it’s just more convenient. However, sometimes you might find yourself with the iTunes Corrupt Backup issue when your iTunes can’t restore data.
As tempting as it might be to pull out your hair and go batshit insane, we recommend you first read on to learn how to fix iTunes Corrupt Backup . And if this still doesn’t work? Then by all means go ahead and mourn the loss of your digital memories.
- Part 1: Why do I encounter the "iTunes Backup was Corrupt or Not Compatible” message?
- Part 2: How to recover data from iPhone/iCloud
- Part 3: How to fix iTunes corrupt backup issue
- Part 4: How to fix iTunes corrupt backup issue on iPhone/iPad
- Part 5: How to find iTunes backup on your computer
- Part 6: Conclusion
Part 1: Why do I encounter the "iTunes Backup was Corrupt or Not Compatible” message?
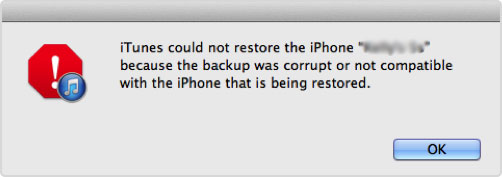
If you’re reading this article, I assume you’ve already encountered the message "iTunes Backup was Corrupt or Not Compatible.” If not, well then frankly I don’t know what you’re doing reading this. But anyway, before we dive into the nuts and bolts of how to fix iTunes corrupt backup issues, I should probably educate you on what you’re dealing with. The reason for this message does seem pretty self-explanatory though. It can be there for one of two reasons:
1. The backup your are trying to restore is corrupted.
2. The backup was made for a different iOS version than the one you are using
Part 2: How to recover data from iPhone/iCloud
This first solution is meant for you if you aren’t completely married to the idea of restoring with iTunes. After all, it’s all about preserving your memories right? Does it really matter how you do so? The thing is, while we’ll be giving you a few solutions on how to fix iTunes corrupt backup issues, there’s still a large possibility that they might not work. or you might have to go through several of those solutions in a trial and error manner to try and fix iTunes corrupt backup issue.
However, if you want to simply bypass all that time wastage and unpleasantness, you could choose to use a simple, easy-to-use tool called Dr.Fone - Data Recovery (iOS), which allows you to restore your data, regardless of iOS version or ‘compatibility’. I assure you, it’s not nearly as fussy as that pompous Apple product iTunes.
Dr.Fone is a software that’s been rolled out by Wondershare and amongst its many advantages is the fact that it is extremely multi-purpose in nature, so you could keep it around for use in case some other problem also pops up!

Dr.Fone - Data Recovery (iOS)
World's 1st iPhone and iPad data recovery software
- Provide with three ways to recover iPhone data.
- Scan iOS devices to recover photos, video, contacts, messages, notes, etc.
- Extract and preview all content in iCloud/iTunes backup files.
- Selectively restore what you want from iCloud/iTunes backup to your device or computer.
- Compatible with latest iPhone models.
2.1 Recover data directly from iPhone
Step 1: Access Dr.Fone - Data Recovery (iOS)
Download the Dr.Fone software and install it. Lauch Dr.Fone and select Recover. Then connect your iPhone to your computer via a cable.

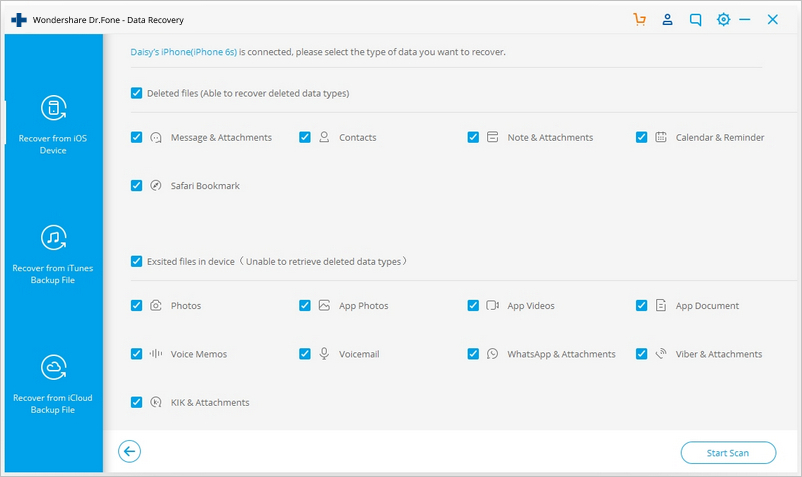
Step 2: Click on ‘Start Scan’
On the left hand side blue panel, you’ll find an iPhone icon at the top. Click on that, then click on ‘Start Scan’ to scan your complete iPhone for data.
Step 3: Select and Recover
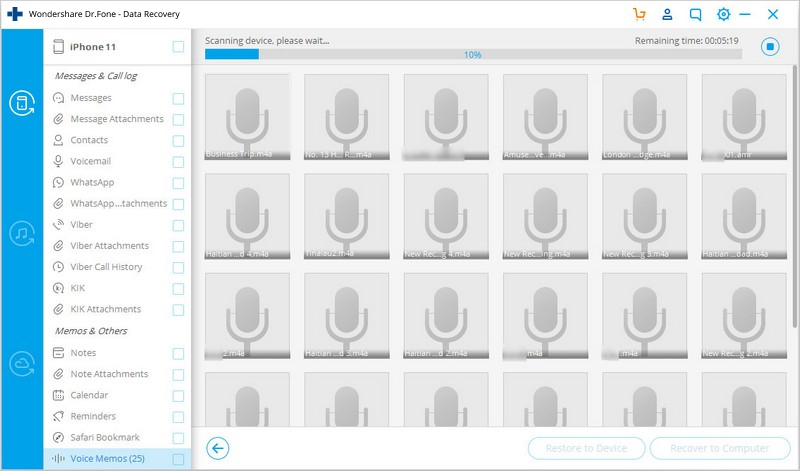
Finally, you’ll see all the data listed out on one corner, followed by what it contains on the right. Enter the folders, select what you want to recover, and click on ‘Recover’ to save the infor-mation.
2.2 Recover data from iCloud
If you store your information in the Clouds where they can be safe and secure for eternity, then the previous method might not be of much relevance to you. However, Dr.Fone, as I already mentioned, is a on-shoe-fits-all kind of solution. Which basically means that it can also help you retrieve your data from the Cloud! So here’s how you can do that.
Step 1: Access Dr.Fone - Data Recovery (iOS)
Download the Dr.Fone software and install it. Lanch the program and select Recover. Then connect your iPhone to your computer via a cable.
Step 2: Click on ‘Recover from iCloud Backup File’
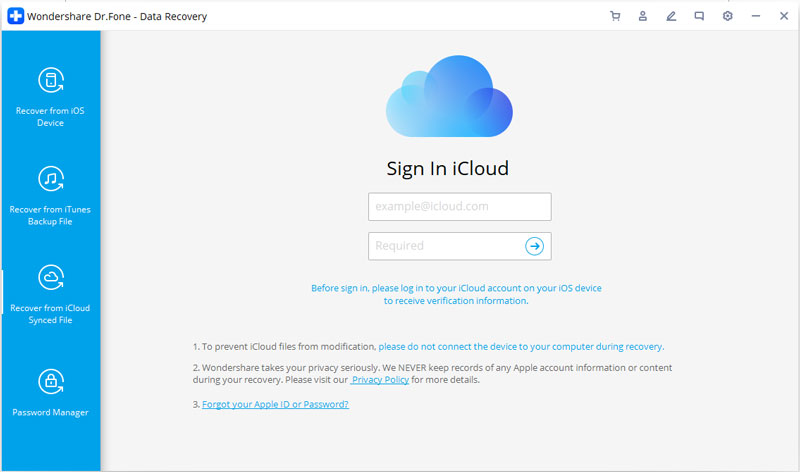
On the left hand blue panel, the third icon would be that of the Cloud. Click on it. Following that sign in to your iCloud.
Step 3: : Choose the Backup File
You’ll be shown a list of devices that have been linked to your iCloud. Choose the one from which you wish to recover data and then click on ‘Download.’
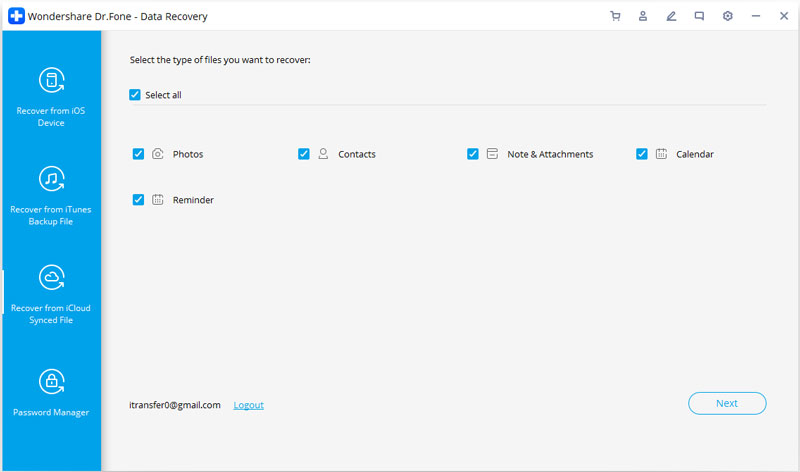
Step 4: : Select and Recover
Finally, you can browse through your store of data, pictures, videos, etc and recover what you want with a click of a button!
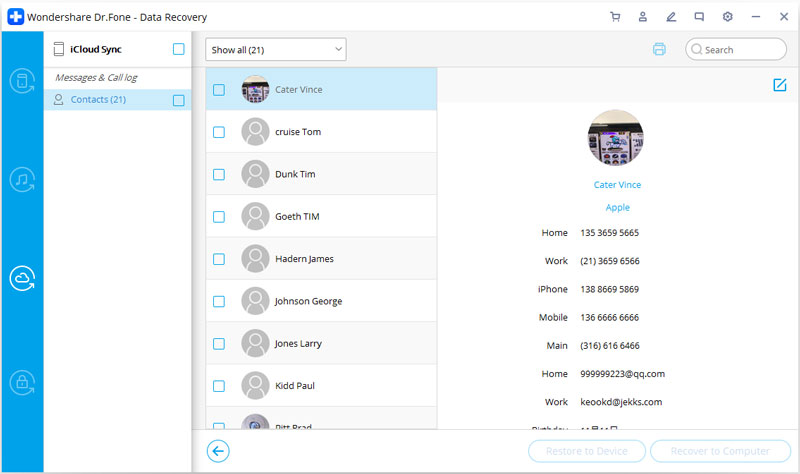
And with that you are done! All your precious data has been restored and saved at your pre-ferred location!
Part 3: How to fix iTunes corrupt backup issue
The previous step is a sure shot way of restoring your data. However, if you are really con-cerned about the health of your iTunes and want to fix iTunes Corrupt Backup issue then you can first try and diagnose the issue and (hopefully) fix it, in one of the following ways:
1. Sometimes, it might so happen that your iPhone isn’t connected well to the computer, or maybe the cable is corrupted. Look into that.
2. Ensure that there is sufficient space in your device so that the restoration can carry on without a hitch. For windows, you should create the requisite space in the ‘C’ drive.
3. Ensure that you have the latest version of iTunes installed into your computer. You can do so by going to About > Check for Updates.
4. Another trick which seems to commonly work is deleting old backups. Don’t ask me why this works, it just does, albeit occasionally.
Part 4: How to fix iTunes corrupt backup issue on iPhone/iPad
Step 1: Log out of iTunes.
For Windows: Hit the ‘Start’ button, and in the search box, enter “appdata.’ Following that, go to Roaming > Apple > Computer > Mobilesync > Backup. Move the backup folder to your desktop.
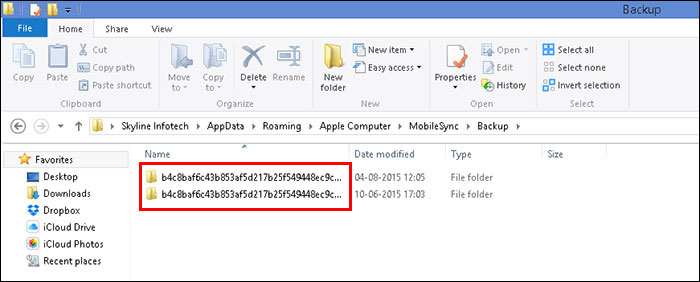
For Mac: Go to Folder Library > Folder Library > Mobilesync > Backup. Move the backup folder to your desktop.
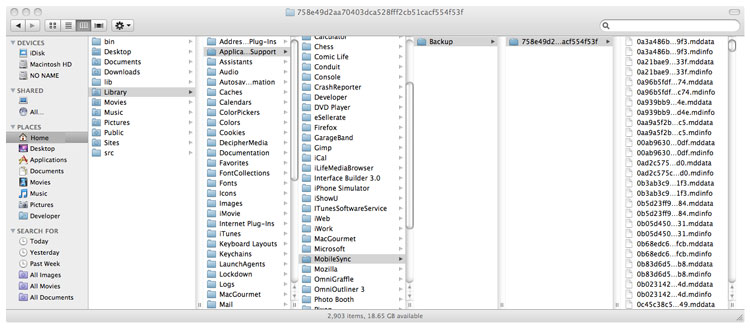
Step 2: Access iTunes.
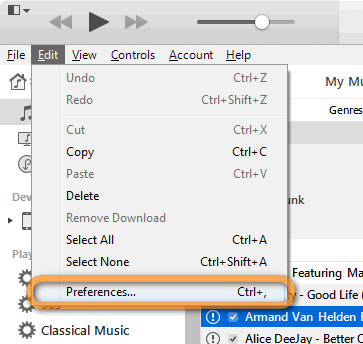
For Windows: Go to main menu, and select Edit > Preferences.
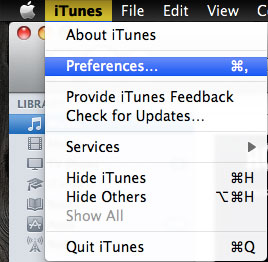
For Mac: Go to main menu, and select iTunes > Preferences.
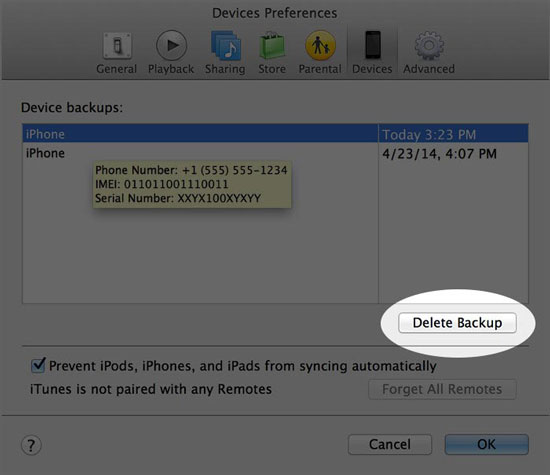
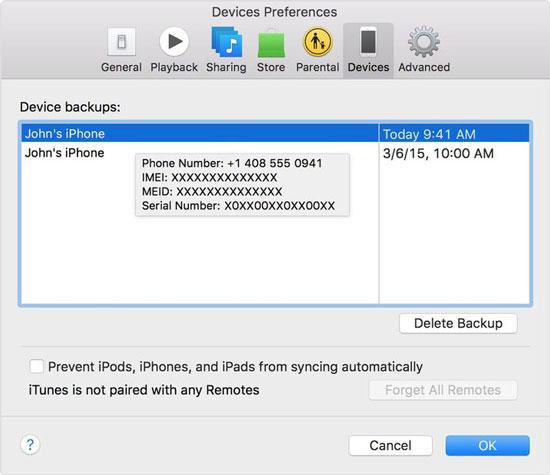
Step 3: : Delete Backup.
Go to Devices > Device Backups. Select all the backups and delete them.
Step 4: : Move the Backup folders.
Select the backup folders from your desktop and move them to the iTunes backup folder.
Step 5: : Restore data.
Hopefully, this should fix iTunes corrupt backup issues, and you can restore all your precious data!
Part 5: How to find iTunes backup on your computer
If you’re following the previous method to fix iTunes Corrupt Backup issues, then you’ll need to know where to find the iTunes backup location on your computer. Different operating systems keep that stored in slightly different locations. So here’s a complete list of where to go for each OS, so that you aren’t left floundering in the dark.
Mac OS: Library > Application Support > MobileSync > Backup.

Windows XP: Documents > Settings > Application Data > Apple Computer > MobileSync > Backup.
Windows Vista: AppData > Roaming > Apple Computer > MobileSyncBackup.
Windows 8: AppData > Roaming > Apple Computer > MobileSync > Backup.

Windows 10: Users > User > AppData > Roaming > Apple Computer > MobileSync > Backup.

NOTE: For all the Windows OS, to access the AppData folder quickly, click on ‘Start’ and in the search box, enter “appdata.'
Part 6: Conclusion
So these are all the methods by which you can restore your data. As we’ve shown you, you could choose to fix iTunes Corrupt Backup issue, but for that you’ll first have to diagnose the correct problem and it involves a lot of trial-and-error. Updating iTunes, or deleting old backup files are two of the other preferable methods to go about it. But as I mentioned earlier, while this is a good method, it still isn’t a guarantee. So if you wanna restore the data quickly, we suggest you follow the solution in Part 2, that is, use Dr.Fone to recover your data immediately and with surety. But either way, do let us know down in the comments which method you eventually went with and how did it work for you, we’d love to hear from you!
iTunes
- iTunes Backup
- Restore iTunes Backup
- iTunes Data Recovery
- Restore from iTunes Backup
- Recover Data from iTunes
- Recover Photos from iTunes Backup
- Restore from iTunes Backup
- iTunes Backup Viewer
- Free iTunes Backup Extractor
- View iTunes Backup
- iTunes Backup Tips


James Davis
staff Editor