

How to Transfer Photos from Galaxy s6/s7/s8/s9/s10 to PC

Apr 27, 2022 • Filed to: Backup Data between Phone & PC • Proven solutions
Whether it's a Samsung galaxy s6 or s7 or s8 or so on. The common thing among them is the ability to capture clear and high-resolution pictures. They provide you with an ability to capture dynamic pictures that can compete with pictures taken from DSLR. But the issue is about the large file size of the captured pictures and limited device’s storage. Moreover, when you capture HD, Full HD, or 4K videos or download them from various sources it occupies the whole storage space.
As a result, it becomes compulsory to transfer photos from galaxy s7 to pc or transfer photos from galaxy s8 to pc or transfer photos from galaxy s9 to pc and so on.
Doing this will clear up your phone’s storage thus allowing you to capture and store new pictures and videos. It also creates a backup for you so that you can access them anytime you want. Now how to perform this task is difficult for many, but it is simplified here for you.
Part One: Transfer photos from galaxy s6/s7/s8/s9/s10 to pc directly by copy & paste
One of the best methods to transfer photos from galaxy s6 to pc or transfer photos from galaxy s7 to pc or transfer photos from galaxy s8 to pc or so on in continuation of the series is to simply copy and paste your photos. You can use a USB cable for this purpose. It will let you easily and rapidly transfer photos to PC. But keep in mind to use a genuine USB cable for fast and efficient data transfer.
This process will not only let you transfer your photos, but you can transfer files from galaxy s7 to pc or transfer files from galaxy s8 to pc or so on. For this, you just need to follow some simple steps as given below.
Note: This method will work on galaxy s6/s7/s8/s9/s10 and so on. In short, this method is for all Samsung Galaxy series. It doesn’t matter which galaxy model you are using. This technique will work for all.
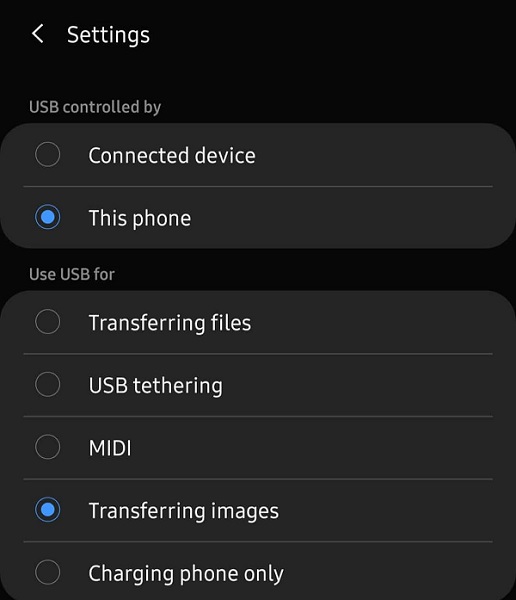
Step 1: Connect your galaxy phone to your PC with the help of the USB cable. It is advised to use genuine Samsung cable for high speed and efficient data transfer. Once your phone is connected to the PC, you will see many USB related options on your phone’s screen. Here you need to choose “Transferring images” from the various given options as shown in the image.
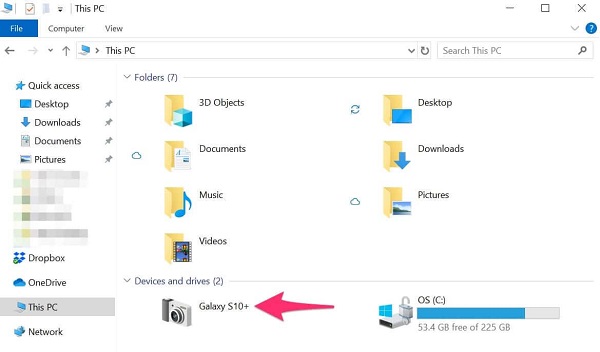
Step 2: Now open File Explorer from your PC. Here you will see your connected device. It will be shown under the devices and drivers. It will also be shown in the left corner under “My PC”. Double click or right-click to open it. If you are using an SD card it will be shown separately. You can select the phone’s storage or your SD card storage depending upon, where you want to transfer photos from.
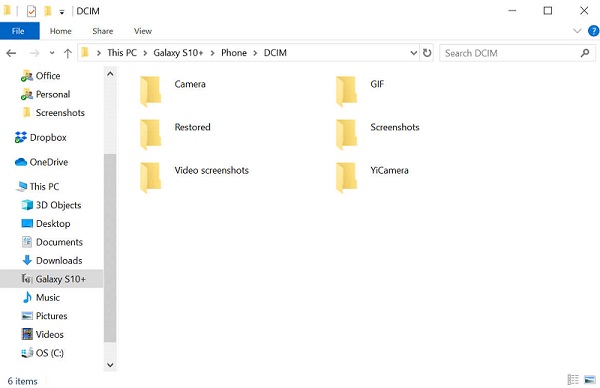
Step 3: All of your captured pictures and videos will be stored under DCIM/Pictures and DCIM/Camera and so on. Now go to the specific folder where you want to transfer photos from and open it. Now select photos that you want to transfer. You can select single or multiple photos at a single time. Once selected right-click to copy or use a shortcut “Ctrl + C”. This will copy your selected photos. You can also select the whole folder and copy it.
Step 4: Now go to the folder or the location where you want to store your photos on your PC. Once you are done with selecting location just right-click and choose paste. You can also use a shortcut “Ctrl + V” for pasting your photos or folder. Once the process of copying is completed you can safely eject your phone. Now you are free to access the copied photos from the same location on your PC, where you pasted.
Part Two: Transfer photos from galaxy s6/s7/s8/s9/s10 to pc in one click
You can easily transfer photos by connecting galaxy s8 to pc or connecting galaxy s9 to pc and so on by simply copy and paste option. But will it provide you with the freedom to transfer all data in a single click without any confusion and that too in lesser time?
Probably not, because the process of galaxy s8 backup to pc or galaxy s9 backup to pc is a hectic process. It requires precision to backup the whole data.
To resolve this issue Dr.Fone - Phone Manager is presented to you. Dr.Fone provides you with a rapid and efficient way to transfer your files to Windows PC and other platforms like iTunes, Mac, etc. It provides you with a platform to transfer your photos, music, videos, contacts, documents, messages, etc in a single go. It provides you with an opportunity to sync your Android phone data with your PC without any difficulty.
Dr.Fone - Phone Manager (Android)
Transfer Data Between Android and Mac Seamlessly.
- Transfer files between Android and computer, including contacts, photos, music, SMS, and more.
- Manage, export/import your music, photos, videos, contacts, SMS, Apps etc.
- Transfer iTunes to Android (vice versa).
- Manage your Android device on computer.
- Fully compatible with Android 8.0.
You must be probably thinking about how can Dr.Fone perform this hectic task of transferring photos from galaxy to computer so easily?
Well, for better clarification let us follow three simple steps for transferring photos to PC using Dr.Fone - Phone Manager.
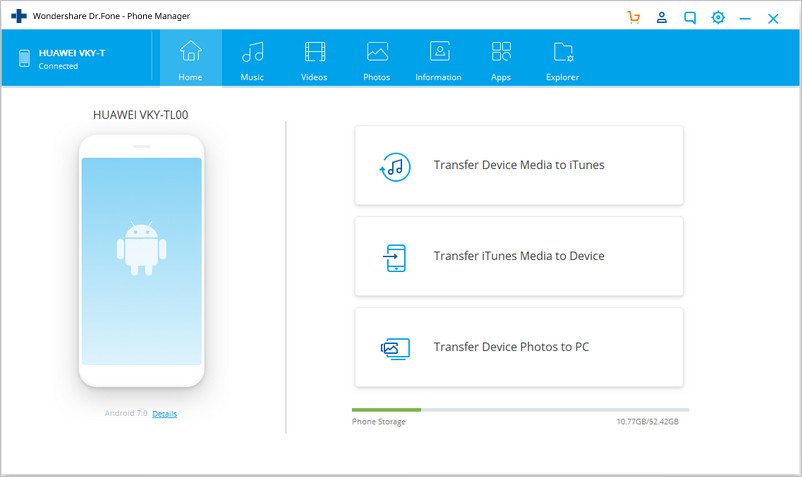
Step 1: Connect your Android device
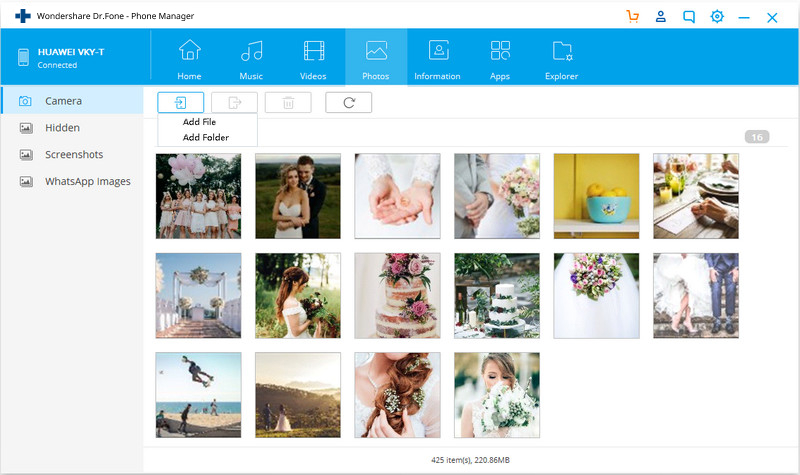
Launch Dr.Fone on your PC and connect your phone with PC. You can use a USB cable for connecting your phone. Be ensured to use the original USB cable for faster and efficient data transfer. Once your phone is connected successfully with your PC, it will display on in the primary window of Dr.Fone as shown in the image. Now you can directly click on “Photos” from the top panel or choose the third option of transferring photos to PC.

Step 2: Select files for transfer
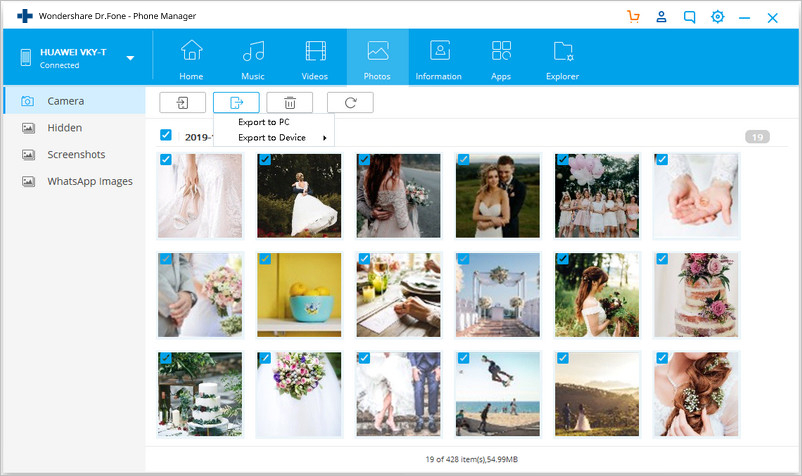
Once you are done with clicking on “Photos” all of the albums will be displayed on the left. Now you can click on a particular album for selecting photos. Once you click on an album all photos of that album will be displayed. You can choose the photos that you want to transfer. The photo that you select will be indicated with a tick as shown in the image.
You can also select the whole album for transfer or can choose various photos for transfer by choosing the option of “Add Folder” as shown. This will create a new folder containing selected photos.
Step 3: Begin to transfer
Once you have selected photos that you want to transfer from phone to PC, Click on “Export to PC” as shown.
This will brings up a file browser window demanding a location or folder to store the photos on your PC as shown.
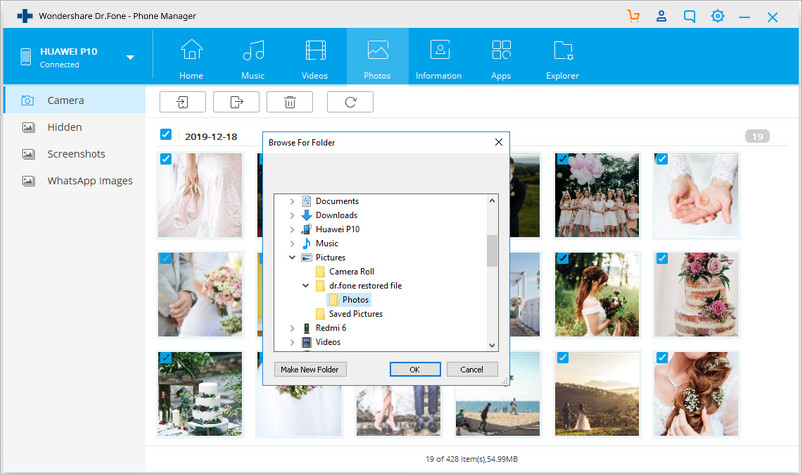
Once you select the desired location, the process of transferring will start. It will take some time depending upon the size of the file. Once the process of transferring photos from phone to PC is completed, you can eject your device safely. Now you can go to the desired location on your PC and can access whole transferred photos.
Conclusion:
These days mobile phones have developed a lot. They can perform many tasks as a computer can perform. This is the reason why most people use phones to surf the internet. An additional advantage of phones is its ability to capture high-resolution pictures and videos.
When we come to the Samsung Galaxy series, this series is well known for its picture quality. But with this advantage, you have to face a low storage capacity of phones. Most of the phones come with a storage capacity of 64GB or 128 GB or 256GB. Now the high-quality pictures are obvious to carry a large file size. So even a few pictures and videos occupy full storage space. As a result, there is a need to transfer files from galaxy s7 to pc or transfer files from galaxy s8 to pc or transfer files from galaxy s9 to pc and so on.
Now there are many techniques to transfer photos from galaxy to computer, but most of them are difficult to implement practically. The most trusted and tested techniques among them are presented to you here. So go ahead and transfer photos from galaxy s6/s7/s8/s9/s10 to pc without any difficulty.


Samsung Transfer
- Transfer Between Samsung Models
- Transfer to High-End Samsung Models
- Transfer from iPhone to Samsung
- Transfer From iPhone to Samsung S
- Transfer Contacts from iPhone to Samsung
- Transfer Messages from iPhone to Samsung S
- Switch from iPhone to Samsung Note 8
- Transfer from common Android to Samsung
- Android to Samsung S8
- Transfer WhatsApp from Android to Samsung
- How to Transfer from Android to Samsung S
- Transfer from Other Brands to Samsung
Alice MJ
staff Editor