
How to Transfer Data from Lumia to Any iOS Devices

Apr 27, 2022 • Filed to: Data Transfer Solutions • Proven solutions
If you are a proud owner of smartphones running on two different operating systems such as Windows and iOS, you might face a challenging task of transferring the data from your Windows phone to iPhone. Transferring the data between the two devices running the OS of different platform is not as easy as it is when you have devices with common platform. This article aims to guide you through two simple routes that you can follow to transfer the data stored in your Windows phone such as Nokia Lumia to iPhone or other iOS devices. You don't need worry about how to transfer from lumia to iphone or How to transfer contacts from lumia to iphone any more after reading this artile. Read them on.
- You can rely on some program/online service/website such as Outlook, CSV file format, Google Contacts, etc.
- You may experience issues while transferring data from your Lumia phone to iPhone.
- Part1: Best Way to Transfer data from Lumia to iPhone
- Part2: Transfer Data Wirelessly via Microsoft ID
- Part3: Transfer Data Using PhoneCopy
Part1: Best Way to Transfer data from Lumia to iPhone
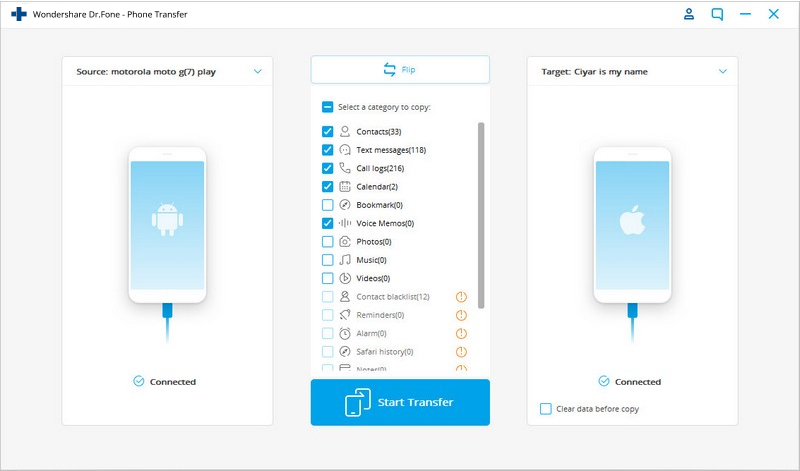
Dr.Fone - Phone Transfer lets you transfer data from Lumia to iPhone in 1 Click. It supports almost all mobiles, including WinPhone, iPhone, Android Samsung, LG, Sony, HTC, etc. Dr.Fone - Phone Transfer can transfer muaic, videos, contacts, messages, call logs and apps between mobiles. If you want to transfer from WinPhone to iPhone, it must be the best solution for you. Try it free. Follow the steps below to know how to transfer contacts from Lumia to iPhone.
Dr.Fone - Phone Transfer
Transfer Data from Lumia to iPhone in One Click.
- 1 CLick to transfer contacts from Lumia to iPhone.
- Easily transfer photos, videos, calendar, contacts, messages and music from Android to iPhone/iPad.
- Works perfectly with Apple, Samsung, HTC, LG, Sony, Google, HUAWEI, Motorola, ZTE, Nokia and more smartphones and tablets.
- Fully compatible with major providers like AT&T, Verizon, Sprint and T-Mobile.
- Fully compatible with iOS 13 and Android 8.0
- Fully compatible with Windows 10 and Mac 10.14.

Note: If you have no computer at hand, you can also get the Dr.Fone - Phone Transfer (mobile version) from Google Play, with which you could log into your iCloud account to download the data, or transfer from iPhone to Lumia using an iPhone-to-Android adapter.
Step 1. Download Dr.Fone - Phone Transfer to transfer from Lumia to iPhone
Launch Dr.Fone. You will see the Switch Solution. Click it.

Step 2. Connect Phones and select files
Connect your Winphone Lumia and iPhone. Dr.Fone will detect it soon. Then select the files and click Start Transfer. It can tranfer almost all files, contacts, apps, messages, photos,music, videos ect. If you just want to transfer contacts from Lumia to iPhone, then it is also ok. Just check the Contacts option to transfer contacts from Lumia to iPhone easily.
Part2: Transfer Data Wirelessly via Microsoft ID
Windows phones such as Nokia Lumia depend on a Microsoft ID to back up your important data such as contacts, text messages, calendar, and device preferences. Once you have configured the data on your Nokia Lumia smartphone, you can add the same Microsoft email address to your iPhone and then sync the data to it. Given below are the step-by-step instructions on how to transfer from lumia to iphone via Microsoft ID:
Step 1: Make an account on Outlook.com.
1. Open www.outlook.com on the web browser on your smartphone or PC.
2. Once you are redirected to the website, tap the "Sign up" option from the top-right corner
3. Enter the required information in the available fields to create an account.
Step 2: Sync the data on your Nokia Lumia to the Microsoft’s Outlook.com account.
1. Switch on your Nokia Lumia smartphone.
2. Scroll through the Home screen to find the "Settings" option.
3. Once located, tap the "Settings" option to open it.
4. On the "Settings" window, locate and tap the "email+accounts" option to open it.
5. From the opened window, tap the "add an account" option.
6. After the "ADD AN ACOOUNT" window opens, tap "Outlook.com" from the available options.
7. Tap the connect button from the bottom-left corner of the OUTLOOK.COM window.
8. Once you are redirected to the outlook.com website, in the available fields, enter the credentials of your Microsoft account that you created earlier.
9. Tap the "Log in" button when done.
10. Wait till the data on your Nokia Lumia automatically gets synchronized with your Outlook account.
Step 3: Import the data from your Outlook account to the iPhone.
1. Switch on your iPhone and scroll through the Home screen to locate the "Settings" option.
Note: Make sure your device is connected to the Internet.
2. Once located, tap to launch the "Settings" app.
3. On the opened "Settings" window, tap the "Mail, Contacts, Calendars" option.
4. After the "Mail, Contacts, Calendars" window opens, tap the "Add Account"Add Account option under the "ACCOUNTS" section.
5. From the available options, tap "Step two"Outlook.com.
6. Once the "Outlook" window opens, enter your Outlook account credentials, and tap "Next" from the top-right corner.
7. Wait till your device verifies your account.
8. Once your account details are verified and a list of transferrable data type is displayed on the screen, tap to slide the switch to the right for the data that you want to import.
Note: After you slide the switch to transfer the Contacts, iPhone provides you with an option to keep the contacts that are already stored in your device or delete them altogether before importing the new ones from your Outlook account. You can choose any option as per your requirement.
9. Once you have selected the data that you want to import, tap the "Save" button from the top-right corner.
10. Wait till the data gets imported to your iPhone.
Pros:
- You can transfer your data for free using this method and the only requirement is Internet connectivity.
- You are saved from downloading a third party application to transfer your data.
- You can easily transfer the data wirelessly without the need to make your PC as a go-between
Cons:
- It is a time- consuming process.
- You cannot transfer photos and media files by following this method.
Part3: Transfer Data Using PhoneCopy
With PhoneCopy you can easily export data from your Nokia Lumia to the PhoneCopy server, and then import the data from the PhoneCopy server to your new iOS device. It is easy to transfer contacts from Lumia to iPhone with PhoneCopy. What you need is PhoneCopy iPhone Lumia.
In order to do so, you need:
- A registered PhoneCopy account.
- The PhoneCopy app on your Windows phone.
1. On your computer, open any web browser of your choice and go to https://www.phonecopy.com/en/.
Note: Make sure your device is connected to the Internet.
2. From the right section of the opened web page, click "REGISTER NOW."
3. On the "REGISTRATION" page, populate the available fields with the correct values and click "CONTINUE" from the bottom.
4. Follow the on-screen instructions thereafter to complete the account creation process.
Note: You may need to activate your account using the confirmation mail that you would receive while completing the account creation process.
1. Power on your Nokia Lumia smartphone.
შენიშვნა: დარწმუნდით, რომ ტელეფონი დაკავშირებულია ინტერნეტთან.
2. საწყისი ეკრანიდან იპოვნეთ და შეეხეთ Store ხატულას Windows App Store-ის გასახსნელად.
შენიშვნა: თქვენ უნდა გამოიყენოთ თქვენი Microsoft ანგარიში Windows Store-ში შესასვლელად, სანამ ტელეფონი აპების ჩამოტვირთვის საშუალებას მოგცემთ.
3. როგორც კი მოხვდებით „მაღაზიის“ ინტერფეისში, მოძებნეთ და შეეხეთ „PhoneCopy“ აპს
4. მომდევნო ფანჯარაში, რომელიც გამოჩნდება, შეეხეთ „ინსტალაციას“ და დააინსტალირეთ PhoneCopy თქვენს Windows ტელეფონზე.
მას შემდეგ რაც წარმატებით დააინსტალირეთ PhoneCopy თქვენს Nokia Lumia-ზე, ახლა დროა თქვენი ყველა კონტაქტის ექსპორტი PhoneCopy სერვერზე. ამის გაკეთება შეგიძლიათ ქვემოთ მოცემული ნაბიჯების შემდეგ:
ნაბიჯი 1: მონაცემების ექსპორტი PhoneCopy სერვერზე.
1. თქვენს Windows ტელეფონზე, იპოვეთ და შეეხეთ „PhoneCopy“ აპის გასაშვებად.
2. გამოჩენილ ინტერფეისზე, ხელმისაწვდომ ველებში მიუთითეთ თქვენი PhoneCopy ანგარიშის რწმუნებათა სიგელები (მომხმარებლის სახელი და პაროლი), რომელიც ადრე გამოიყენეთ PhoneCopy ანგარიშის შესაქმნელად.
3. დასრულების შემდეგ, შეეხეთ ღილაკს "ექსპორტი phonecopy.com-ზე" და დაელოდეთ სანამ თქვენი ყველა კონტაქტი იქნება ექსპორტირებული PhoneCopy სერვერზე.
ნაბიჯი 2: მონაცემების იმპორტი iPhone-ზე PhoneCopy სერვერიდან.
1. ჩართეთ თქვენი iPhone.
შენიშვნა: დარწმუნდით, რომ თქვენი ტელეფონი დაკავშირებულია ინტერნეტთან.
2. საწყისი ეკრანიდან იპოვნეთ და შეეხეთ Apple App Store-ის ხატულას.
შენიშვნა: დარწმუნდით, რომ შესული ხართ App Store-ში თქვენი Apple ID-ის გამოყენებით.
3. მოძებნეთ, მოძებნეთ, ჩამოტვირთეთ და დააინსტალირეთ „PhoneCopy“ აპი თქვენს iPhone-ზე
4. ინსტალაციის შემდეგ შეეხეთ „PhoneCopy“ ხატულას თქვენს iOS მოწყობილობაზე პროგრამის გასაშვებად.
5. მოთხოვნის შემთხვევაში, მიაწოდეთ იგივე PhoneCopy სერთიფიკატები, რომლებიც გამოიყენეთ Nokia Lumia ტელეფონიდან მონაცემების ექსპორტისთვის წინა ეტაპზე.
6. მას შემდეგ, რაც შეხვალთ თქვენს PhoneCopy ანგარიშში iPhone-ზე, დააწკაპუნეთ ღილაკზე „სინქრონიზაცია“ PhoneCopy სერვერიდან ყველა მონაცემის ახალ iPhone-ში იმპორტისთვის.
მიუხედავად იმისა, რომ PhoneCopy შესანიშნავ საქმეს აკეთებს, როდესაც საქმე ეხება ტელეფონებს შორის მონაცემების გადაცემას სხვადასხვა პლატფორმიდან, აპს გააჩნია რამდენიმე დადებითი და უარყოფითი მხარე, რომელიც მოიცავს:
Დადებითი:
PhoneCopy-ის რეგისტრაცია და გამოყენება უფასოა.
PhoneCopy-ს შეუძლია თქვენი კალენდრის მოვლენების, SMS-ების, ამოცანებისა და შენიშვნების სარეზერვო ასლის შექმნა და დაგეხმარებათ მათი იმპორტი სხვა ტელეფონზე (ჩვეულებრივ, iPhone-ზე).
მინუსები:
PhoneCopy-ის ძირითადი ვერსიის (უფასო ანგარიშის) გამოყენებისას შესაძლებელია მხოლოდ 500-მდე კონტაქტის, SMS-ის, ამოცანების და შენიშვნის სინქრონიზაცია. ამ შეზღუდვის მოსახსნელად, თქვენ უნდა შეიძინოთ Premium ვერსია, რომლისთვისაც PhoneCopy ყოველწლიურად იხდის $25.
დაარქივებული მონაცემები ავტომატურად იშლება PhoneCopy სერვერიდან ერთი თვის შემდეგ ძირითადი ვერსიის გამოყენებისას და 1 წლის შემდეგ პრემიუმ ვერსიის გამოყენებისას.
დასკვნა
მიუხედავად იმისა, რომ არსებობს მრავალი უფასო გადაწყვეტა, რომელიც დაგეხმარებათ გადაიტანოთ მონაცემები თქვენი Nokia Lumia-დან iPhone-ზე , ფასიან სერვისებს ყოველთვის აქვთ უპირატესობა, როდესაც საქმე ეხება უპრობლემოდ მიგრაციის უზრუნველყოფას კროს-პლატფორმულ მოწყობილობებს შორის.


ტელეფონის გადაცემა
- მიიღეთ მონაცემები Android-იდან
- ანდროიდიდან ანდროიდზე გადატანა
- ანდროიდიდან BlackBerry-ზე გადატანა
- კონტაქტების იმპორტი/ექსპორტი ანდროიდის ტელეფონებში
- აპების გადატანა ანდროიდიდან
- ტრანსფერი ანდრიოდიდან ნოკიაში
- Android-ზე iOS გადაცემა
- Samsung-დან iPhone-ზე გადატანა
- Samsung-ზე iPhone-ზე გადაცემის ინსტრუმენტი
- გადატანა Sony-დან iPhone-ზე
- გადატანა Motorola-დან iPhone-ზე
- გადატანა Huawei-დან iPhone-ზე
- ანდროიდიდან iPod-ზე გადატანა
- გადაიტანეთ ფოტოები Android-დან iPhone-ზე
- ანდროიდიდან iPad-ზე გადატანა
- გადაიტანეთ ვიდეოები ანდროიდიდან iPad-ზე
- მიიღეთ მონაცემები Samsung-ისგან
- გადაიტანეთ მონაცემები Samsung-ში
- ტრანსფერი სონიდან სამსუნგში
- გადატანა Motorola-დან სამსუნგში
- Samsung Switch-ის ალტერნატივა
- Samsung ფაილების გადაცემის პროგრამა
- LG ტრანსფერი
- ტრანსფერი სამსუნგიდან LG-ში
- LG-დან ანდროიდზე გადატანა
- გადატანა LG-დან iPhone-ზე
- სურათების გადატანა LG ტელეფონიდან კომპიუტერზე
- Mac-ზე Android გადაცემა
Alice MJ
პერსონალის რედაქტორი